
There’s a lot of confusion about the three different media types in Final Cut Pro X: native, optimized, and proxy.
Native media is the format shot by your camera. For example, AVCHD, H.264, DV, and HDV are all examples of native media formats.
Optimized media is always ProRes 422. When the “Optimize Media” checkbox is checked during import, FCP X transcodes, which is a fancy way of saying it “converts,” your media from its native format into Apple ProRes 422.
Proxy media is always Apple ProRes 422 Proxy. Proxy media creates a reasonably high-quality media file, but at about 1/4 the size of ProRes 422.
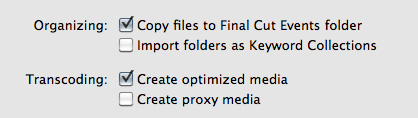
When you import media from either a file or camera, you have the ability to optimize it, or create proxy files.
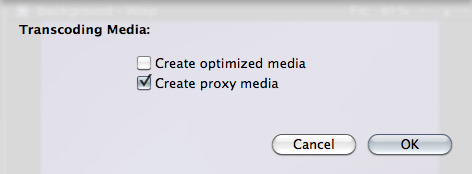
You also have the ability to convert media after you’ve imported the files. Simply select the clips in the Event Browser that you want to transcode and select File > Transcode media.
Either way, here are your options:
What’s “reasonable image quality?” Generally, the higher the bit rate of the media, the better the image quality. For this reason, since ProRes 422 has a much higher bit rate than ProRes Proxy, the image quality is potentially better. This is especially true if you are doing color correction, green-screen keying, or lots of image manipulation. However, if you are simply capturing and editing consumer-grade camera images, without many effects, you may not see any quality difference at all between optimized and proxy media.
Creating proxies or optimized media always makes a copy of your camera source files. Both optimized and proxy media will have better performance than the camera native formats.
You can select one option, both, or none. Depending upon which options you select, you could have up to three copies of your media files stored on your system:
1. Camera native
2. Optimized
3. Proxy
Duplicate media files are not necessarily a bad thing and FCP X will track them properly; however, multiple copies do require more disk space.
RECOMMENDATIONS
Not all camera formats require optimizing. If the Optimize option is grayed out, it means that the camera format is already optimized and would not benefit if converted into ProRes 422. (DV and AVC-Intra are two examples of already-optimized media formats.)
NOTE: For the geeks among us, optimized formats are those that are stored in an I-frame format.
My general recommendation is to always optimize media. Purchasing an extra hard disk will more than pay for itself in the time you save during editing.
SWITCHING BETWEEN FILES
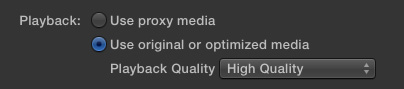
To switch between native, optimized, or proxy files in your Project go to the Final Cut Pro > Preferences > Playback tab.
Click the radio button for Proxy to edit using Proxy files.
Click the radio button for Original/Optimized to edit using anything else.
You can change this setting whenever you want, however, you can’t have a mix of some Proxy and some Optimized files in the same Project at the same time. Proxy and Optimized files are stored in different folders in the same Event folder.
(By the way, I thought whether you selected High Quality or Better Performance in this preference pop-up menu, your output quality will always be the same – high quality. However, see Jason’s comment below.)

2,000 Video Training Titles
Edit smarter with Larry Jordan. Available in our store.
Access over 2,000 on-demand video editing courses. Become a member of our Video Training Library today!
Subscribe to Larry's FREE weekly newsletter and
save 10%
on your first purchase.

142 Responses to FCP X: Native vs. Optimize vs. Proxy Media
← Older Comments Newer Comments →-
 Can KINALIKAYA says:
July 1, 2012 at 5:58 am
-
 Gary says:
July 7, 2012 at 2:23 pm
-
 Larry Jordan says:
July 7, 2012 at 2:56 pm
-
 Gary says:
July 7, 2012 at 3:05 pm
-
 Rick says:
July 8, 2012 at 8:19 am
-
 Sonny says:
July 15, 2012 at 12:37 pm
-
 Larry Jordan says:
July 15, 2012 at 2:18 pm
-
 Abed Loutfi says:
July 19, 2012 at 7:54 am
-
 Iain Anderson says:
July 19, 2012 at 1:58 pm
-
 Abed Loutfi says:
July 23, 2012 at 4:04 am
← Older Comments Newer Comments →advised workflow for long hours shooters :
1. rename all clips into a new folder (i use adobe bridge for that) …p.c. this step is necesary as fcpx may confuse by creating proxy files which have been same name given from two different camera during shooting by chance
2. import files with >create proxy media> checked!
3. edit clips to a movie with >pereferences>use proxy media> selected !!
4. after fine cut, >File>duplicate project + used clips only to a new event !!!
5. open new project, chose >pereferences>use original or optimized media> selected !!
6. select all clips in newly created Event in Event Library and go to File>Transcode Media>Create optimized media
7. Apply Effects and Color Correction you wish after optimization done in background
8. For final output: go to Share>Export Media> …with video codec: Current settings> selected
So keep in mind; right click on a clip in your timeline and chose >Reveal in Finder> to see which version of clip (Original, proxy or high-quality-ProRess=optimized) You are currently using in your project (good to know for output!!)
_____
Thanks for everything Larry
Hi Larry,
I thought transcoding on import, by selecting the Create Optimized Media checkbox, simply ‘converted’ the imported files to ProRes. However, when I select the clips in the event browser, they appear in the Inspector as H.264 (shot on Canon HDSLR). If I import the transcoded ProRes files from the High Quality Media folder that FCPX created during the previous step, the clips all have the “content created” date of the transcode rather than the shoot. This creates another problem, since I shot the project with multiple cameras and have over 1,700 clips, and would like to organize the event browser by date.
Thanks in advance if you can help.
Gary
Gary:
OK, I just did a test and here’s what I think is happening.
When you optimize your media, FCP X uses the optimized media in your editing, but displays all the metadata based on your source clip. So, depending upon preferences, the Timeline will play either Proxy or Optimized media. If you don’t optimize media, the timeline plays the source clips in the camera native format. Regardless of what media is used for playback, the metadata always references the source clip.
You can test this for yourself by checking the metadata and assuring yourself it points to the source clip.
Then, right-click a clip in the Timeline and select “Reveal in Finder.” FCP X will display the transcoded clip.
Larry
Tested as you suggested, and you’re right. Thanks very much Larry!
Gary
Does “Send to Compressor” on export (“share”) change any of this discussion? Specifically will Send to Compressor” force compressor to go back to the native and re-render all effects?
I think that in Final Cut 7, “send to compressor” forced compressor to rebuild everything from the original media in the timeline. Now in FCP X we sort of have 3 versions of media in the project (timeline): native, prores, and prores proxy.
It is worth remembering that anytime there is any spatial filtering, there will be a slight softening of the image in resolution. Even 4.2.0 to 4.2.2 conversation, I think, requires spatial filtering. So, if you go 4.2.0 to 4.2.2 to any compressed output, you have applied a spatial filter at least twice. If you can avoid using any intermediate spacial filtering when producing the final output, at least in theory, you should have a better output. Is the difference observable? Maybe not, and it certainly can increase export time to your final output. Of course, if your final delivered product is ProRes 4.2.2, then Compressor does not matter.
Rick
Hi Guys
One quick question.
Can I import in PROXY and edit my FILM in PROXY
AND when done editing the project optimize the final video and then export it.
Or do I have to optimize the whole source file at the end and not just the project which I edited in PROXY.
Sonny
Sonny:
yes and no.
Can you import media in Proxy format? Yes.
Can you edit your media in Proxy format? Yes.
When the edit is done, can you go back to the source media and optimize it in high-quality? No. Instead, what you would do is change the preference from Proxy to Native and FCP will connect to your camera source files for final output. Since editing is complete, there is no reason to create optimized media for output, just output the original camera files.
Larry
Hello Larry and everyone.
I got myself into a some trouble earlier this day.
I have been editing some high quality footage(1920 x 1080) for my documentary project on a MAC OSX that originally had 1 TB of free space that a student organization offered me access to.
My rushes alone, after putting them through clipwrap to convert them, were around 80 GB. Given that I was the only one editing on this station, I went with original media. I got a call this morning from the manager of the station saying that I’m using too much space, now that someone else is also editing here. Not knowing what he meant, I came and checked all the project files and the combination of the project and event files were at 257 GB!
I know this might be normal given the file sizes I started with but how can they become so big?
The files were as follows:
FC project files> render files = 42 GB
FC events> Transcoded Media > HQ media = 217 GB
Is this normal? Its just a 40 minute project and around 3 hours of rushes.
So basically I have three large files, the one with the original media, the HQ transcoded media file, and the project Render Files.
I’m almost done with my project and I was wondering if there are any files I can harmlessly delete without having to go for proxy media.
I hope I made sense and I hope I can get some help or at least an overview of how to manage these files better for the future.
It is worth mentioning that when I first read this post a few months ago I tried the proxy media but then switched back to original/optimized media in the playback settings. I think this has created some large files as well.
System specs:
MAC OSX version 10.7.4
Processor: 3.1 GHz Intel Core i5
Memory: 4GB 1333 MHz DDR3
Thank you so much in advance and I hope I can manage this as soon as possible.
That’s normal, because you’ve chosen to Optimize your media. Optimizing media will take about triple the original unoptimized media size. Good news is that you have a few options:
1. Don’t optimize. Depending on the Mac, this may not be much of a speed hit at all. Or…
2. When the project is complete, Share > Export Media for a full, high quality result, then find your Event in the Finder, and delete the High Quality Media folder. FCP X will happily use the non-optimized footage should you need to go back to this project, and you can re-optimize if needed. Or…
3. Buy more storage. 1TB simply isn’t enough for a shared edit station set to optimize media, so grab a big cheap external HD and move your projects/events to that. It’ll work fine.
Thank you so much for your help!
Although my project is somewhat done but every now and then I find myself tweaking some settings here and there.
I have a couple of follow up questions, if its ok.
First, if I want to go back to using native files without optimizing, what files can I delete? I need to know which file each option creates so I’d know whats safe to take away.
Second, and this is probably a bigger question, as I finalize my project and want to preserve it for future edits, what files do I save and what files are recreated upon relaunch? Given that my project is now taking up around 600 GB, do I have to save all files? That is aside from the original rushes.
Once more, thank you so much for your help. I’m new to Apple and Final Cut having used Premiere Pro on PC for the past two years. I just need to ground the formats and saving basics.
Have a great week,
Abed