
There’s a lot of confusion about the three different media types in Final Cut Pro X: native, optimized, and proxy.
Native media is the format shot by your camera. For example, AVCHD, H.264, DV, and HDV are all examples of native media formats.
Optimized media is always ProRes 422. When the “Optimize Media” checkbox is checked during import, FCP X transcodes, which is a fancy way of saying it “converts,” your media from its native format into Apple ProRes 422.
Proxy media is always Apple ProRes 422 Proxy. Proxy media creates a reasonably high-quality media file, but at about 1/4 the size of ProRes 422.
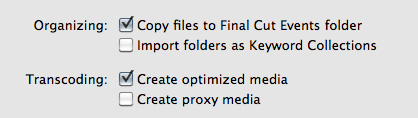
When you import media from either a file or camera, you have the ability to optimize it, or create proxy files.
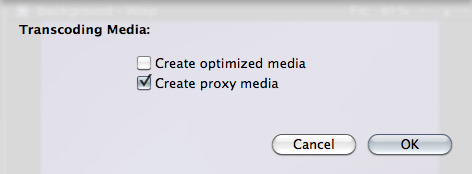
You also have the ability to convert media after you’ve imported the files. Simply select the clips in the Event Browser that you want to transcode and select File > Transcode media.
Either way, here are your options:
What’s “reasonable image quality?” Generally, the higher the bit rate of the media, the better the image quality. For this reason, since ProRes 422 has a much higher bit rate than ProRes Proxy, the image quality is potentially better. This is especially true if you are doing color correction, green-screen keying, or lots of image manipulation. However, if you are simply capturing and editing consumer-grade camera images, without many effects, you may not see any quality difference at all between optimized and proxy media.
Creating proxies or optimized media always makes a copy of your camera source files. Both optimized and proxy media will have better performance than the camera native formats.
You can select one option, both, or none. Depending upon which options you select, you could have up to three copies of your media files stored on your system:
1. Camera native
2. Optimized
3. Proxy
Duplicate media files are not necessarily a bad thing and FCP X will track them properly; however, multiple copies do require more disk space.
RECOMMENDATIONS
Not all camera formats require optimizing. If the Optimize option is grayed out, it means that the camera format is already optimized and would not benefit if converted into ProRes 422. (DV and AVC-Intra are two examples of already-optimized media formats.)
NOTE: For the geeks among us, optimized formats are those that are stored in an I-frame format.
My general recommendation is to always optimize media. Purchasing an extra hard disk will more than pay for itself in the time you save during editing.
SWITCHING BETWEEN FILES

To switch between native, optimized, or proxy files in your Project go to the Final Cut Pro > Preferences > Playback tab.
Click the radio button for Proxy to edit using Proxy files.
Click the radio button for Original/Optimized to edit using anything else.
You can change this setting whenever you want, however, you can’t have a mix of some Proxy and some Optimized files in the same Project at the same time. Proxy and Optimized files are stored in different folders in the same Event folder.
(By the way, I thought whether you selected High Quality or Better Performance in this preference pop-up menu, your output quality will always be the same – high quality. However, see Jason’s comment below.)

2,000 Video Training Titles
Edit smarter with Larry Jordan. Available in our store.
Access over 2,000 on-demand video editing courses. Become a member of our Video Training Library today!
Subscribe to Larry's FREE weekly newsletter and
save 10%
on your first purchase.

142 Responses to FCP X: Native vs. Optimize vs. Proxy Media
← Older Comments Newer Comments →-
 Iain Anderson says:
July 23, 2012 at 6:34 am
-
 Tonollo says:
August 3, 2012 at 4:07 am
-
 Paul says:
August 4, 2012 at 9:51 pm
-
 Iain Anderson says:
August 4, 2012 at 11:03 pm
-
 Larry Jordan says:
August 4, 2012 at 11:16 pm
-
 Mike T. says:
August 6, 2012 at 11:42 am
-
 Paul says:
August 9, 2012 at 6:36 am
-
 Larry Jordan says:
August 9, 2012 at 9:38 am
-
 Abed Loutfi says:
August 10, 2012 at 9:13 am
-
 Jackee says:
September 3, 2012 at 11:15 pm
← Older Comments Newer Comments →In an Event, the High Quality Media folder contains transcoded footage and should be safe to delete. In a Project, I’d recommend keeping a fully rendered ProRes version of the edit for archiving. To save space, the easiest method is to copy only necessary files when archiving.
Connect your archive drive, then right-click and Duplicate your Project. In the Duplicate Project dialog, choose the archive drive at the top. Then, choose Duplicate Project and Used Clips only from the options below. That way, you’ll only keep the clips you have used — others will *not* be copied. Don’t check the “Include Render Files” and they can be re-created later (assuming FCP X renders the same way in the future).
Hello. First of all sorry about my english.
I´m editing a documental with a lot of shots (2tb). I,m trying to find out the best option to save space (editing in h.264, files from the camera Canon 60D). I saw your post Mike on apple comunity
https://discussions.apple.com/message/18417093#18417093
Still It´s not clear for me because ¿have you the same result ,in terms of quality, if you apply a color correction to a pro res file than if you apply the same effect to a h.264 original file and the you render it in apple pro res, as supossed FCPX do?
Besides this, i couldn´t find the rendered file with the color correction aplied to the h.264 original one. when i choose “reveal in finde” FCPX shows the original one without the color correction.
Mike did you find out if your theory it´s wrigth?
After reading through all these great comments, I think I know the answers to my questions but would appreciate confirmation.
Background: I shoot videos of my kids with a AVCHD camera (Sony) that saves it to memory. I only want the raw footage available for some day when I will get around to creating projects/movies. I don’t want to store and backup optimized video due to its size.
1. Import: There is no need or advantage to select optimize or proxy media when I import (given that I have no intention of working on the files any times soon.)
2. Since I already imported some videos and selected optimize, I can simply go into Finder and delete the Transcoded Media directory. As long as “original media” directory and contents are left intact, I will always be able to create optimized or proxy media when I need it (via File>”transcode media” feature. The advantage of optimizing later rather than at import is that I am not storing and backing up optimized video (which is huge).
Can someone confirm the above statements are accurate?
Thanks
Paul
In my opinion, the answers are:
1. Yes. There’s no need to optimize on import, especially if you won’t edit for a while. When you do edit, see what performance is like on your Mac without optimizing — maybe you won’t need to at all.
2. Yes, you should be able to delete the Transcoded Media directory, so long as FCP X is closed.
Best wishes,
Iain.
Paul:
Well, yes…
However, if you are not going to edit the material, don’t bother to import it into FCP. Simply copy the AVCHD cards to your hard disk – each to its own folder – make backups as necessary.
You can review the footage in FCP X using Import from Camera, without actually importing it.
Then, some years into the future, you’ll be able to import the footage because it is still stored in its camera native format in its own folder on your hard disk.
Larry
Tonollo, I haven’t seen any official information from Apple concerning the correctness of this but from research within the community and from common sense I believe it’s 100% correct. Using native video files such as h.264 or DVCPROHD can save you lots of time and space during the edit process. You don’t have to transcode your media which takes time, and duplicates video files. Because FCPX renders every project in ProRes422 (or 4444 if you change project settings) your final color correction and graphics will render in ProRes422 and give you automatic benefit of 422 color space for your final watch back on timeline and video export for master file. I see this personally as a highly preferential route. The the few setbacks to this to re-iterate are that render times will unfortunately suffer and be slower because every render and re-render is rendering from the original native format (ex: h.264) to ProRes422. Another potential down size is computer performance – in the event that you’re doing multi-cam, your computer may have a harder time playing back multiple streams of h.264 video versus ProRes Proxy.
Larry and Lain, Thanks for the responses. Both very helpful.
Larry you suggested just copying the AVCHD file instead of importing.
Is there an advantage to that? It seems just as easy for me to import it. Is there a disadvantage other than the time it takes to import?
Paul
Paul:
I’m suggesting that you copy the card to your hard disk first, to make a backup, then ingest from that copy. That way, you have a master to go back to, if you need it. It doesn’t make any difference in terms of quality, though ingesting from the hard disk will be faster than ingesting from the card, due to transfer speed differences.
Larry
Hello again Larry and all the nice people on here.
Today I finished working on my documentary. It was shot in HD and is around 38 minutes, 1980×1080, 25FPS.
Now that I come to exporting, I have figured my way around Compressor 4 and wish to export my film and burn it onto DVDs to send to festivals.
I was hoping someone could recommend the best way and settings to export an HD film with the above specifications onto a DVD or a DVD ready file. I only have FCPX and Compressor 4. I already bought some 8.5 GB DVDs since one export of my film to .MOV was around 5 GB.
I’m sorry for posting in the wrong place and hope I can get some help quick since I have to pack up and travel in tomorrow.
Thank you very much for your assistance, its greatly appreciated.
for my opinion, cos my mac is little bit old, it’s mac bood pro 991, so , i choose proxy media to do the edit, by the way, the footate is shoot by sony hd carmera, ex1r, 1080p ,50i, what i want to share is using proxy media is really save my time and you don’t need to worry about the final export media, you just need to switch to using optimize media after edidting. and the final video quality is great.