
There’s a lot of confusion about the three different media types in Final Cut Pro X: native, optimized, and proxy.
Native media is the format shot by your camera. For example, AVCHD, H.264, DV, and HDV are all examples of native media formats.
Optimized media is always ProRes 422. When the “Optimize Media” checkbox is checked during import, FCP X transcodes, which is a fancy way of saying it “converts,” your media from its native format into Apple ProRes 422.
Proxy media is always Apple ProRes 422 Proxy. Proxy media creates a reasonably high-quality media file, but at about 1/4 the size of ProRes 422.
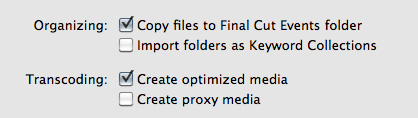
When you import media from either a file or camera, you have the ability to optimize it, or create proxy files.
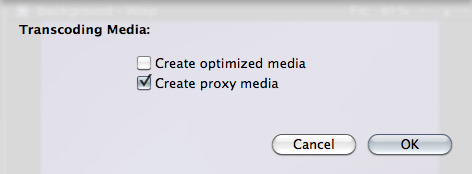
You also have the ability to convert media after you’ve imported the files. Simply select the clips in the Event Browser that you want to transcode and select File > Transcode media.
Either way, here are your options:
What’s “reasonable image quality?” Generally, the higher the bit rate of the media, the better the image quality. For this reason, since ProRes 422 has a much higher bit rate than ProRes Proxy, the image quality is potentially better. This is especially true if you are doing color correction, green-screen keying, or lots of image manipulation. However, if you are simply capturing and editing consumer-grade camera images, without many effects, you may not see any quality difference at all between optimized and proxy media.
Creating proxies or optimized media always makes a copy of your camera source files. Both optimized and proxy media will have better performance than the camera native formats.
You can select one option, both, or none. Depending upon which options you select, you could have up to three copies of your media files stored on your system:
1. Camera native
2. Optimized
3. Proxy
Duplicate media files are not necessarily a bad thing and FCP X will track them properly; however, multiple copies do require more disk space.
RECOMMENDATIONS
Not all camera formats require optimizing. If the Optimize option is grayed out, it means that the camera format is already optimized and would not benefit if converted into ProRes 422. (DV and AVC-Intra are two examples of already-optimized media formats.)
NOTE: For the geeks among us, optimized formats are those that are stored in an I-frame format.
My general recommendation is to always optimize media. Purchasing an extra hard disk will more than pay for itself in the time you save during editing.
SWITCHING BETWEEN FILES
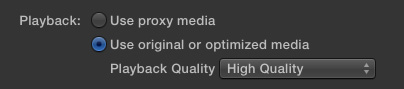
To switch between native, optimized, or proxy files in your Project go to the Final Cut Pro > Preferences > Playback tab.
Click the radio button for Proxy to edit using Proxy files.
Click the radio button for Original/Optimized to edit using anything else.
You can change this setting whenever you want, however, you can’t have a mix of some Proxy and some Optimized files in the same Project at the same time. Proxy and Optimized files are stored in different folders in the same Event folder.
(By the way, I thought whether you selected High Quality or Better Performance in this preference pop-up menu, your output quality will always be the same – high quality. However, see Jason’s comment below.)

2,000 Video Training Titles
Edit smarter with Larry Jordan. Available in our store.
Access over 2,000 on-demand video editing courses. Become a member of our Video Training Library today!
Subscribe to Larry's FREE weekly newsletter and
save 10%
on your first purchase.

142 Responses to FCP X: Native vs. Optimize vs. Proxy Media
← Older Comments Newer Comments →-
 Mike T. says:
May 16, 2012 at 7:22 pm
-
 Jeff Orig says:
May 16, 2012 at 7:29 pm
-
 Larry says:
May 16, 2012 at 8:38 pm
-
 Larry says:
May 16, 2012 at 8:39 pm
-
 Mike T. says:
May 16, 2012 at 8:47 pm
-
 Jeff Orig says:
May 16, 2012 at 9:21 pm
-
 Kent Jakusz says:
May 17, 2012 at 6:10 am
-
 Kent Jakusz says:
May 17, 2012 at 9:02 am
-
 Larry Jordan says:
May 17, 2012 at 10:00 am
-
 Kent Jakusz says:
May 17, 2012 at 5:28 pm
← Older Comments Newer Comments →I agree with John – no one has touched on the PROJECT RENDER settings. It’s seems to me that one could theoretically import and edit entirely with the original h.264 files. Once you’re done with your edit and want to get the added benefits of COLOR GRADING in ProRes422 color space, it seems that FCPX will automatically render your edit in ProRes422 according to these preferences. In that case, a color grade could be applied to the whole edit, and be automatically transcoded/rendered into ProRes 422 during the render process. After rendering, what would show up on the viewer and what would EXPORT would be the rendered Prores files and not the original h.264 files. This saves a lot of time and space of transcoding ALL your media, and in theory should enable you to edit NATIVE video formats like h.264, with automatic benefits of ProRes during render. Can anyone please confirm that this theory is correct and optimal for certain work flows?? Thanks!
Thanks for the reminder. I will attempt a test it on a little project I am editing right now. My “fear” is that once you change the setting will it make a ProRes of everything in the event browser? I will check to see what it does and report what I find.
Interesting concept, Mike, and I don’t know the answer. Worth a test.
Larry
Jeff:
Changing preference settings does NOT re-render clips in your Event Browser. Also, you need to select the specific clips you want to transcode, then select File > Transcode Media.
Unselected files are not touched.
Larry
Thanks for the timely response Larry. Yes, changing the Project Render Settings should NOT cause the whole timeline to be re-rendered. Nor will it transcode any of the other clips in your event browser. Changing a filter on a clip in the timeline should cause it to un-render and be re-rendered in the new Project render settings.
Touching on my original concept – I’m not sure of a way to TEST my theory. Coloring and rendering a h.264 timeline full of edits, should render ProRes422 files, since thats what the project render settings say. Unfortunately, FCPX render files appear to be a highly technical form of data files, and not movie files that can actually be inspected in their physical folder location. Any ideas how one might go about testing my theory – of having automatic ProRes advantages of color grading/compositing from rendering – while editing h.264 original native media?
Have researched this idea all night online and can’t seem to find anyone talking about Render Settings.
Thanks guys. If I understand correctly, we want the following:
1. Edit the native H.264 files
2. Once picture is locked, transcode ONLY the timeline clips to ProRes while maintaining all of the individual clips’ in and out points. (As opposed to rendering out the entire timeline as a single ProRes clip)
3. Then make the color corrections and effects on the timeline utilizing the new ProRes versions of the clip.
4. Then output that as you see fit.
The idea is to save on HD space and avoid CPU time transcoding all clips in the browser to ProRes before/during editing. Since editing H.264 does not present a performance speed hit. But we want the ProRes to take advantage of color/effect .
Really what we need is to be able to select clips in the timeline and then click File > Transcode Media. As of version 10.0.4 this is not part of it. Maybe we all can submit feedback regarding this.
Basically, it would be almost like a single click to go from your “offline” to an “online” edit.
How is this done in 4k workflows? Do they just take the time and create editable 2k versions, edit and get picture lock, then create an EDL to match the 2k with the 4k?
Thanks.
To many variables cameras, computers, end results. Everyones situation is different.
Here is my situation. I shoot with Canon 5D Mk2 and a Canon 5DMk3 ( at the highest quality). I edit on a iMac configured as follows: 3.4 GHz Intel Core i7, Memory: 16 GB 1333 MHz DDR3, Graphics AMD HD 6970M 2048 MB. The OS is Mac OS X 10.7.4. My output is HD 1920 x 1080 for publishing on YouTube or Vimeo. I desire the highest quality possible.
I mostly shoot nature. Lots of hours captured, a small percentage used. I also shoot a lot of stills. My current workflow is to import everything, movies and stills, into Aperture where everything is cataloged and rated. Aperture allows export directly into FCPX of both movies and stills. Just drag to the timeline. If I want just a portion of a movie clip I make the rough cut in Aperture, export to
a designated folder on my desktop for import and transcoding to ProRes 422 for FCPX. The desktop clip can then be trashed as the original still resides in Aperture. The media is than edited, color corrected etc., exported to Compressor for publishing to the web.
I solicit everyones comments on this workflow. Learning from constructive criticism!!
Thank you
Kent
Is it possible to transcode just a portion of a clip that is in the event browser?
Kent
No.
Larry
What a great feature transcoding a portion of a clip would be.
Kent