
There’s a lot of confusion about the three different media types in Final Cut Pro X: native, optimized, and proxy.
Native media is the format shot by your camera. For example, AVCHD, H.264, DV, and HDV are all examples of native media formats.
Optimized media is always ProRes 422. When the “Optimize Media” checkbox is checked during import, FCP X transcodes, which is a fancy way of saying it “converts,” your media from its native format into Apple ProRes 422.
Proxy media is always Apple ProRes 422 Proxy. Proxy media creates a reasonably high-quality media file, but at about 1/4 the size of ProRes 422.
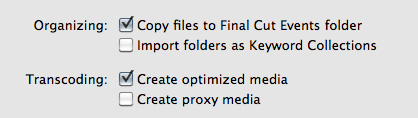
When you import media from either a file or camera, you have the ability to optimize it, or create proxy files.
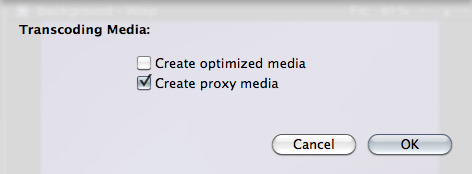
You also have the ability to convert media after you’ve imported the files. Simply select the clips in the Event Browser that you want to transcode and select File > Transcode media.
Either way, here are your options:
What’s “reasonable image quality?” Generally, the higher the bit rate of the media, the better the image quality. For this reason, since ProRes 422 has a much higher bit rate than ProRes Proxy, the image quality is potentially better. This is especially true if you are doing color correction, green-screen keying, or lots of image manipulation. However, if you are simply capturing and editing consumer-grade camera images, without many effects, you may not see any quality difference at all between optimized and proxy media.
Creating proxies or optimized media always makes a copy of your camera source files. Both optimized and proxy media will have better performance than the camera native formats.
You can select one option, both, or none. Depending upon which options you select, you could have up to three copies of your media files stored on your system:
1. Camera native
2. Optimized
3. Proxy
Duplicate media files are not necessarily a bad thing and FCP X will track them properly; however, multiple copies do require more disk space.
RECOMMENDATIONS
Not all camera formats require optimizing. If the Optimize option is grayed out, it means that the camera format is already optimized and would not benefit if converted into ProRes 422. (DV and AVC-Intra are two examples of already-optimized media formats.)
NOTE: For the geeks among us, optimized formats are those that are stored in an I-frame format.
My general recommendation is to always optimize media. Purchasing an extra hard disk will more than pay for itself in the time you save during editing.
SWITCHING BETWEEN FILES

To switch between native, optimized, or proxy files in your Project go to the Final Cut Pro > Preferences > Playback tab.
Click the radio button for Proxy to edit using Proxy files.
Click the radio button for Original/Optimized to edit using anything else.
You can change this setting whenever you want, however, you can’t have a mix of some Proxy and some Optimized files in the same Project at the same time. Proxy and Optimized files are stored in different folders in the same Event folder.
(By the way, I thought whether you selected High Quality or Better Performance in this preference pop-up menu, your output quality will always be the same – high quality. However, see Jason’s comment below.)

2,000 Video Training Titles
Edit smarter with Larry Jordan. Available in our store.
Access over 2,000 on-demand video editing courses. Become a member of our Video Training Library today!
Subscribe to Larry's FREE weekly newsletter and
save 10%
on your first purchase.
142 Responses to FCP X: Native vs. Optimize vs. Proxy Media
← Older Comments-
 KW says:
January 9, 2013 at 9:30 pm
-
 Mike T. says:
January 9, 2013 at 9:37 pm
-
 KW says:
January 10, 2013 at 12:34 pm
-
 Nick says:
January 12, 2013 at 12:06 pm
-
 Iain Anderson says:
January 12, 2013 at 6:39 pm
-
 Larry Jordan says:
January 14, 2013 at 12:00 pm
-
 Nick Ferrall says:
January 14, 2013 at 12:21 pm
-
 Mike T. says:
January 14, 2013 at 12:29 pm
-
 Larry Jordan says:
January 14, 2013 at 12:48 pm
-
 wouter says:
February 8, 2013 at 2:45 am
-
 Rick says:
February 8, 2013 at 6:49 am
← Older CommentsLarry,
I’m brand new to editing and FCPX. Here’s what I have going:
I have two external drives hooked to my mac (drive 1 and drive 2). I downloaded all of my original files to drive 1. Then in FCPX I chose drive 2 to import to and I imported all of those same files to FCPX and clicked Proxy Media. Then I completed my edit using the Proxy Media.
Questions:
1. I need to now export the final video in ProRes(HQ). What is the best way to do this?
2. If I choose ProRes(HQ) from the ‘share’ menu, will FCPX know to go back and use the original files on drive 1? Or will it simply be up-resing from the proxy media I used to edit with?
Thanks!
KW
You Will need to go to your preferences in FCPX and click “Use Original or Optimized Media”. This should “re-connect’ your timeline edit to the original files for best quality. If you leave it on Proxy, your export will be scaled in bitrate and size from the proxy media. After you’ve done this, you can Export a master Quicktime movie with any version of ProRes that you want, including HQ.
Depending on how you imported your files, sometimes checking the “Use Original or Optimized Media” button in preferences won’t reconnect your media. Usually if you use FCPX to create Proxy files, it will know where the original media lives and reconnect to it. However, if you made proxy files via another application and imported them directly, in this case, you would need to manually reconnect your Event files to the original media.
Thank you, Mike!
Hi Larry,
I made the mistake of not transcoding my media (from H.264 to ProRes 422) prior to beginning my edit. I now have a ton of work into a project, and realize I should have been working with the optimized media the whole time. In the past I’ve had a ton of issues trying to reconnect any source files, and I’m worried this will pose the same issue. I’ve never used the copy files setting in the preferences – always just worked from my source file on an external harddrive.
I tried deleting one of my source files from an event and then reimporting with the copy files and optimized transcoding settings checked. I see the 422 file in my mac folder, but the events codec still says H.264. Is that normal?
Is there a better way to fix this issue?
Last question: Is the problem with H.264 just that it’s buggy, or will it actually not export correctly (even as a 422 HQ)?
Thanks!
I’m not Larry, but there’s an easy fix. If you’re having trouble with H.264 footage (and that depends on your camera and your Mac) then simple select it all, right-click, and choose Transcode Media. In the next dialog, tick Create optimized media. Everything will automatically reconnect. Showing H.264 as the media type is still normal, though.
Iain’s fix is perfect. You can also select all the media you want to optimize in the Event Browser, then select File > Transcode Media.
H.264 is NOT buggy – but it is mathematically challenging to decompress in real-time and it has a very limited color space. It is an excellent distribution format, but not an ideal editing format.
Larry
Iain and Larry,
Thank you for the quick response! People were telling me horror stories, but perhaps the problems were more prevalent on FCP 7.
Sorry – last question. If I want to keep space down and continue to work with H.264 in the edit, will it make any difference in quality once I output at ProRes 422? I don’t want to lose any quality in the output, but transcoding a feature doc is going to take up a ton of space.
Really appreciate your help and this site.
Nick
Nick –
This is a great question, and I’m sure one that many have. I had discussed this much earlier in this very long discussion thread. I never quite got an answer nailed down, however. My “theory’ was that when you edit H.264 footage in FCPX, since the timeline RENDERS in ProRes422 by default, you just MAY get the benefit of rendering color grading and effects in 4:2:2, 10bit color space – even though the source footage wasn’t converted to ProRess422. Ideally if this was true, and I hope Larry can confirm one way or another, you could save precious disk space by just using H.264 source media for editing and saving time of the conversion process to ProRes. An obvious downside though, is that H.264 is processor intensive and will suck up more computing power than ProRes, and renders will take longer. So it’s a trade off from performance, to space.
If anyone could verify my “theory” it would be greatly appreciated. If in fact it is true, then editing in H.264 with a ProRes422 master export will see no quality degradation or loss. If it’s not true, then transcoding H.264 footage to ProRes422 at some point during editing would yield higher quality results (such as in color grades etc.)
Mike is essentially correct.
There is a performance hit when editing H.264 natively. If your system is fast enough, you can edit in H.264, render in ProRes and output to ProRes.
Larry
Hi,
I read the article and some comments, but a bit too much to read them all.
Say I check ‘create proxy media’ and not optimized media (don’t have the disk space). Then I edit everything (using the proxies for faster performance). Then I want to export my movie, will finalcut use the proxy files to render the final output, or the native files?
If finalcut uses the proxies to render final output, that would deestroy the whole point of using proxies, which should in fact just be a placeholder to be able to edit quicker, not to use in final export.
I also find it very strange that finalcut creates proxies for every file upon import. Let’s say you import 2h of footage spread over 100 clips. Then you start cutting away and end up with a 5min timeline. That means finalcut will have created proxies for 2h of video of which you only use 5mins on the timeline, or in other words it waists 1h55m proxy files which waist disk space since you’re not using them. (same goes for optimized media, why doesn’t it optimize only the parts on the timeline).
Premiere works like this, and altough you then have to recreate proxies from time to time (for example when you decide to make a shot on the timeline last a few seconds longer), in my eyes this is much more efficient. Also on export in premiere, it simply uses your original files instead of the proxies, unless you specifically tell premier to use the proxies instead (for example when you want to do a quick test export as of course this results in lower final image quality).
Thanks,
Wouter
Wouter-
You do not have to transcode anything on import – it is a performance trade. If you want to edit in Proxy, then transcode everything on import to Proxy. Set your display preferences to Proxy. When you are ready to export, then change the preferences/display settings to native/optimized. The display setting controls what is exported. If you need to use optimized media for speed reasons at this point, just select the project media and select create optimized media by File/Transcode media.
A side note: Render files are never used in export if you are using Send to Compressor. So you don’t have to render prior to exporting, according to Ross Shane. You will only need to render for playback performance/playback quality. Leave background render off.
Rick