
There’s a lot of confusion about the three different media types in Final Cut Pro X: native, optimized, and proxy.
Native media is the format shot by your camera. For example, AVCHD, H.264, DV, and HDV are all examples of native media formats.
Optimized media is always ProRes 422. When the “Optimize Media” checkbox is checked during import, FCP X transcodes, which is a fancy way of saying it “converts,” your media from its native format into Apple ProRes 422.
Proxy media is always Apple ProRes 422 Proxy. Proxy media creates a reasonably high-quality media file, but at about 1/4 the size of ProRes 422.
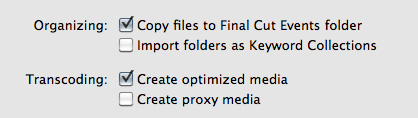
When you import media from either a file or camera, you have the ability to optimize it, or create proxy files.
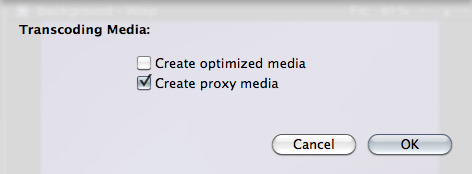
You also have the ability to convert media after you’ve imported the files. Simply select the clips in the Event Browser that you want to transcode and select File > Transcode media.
Either way, here are your options:
What’s “reasonable image quality?” Generally, the higher the bit rate of the media, the better the image quality. For this reason, since ProRes 422 has a much higher bit rate than ProRes Proxy, the image quality is potentially better. This is especially true if you are doing color correction, green-screen keying, or lots of image manipulation. However, if you are simply capturing and editing consumer-grade camera images, without many effects, you may not see any quality difference at all between optimized and proxy media.
Creating proxies or optimized media always makes a copy of your camera source files. Both optimized and proxy media will have better performance than the camera native formats.
You can select one option, both, or none. Depending upon which options you select, you could have up to three copies of your media files stored on your system:
1. Camera native
2. Optimized
3. Proxy
Duplicate media files are not necessarily a bad thing and FCP X will track them properly; however, multiple copies do require more disk space.
RECOMMENDATIONS
Not all camera formats require optimizing. If the Optimize option is grayed out, it means that the camera format is already optimized and would not benefit if converted into ProRes 422. (DV and AVC-Intra are two examples of already-optimized media formats.)
NOTE: For the geeks among us, optimized formats are those that are stored in an I-frame format.
My general recommendation is to always optimize media. Purchasing an extra hard disk will more than pay for itself in the time you save during editing.
SWITCHING BETWEEN FILES

To switch between native, optimized, or proxy files in your Project go to the Final Cut Pro > Preferences > Playback tab.
Click the radio button for Proxy to edit using Proxy files.
Click the radio button for Original/Optimized to edit using anything else.
You can change this setting whenever you want, however, you can’t have a mix of some Proxy and some Optimized files in the same Project at the same time. Proxy and Optimized files are stored in different folders in the same Event folder.
(By the way, I thought whether you selected High Quality or Better Performance in this preference pop-up menu, your output quality will always be the same – high quality. However, see Jason’s comment below.)

2,000 Video Training Titles
Edit smarter with Larry Jordan. Available in our store.
Access over 2,000 on-demand video editing courses. Become a member of our Video Training Library today!
Subscribe to Larry's FREE weekly newsletter and
save 10%
on your first purchase.
142 Responses to FCP X: Native vs. Optimize vs. Proxy Media
← Older Comments Newer Comments →-
 Abed Loutfi says:
August 10, 2012 at 9:13 am
-
 DavidB says:
September 4, 2012 at 11:16 am
-
 George says:
September 25, 2012 at 12:07 am
-
 Larry Jordan says:
September 25, 2012 at 7:52 am
-
 George says:
September 25, 2012 at 8:37 am
-
 Paul Golden says:
October 2, 2012 at 12:27 pm
-
 Larry Jordan says:
October 2, 2012 at 12:33 pm
-
 Paul Golden says:
October 2, 2012 at 12:39 pm
-
 achille says:
October 28, 2012 at 4:31 pm
-
 achille says:
October 28, 2012 at 6:35 pm
-
 Larry Jordan says:
October 29, 2012 at 9:04 am
-
 Mike T. says:
October 29, 2012 at 9:38 am
-
 Rick says:
October 29, 2012 at 12:26 pm
-
 Lennard says:
November 18, 2012 at 12:20 pm
-
 Iain Anderson says:
November 18, 2012 at 8:57 pm
-
 Lennard says:
November 19, 2012 at 3:41 am
-
 Iain Anderson says:
November 19, 2012 at 4:29 am
-
 Lennard says:
November 19, 2012 at 6:26 am
-
 JC says:
November 25, 2012 at 7:18 pm
-
 Rick says:
November 25, 2012 at 8:05 pm
-
 Larry Jordan says:
November 25, 2012 at 10:59 pm
-
 Iain Anderson says:
November 26, 2012 at 12:22 am
-
 trish says:
December 16, 2012 at 11:19 am
-
 Larry Jordan says:
December 16, 2012 at 12:13 pm
-
 trish says:
December 16, 2012 at 12:27 pm
-
 Lennard says:
December 19, 2012 at 1:31 am
-
 Larry Jordan says:
December 19, 2012 at 8:52 am
-
 Lennard says:
December 21, 2012 at 4:24 am
-
 Richard says:
January 7, 2013 at 3:43 am
-
 Jeff Orig says:
January 7, 2013 at 1:37 pm
-
 Kent Jakusz says:
January 7, 2013 at 3:30 pm
-
 Jeff Orig says:
January 8, 2013 at 10:22 am
← Older Comments Newer Comments →Hello again Larry and all the nice people on here.
Today I finished working on my documentary. It was shot in HD and is around 38 minutes, 1980×1080, 25FPS.
Now that I come to exporting, I have figured my way around Compressor 4 and wish to export my film and burn it onto DVDs to send to festivals.
I was hoping someone could recommend the best way and settings to export an HD film with the above specifications onto a DVD or a DVD ready file. I only have FCPX and Compressor 4. I already bought some 8.5 GB DVDs since one export of my film to .MOV was around 5 GB.
I’m sorry for posting in the wrong place and hope I can get some help quick since I have to pack up and travel in tomorrow.
Thank you very much for your assistance, its greatly appreciated.
I’m not sure whats going on here. I’ve began editing some projects in Final Cut ProX. My workflow is: copying all of my Canon 5D MarkII footage to a separate hard drive, which is my backup of the original files. From that hardDrive, I import all of the files, with transcode checked. Editing has been OK, but bigger projects are becoming very slow. I just noticed that when I click on the events, they are appearing as H.264 files, and not proRes! It seems like Final cut pro is using my original files and not the transcoded ones…Is this normal? What am I doing wrong?? Or does it just appear that way in the info window…
Hi,
I read though all this and didn’t really find a straight answer… Sorry. What is the best option to edit quickly 5D mKII files with FCPX?
Is this a way to go:
1. Import and transcode to Proxy
2. Cut
3. Generate Optimized Media
4. Round Trip that to let’s say Davinchi Resolve
5. Export
BTW! I think it is SOOOO foolish that your timeline settings affect your output settings. We should have the option to exit in 320×240 if we wanted to and then just export using the original media at Highest possible quality. Am I the only one who sees a problem with the current setting?
George:
If the goal is to QUICKLY edit 5D footage, edit natively. Don’t optimize and don’t create proxy files. FCP X can edit H.264 files natively.
If the goal is high-quality color correction, ProRes 422 provides better color space and MUCH faster rendering which will improve image quality and make the Davinci process go more smoothly.
Apple has designed FCP X so that you CAN export different media than your timeline – however, the highest quality you can achieve is to match your timeline settings.
Editing 320×240 Proxy files is fine for cutting, but won’t work for placing titles or anything dealing with sizing or placing images, because the geometry of working with small files is way too inaccurate when you need to replace the small files with full size HD files.
Larry
Thanks Larry,
This is what I have been doing. So cheers for the confirmation.
Option one (let’s say our team’s game on the pitch):
1. Shoot 5D
2. Import native h.264 no optimisation
3. Sync sound
4. Cut head and tail
5. Add few transitions Team A vs Team B
6. Export with compressor using desired settings
Option two (let’s say three cam interview with 2 lav mice)
1. Shoot all cameras
2. Import and create optimised footage (have coffee/ shower/ gym)
3. Sync sound to all pics from one camera. Repeat for all cameras
4. Sync clips (three of them in this case) to multi cam
5. Cut
6. Export with compressor using desired settings
NB! In both cases I have Display preferences set to better performance because as far as I know that does not affect what I got on the timeline.
I use a MBP Retina 15″ with 16GB ram and 750GB SSD drive + Intek HD Graphics 4000 512MB. The external drive, if I use one is WD Thunderbolt Duo 4TB.
OK, so if we bring DaVinci Resolve into the mix, here’s my question:
Footage is shot on Canon DSLR using Cinestyle, so it’s flat. FCPX ignores THM files, so TOD timecode must be generated outside of FCPX. Use Magic Bullet Grinder to create H264 versions of Originals with TOD TC embedded. (This could be done for C300 or other cameras that shoot LOG; or cameras that shoot RAW like the Black Magic Cinema Camera)
1) Import TC H264 footage into Resolve
2) Apply Cinestyle LUTs
2a) (Optional) Synch H264 with 2nd Source audio (Resolve does a good job of this!)
3) Create window burn with filename and TC
4) Render 1080p ProRes Proxy files
5) Import Proxies as “optimzed” media (still haven’t figured out how to get FCPX to treat imported proxies as proxies
6) Edit in FCPX and export XML back to Resolve
7) Grade original H264 media using FCPX XML list
8) Render ProRes 422 HQ back out of Resolve with handles
9) Open Resolve XML back in FCPX and conform with Hi-Res graded Media
10) Resync audio; add effects back in;
11) Render final master movies out of FCPX
Here’s my question: is there any reason why I need FCPX to recognize my Resolve-created Proxy footage as Proxy in FCPX? Or should i just let FCPX treat them as “optimized” footage until I replace it with graded, rendered hi-res footage?
Paul:
Nice write up. Since you are linking back to the masters using Resolve, there’s no reason to worry about linking to proxies in FCP X. Just treat them as regular media and let Resolve relink to the source files during final color grading.
larry
Thanks Larrry. FCPX Proxy is half-res anyway. Creating Proxy optimized media saves a lot of space and my laptop is happier. This way, I can create dailies on the road without creating massive folders full of 422HQ media. Unless there’s an easy way to apply LUTS en masse in FCPX, this seems like a pretty good workflow….
Larry,
first of all forgive me if i missed the answer to this question in the midst of the above dialog… however i need something further clarified from a reliable source such as yourself…
You indicate above “You can change this setting whenever you want, however, you can’t have a mix of some Proxy and some Optimized files in the same Project at the same time. Proxy and Optimized files are stored in different folders in the same Event folder.”
(sorry, don’t know how to make this quote show up in blue… also 64 and technologically impaired… not an under the hood guy, and too limited in budget to hire one… 😉
so my question; in mid project with many hundreds of gigs imported without optimizing, and many many hours into editing, now absolutely neeeeed to convert to something more manageable. Up ’till now every thing has been relatively smooth in prelim edit, however now that effects such as scaling, position, layers of graphics, and abundant text, w effects as well…. well let’s say things have reached LA freeway proportions.. movement in rendering or even “real time” (now there’s an oxymoron 4 u ) simple editing is extremely unwieldy, at best
So what would be best workflow for optimizing a substantial project already in post;
1 – is there a way to convert only clips in use in the various Projects in my “active” Project Library (some are temporarily archived using Event Manager X)? At this point in the overall project all i am essentially doing is refining the “Projects”… very unlikely i will add substantial new footage.
2 – if option 1 is not viable can i select (for optimization) specific events or folders or key word collections from Event Library?
…. or is there an other option for me to consider?;
I have a tangential question which is somewhat off topic, that being
3 – where should i be directing FC to place the optimized media in light of my current preference settings/hardware configuration (specified immediately below)
I thank any one in advance for any willingness to “speak” with someone so technologically limited… did my one year minimal digital film training at 60, having cut my teeth on 16mm 40 years previously and been away from the industry for 30…
Hardware:
2.66 Intel Core I5 iMac, 16 GB RAM
one T internal drive, where OS and apps/FCP X.4 live
Events and Projects currently live at root level of a one T Cinemastar drive sharing an external 2 bay drive housing (ICY DOCK) in JBOD configuration with a 2T drive where original media off of P2 card lives (still looking for the definitive workflow for P2 to FCPX if someone wants to point me to that thread somewhere).
can’t think of anything else pertinent to add at this moment…
much gratitude in advance for anyone making it this far… hopefully others with similar issues to resolve will also benefit from wisdom shared here
cheers,
achille
ps although recommendations for the purchase of additional hardware for better workflow etc. are quite welcome, for the time being the hardware i have is the hardware i will have (for the foreseeable future), except for the additional drives i will be purchasing due to lack of space… here again i would welcome suggestions, it 1T or 2T or 3T, ok to use multi drive dock? etc.
BTW neglected to mention current setting is for use original or optimized media/ playback “better performance”… thinking need to up the ante to proxy as well as optimized… therefore need to know where to optimally send all the versions for storage relative to one another… how many drives needed?
Achile:
I currently believe the following statements to be true:
1. You can only create proxy media (or optimized media) for clips in the Event Browser. You can, however, select clips in the Event Browser to create Proxy media for. This selection can be done using keywords, clicking, or other selection methods. However, Proxy media is created for whole clips, not portions of clips.
2. You can not create proxy media only for clips, or portions of clips, edited into the Timeline.
3. You can not mix Proxy and Optimized media in the same project – it needs to be one or the other
4. For an existing project, creating proxy media will not reduce storage requirements, because Proxy media would always be created in addition to, not in replacement of, existing media.
5. Proxy and optimized media are always and only stored in the Events folder. You do not have any options on where this media is stored.
6. You switch between Proxy and Optimized media using Final Cut Pro > Preferences.
Larry
Achile & Larry,
I believe there is a workaround way to only create proxy files of media used in your project/timeline.
1) In the Project Library window, you can choose to DUPLICATE your project, and choose the option “Duplicate Project + Used Clips”. This will make a new EVENT folder in both FCPX Event Browser and the Finder. This will duplicate all of your used media in the timeline – the entire clips, not just the portions of clips you cut down in your timeline. However, This will be MUCH less media than your original entire Event.
2) Now, you can select the newly created Event in Event Browser, Right-click, and choose “Transcode Media”. You can now create Proxy Files of the clips used in your edited project only.
3) In Preferences, Choose “Use Proxy Media” to switch your timeline clip media linking to the new proxy files.
To note, this will not save you space as it will create original media duplicates as well as new proxy files all within the newly duplicated Event folder. HOWEVER, this may be a solution for some looking to get better PERFORMANCE in their editing by using Proxy files – without needing to TRANSCODE ALL of the original media, just used clips. This will be less taxing on the system, and enable better real time playback of multi-cam etc. When you want to finalize your edit in full quality, simply select the radio button in Preference – “Use Original or Optimized Media”. This will switch your timeline back to the source clips for mastering.
Somebody please let me know if there is any flaws in this method. Thanks!
In addition to Mike T’s suggestion, you can save space if that is a priority. If you follow Mike’s suggestion of creating a new project with it’s events, that will probably save you a lot of space.
You can save even more space if necessary, if all your media is in FCP X “camera archives”. If so, follow Mike’s workflow, creating proxy media. Then delete all the “original media”, and “optimized media” in the new events folder created when your duplicate project. You can then edit the project using only the proxy media. When you are finished you can regenerate the “original media” and the optimized media if you wish by reconnecting to the camera archives for final processing at output.
Lots of cautions here:
1. Make sure all your media is really in camera archives
2. The camera archives are backed up
3. If at all unsure, backup the new events folder before deleting the media out of it.
I am not sure where non video media gets stored, like sound files, graphics files, and animations. Be careful not to delete them.
Is it true that it is not possible to share (export) in native?
Because when i import only native files (H.264) and i want to share i see in the list; “source apple pro res”.
I thought Source = Native.
So FCP is always transcoding?? Even if i want to work in native??
Not quite. You don’t have to transcode to play back, but exports default to the Render codec, probably ProRes 422. You *can* force the export codec to H.264, XDCAM, or a few other formats with the Master File export option, but some kind of transcoding is probably going to happen at some stage. It’s very fast, though.
Thank you, but i am still wondering.
Is it true that there is no option “export (share) in native”?
Because when i choose share (master file) the list starts with “source apple pro res”.
And apple pro res is not the source. My native files are AVCHD.
When you export a Master File, you can choose the codec (including H.264, as used in AVCHD) but no, not “native”. The Same as Source option references the Render codec, which is ProRes. “Native” could only ever apply if no changes were made to the video — no color changes, no effects, no transitions at all. You can’t avoid at least one very minor generation loss.
Thank you Iain,
Hi everyone,
Lots of great discussion here. I just wanted to confirm that my workflow makes the most sense. I’m shooting DSLR on two Canon 7Ds. I’m editing on a MacBook Pro that’s a couple years old. So my thought is to drag the .mov files off the memory card into a folder on my external drive. (My master files.)
Then I’d import those into FCPX and click optimize media AND create proxy files.
I’d edit using the proxy files. (Plays so much nicer when editing on my MacBook Pro, especially when using multicam.)
When done, I’d switch my preferences to use optimized files and export as such.
So essentially, I’ve got 3 versions of each clip. Not ideal in terms of storage space but can live with it if it makes sense. I guess what I’m wondering is: IF I’m editing with the proxy files, am I gaining anything by creating optimized versions of those files as well? Would I be better off creating proxy files and leaving ‘optimize files’ unchecked? Because then it’ll just relink to the original files from the camera. (Which are in H264 I guess. – Really chugs when trying to edit it but if I’m not editing them and only linking back to them in export, does it matter?)
Thanks to anyone who can add some insight!
JC
JC-
I think you would be better off if you created Camera Archive from the original card and create originals from that. You can always reload from the Camera Archive.
When you import the files from the camera, does FCP create a new copy, the “Original Media”, maybe not in the original format?
For final output, “original media” or optimized media should give you full quality.
Rick
JC:
I don’t have a problem with your workflow. The benefit for camera archives is for storing media. Since you want to edit, a camera archive won’t help, or hurt.
I’d suggest doing what you plan to do.
Larry
An issue: you could end up with four copies of your media that way — the copy you dragged off the card, the native copy that FCP X puts in Events, and the Optimized and Proxy versions. Instead, just use Import Media from the card directly and you eliminate one source of duplication. I’d also suggest that you don’t need to create Optimized. If native files aren’t good on your Mac, then you should only need one of Proxy or Optimized.
HI Larry (and friends)
could someone help me ? I have edited a wedding video using Proxy media but now after reading ..
I want to export using the highest quality .. I want to burn it to Blue Ray
could someone tell me what I do ?
thanks so much .. trish
Trish:
If you are using FCP X, simply change your preference setting from Proxy to Optimize/Native and re-export.
However, I suspect that your proxy media – which has very good quality – may be good enough for a Blu-ray DVD.
Larry
hey Larry
you are so kind to respond so quickly
thank you .. on my way smiling
trish
Hi, i thought i understand finally the export settings, but i still have a question.
When i import my H264 files (Sony Alpha57) and when ik create a project in de correct preferences (use original media) then i export 2 versions.
The first version is source prores422 (900mb) and the second version is H264 (90mb)
But i think its very strange, because when i watch both video’s, they are exactly the same.
Lennard:
The two codecs – ProRes and H.264 – are optimized for different things. ProRes is optimized for extensive color space, fast editing and multi-generational quality. It is an excellent mastering format. H.264 is optimized for small file sizes. It has limited color space, degrades quickly when you copy it, and is very difficult to edit. It is an excellent distribution format.
Larry
Thanks Larry,
Is it true, ProRes is also better when you want to use the stabilization function, or is there no difference between H.264 and ProRes?
Thanks
Hi Larry,
I’m making my first feature length doc film. I have shot solidly for about 9 days and will probably be shooting for another 9, so I have a huge amount of footage all shot on a 7D Dslr. So storage is a big problem for me.
Having read most of the comments on this article I think the best solution for me is this: import the files with ONLY the Proxy media box ticked.
Later, when my edit is complete, I somehow (don’t know how yet) convert all the files used on the time line to full, optimized prores 422, a bit like when you would reconnect media in FCP 7. My understanding is that this is necessary for the best possible quality when I export my final film file.
Please can you tell me if I’m correct? Is this a good idea?
Many thanks,
Richard
Hi Larry,
I think with 10.0.7 this has changed a bit. At least for Canon DSLR footage. With 10.0.7 it is now forcing conversion to ProRes. It might be time to close the comments on this thread as I think the information may be getting out of date.
Just a thought.
Thanks.
Jeff;
Where did you get your information? Why do you say that “10.0.7 it is now forcing conversion to ProRes”?
Kent
Hi Kent,
Ah, good clarification. Maybe it is not forcing conversion. But I assumed it was. I will have to double check.
10.0.7 is forcing copy of Canon DSLR footage to the final cut events folder upon import. Which then renames all the files in event browser.
I will check when I get to the office.
Thanks.
-Jeff