
There’s a lot of confusion about the three different media types in Final Cut Pro X: native, optimized, and proxy.
Native media is the format shot by your camera. For example, AVCHD, H.264, DV, and HDV are all examples of native media formats.
Optimized media is always ProRes 422. When the “Optimize Media” checkbox is checked during import, FCP X transcodes, which is a fancy way of saying it “converts,” your media from its native format into Apple ProRes 422.
Proxy media is always Apple ProRes 422 Proxy. Proxy media creates a reasonably high-quality media file, but at about 1/4 the size of ProRes 422.
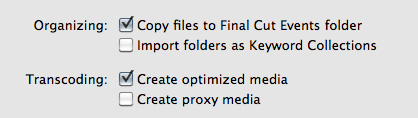
When you import media from either a file or camera, you have the ability to optimize it, or create proxy files.
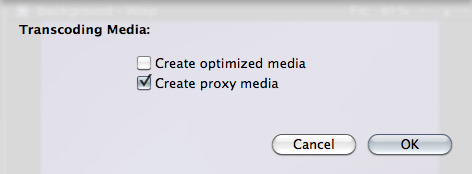
You also have the ability to convert media after you’ve imported the files. Simply select the clips in the Event Browser that you want to transcode and select File > Transcode media.
Either way, here are your options:
What’s “reasonable image quality?” Generally, the higher the bit rate of the media, the better the image quality. For this reason, since ProRes 422 has a much higher bit rate than ProRes Proxy, the image quality is potentially better. This is especially true if you are doing color correction, green-screen keying, or lots of image manipulation. However, if you are simply capturing and editing consumer-grade camera images, without many effects, you may not see any quality difference at all between optimized and proxy media.
Creating proxies or optimized media always makes a copy of your camera source files. Both optimized and proxy media will have better performance than the camera native formats.
You can select one option, both, or none. Depending upon which options you select, you could have up to three copies of your media files stored on your system:
1. Camera native
2. Optimized
3. Proxy
Duplicate media files are not necessarily a bad thing and FCP X will track them properly; however, multiple copies do require more disk space.
RECOMMENDATIONS
Not all camera formats require optimizing. If the Optimize option is grayed out, it means that the camera format is already optimized and would not benefit if converted into ProRes 422. (DV and AVC-Intra are two examples of already-optimized media formats.)
NOTE: For the geeks among us, optimized formats are those that are stored in an I-frame format.
My general recommendation is to always optimize media. Purchasing an extra hard disk will more than pay for itself in the time you save during editing.
SWITCHING BETWEEN FILES

To switch between native, optimized, or proxy files in your Project go to the Final Cut Pro > Preferences > Playback tab.
Click the radio button for Proxy to edit using Proxy files.
Click the radio button for Original/Optimized to edit using anything else.
You can change this setting whenever you want, however, you can’t have a mix of some Proxy and some Optimized files in the same Project at the same time. Proxy and Optimized files are stored in different folders in the same Event folder.
(By the way, I thought whether you selected High Quality or Better Performance in this preference pop-up menu, your output quality will always be the same – high quality. However, see Jason’s comment below.)

2,000 Video Training Titles
Edit smarter with Larry Jordan. Available in our store.
Access over 2,000 on-demand video editing courses. Become a member of our Video Training Library today!
Subscribe to Larry's FREE weekly newsletter and
save 10%
on your first purchase.
142 Responses to FCP X: Native vs. Optimize vs. Proxy Media
← Older Comments Newer Comments →-
 Becks says:
January 20, 2012 at 5:48 pm
-
 Larry Jordan says:
January 22, 2012 at 5:42 pm
-
 Jonathan says:
February 20, 2012 at 10:28 am
-
 Michael Richard says:
February 20, 2012 at 9:32 am
-
 Larry Jordan says:
February 20, 2012 at 9:37 am
-
 Brian says:
February 20, 2012 at 3:17 pm
-
 Larry Jordan says:
February 20, 2012 at 3:50 pm
-
 Jeff Orig says:
February 20, 2012 at 5:05 pm
-
 Richard says:
February 24, 2012 at 12:19 pm
-
 Larry Jordan says:
February 24, 2012 at 2:42 pm
-
 Richard says:
February 24, 2012 at 3:06 pm
-
 Larry Jordan says:
February 24, 2012 at 4:24 pm
-
 Larry Jordan says:
February 24, 2012 at 10:11 pm
-
 Richard says:
February 25, 2012 at 1:30 am
-
 Jeff Orig says:
February 26, 2012 at 8:32 am
-
 Don Cherry says:
March 5, 2012 at 8:36 am
-
 Larry Jordan says:
March 5, 2012 at 8:41 am
-
 Rob says:
May 15, 2012 at 9:03 am
-
 Don Cherry says:
March 5, 2012 at 8:38 am
-
 Don Cherry says:
March 5, 2012 at 8:45 am
-
 Larry Jordan says:
March 5, 2012 at 9:18 am
-
 Don Cherry says:
March 5, 2012 at 3:06 pm
← Older Comments Newer Comments →I have the same question as Jonathan.
Is it better to use Compressor to convert to ProRes first, or let FCP optimize it for us? What’s the difference?
Becks & Jonathan:
If you are using FCP X, let FCP X convert to ProRes for you.
If you are using FCP 7, and you are using Log & Capture, you can let FCP 7 convert to ProRes for you.
If your project is large, take advantage of the background processing Compressor provides and convert using Compressor.
It is not a matter of quality, but of saving time. In all three cases, image quality should be essentially identical.
Larry
Larry,
Okay. I will probably let FCP X do the converting then. Thanks for the help
When you optimize your original media what is happening? Is the original media transcoded to 422. Or are you getting a new version, 422 and keeping a copy of the original media as well? In effect have two copies of the same file, one 422 one original?
Michael:
Correct. Transcoding makes a copy of your original media using the ProRes 422 format.
Larry
Hey Larry,
After operating fine for months with only optimized media, I finally met my match and now work with Proxy Media. So, as you state above, I now have three different versions of the same footage. I’m just starting to feel the squeeze of storing all of it.
Do you see any major issues with deleting the original media? I don’t like to do it…but do I really need it after it’s optimized??
Anyone’s thoughts are welcome.
Thanks,
Brian
Brian:
I am VERY reluctant to ever recommend deleting camera source files – just in case. However, it is true that once you have optimized your media, your camera source is no longer needed.
Larry
I would buy more hard drives. They are currently around $110 for 2TB. Plus, you should be backing everything up.
I learned this lesson the hard way. I was not properly backing up and lost literally 2 weeks of time trying to recover mission critical data off one drive that went bad.
I am trying this as a back up plan. I have a 2006 Mac Pro with 4 hard drive bays. 1 drive is system drive. 1 drive is media drive. 1 drive is a Time Machine of the system. 1 drive is a Time Machine for the media drive.
Not perfect since I don’t have an off-site back up in this scheme, but better than nothing.
For a few hundred dollar investment, you save yourself a lot of heartache and hair pulling.
Plus, if your system is fast enough, you may not even need to optimize the footage or use proxy. My current workflow, I don’t even convert to optimized media. Editing works fine, no hangups or minimal slowdowns. I wish FCPX would allow me to do the following: with the click of a button when I have picture lock, only optimize the timeline and keep all the cuts. Then I could bring that picture locked edit into some sort of color correction software.
Maybe one day.
Also search for Larry’s article on maintaining hard drives properly over the course of a year.
Data floats away off the disk if not fully cycled through.
I got very used to using Canon’s E-1 plugin (Log and Transfer) to audition clips, occasionally set in/out points, and then transcode them to ProRes 422 for editing in the timeline. This helped me sort through the raw clips and keep my library down to only the clips I needed (and also helped with disk space as I was only transcoding the clips I actually wanted to use).
Yesterday I got the FCPX trial, and am considering upgrading to it, as it seems to better use my MBP’s power (GPU, etc).
I’m wondering, though, what workflow do you guys use to most closely emulate the Canon E-1 plugin?
The closest thing I can come up with is the following, but I’d like some advice on whether it’s really doing the same thing.
So I import the clips from a shoot into an “Event”. I uncheck “copy media” and uncheck “optimize clips”. I then preview the clips in the library, and when I know which ones I want, I right-click on them and hit transcode, and then optimize them from the native Canon format (h.264) to ProRes 422.
This seems to save me from having to transcode every single clip on the card (which I may not use), though it’s not quite as clean as using E-1 was. Is this a pretty solid approach?
On that note, since Final Cut Pro X can work natively with h.264 files, is there a *need* to transcode to ProRes 422 in this situation?? I’m assuming editing/effects/etc work better on ProRes, but I have nothing to base that on.
Any advice about whether I’m doing this correctly to match the old workflow would be greatly appreciated.
EDIT: Oh, one thing I forgot to ask, too: I did notice that when transcoding from h.264 to ProRes in FCPX, the transcode seems quite a bit slower than Canon’s E-1 plugin did in FCP7. Is this just me or is it really a slower transcode?
Richard:
I would recommend a different workflow.
When you are reviewing your clips in the Import window – only import the clips you want and optimize (transcode) on import. Since you can bring in clips at any time, this saves importing clips you won’t need, and, as the optimization happens in the background you can begin editing, even before the optimization is done.
As for speed, FCP X is probably as fast as Canon – EXCEPT Canon is running in the foreground and you can’t start editing until the transcode is complete. FCP runs in the background and you can start editing immediately, regardless of how long the transcoding takes.
The key is to only import the clips you need, rather than import everything and transcode later.
Larry
Hey Larry,
Thanks a ton for the advice. I suppose that does make more sense, and does mirror the old E-1 workflow more closely. The only downside, unless I’m doing it wrong, is that the FCPX clip import window doesn’t offer much in the way of scrubbing or in/out points; it’s just a Finder window pretty much. Maybe the “Camera Import” is different, but seeing as I’ve already copied everything to my external HD, I wasn’t able to try that.
Regardless, it’s good to know that everything else is pretty much the same, and transcoding with FCPX is pretty much the same concept as using Log and Transfer.
I’ve heard some people say that the thing that’s NOT the same is that L&C would import timecode data, but I guess my workflow hasn’t yet made apparent why that should matter (I’m guessing for audio reference).
Richard:
I’m not sure what you mean in that FCP X allows you to scrub every clip in the Camera Import window, as well as set In and Out points on a clip.
Larry
Richard:
Sorry for not being precise. When you import a file, you can’t preview it. When you use import from Camera, which is how you would bring in your raw camera footage, you can preview, scrub, and mark Ins and Outs.
Larry
Ahh, import from camera; much better :]
Thanks for the advice and keep up the great work; your site is an outstanding resource!
Hi Richard and Larry,
I never thought to use import from camera for the Canon footage. I just use import files. I will definitely try import from camera next time.
My current workflow was like what you stated Richard. Import files unchecked optimize and unchecked copy media.
But I just edit the native H.264’s. I have not seen a major performance hit on my Mac Pro 1,1 (2006 with upgraded graphics card) and no major performance hit on my 2011 Macbook Pro. You do get hit on the effects side. Once you add a couple of effects on clips it is not nearly as fast as the ProRes files.
I am thinking on my next project, I will do as I have done above. Once I have picture lock, I will duplicate the project and convert only the timeline to ProRes files. Then I can do effects and color correction with ProRes. I am not sure if this will have the intended result of only transcoding the files in the timeline or all the files in the event.
Richard, are you keeping copies of your camera original on your hard drive somewhere? I hope so. Just in case you need them in the future.
If I get a chance, I will post my findings on that. Unless someone already knows the answer to that. It is greatly appreciated.
Thanks.
I have found the information here very valuable. I am new to video production. I am looking at a big project, where I will be using 4 cameras to shoot about 30 hours of classroom activity. So that’s 120 hours of video. That’s a LOT of hard disk space. I am going to be away from home, with just my MacBook Air, so will be using USB external drives just to import the video (will edit it later with firewire drives). Storage is a big concern, obviously, with so much video. I figure I will just import it with no optimization or proxies at first, then deal with the stuff later. I can create optimized and proxy versions after import, right? I am thinking I may invest in a new iMac, and that this may be fast enough to deal with the original files so that I don’t have to make optimized versions. In the article above, you say working with original files is advantageous in that it saves disk space. The downside then is the editing process is slower? Is that all? Is there any hit in video quality?
There are three potential problems in your workflow:
1. The USB drives may not be fast enough. Do a test – capture 15 minutes of video – if you don’t have any problems and no dropped frames you can use your USB drives for capture.
2. Yes, you can optimize your files later. I don’t see a need to create proxy files for your project.
3. If all you are doing is straight cuts, editing native and optimizing will yield the same results. As you start to add effects – color correction, green screen, gradients – using optimized media means your renders will be faster, your exports faster, and your image quality higher.
Larry
Larry, can you confirm that there is a performance improvement (faster) when exporting optimized media versus native media (XDCAM EX)?
I should have also mentioned, the cameras are tapeless, AVCHD. I just checked some video I imported, and it says under Codecs in the information window that it is H. 264
Thank you very much Larry. I will do that test with the USB drive. I have already captured very short bits using the USB drive, and it appears to have been successful. But these have been only 5-minute bits. I will try an 60-minute chunk and see how that goes. If there is a probelm in the import, FCPX will let me know, right? Give me one of those “dropped frame” warnings.
Correct – it should warn you if the drive is too slow. Since you are using AVCHD, which requires less than 5 MB per second, you should be OK.
I stress, however, that USB drives are, in almost all cases, too slow for editing on the Mac.
Larry
Thank you, Larry.