
 This article was suggested by Robert Bagley, who was having problems storing files on a newly-acquired hard drive. Fixing his problem was simple – but not obvious. If this setting is incorrect on a new hard drive you just installed, you’ll have problems accessing files on that drive.
NOTE: This technique applies to, and works the same on, all versions of the Mac OS from 10.6 through 10.9.
Applications, and the boot disk, require permissions and ownership to be accurate and enabled to function properly. (A permission allows one application to “talk” with another application.) This is what we are repairing when we use Disk Utility to “Repair Permissions.”
NOTE: File servers, also, require permissions to keep track of which user has access to which file.
Drives that store data don’t use permissions and ownership. In fact, they shouldn’t use permissions. However, especially for new drives, permissions get turned on by accident for a data drive, which then prevents it from working properly.
Here’s how to turn off permissions on a hard drive or RAID.
BIG NOTE: This should NOT be done for the boot disk or server volumes. This SHOULD be done for all direct-connected drives that only store data.
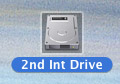
Select a drive. (Remember, leave the boot disk alone.)
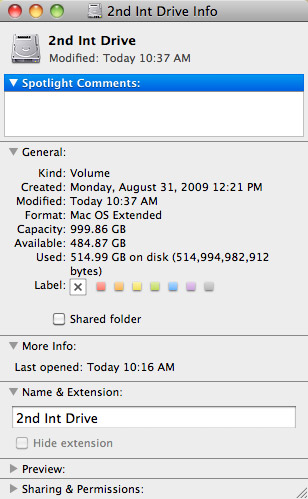
Type Command+I (or choose File > Get Info). This displays a wide variety of statistics about that hard disk. (My favorite is “Available,” which is always seems to disappear almost immediately.)
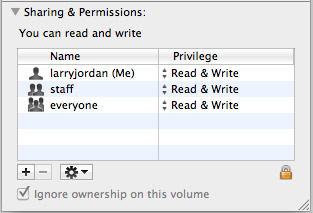
If it is closed, twirl open the Sharing and Permissions triangle and look toward the bottom. If “Ignore ownership on this volume” is checked, everything is fine.
However, if this is NOT checked, we need to change the setting.
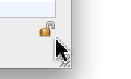
Click the lock and enter an administrator’s password to allow changes to this setting.

Then, check “Ignore Ownership on this volume” and close the window.
You only need to do this once for each of your data drives. Most of the time, this will be set correctly. But, for those instances where it isn’t, now you know how to fix it.

2,000 Video Training Titles
Edit smarter with Larry Jordan. Available in our store.
Access over 2,000 on-demand video editing courses. Become a member of our Video Training Library today!
Subscribe to Larry's FREE weekly newsletter and
save 10%
on your first purchase.

79 Responses to Mac OS: Turn Off Drive Ownership
← Older Comments Newer Comments →-
 Myname says:
April 2, 2016 at 10:41 am
-
 Larry says:
April 2, 2016 at 11:24 am
-
 Tom Quackenbush says:
June 14, 2016 at 9:28 am
-
 Larry says:
June 14, 2016 at 9:38 am
-
 Alexander says:
July 28, 2016 at 12:11 pm
-
 Larry says:
July 28, 2016 at 12:18 pm
-
 Alexander says:
July 28, 2016 at 4:52 pm
-
 LYNND says:
December 12, 2016 at 1:32 pm
-
 Larry says:
December 12, 2016 at 7:02 pm
-
 John says:
February 14, 2017 at 8:19 pm
← Older Comments Newer Comments →Where is this option? This is my External HDD (NTFS) http://imagizer.imageshack.us/a/img921/4143/x91nGa.png
MyName:
Your drive is formatted for Windows. This option only exists when it is formatted for a Mac.
Larry
Hi, I am having a problem with the “Ignored ownership” check box changing all by itself to unchecked every day. This is a non-boot, data-only volume. I set check the “Ignore ownership” and lock it, but the next morning the box is unchecked. Very strange. I have to unlock it everyday. Any suggestions, please?
Tom:
Something more serious is messing with your drive. Time to call Apple Support.
Larry
This is a very interesting article and discussion. I wonder if you could shed light on a different problem that may or may not be related. When I am running an application (say MS Word) and do a command-O to open a file, there is a longer-than-needed delay while the computer starts up the backup drive, so that it will be available for searching. I have the backup drive EXCLUDED in spotlight preferences. Is there any way to exclude it from simple “open” commands? Thank you.
Alexander:
When you Open a file, you are not doing a spotlight search. Instead, the OS spins up every hard disk because it does not know where the file you want to open is stored. Therefore, it brings everything online.
Larry
Thank you… I get that – what I’m asking is how to tell the OS NOT to search in that drive. Same problem when saving – I never want an application to save in that drive, so don’t want to wait the extra 5+ seconds for it to spin open that drive.
Ok, what do I do if I had a permissions disaster on my main HD and then used TimeMachine from my constantly-connected backup to restore from a prior date only to find that my Backup Drive AND my secondary partition, which is set to boot into a newer OS (El Capitan vs. the first on Snow Leopard) has a “lock” icon on each of them and when doing a “Get Info” the permissions are set to “custom” even for system, even for admin? I can enter my password, which has not changed, to change “system” to read/write but it will revert back to “custom” by the time I re-do the packlock.
Changing “ignore ownership” check-mark doesn’t make any difference. If I hold “option” at startup I can’t even select my secondary partition as a boot disk. I am locked out entirely from that partition AND I am locked out of using my restored HD from using my backup drive for backups because it, too, is locked.
HELP! I can’t even find anything on Google when I search issues with “custom permissions” that can’t be changed. I was lucky that while booted into the OS Snow Leopard install disk (thank God I have one) I could even use my Time Machine backup disk to restore.
I restored to a date where my HD permissions were not screwed up but prior to this I had booted from the OS X installer DVD to do a password reset (except instead of changing the password I just chose the reset permissions). This resulted in numerous ACL errors, over 200K worth, when I went to boot my computer. I ran a script to get rid of the ACL permissions errors but after doing so I still had a couple thousand instances and it was causing a permissions check on my OS X Snow Leopard to take 20-some minutes.
In restoring to a previous day using Time Machine it apparently left my connected backup drive and my secondary partition with El Capitan set to the permissions that were “reset” with the Utility and so I have no access to either of them. I am afraid to boot from the OS X installer DVD and run the reset again (not of my passwords but just of permission defaults) for fear that it will trigger the numerous ACL expected/not found errors again. But right-clicking and doing “Get Info” doesn’t allow me, even though I am the admin, to change the “Custom” permissions beck to allowing “System” read/write access. They just keep reverting to “Custom” and the packlock icon is on my backup drive and my secondary partition.
I do NOT have filevault or any such service set up or enabled at any point. The disaster came on slowly when I attempted first to get the two partitions to allow me equal access between documents, folders, etc. and then further complicated matters by buying a MacBook and doing the same so that I could access my files through my home network. Even after altering permissions last week and the week prior everything was going well until I booted up and accidentally hit something on my keyboard after which the permissions issues became so bad that I couldn’t boot into my primary OS (HD). I managed to restore to a point before all this nonsense started so why is my backup drive and my secondary partition locked out, and how to I reset the “custom” permissions that are on both of those volumes to default without having system-wide permissions chaos ensue?
Sorry for the long reply. I do appreciate any help. So far I’ve been batting zero looking up how to fix anything pertaining to “custom” permissions settings that allow no read/write access (or changes).
Lynn D:
Ouch! This requires more specific technical skills than I feel comfortable offering via email.
I strongly urge you to contact Apple Support.
Larry
Hi,
I’m trying to backup a NAS …
I understand your suggestion to uncheck “Ignore ownership on this volume” thru the get info route. Unfortunately, my problem is that this box does not appear when using Command+I.
Any suggestions will be greatly appreciated.
Thanks in advance.