
 Sometimes, when you are shooting SD (standard-definition) video, you set the camera menu to shoot an aspect ratio of 16:9, but the camera isn’t paying attention, so it records the video as 4:3. (This can also happen when shooting 2K 4:3 with the Arri Alexa.)
The result is that your video looks squished.

NOTE: The opposite can also happen, where video that’s supposed to be 4:3 is recorded as 16:9. For example, in the screen shot above, the earth looks “stretched,” because the aspect ratio is wrong.
This problem is easy to fix, but not easy to find. Here’s how.
CORRECT THE ASPECT RATIO
Select the clip, or clips, that you want to correct in either the Browser or the Timeline.
Open the Inspector (Cmd+4) and click the Info tab.
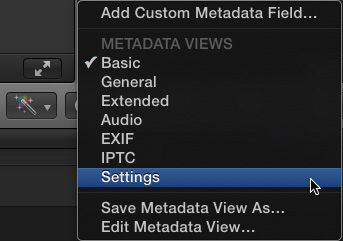
In the lower left corner of the Inspector, change the popup menu to Settings.
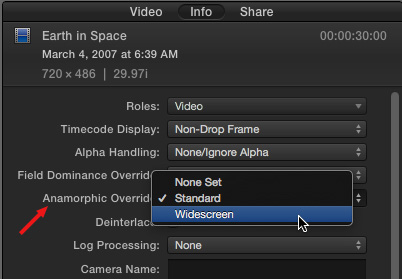
Then, in the Settings window, change the Anamorphic Override from None Set to Standard, if you want to display the selected clips in a 4:3 aspect ratio, or Widescreeen, if you want to display the clips in a 16:9 aspect ratio.

Here’s the earth, displayed at the correct aspect ratio for this clip, which is 4:3.
SUMMARY
The Anamorphic Override does not appear for HD clips, as HD is always 16:9. However, for SD clips that display incorrect aspect ratios, this is a very fast way to fix it without damaging image quality.

2,000 Video Training Titles
Edit smarter with Larry Jordan. Available in our store.
Access over 2,000 on-demand video editing courses. Become a member of our Video Training Library today!
Subscribe to Larry's FREE weekly newsletter and
save 10%
on your first purchase.

24 Responses to FCP X: Reset an Incorrect Aspect Ratio
← Older Comments Newer Comments →-
 Larry says:
November 21, 2018 at 1:48 pm
-
 Tommy says:
November 22, 2018 at 8:16 am
-
 Larry says:
November 22, 2018 at 8:27 am
-
 Marek klosowski says:
July 26, 2019 at 2:52 pm
-
 Larry says:
July 26, 2019 at 3:03 pm
-
 Sammy Warren says:
August 20, 2019 at 4:24 am
-
 Larry says:
August 20, 2019 at 8:41 am
-
 DaveGadgeteer says:
January 18, 2020 at 1:22 pm
-
 Larry says:
January 18, 2020 at 1:52 pm
-
 Janelle says:
August 23, 2020 at 7:23 am
← Older Comments Newer Comments →Tommy:
Yes, you need to emulate what broadcasters do. Duplicate the clip and stack them above each other.
Apply Spatial Conform to the bottom clip, and add a Gaussian Blur so it is very blurry.
Then, the top clip will be in focus, and the bottom clip will fill the frame.
Larry
Hi Larry, I just tried your solution, but…..after applying the Gaussian Blur I see that it does now remove the black bars and fills the frame, but…….it crops right into the frame, thus losing half the image. I was able to achieve the same results with just a crop or a spacial reform, and similar results with the Ken Burns effect without applying the blur. What I was hoping for was to fill the frame without zooming in (cropping). Do you think it is possible to achieve this without the crop?
Tommy:
No.
The purpose of the lower, blurred, image is to fill the frame so there are no black bars.
The purpose of the top image is to display the entire image with no cropping. You can not fill the frame AND not crop the image; unless you also accept the black bars.
Larry
The help makes no sense. The menus mentioned in the article do not exist.
Marek:
First, remember that these settings only apply to Standard Definition (SD) video. Virtually all video shot today is High-Definition (HD), which is always 16:9. (It can be cropped to other aspect ratios as needed.)
Second, the Settings menu in the lower left corner of the Metadata Inspector in Final Cut Pro X. The default menu choice is Basic. Click on it, then choose Settings from the popup menu.
Larry
I know this is a really old topic but I am having a similar problem. I am working with video which alot of clips were mistakenly shot on DSLR vertically instead of horizontally so I am having to resize alot of them and double expose, blend modes etc….but my question is how do I know when I am resizing them if it is 16:9 ? or the right size. i dont want to get through all of this and have to fix it after. Thanks.
Sammy:
You can’t resize vertical video to make it 16:9 – everything will look stretched and fat.
To make sure you are creating 16:9 video, create a 16:9 project, then put your vertical video into it – WITHOUT resizing it. This will give you the full frame of video, with large black bars on the sides. Then, fill this black background with whatever images or background makes sense. The project size determines the size of your final exported video.
Larry
I have a video shot on iPhone in hi def, but vertically. I want to rotate it and crop away all but the performer. There’s enough resolution to make a decent video using that part, but I want to crop a 16×9 ratio shape–how do I do that? And then I want to export it to YouTube as a lower resolution video with either 16×9 or 4×3 aspect ratio so it can be viewed on normal setups.
Dave:
You don’t need to rotate it, just crop it.
Create a 16:9 project, say 1280×720. Drop the clip into it, you’ll see black bars on the side, don’t worry about it.
Select the clip, then go to the Video Inspector.
At the bottom, change Spatial Conform to None.
Then, at the top of the Inspector, use Transform > Scale to size the image the way you want.
Done.
Larry
Hi, im hoping you’ll be able to respond to this soon. I’m not seeing the Anamorphic Override option after clicking settings. Like the other commenters, the option has been removed. Can you please just tell us how to enable this. Thank you