
 [ This article was first published in the January, 2011, issue of
Larry’s Monthly Final Cut Studio Newsletter. Click here to subscribe.
Updated Jan. 15, 2012 adding information about FCP X and Compressor 4. ]
NOTE: Of all the articles I’ve written, this ranks number 3 in popularity and comments generated. However, it illustrates using older software; specifically Compressor 3, to compress your video. The MPEG-4 compression in Compressor 4 yield better results. For an article on Compressor 4 and YouTube, read this.
One of the features in both Final Cut Pro X and Final Cut Pro 7 is the Share option. This provides a variety of different compression settings for your project, one of which is YouTube. Whether you use FCP 7 or FCP X, this option allows us to export a sequence from Final Cut, compress it for YouTube, then transfer it to our YouTube account automatically.
While this simplifies file compression and is a very nice addition to the program, I don’t use it. Mainly because I find it easier to export a master version of my program, then create all the different versions I need from that master. This means that I need to figure out how to compress videos for YouTube using Compressor. In this regard, Brian Gary provided some advice to me a while back that I found very useful.
The key thing, he told me, that you need to understand is that YouTube ALWAYS re-compresses your video. Regardless of how small, or gorgeous, your file is when you upload it. Therefore, our goal is not to match YouTube settings, but to exceed them, so that when the video is re-compressed, YouTube won’t make the image quality worse.
While YouTube supports a maximum image size of 4K, the data rate for really large images is ridiculously high. For most web videos, given current download rates, the preferred image size is 1280 x 720. This means that when I shoot for the web, I shoot a 720p image. (Progressive is ALWAYS better for the web than interlaced. The advantage of shooting 1080i for repositioning/reframing shots is far out-weighed by the problems interlacing causes web video. 1080p is an ideal format, but not all cameras support it.)
EXPORTING
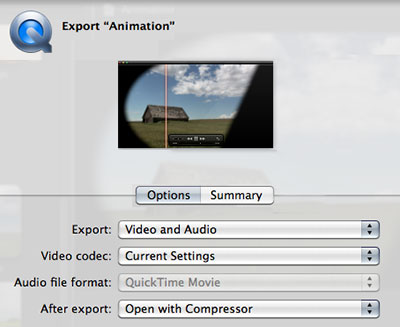
To export a high-quality movie from FCP X, use Share > Export Media. Leave the Video Codec set to Current Settings. In most cases, transcoding to ProRes during export will not improve image quality, it will only make your file sizes larger.
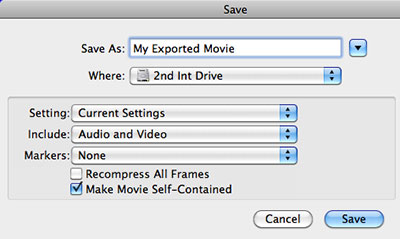
To export a high-quality movie from Final Cut Pro 7, use File > Export > QuickTime Movie. Again, leave the Setting at Current Settings.
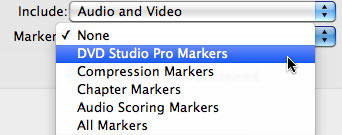
Also, while we can’t create or export chapter markers in FCP X, we can do so in FCP 7. To make sure chapter markers export with your movie, change the Marker popup menu to DVD Studio Pro Markers. This adds markers to your movie which can be accessed in videos destined for DVD or H.264 files compressed for the web.
COMPRESSING
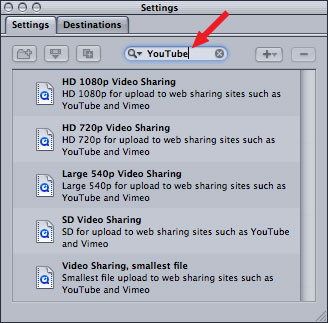
There is an Apple setting for YouTube in both Compressor 3 and 4, which you can locate by typing “YouTube” in the search box. (This screen shot is from Compressor 4.) If you are in a hurry, use this. However, you can provide higher image quality with more options by creating your own compression setting.
This tutorial illustrates the compression settings I use when compressing a video for YouTube. All the screens below are from Compressor 3.5.

In Compressor, create a new MPEG-4 movie in the Settings tab.

Select the new setting to load it into the Inspector. Give it a name and description – something that makes sense to you.
Click the Streaming tab and make sure your settings match mine in the image above.

Click the Audio tab and match my settings. Again, remember, you want to feed YouTube MORE data than it needs, so that your audio sounds good when YouTube is done recompressing it.

Here are the Video compression settings. Notice that Job Segmenting is turned off. Job Segmenting only has a purpose if you are working with compression clusters. I have not found these reliable, so I don’t use them. You can turn this off. Even if you leave this on, which is the default, it doesn’t really make a big difference.
Notice that the compression settings are set as high as possible. This guarantees that as much of the clip’s image quality will be preserved before sending it to YouTube.
At this point you can add filters, such as watermarks, timecode, or gamma compensation to customize your final image. Here’s a link that explains how to add watermarks during compression.

Finally, change the Geometry tab to create the correct image size. In my case, I set this to 1280 x 720, with square pixels.
Save your Settings, then apply these settings to your file and compress. Or, for even faster results, create a droplet and simply drag files on top of the droplet to compress them. Here’s a link that explains how.
Experience teaches me that these settings will create a file about 2.5 times bigger than if I were optimizing my settings to post this file directly to the web. However, I’m not. I’m optimizing for YouTube. Big difference.
As always, let me know what you think.

2,000 Video Training Titles
Edit smarter with Larry Jordan. Available in our store.
Access over 2,000 on-demand video editing courses. Become a member of our Video Training Library today!
Subscribe to Larry's FREE weekly newsletter and
save 10%
on your first purchase.

92 Responses to FCP 7: Compressing Video For YouTube
← Older Comments Newer Comments →-
 AVExpert says:
November 10, 2012 at 3:50 am
-
 Larry Jordan says:
November 10, 2012 at 7:54 am
-
 ane says:
November 12, 2012 at 10:31 am
-
 Larry Jordan says:
November 12, 2012 at 3:43 pm
-
 Rafael Amador says:
November 23, 2012 at 8:12 pm
-
 Larry Jordan says:
November 23, 2012 at 8:38 pm
-
 Rafael Amador says:
November 24, 2012 at 6:29 am
-
 Craig Seeman says:
November 24, 2012 at 11:40 am
-
 Larry Jordan says:
November 24, 2012 at 11:54 am
-
 Ed Waldrup says:
November 24, 2012 at 8:07 pm
← Older Comments Newer Comments →Using 2048kbps for 720p is a stupid overkill. 256kbps for audio too? This is a ridiculousness guide that seems to only point out the basics of how to do this, and ignored WHY you want to do it in the first place; small files maintaining high SnR. Never go over 192kbps on audio. you WILL NOT hear the differance unless you have superhuman hearing AND an audio system that is worth thousands. NEVER compress your video with such retarded high bit-rates unless it doesnt matter. Online IT MATTERS. The whole point of compression is to compress it as low as possible while keeping the quality as close to the original as possible. A HIGH-END bitrate for 720p is HALF of what you have in your guide.
Terrible and misleading thats going to make many people develop bad habits and come out doing WORSE than if they just let youtube do it for them
AVExpert:
You are welcome to disagree. You are not welcome to be disagreeable about it. If you post another message with a similar tone, I’ll remove you from the site.
The KEY point in this article is that YouTube always recompresses your media. This means that, in order to get the best compression from YouTube, you need to send it a file that has excess data so that when the recompression occurs, YouTube can remove data without damaging your project.
I agree that audio compression settings above 192 kbps for MP3 audio can not be heard.
Larry
How do you compress a 1080p video to 1080i using compressor?
Ane:
You create 1080i as part of a specific video codec. You would need to select a codec – like XDCAM that supports interlacing. HOWEVER, if you are posting to the web, 1080i is ABSOLUTELY the wrong format. Progressive is always better.
Larry
With all my respect, a “Key-frame Interval = 120”, is a BIG mistake.
Nobody can know which is the best Key-frames interval, because that depends on the picture.
So, the best policy is always leaving “Key-frames interval; AUTO”.
That won’t increase file size (file size has already being limited), but will allow an optimal key-frames interval.
This is why the Multi-pass processing is for.
Rafael
Rafael:
Interesting comment. Thanks for sharing it. I will experiment.
Larry
Larry,
I’ve had another look to the workflow, and sorry to say, I see it very improvable.
The main problem is that is based on the “Isma Profile MP4”.
That is an old MP4 flavor (QT.6 compatible) containing a little efficient MP4 codec instead of the H264.
This do not allows “Multipass”, neither “Key-frames AUTO”
However -can’t understand why- this (ISMA) is the only MP4 option available in Compressor, so IMO is better to use QT or MPGstreamclip to make H264-Mp4 for YouTube or Vimeo.
Rafeal, Compressor 4 encodes to H.264 .mp4
Larry, Perhaps you should take this tutorial down and do a major update. I’m not sure there’s any reason for using Compressor 3 and creating ISMA Profile MP4 these days.
Everyone:
Thanks for all your comments.
First, I’m leaving this article on-line, but with a new note at the top, because not everyone has upgraded to Compressor 4.
Second, the comments are too valuable to remove.
Third, because this is a really good illustration of the benefits of keeping your software current.
And, fourth, because of all the articles I’ve written, this ranks number three in all-time popularity.
So, with all its warts, we’ll keep it online.
Larry
If one has FCP X and Compressor 4 as I do what is the best HD setting for YouTube? I am an oldie with a 1080i camcorder that shoots HDV. The original format is 1440 X 1080 with MPEG 2. Yes, it is the Sony FX-1 from 2004. Guess I need to purchase the Compressor training you offer Larry.Yes it is the Sony FX-1 from 2004.
Thanks Larry,