
 [ This article was first published in the January, 2011, issue of
Larry’s Monthly Final Cut Studio Newsletter. Click here to subscribe.
Updated Jan. 15, 2012 adding information about FCP X and Compressor 4. ]
NOTE: Of all the articles I’ve written, this ranks number 3 in popularity and comments generated. However, it illustrates using older software; specifically Compressor 3, to compress your video. The MPEG-4 compression in Compressor 4 yield better results. For an article on Compressor 4 and YouTube, read this.
One of the features in both Final Cut Pro X and Final Cut Pro 7 is the Share option. This provides a variety of different compression settings for your project, one of which is YouTube. Whether you use FCP 7 or FCP X, this option allows us to export a sequence from Final Cut, compress it for YouTube, then transfer it to our YouTube account automatically.
While this simplifies file compression and is a very nice addition to the program, I don’t use it. Mainly because I find it easier to export a master version of my program, then create all the different versions I need from that master. This means that I need to figure out how to compress videos for YouTube using Compressor. In this regard, Brian Gary provided some advice to me a while back that I found very useful.
The key thing, he told me, that you need to understand is that YouTube ALWAYS re-compresses your video. Regardless of how small, or gorgeous, your file is when you upload it. Therefore, our goal is not to match YouTube settings, but to exceed them, so that when the video is re-compressed, YouTube won’t make the image quality worse.
While YouTube supports a maximum image size of 4K, the data rate for really large images is ridiculously high. For most web videos, given current download rates, the preferred image size is 1280 x 720. This means that when I shoot for the web, I shoot a 720p image. (Progressive is ALWAYS better for the web than interlaced. The advantage of shooting 1080i for repositioning/reframing shots is far out-weighed by the problems interlacing causes web video. 1080p is an ideal format, but not all cameras support it.)
EXPORTING
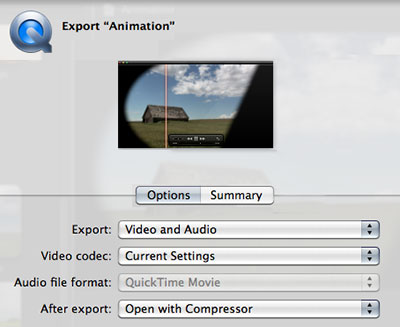
To export a high-quality movie from FCP X, use Share > Export Media. Leave the Video Codec set to Current Settings. In most cases, transcoding to ProRes during export will not improve image quality, it will only make your file sizes larger.
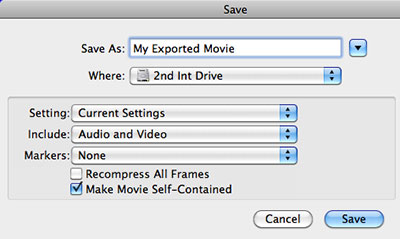
To export a high-quality movie from Final Cut Pro 7, use File > Export > QuickTime Movie. Again, leave the Setting at Current Settings.
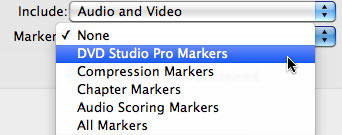
Also, while we can’t create or export chapter markers in FCP X, we can do so in FCP 7. To make sure chapter markers export with your movie, change the Marker popup menu to DVD Studio Pro Markers. This adds markers to your movie which can be accessed in videos destined for DVD or H.264 files compressed for the web.
COMPRESSING
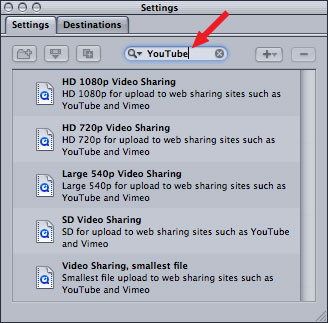
There is an Apple setting for YouTube in both Compressor 3 and 4, which you can locate by typing “YouTube” in the search box. (This screen shot is from Compressor 4.) If you are in a hurry, use this. However, you can provide higher image quality with more options by creating your own compression setting.
This tutorial illustrates the compression settings I use when compressing a video for YouTube. All the screens below are from Compressor 3.5.

In Compressor, create a new MPEG-4 movie in the Settings tab.

Select the new setting to load it into the Inspector. Give it a name and description – something that makes sense to you.
Click the Streaming tab and make sure your settings match mine in the image above.

Click the Audio tab and match my settings. Again, remember, you want to feed YouTube MORE data than it needs, so that your audio sounds good when YouTube is done recompressing it.

Here are the Video compression settings. Notice that Job Segmenting is turned off. Job Segmenting only has a purpose if you are working with compression clusters. I have not found these reliable, so I don’t use them. You can turn this off. Even if you leave this on, which is the default, it doesn’t really make a big difference.
Notice that the compression settings are set as high as possible. This guarantees that as much of the clip’s image quality will be preserved before sending it to YouTube.
At this point you can add filters, such as watermarks, timecode, or gamma compensation to customize your final image. Here’s a link that explains how to add watermarks during compression.

Finally, change the Geometry tab to create the correct image size. In my case, I set this to 1280 x 720, with square pixels.
Save your Settings, then apply these settings to your file and compress. Or, for even faster results, create a droplet and simply drag files on top of the droplet to compress them. Here’s a link that explains how.
Experience teaches me that these settings will create a file about 2.5 times bigger than if I were optimizing my settings to post this file directly to the web. However, I’m not. I’m optimizing for YouTube. Big difference.
As always, let me know what you think.

2,000 Video Training Titles
Edit smarter with Larry Jordan. Available in our store.
Access over 2,000 on-demand video editing courses. Become a member of our Video Training Library today!
Subscribe to Larry's FREE weekly newsletter and
save 10%
on your first purchase.

92 Responses to FCP 7: Compressing Video For YouTube
← Older Comments Newer Comments →-
 Larry Jordan says:
August 21, 2012 at 9:50 am
-
 John A. Mozzer says:
August 23, 2012 at 2:54 am
-
Video Encoding for YouTube - Crossroads Tapestry says:
August 27, 2012 at 5:30 am
-
 Craig Seeman says:
August 27, 2012 at 1:59 pm
-
 Craig Seeman says:
August 27, 2012 at 2:07 pm
-
 John A. Mozzer says:
August 27, 2012 at 3:57 pm
-
 martha says:
October 18, 2012 at 3:04 pm
-
 Larry Jordan says:
October 18, 2012 at 3:08 pm
-
 Craig Seeman says:
October 18, 2012 at 3:43 pm
-
 Danielle says:
October 24, 2012 at 3:23 pm
← Older Comments Newer Comments →Terry:
Exporting is easy. Go to the Project Library. Select the project you want to export. Then, select Share > Apple Devices. And export for the iPad. This is a good combination of small file size and excellent quality. It is also an MPEG-4 movie.
Larry
Have you seen YouTube’s “Encoding Video For YouTube: Advanced Specifications”, and the “Suggested bitrates for uploads”?
http://support.google.com/youtube/bin/static.py?hl=en&guide=1728585&topic=1728573&page=guide.cs
I find the “High quality uploads for creators with enterprise quality internet connections” section of particular interest. YouTube recommends uploading files with video bit rates as high as 50,000 kbps.
And, in my personal experience, having an “enterprise quality internet connection” is not a requirement. Patience for very long uploading times is the only requirement.
[…] another article from Larry Jordan. Share → (function(d, s, id) { var js, fjs = […]
BTW, some people are concerned how long it takes to encode H.264 files to send to YouTubes as masters. Often I’m sending presentations that are well over an hour long which, depending on your Mac, could normally take many hour to encode. What I do now is use a Matrox CompressHD card in my MacPro. It accelerates encoding tremendously, often close to real time (a 90 minute piece can be completely encoded in around 90 minutes). The Matrox software installed presets to work directly in Compressor (It works very well in the current version of Compressor that one would buy with FCPX). Since it’s a PCIe card you’re still free to use any video card you chose.
If you’re on a laptop you can get the “MAX” option with the MXO2 series. It essentially uses the same accelerator found the CompressHD card. I do a fare amount of “ENG” stile work and I often have to post long versions of my pieces as well. I often have to turn these around the same day! and Matrox MAX is the only way I could get these done and uploaded to YouTube or FTP/DropBox delivery to my clients.
Scott, Youtube recompresses the video which is why you want to give them the highest quality source. They encode to all various versions from smallest to largest sequentially. You can see that if you upload a 1080 file and play it as soon as it becomes available. Depending on the file size, over minutes to hours, you’ll see higher quality playback options added. The viewer chooses the quality level so it’s not “dynamic” per se.
The better the source the better their encode will look. YouTube has said that as they improve their encoding they’ll reuse your source for future re-encoding. The better your H.264 master you send them, the better you are “future proofed” on quality. Of course big files mean longer upload times dependent on your internet connection. You can speed your encode times though with Matrox CompressHD or MXO2 with MAX.
Browsers do have some sort of meta flag that tells a web host whether it is a desktop browser or mobile browser, that sort of thing. So I’m guessing YouTube defaults to a particular quality setting based on that information.
I’ve noticed only recently that you can right click on any video playing in YouTube’s player, and select Show Video Info. The information includes the average kbps. I believe this is the video bit rate, and not the overall bit rate.
When checking my own videos on YouTube, I like to select the highest quality option first, if it has not defaulted to it. Then I’ll right click, select Show Video Info, and see the average kbps in YouTube’s highest quality encode of my video.
hi there,
i am using final cut 7 and my sequence is 1440×1080 29,97 appleres 422
its a 8 minutes documentary. when i export as current setting the size is too big 7gb
i need a file size around 1gb. this doc will be screening in a big screen in a festival.
how can i export my sequence to a smaller size without loosing quality?
thank you very much,
Martha:
To reduce the file size, you need to compress it. Try Compressing it to ProRes Light and see if your file size gets closer to 1 GB.
ProRes will yield better quality than H.264, but the file sizes will be larger. In your case, you care more about image quality than file size, because you’ll be screening the movie, not downloading it from the web.
Larry
I don’t think going to ProRes Light is going to drop the file size nearly 7 fold.
I think it’ll be around 6GB
http://www.digitalrebellion.com/webapps/video_calc.html
You may need to ask them how they’re playing the files back.
BTW the basic calculation is
Duration times data rate equals files size.
You’d want a bit over 17,000 Kbps.
Just wanted to say thank for these tips, helped me a lot.