
![]() Hidden inside QuickTime Player 7 are several options for manipulating multi-channel audio that I find indispensable. Most of the time, I handle these audio chores in my video editing software; except… every so often, QuickTime Player is better and faster.
Hidden inside QuickTime Player 7 are several options for manipulating multi-channel audio that I find indispensable. Most of the time, I handle these audio chores in my video editing software; except… every so often, QuickTime Player is better and faster.
When recording interviews, the best technique is to record audio using a “dual channel mono” format. The interviewer is on one mic, which is recorded to channel 1, while the guest is on a second mic, recorded to channel 2.
NOTE: I strongly advise against recording any interviews or dramatic scenes in stereo. Editing and mixing stereo audio interviews are far more difficult than editing mono audio tracks. Remember this phrase: “One mouth – One mic – One channel.”
This same technique can be used for dramatic scenes where each actor is recorded to a separate channel. Recording one voice to one channel simplifies editing and cleanup, plus makes mixing and panning much easier.
NOTE: QuickTime Player 7 Pro is a $29.00 upgrade from the free QuickTime Player. Click here to download a copy: http://support.apple.com/downloads/#quicktime You must also upgrade to the Pro version for these features to work. QuickTime Player X does not have these features.
SCNEARIOS
One common interview option is where the interviewer doesn’t wear a mic, because you won’t use the interviewer’s voice. Here, you record the guest on channel 1 and leave channel 2 blank.
Another common interview option is to record the interviewer on channel 1 and the guest on channel 2. This gives you the option to use, or not use, the interviewer’s voice; or to at least know the exact question of the interviewer.
There’s no reason to waste hard disk space capturing an empty audio channel. One hour of 48/16 mono audio requires about 320 MB. Multiply that by the number of hours of recorded material and that adds up to a lot of space.
QuickTime Player 7 Pro allows us to silence a track, delete a track, or extract a track to a separate file, quickly and easily. Here’s how.
FAST AND PAINLESS TRACK SURGERY WITH QUICKTIME PLAYER 7 PRO
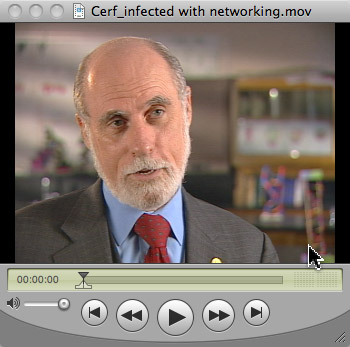
Open your media file in QuickTime Player. (QuickTime Player is versatile, but it won’t play all media formats. Also, QuickTime Player 7 is a 32-bit application, so at some point in the future it will not be supported by the Mac OS. However, it works fine up through Mac OS X 10.8.x)
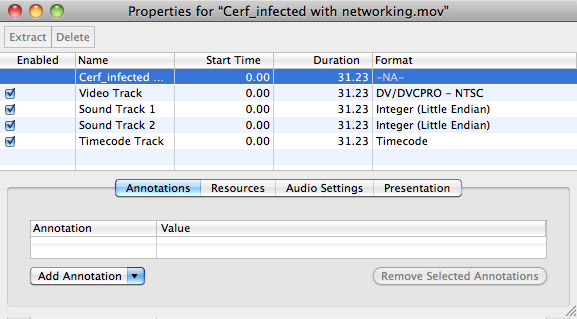
Select Window > Show Movie Properties (type Cmd+J). Every QuickTime movie can contain multiple tracks. Here, for example, there is one video track, two audio tracks, and one timecode track. A single QuickTime movie file can contain one video track, up to 24 audio tracks, up to 3 timecode tracks, plus text metadata.
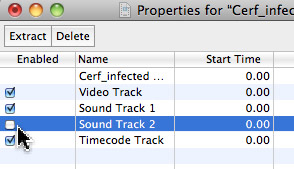
To disable a track, uncheck the blue checkbox. Here, for example, I’ve disabled the second audio track. This means that the audio is still there, but it is no longer audible. To enable the track again, recheck the checkbox. Changing this checkbox does not affect file size or actual file contents. Saving the file means the audio is still there, but not audible; you can open this file later and turn the audio for that track back on.
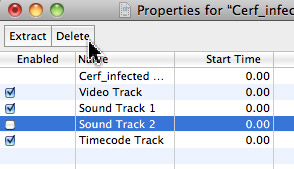
To delete a track, for example to get rid of an empty audio channel, select track and click the Delete button at the top. The track is instantly deleted. You can recover a deleted track using Undo.
However, these changes are not permanent until you save the QuickTime file. Once saved, that track is gone forever and can’t be recovered. However, UNTIL you save the file, none of your changes are permanent. And if you close the file without saving, none of your changes take effect.
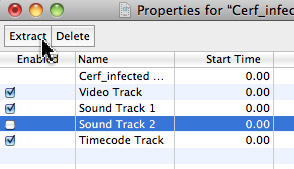
To extract a track into a separate file, select the track and click the Extract button. Almost instantly, a new QuickTime movie appears containing just the track that you extracted, and the track is removed from the original source file.
Again, to make your changes permanent, save the file. To not save changes, close the file without saving changes.
SUMMARY
The ability to manipulate individual tracks inside QuickTime makes it a very powerful application in my toolkit. I don’t use it often, but when I need it, there’s nothing like it.

2,000 Video Training Titles
Edit smarter with Larry Jordan. Available in our store.
Access over 2,000 on-demand video editing courses. Become a member of our Video Training Library today!
Subscribe to Larry's FREE weekly newsletter and
save 10%
on your first purchase.
15 Responses to QuickTime 7: Edit Multitrack Audio
Another thing I use Quicktime 7 for is to rough edits. Using I and O to set ins and outs I can either trim to selection or copy and paste into a new file and keep adding selections from multiple files to the new one to combine them into one file.
Thanks for all you do, Larry
Larry,
If someone has to batch delete audio tracks, say from a batch of b-roll clips, Drew Lahat posted an Apple script on Precision Post’s site that does just that: http://www.precisionpost.com/channels/videovillage/2012/10/delete-tracks-from-quicktime-files—applescripting-qt.html
I created a quick screen cast demonstrating it in action (I do not have any affiliation with Precision Post, just something I found while Googling): http://youtu.be/EyGKqdRjXtg
Eric
My company has requested me come up with a way to present/distribute an artistic video/audio piece requiring dynamic blending/processing at least two audio stream in real-time and in sync with at least one (but ideally two) video streams. The result should be natively playable in a format such as QT or packaged in such a way that it can be unpacked on a Windows or Mac OS host, and played without any special software licensing. I am a software developer, but haven’t done any audio programming recently.
My understanding is that QT format supports up to 24 tracks of audio, but I haven’t found anything indicating that it’s possible to blend/mix or even select different audio tracks DURING playback.
It’s leading me to think that the best approach might be to find or write something that handles real-time blending of the audio,
that can be made to sync with a sync track from QT or some other popular format.
Can anyone think of a low-risk / low-complexity way to accomplish this? HTML5?
Thanks,
-Jay-
Los Angeles
Jay:
The problem is that QuickTime files only contain one video track.
So, you need two QuickTime files to play the two video tracks. This, then, makes the dynamic audio easy. The trick is starting the playback of the two QuickTime movies at the same time. Once they start running, they will stay in sync.
There are a number of software solutions that play dual QuickTime streams – do a Google search to find one that works for you.
Larry
You wrote “My understanding is that QT format supports up to 24 tracks of audio, but I haven’t found anything indicating that it’s possible to blend/mix or even select different audio tracks DURING playback.”
I am very interested in this technology have you come across any thing that might be able to do this? Please let me know
Are there any other players on android or IOS that have this capability?
Thanks in advance
Micheal
New York
I’ve got some files that have audio tracks disabled. When I open properties, I’m able to click the check boxes and re-enable those tracks. However when I click save, and then close and re-open the file, the tracks are still disabled.
Any tips? I’m hoping to NOT do a “save as” as I have a lot of these files to process and the “save as” function seemingly renders out a new file, as it takes some minutes to complete.
Thanks!
Brian:
You are correct – “Save As” always creates a new file – that’s what it is designed to do.
I just did a quick test and verified that, using QuickTime 7, when you enable or disable an audio track, then save the file, the revised settings are saved. This leads me to think that you may have locked the file to prevent changes, or, if you are using a thumb drive, the thumb drive may be in locked mode.
Check there first.
Larry
Good way to edit multitrack audio within QuickTime 7! Thanks for the detailed instructions and I’d like to try in no time. As I see from this post, I can just disable, delete and extract track and some other editing functions can’t be found here. So sometimes when we want to add audio effects, a professional audio editor will be needed.
Gilbert:
Correct.
Larry
Some friends made a video using two microphones, right for the interviewer and left for the interviewee. When I open the mp4’s in QuickTime Pro, I only see 1 Soundtrack (format AAC) in the Properties window, however I can see two channels (a left and a right.) I can’t figure out how to delete/mute just one channel from the 1 Soundtrack.
Help!
Amber
Amber:
Re-read this article. After you open the Properties window, uncheck the audio track you DON’T want to hear, then save the file.
Larry
Hi Larry,
I found QuickTime lately to be an indispensable tool as well. Got the QuickTime Pro, so I came accross this article, which re-assured me of the long forgotten in-place editing features of the software.
I have a problem though. I would like to create a H.264 movie with both 5.1 AAC and 2.0 (Stereo) AAC. The QuickTime player can deal with this fine, but in VLC, either one or both tracks are silent.
Any suggestions?
Ray
Ray:
Nope, no suggestions. Perhaps another reader has an idea. Keep in mind that QuickTime Pro hasn’t been updated in forever and may not run in Mojave.
Larry
Hey, I’m on Windows, by the way.
Here is the solution.
Adding sound tracks onto a movie in-place obviously works for QuickTime, but not other players.
After doing “Save As…”, QuickTime performs something it calls “flattening”, which basically get the movie to work as regular.
IMO, it is because simlpy adding tracks in-place makes references and doesn’t embedd them.
So simple.
Let me add another feature here:
Automatic audio/video stretching.
In order for this to go smoothly, you need to
a) sync the beginnings
(tip: you can use external tool so you see the waveform, and/or eyeball the video)
b) make both equal length (trim the end(s))
(tip: 1 sec of video has exact number of ticks per sec, 1 sec of audio has 4 ticks)
4. On slave track – Ctrl/CMD+A, Ctrl/CMD+C
5. On master track – Ctrl/CMD+A, Ctrl/CMD+Alt+Shift+V
Slave will be stretched to fit master automatically.
This is very important in situations where you do separate sound recording, and there’s a clock drift between two devices. Basically, the stretching is non-destructive and gives you perfect sync.