
![]()
QuickTime 7 is far from dead. In fact, even today, you can do stuff with it that QuickTime X can’t begin to touch. For example, Charles Love sparked this article with a question:
“Could you do an article on the best way to create time lapse clips with Final Cut Pro X?”
There are multiple answers to his question, but here’s one that will work reliably every time.
BACKGROUND
Whether you are using Final Cut Pro X, FCP 7, any version of Premiere and, probably, Avid, video editing software is designed for editing video clips, not massive numbers of still images. Most video editors bog down when dealing with thousands, or even hundreds, of separate still images.
The ideal way to create time-lapse video is to shoot it that way in the camera. However, not all cameras can record time-lapse video, though most can shoot time-lapse still images.
That’s where QuickTime 7 Pro comes to the rescue. QT7 Pro is only a 32-bit application, which is why Apple moved on to QuickTime X for most movie playback. However, QuickTime 7 is still currently sold and supported by Apple, and it easily creates movie files from individual image sequences.
FIRST NOTE: Click here to purchase QuickTime 7 Pro from the Mac App Store
SECOND NOTE: Click here to read a support note from Apple that explains the installation process.
CREATE THE IMAGES
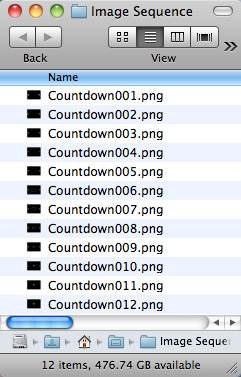
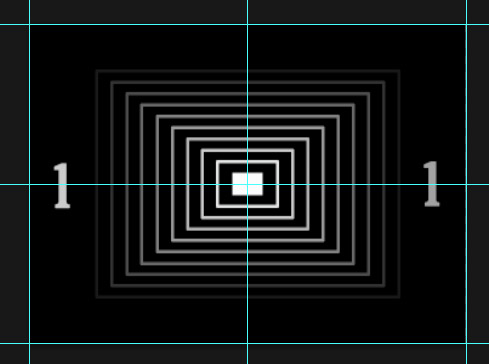
An image sequence is a group of still images, each sharing the same filename, but a different number at the end. In this example, I’m working with twelve different images to create a custom countdown clock. Notice that the file names are identical, except for the sequence number at the end.
This image sequence can be created anywhere. For example, here, I created it using a sequence of PNG files created in Photoshop. Generally, though, these sequences are created in a still camera that is programmed to take an image every X seconds.
Once the images are recorded, store them all in the same folder. The numbers in the file name indicate the order in which the images will be combined into a movie.
CONVERT THE IMAGES INTO A MOVIE
Once you gather all your images into one place, its time for QuickTime Player 7 to work it’s magic.
NOTE: QuickTime Player X can’t do this. You must use QuickTime Player 7 Pro to convert image sequences into a movie.
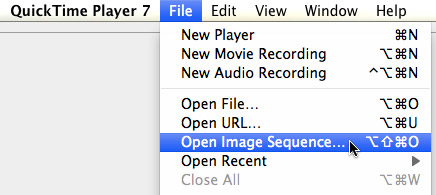
Open QuickTime Player 7 and choose File > Open Image Sequence.
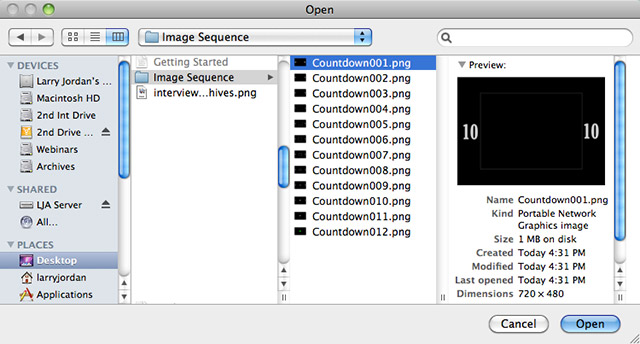
Navigate to the FIRST image in the folder containing the image sequence. In this example, I stored the images in a folder named “Image Sequence.” You can name this folder any thing you want.
Once you’ve selected the first image, click Open.
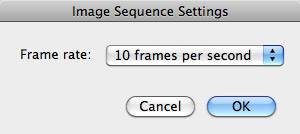
This is the magical part. A dialog pops up allowing you to choose the frame rate you want to assign to these images.
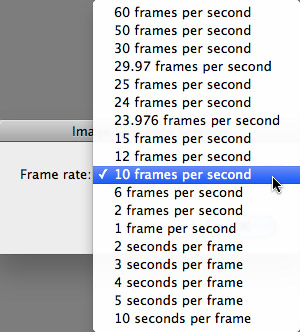
As you move higher in the list, the images flash past more quickly. Select the frame rate that best represents the time-lapse speed you want.
NOTE: You don’t set this to match the frame rate of your project. When you import the movie into your video editor, it will render this file to the correct frame rate, while maintaining the playback speed you select here.
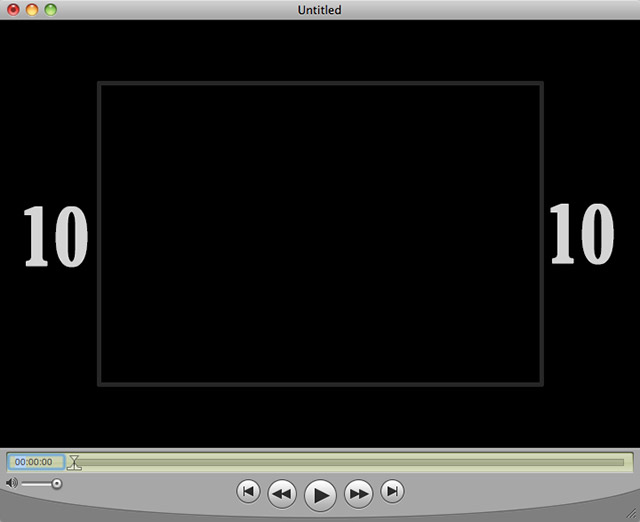
Almost instantly, these individual images are built into a movie file, in the order in which they were numbered in the folder.
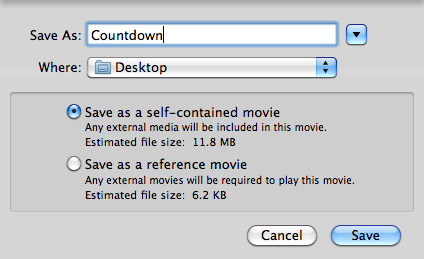
The last step is to save the movie file. Click File > Save As and save the new movie as a self-contained movie.
This QuickTime movie stores your images in the same format you saved them. (In my example, they are saved in Apple PNG format, which is not really a video format but really high-quality.) This means that when you bring this movie into your editor, it will render the file to match your sequence/project settings.
NOTE: Once the image sequence is imported into your editing software, you can still make speed changes to the clip. However, you’ll retain the highest image quality if you modify the speed of the images in QuickTime Player 7 during import, rather than after the clip is created and imported into your video editor.
By the way, here’s the finished video: Larry’s Countdown
Done. Cool.
Visit our website to see Final Cut Pro Training & more!

2,000 Video Training Titles
Edit smarter with Larry Jordan. Available in our store.
Access over 2,000 on-demand video editing courses. Become a member of our Video Training Library today!
Subscribe to Larry's FREE weekly newsletter and
save 10%
on your first purchase.
9 Responses to QuickTime 7 Pro: Image Sequences
If you’re using FCP X, here’s a tip I got watching MacBreak Studio (Link to video http://youtu.be/2kgN5mJaHy0?t=4m30s)
To save on hard drive space, in the “Last step”, Save As ‘Save a reference movie’ instead.
When imported into FCP X, it is treated like a ‘self-contained movie’.
Hi Larry,
I often check out your answers while I’m editing in FCP X. Thanks for the expert advice!
My question here is how would I import photos from a folder tree. This QT7 technique works within a folder but I’d like to import say 14,000 photos from my whole iPhoto library to make kind of a time warp of my past 10 years.
How might I do that?
-ed
Ed:
One folder at a time – then combine the movies.
Larry
Hi Larry,
I’ve got FCPX 10.1.2 now. And I found that if the images are in iPhoto then FCPX can import large selections all at once.
Select them in the camera browse and drag them to the storyline.
You can arrange different import sets in the story line they way you want.
Then I created a group and retimed them to 8000% fast and the photos changed at just the speed that I wanted them too.
If you’d like to see how it all ended up, you’re welcome to look at
https://www.youtube.com/watch?v=Yp8iGoZ8-CM
Ed:
Very cool – thanks for letting us know.
Larry
Following this procedure, and using jpegs that are 1920p pixels wide, I find that Quicktime Pro makes a move that is 640 pixels wide, with no option to change that. I want to import it into a HD video I’m working on. Any thoughts?
Sean:
QuickTime does have the option to change formats. Look in the Settings window under Video Compression.
larry
I created a sequence of about 10,000 JPG’s. I am using Quick Time Pro 7.7.5 on a Win 8 machine. I selected the first image and 15 FPS. The drive light flashed for about 2 minutes, then stopped. The preview screen was not presented. I tried again at 24 FPS. Got the same result – nothing. I tried isolating about 1000 frames in another directory. Same result.
What am I doing wrong?
Steve:
I’m not sure – I don’t use Windows so, if this is a Windows problem, I can’t help.
Try doing this with just 100 images – as a test. See if that works.
Try saving as a Reference Movie – though I STRONGLY recommend against doing this in real-life because if you delete even one image from the image sequence, the entire movie breaks.
Try changing the Video settings for saving the file.
Perhaps one of these ideas will solve it.
Larry