 Why is it that the footage that looks the worst always has the shortest deadline and the lowest budget?
Well, I guess that’s the answer – the filmmakers didn’t have the time or money to craft their images. In an ideal world, you’d finish editing the project and take it to SpeedGrade or DaVinci and make it look glorious. But, hey, remember that budget issue?
OK, so we’ll move it into the 3-way Color Corrector filter… except, there’s also no time.
This is a great reason to use the Fast Color Corrector filter in Premiere Pro CS6 — when it comes to speed and simplicity, this works great. Other filters and programs will work better – but this one can bail you out when time and budgets won’t permit.
There are three key statements about color correction that you need to understand in order to be successful with this filter:
This is a really important point. In fact, much of color correction hinges on a restatement of this: “If something is supposed to be gray, it must contain equal amounts of red, green, and blue.” If it doesn’t, it has a color cast.

For instance, in this screen shot, both the left and right side are equally “bright,” they are both 50% gray. However, the gray on the right has a color cast, it has more red and green, which creates yellow, than it has blue.
NOTE: Color in video is additive. Equal amounts of red, green, and blue equal gray. Red plus green equals yellow. Blue plus green equals cyan. Red plus blue equals magenta. There is no necessary relation between the gray-scale value of a color (how light or dark it is) and the color value of a color. The two are adjusted independently.
If an object in the frame that is supposed to be gray has more red (or yellow, or blue, or any other combination of colors), it is said to have a color cast.
The Fast Color Correction filter measures the amount of red, green, and blue in an object that is supposed to be gray. It then adjusts the color of the entire clip by adding or removing colors until that gray object is restored to equal amounts of red, green, and blue. At which point, both the object and the clip will look “normal.”
It sounds complex, but this filter is designed to fix problems quickly.
ON YOUR MARK
Start Premiere Pro CS6, open the project and sequence containing the clip(s) you want to fix, and select the clip with a color problem.
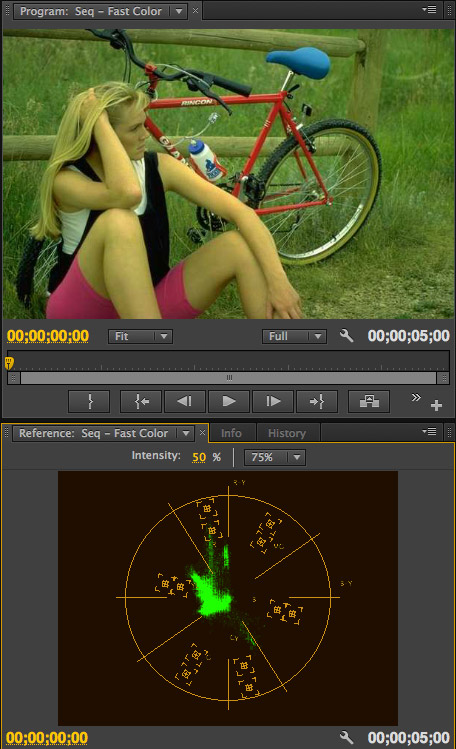
Here’s the problem: a very green clip. Not only does it look green to the eye, but the vectorscope also shows a strong shift (called a “color cast”) toward yellow/green.
NOTE: For a quick tutorial on how to read video scopes, read this. Video scopes are interpreted the same between different applications. Once you learn how to read them, you can use that knowledge in any program.
GET SET
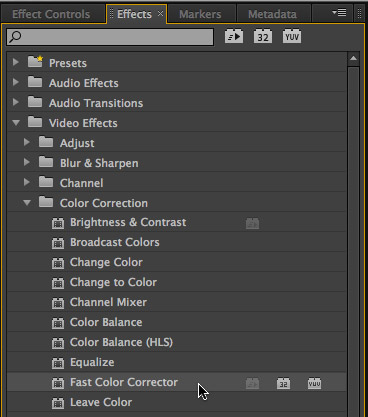
Go to the Effects panel, twirl down Video Effects, twirl down Color Correction and either double-click Fast Color Corrector to apply it to all selected clips in the Timeline, or drag it on top of a clip that needs correction.
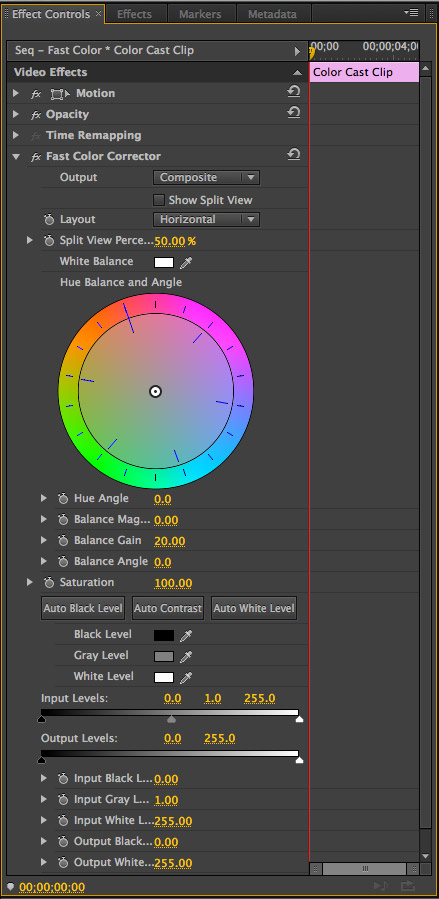
With the clip still selected, click the Effect Controls tab to display the Fast Color Corrector controls…. Yes, this looks scary, but, to get started, there are only a very few settings you need to adjust.
GO
Using this filter is simple: find something in the frame that’s supposed to be gray and click it.
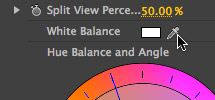
Just above the color wheel in this filter is the White Balance eyedropper. Click the eye-dropper to select it.
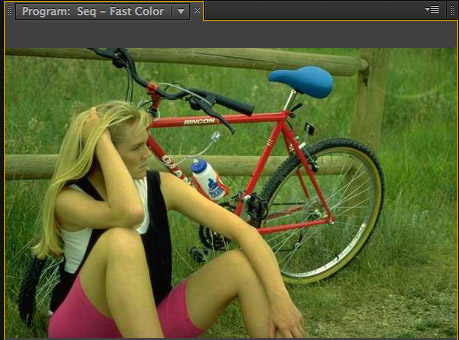
Then, in the Program monitor, find something in the frame that’s supposed to be gray. This is the point where semantics start to get in the way, because “gray” is both a measure of brightness and a color.
In the sense of color correction, white is a gray, black is a gray, and gray is a gray, because all three contain equal amounts of red, green, and blue.
So, in this image, the girl’s white (the color) T-shirt should also be gray (contain equal amounts of red, green, and blue.). But, in this case, it isn’t, it has a yellow/green color cast.
NOTE: Her black vest is also gray (the color), but when it comes to color correction, we have the greatest latitude when we correct mid-tone (50%) gray values, rather than shades very close to white, or very close to black. And, never try to color correct over-exposed sections of the frame or speculars – these are very unreliable for use in color correction.
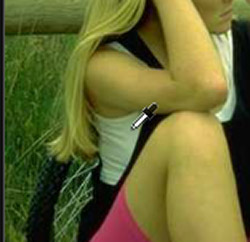
To correct this clip take the eyedropper, which you just selected, and click it on something that should be gray, but isn’t. In this example, I’m clicking on the side of her T-shirt. Ideally, you want something which is not too light nor too dark.
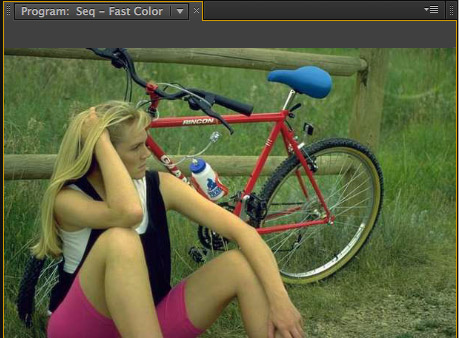
Instantly, the picture looks better.
You can repeat this process by clicking on different “should-be-gray’ elements in the frame, though after two or three more clicks, you won’t see any additional improvement.
MAKING MORE ADJUSTMENTS
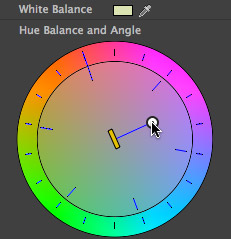
If you want to make additional color corrections, grab the white dot in the middle of the color wheel and drag it in the direction you want the colors to move.
If necessary, click one or two other parts of her clothing to improve the correction.
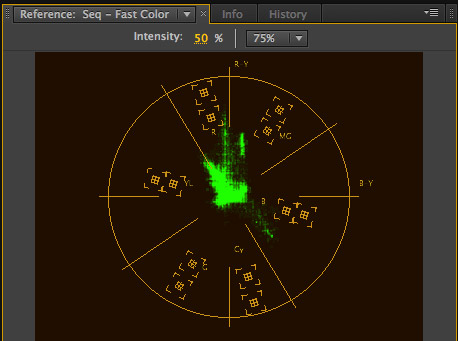
You can see the results on the Vectorscope with her skin color sitting very nicely on the skin-tone line. (The “skin-tone line” is the yellow line going up left at about 1030 on a clock.
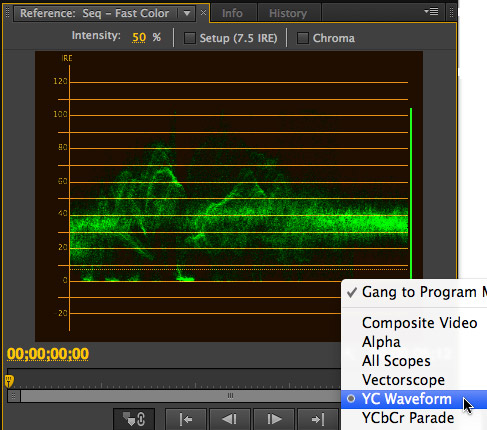
If you need to adjust the black or white levels, switch your scope to display the YC Waveform monitor (click the Wrench icon) and be sure to uncheck Setup (7.5 IRE) and Chroma.

Then, adjust the Input Levels settings for black, mid-tone gray, and white. If you are not sure how to adjust them, read this article. (Again, it uses Final Cut as the example, but the same principles apply.)
SUMMARY
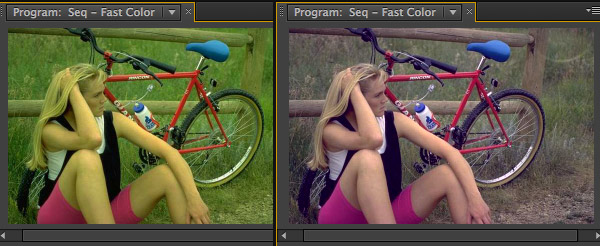
Here is a before and after of our image.
While there is more color correction power in other filters and applications, the Fast Color Corrector filter provides speed and simplicity – provided you have something gray in your scene. If you don’t, its time to turn your attention to the Three-way Color Corrector filter, which we will cover in a future tutorial.
For now, its nice to know that even when budgets and time are ridiculously short, you can still make your images look better.
Want to see this filter in action? Check out this webinar.
2,000 Video Training Titles
Edit smarter with Larry Jordan. Available in our store.
Access over 2,000 on-demand video editing courses. Become a member of our Video Training Library today!
Subscribe to Larry's FREE weekly newsletter and
save 10%
on your first purchase.
20 Responses to Premiere Pro CS6: Fast Color Correction
Newer Comments →-
 sampark says:
February 19, 2014 at 7:59 pm
-
 Larry Jordan says:
February 19, 2014 at 10:12 pm
-
 Yani says:
October 11, 2018 at 10:01 am
-
 akash sadhu says:
March 27, 2020 at 5:48 am
-
 Umar Rasheed says:
April 22, 2020 at 5:11 am
-
 Larry says:
April 22, 2020 at 6:12 am
-
 Shah G Poetry says:
April 23, 2020 at 2:03 am
-
 Sohel says:
April 28, 2020 at 6:56 am
-
 mua xe tot says:
June 1, 2020 at 8:26 pm
-
 Oluwatuyi Olawale says:
July 22, 2020 at 2:35 am
-
 Maruf says:
September 5, 2020 at 8:06 pm
-
 Larry says:
September 6, 2020 at 9:05 am
-
 jon says:
September 19, 2020 at 4:40 am
Newer Comments →Hi Larry,
I have recently lost access to fcpx at my facility and have started using adobe premiere pro instead. When I used fcpx, I used a simple procedure for correction + grading. This started by adjusting the saturation of highlights, midtones and shadows, then adjusting exposure for the same. Finally, I would change the colors in each by using the pallette in the color balance tool. I find that I can never get the color I want (e.g yellow) using the overly complicated color wheel in adobe premiere. Is there a pallette like feature similar to the one in fcpz, that is rich in allt he colors where I can just go click the color I want?. I do not have the patience nor the skill to try and make every color by mixing red green and blue and need the simpler format for color grading afforded by fcpx. I am going through an extremely frustrating time right now as neither do I have access to fcpx, nor do I know how to get what I want from premier. It is like heaven and earth are conspiring to make sure I never get to color correct my project! I am very depressed. please help me get out of this mess. when you do, I hope another million updates are not added to premier pro so that I will have to start from scratch again despite your lessons and advice. I am sorry to say this, but media software, is horribly un intuitive and takes months to learn, no matter who manufactures it. Each company has a zillion file formats, all of which boils down to some evil men who just want to make more money and will stall file format / feature unity just to add another billion to their bank accounts (on which ofcourse, they will refuse to pay tax!). This sucks! I wish you could help me, but I am not sure if you can do anything! Please help!!
SamPark:
Well, I don’t have good news here. The only implementation of the color palette in FCP X, is FCP X. Everyone else uses a color wheel. (Personally, it prefer the wheel, but a lot of that depends upon where you first learned color grading.)
Yes, it is frustrating to learn something new, but, at the moment, I don’t have an alternative.
Larry
Thank you!
That was very helpful. 🙂
THNX FOR SHARING SUCH HELPFUL INFO,
I have recently lost access to fcpx at my facility and have started using adobe premiere pro instead.
When I used fcpx, I used a simple procedure for correction + grading. This started by adjusting the saturation of highlights, midtones and shadows, then adjusting exposure for the same. Finally, I would change the colors in each by using the palette in the color balance tool.
I find that I can never get the color I want (e.g yellow) using the overly complicated color wheel in adobe premiere. Is there a pallette like feature similar to the one in fcpx, that is rich in allt he colors where I can just go click the color I want?. I do not have the patience nor the skill to try and make every color by mixing red green and blue and need the simpler format for color grading afforded by fcpx. I am going through an extremely frustrating time right now as neither do I have access to fcpx, nor do I know how to get what I want from premier.
It is like heaven and earth are conspiring to make sure I never get to color correct my project! I am very depressed. please help me get out of this mess. when you do, I hope another million updates are not added to premier pro so that I will have to start from scratch again despite your lessons and advice. I am sorry to say this, but media software, is horribly unintuitive and takes months to learn, no matter who manufactures it. Each company has a zillion file formats, all of which boils down to some evil men who just want to make more money and will stall file format / feature unity just to add another billion to their bank accounts (on which of course, they will refuse to pay tax!).
This sucks! I wish you could help me, but I am not sure if you can do anything! Please help!!
Umar:
I’m very sorry for your frustration! Sadly, Premiere does not have a feature like the Color Board in FCP X.
Larry
It is very helpful.
Such a Helpful tutorial on color correction, amazing way of describing the entire process, very helpful article.
post it on SpeedGrade or DaVinci and make it look brilliant. But, hey, remember that budget issue?
Wonderful content, it’s really helpful.
https://photoshopcafe.com/use-photoshop-LUTs-to-color-grade-a-video-in-premiere-pro/?unapproved=169023&moderation-hash=070658d489fb1c2d7e76790a2de869ee#comment-169023
Maruf:
Good point. Here’s a video I did on the same subject: Creating LUTs in Photoshop for Premiere:
https://larryjordan.com/articles/create-custom-luts-for-adobe-premiere-pro-using-adobe-photoshop/
Larry
thanks for information