
![]() [ Updated Sept.22, 2020, with additional information from Adobe. ]
[ Updated Sept.22, 2020, with additional information from Adobe. ]
With the Sept. 2020 update, Premiere Pro can now handle some HDR material natively. While this update is a big improvement over how Premiere handled HDR media before, the entire workflow remains a work-in-progress. Expect continual updates over the next several versions of Premiere.
With this version, Adobe made working with HDR media easier, but it still a long way from easy.
NOTE: Adobe has published two User Guides. This one is the most useful, but doesn’t appear on line. This second User Guide is online, but has less information. I pulled multiple excerpts both of these to supplement this tutorial.
OVERVIEW
“With the September 2020 release of Premiere Pro version 14.4, you can work natively in Rec. 2100 HLG thanks to a new sequence working color space option. Apple ProRes and Sony XAVC Intra are both fully color managed and GPU accelerated throughout the HDR pipeline. With the new native HDR workflow you can import, edit, color grade, and export HLG content in Premiere Pro. The first implementation of this workflow addresses the needs of professional broadcasters and in upcoming releases, we plan to add support for other HDR working spaces, such as Rec. 2100 PQ (ST2084), and additional format support, like H.264, and HEVC.
“Historically, Premiere Pro used the Rec. 709 color space, but by processing color in 32-bit floating point, Premiere Pro was able to preserves data outside of the Rec. 709 range and gamut. HDR workflows were possible with this approach but it had drawbacks. With the new HDR workflow, Premiere Pro can process Rec. 2100 HLG content in its native color space. This opens opportunities for post-production, including interoperability with After Effects and better performance.” (Adobe HDR User Guide)
HOW IT WORKS
With this release, you’ll get the best results and smoothest workflow shooting and editing Rec. 2100 HLG media. Currently, two video formats that are fully color managed and supported:
LUTs can also be applied and used. In addition to creating a specific look, LUTs can be used to:
Unlike PQ, the HLG format limits white levels to 100%. (This makes it attractive for broadcasters due to compatibility with existing SDR workflows.) This means that we need to set an “HDR Graphics white point” providing a target luma level for 100% white (excluding speculars). While there are three different settings we can use, the default option is 75%. (For a variety of technical and aesthetic reasons, it is unwise to set this to 100% – the white levels in HDR become far too bright.)
UPDATE: Adobe tells me support for HDR PQ is “coming soon.”
PUT THIS INTO PRACTICE
I created a new project, then imported some ProRes 422 HQ HDR footage.
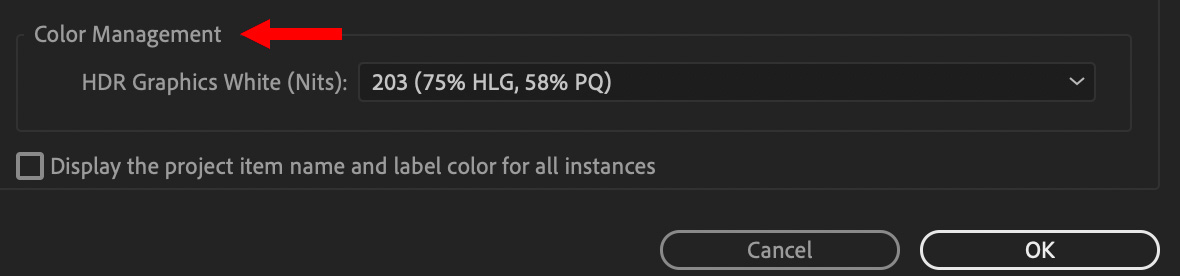
In File > Project Settings > General, set Color Management to 203, which sets the HDR Graphics White to 75%.
In Premiere Pro, HDR Graphics White determines the white point for color space conversions such as SDR to HDR or HDR to SDR. For example, with HDR Graphics White set to 203 (75% of the HLG scale), 100 IRE in Rec709 would get mapped to 75 IRE in the HLG scale.
The first number in the HDR Graphics White setting refers to nits (100, 203, 300) and assumes a peak nit level of 1000 for HLG. HLG as a standard does not follow an absolute nit level and will look brighter or dimmer depending on the capabilities of the actual playback device.
UPDATE: In general, use 203, unless you are specifically told to use a different value.
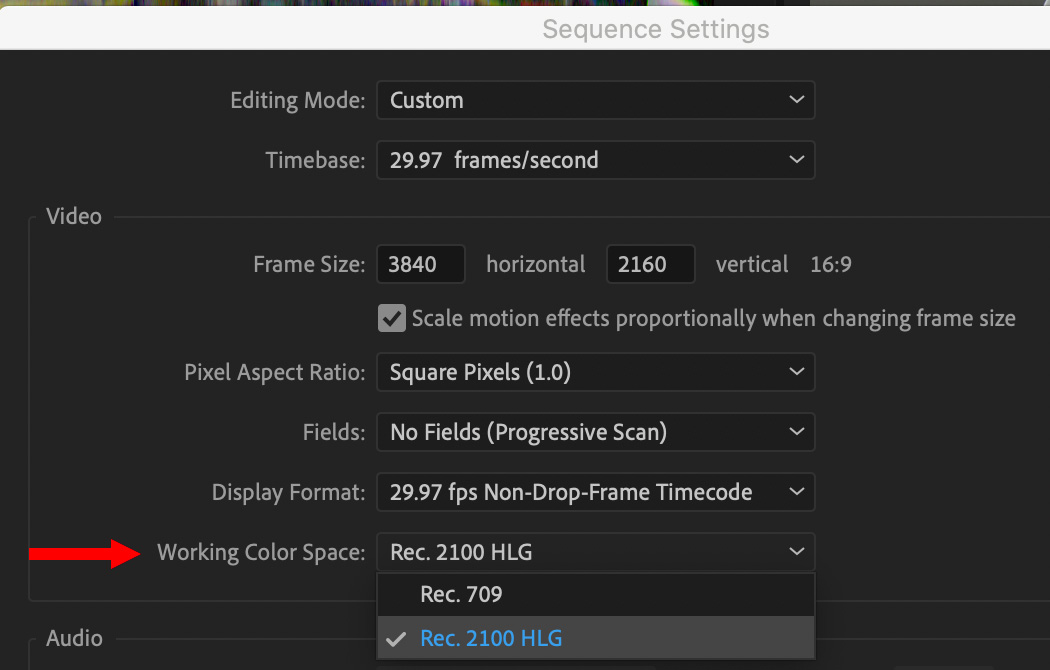
Next, with the sequence selected, choose Sequence > Sequence Settings and set the Working Color Space to Rec. 2100 HLG.
UPDATE: If you create a sequence by dragging an HDR clip onto the New Item icon, these settings will be properly adjusted automatically.
When you choose the Rec. 2100 HLG color space, all color values processed within the timeline will now happen natively using Rec. 2020 color primaries with the Hybrid Log Gamma transfer function. If an HLG file is placed on an HLG timeline, no conversion is required, and the values pass through, which provides a performance benefit. Rec. 709 files placed on the timeline will be converted to HLG using a colorimetric conversion method, using the HDR Graphics White point for range scaling. By default, 100% of the Rec. 709 signal will map to 75% of the HLG signal.
MONITORING & VIDEO SCOPES
Currently, Premiere does NOT support displaying HDR media to a computer display. (I know you WANT to, but you can’t.) You must use an external video HDR monitor.
I should note that Final Cut Pro X doesn’t support monitoring HDR media on computer monitors either.
NOTE: Both AJA and Blackmagic Design provide video interfaces. Currently, the Apple Pro XDR monitor is not supported. You will need to enable Preferences > Playback > Mercury Transmit to send video to the monitor.
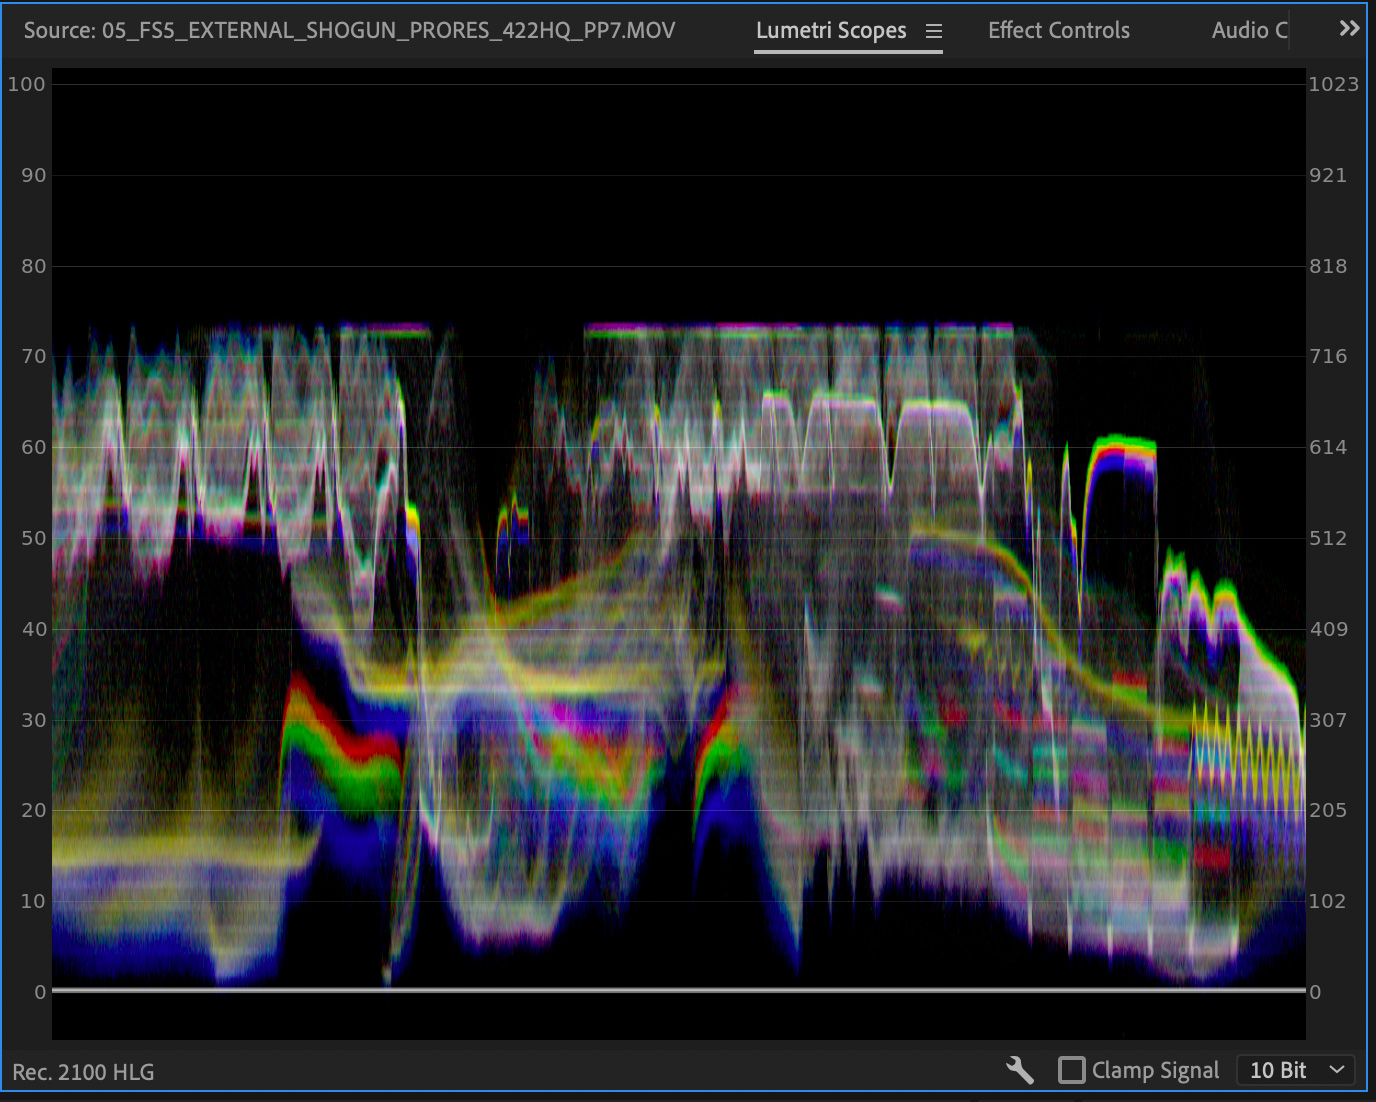
UPDATE: The scopes will automatically configure themselves for the media displayed in the sequence. HLG video maxes out at 100 IRE on the video scopes.
All the standard color grading tools work as you’d expect.
UPDATE: Clamping the scopes removes all display of either super-white or super-black values. This affects the scope only, not the timeline. My suggestion is to turn clamping on for creative work, and off to check video levels technically.
UPDATE: DISPLAY COLOR MANAGEMENT
Turn on Preferences > General > Display Color Management when creating graphics. This allows you to see when they start to exceed 75% in value, which will cause a color shift.
Turn off Display Color Management for normal editing.
EFFECTS
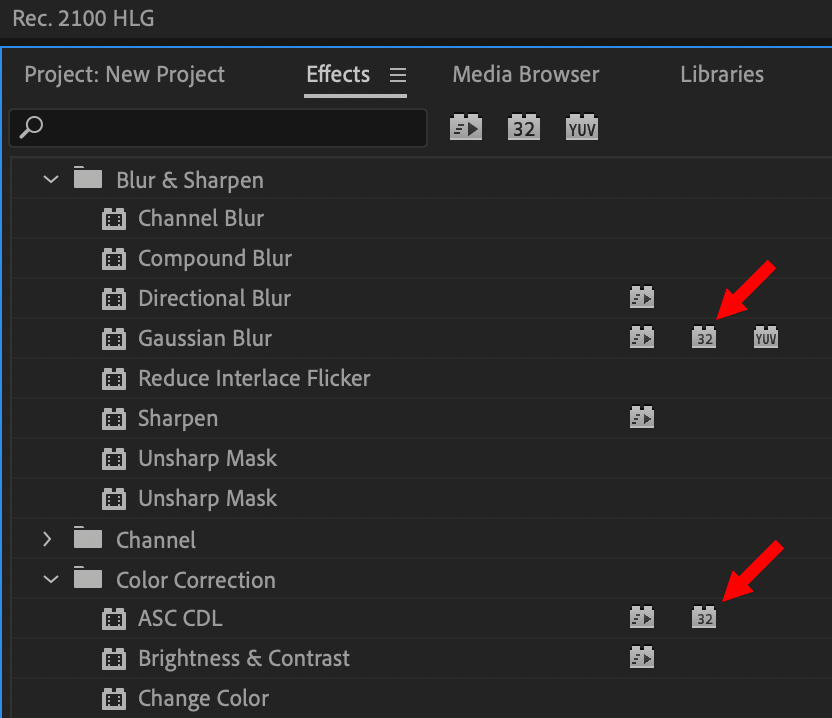
All effects capable of processing in 32-bit color are compatible with HDR. However, only a few effects are 32-bit capable.
To determine which effects you can use, look to the right of the effect name. If the 32-bit flag is displayed, red arrows in the screen shot above, that’s an HDR-compatible effect.
Technical and creative LUTs may also be used in HDR production, however, for best results make sure the LUT is designed for HDR material. Rec. 709 LUTs can be used, but may deliver results different from what you expect.
EXPORT
Premiere supports two fully color-managed codecs for HDR output:
To export a file, select the sequence, then choose File > Export > Media. (Shortcut: Cmd+M)
UPDATE: In the Format menu, select either QuickTime or MXF OP1a. For QuickTime, my recommendation is to use either ProRes 422 HQ or ProRes 4444. For MXF, select ONLY XAVC-Intra – either Class 100 or 300. Long-GOP is NOT supported. Pick the appropriate frame rate from the different options.
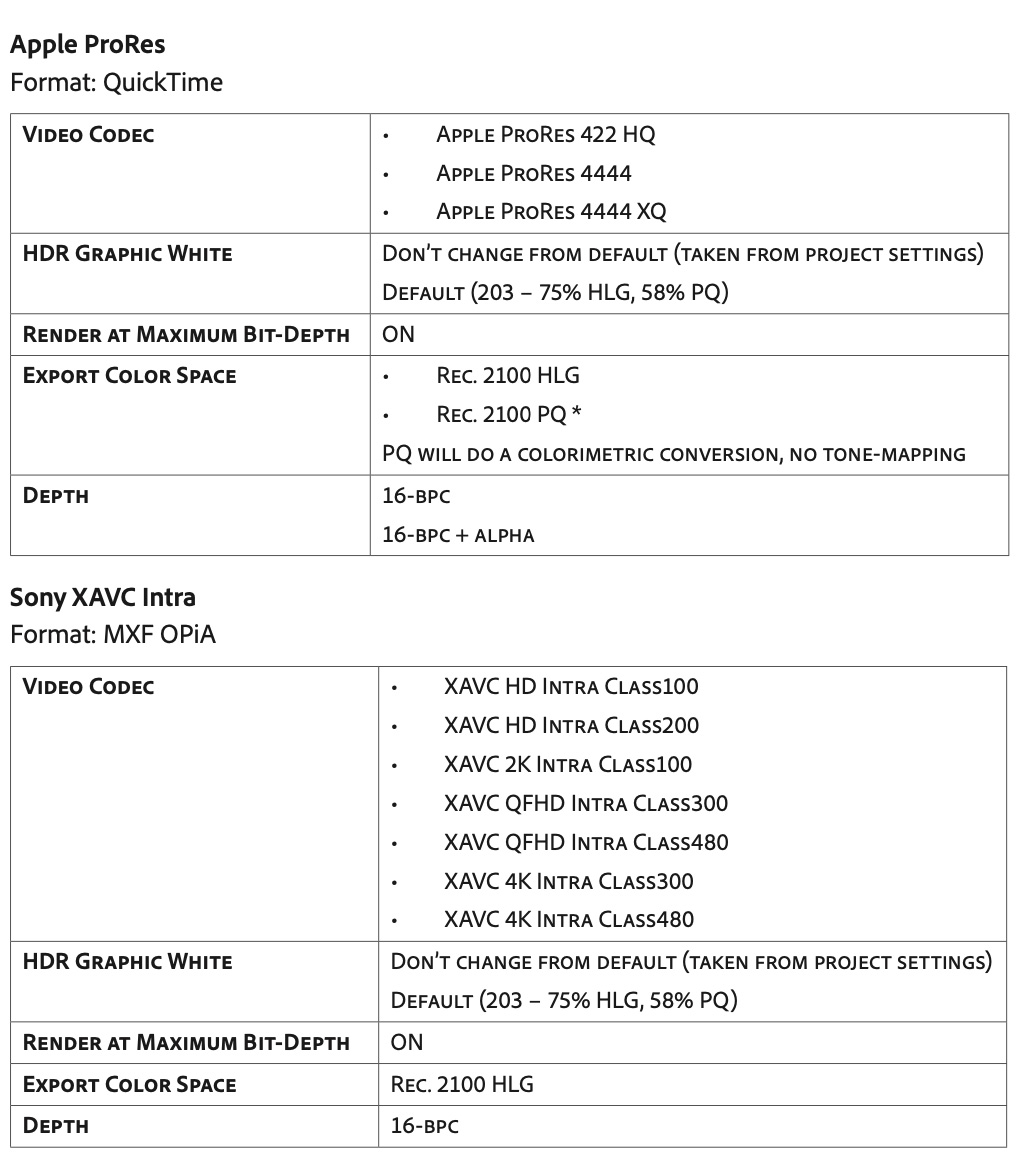
This screen shot is from Adobe’s HDR User Guide (linked at the top of this article) highlighting the appropriate settings for HDR export for both QuickTime and MXF media.
SUMMARY
Adobe continues to upgrade Premiere to support HDR. (Rec. 709 was deeply hard-coded throughout the app, so this conversion process will take several versions to complete.) However, working with HDR is not painless. Not all HDR formats are supported and there are many settings that need to be properly configured. And the problem of monitoring HDR media is still a work in process.
If HDR is part of your plan, this latest version of Premiere moves it from the realm of “nearly impossible” to “doable.” However, take time to read Adobe’s HDR Workflow (here’s the link) before tackling an HDR project. And, as with all new things, test your entire workflow before starting an HDR project.
Practice, and properly configuring your settings, will significantly decrease your stress.

2,000 Video Training Titles
Edit smarter with Larry Jordan. Available in our store.
Access over 2,000 on-demand video editing courses. Become a member of our Video Training Library today!
Subscribe to Larry's FREE weekly newsletter and
save 10%
on your first purchase.
13 Responses to New HDR Workflow in Adobe Premiere Pro
i’m shooting on a S1H/Ninja V in HLG 10 bit prores 422 and on the older version of Premiere i could just import the footage and then check the box that said HDR and I was good to export footage as rec709 now it the output looks burnt and over exposed what setting do i need to set to shoot HLG buit export rec709 – thanks – I’ve up graded to 14.3-14.4 and have gone back to 14.1
Tim:
Adobe changed HDR handling with the 14.5 update that occurred last week. Premiere now supports both PQ and HLG media. Because of this, I’m not sure any of the older settings work the way we expect.
I haven’t had time to test this – perhaps another reader can suggest an option – or it may be time to contact Adobe Support.
Larry
I miss that HDR button as well. I noticed, that if I selected HDR with the button in Lumetri Color settings inside the Effects panel, I would get much more information showing up in the picture. Even in footage that was not even raw footage, but just plain 8-bit 4:2:0 or 10-bit 4:2:2.
Morten:
Thanks for letting us know. I’ll have to look at that more closely.
Larry
Hi Larry! very nice description! You mentioned some HDR gamut conversion LUTs, are those available anywhere?
I’ve tried out the current premiere version in HDR and got a few weird behavior:
– Using footages from Canon R5, there is no log to PQ LUT available. but it works kind of find to use a canon-to rec2020 and then rec2020 – pq LUT which I could create in lightspace/colourspace. looks ok.
– Export to any H265 HEVC based files are ok, with or wthout HDR metadata. Using H264 for export in HDR, could not find a single player who could playback this footages. Is this expected??
– And now the disappointing part. I imported some still photos in JPG (sRGB 8bit) and PSD (48bit) into the timeline. Having those in the premiere sequence (HDR PQ), I expected that they use the full bit depth and both will end up with different effects in HDR after applying the PQ LUTs. But any PQ LUT i’ve created did not work at all with the stills!! They are always much too bright and flat. Using no conversion LUT, also does not lead to the right colors. Thus, is this normal behavior? Do you have any idea how to handle imported photo stills in JPG or PSD in the HDR workflow to get the right colors? Which conversion LUT would be needed and work?
Very best and many thanks for all your nice resources! Franz
Franz:
Thanks for writing and sharing your comments.
I don’t have an answer for your color questions. Perhaps another reader – or Adobe support – can help.
Larry
Many thanks anyway! I see another phenomenon I don’t understand: when trying to change clips inside of premiere (change clip, interpret footage), with all imported mp4 4k clips the new color management settings, where you can already define a lut in the clip properties, are always disabled grayed out. None of them is already used in timelines. Thus, is there any general rule in premiere which prevents to use these color management properties in those clips? with the still photos, the color management is active and can be used… many thanks again!!
Franz:
My first suspicion is that you are working with MP4 media – which may be limited to 8-bits. But that’s a guess, I’m not really sure. Try contacting Adobe support and see what they can tell you.
Larry
Hello Larry and first let me thank you for all the great tutorials and videos. I have a question relating to FCPX if I may. Putting aside the fact that most people do not have HDR screens, in theory at least, would it be best to import a Sony S-Log footage into a HDR timeline (rec. 2020) rather than a SDR one (rec. 709)?
Thanks and keep up the amazing work.
Ghyslain:
Smile… well, it depends. If you plan to release your project to commercial services – Netflix, Digital Cinema, Amazon, perhaps Broadcast – creating an HDR master is a good idea. As well, if your project has a projected long life ahead, creating an HDR Master will preserve your options. However, while the EDIT is the same between HDR and SDR, the color grade is not. You will need to do two color grades, one for HDR and a second for SDR. And, once you see your project in HDR, your SDR version will never look as good.
That being said, if you are shooting Log footage to give you the most options in the color grade and you don’t expect to release an HDR Master, then bring your HDR media directly into an SDR project. This provides maximum flexibility during the color grade. The only downside is the source files are really big, which requires fast and deep storage.
For most of my projects, as I don’t deliver media to Netflix et al, I’d go with option 2.
Larry
Hi Larry
So having created by HLG timeline, ready to export, I’ve found that it seems like I’m unable to adjust the target bit-rate. A 3m30s clip exports to something like 17GB when using the settings that appear to be default (using Prores 422 HQ codec). I can’t seem to find anywhere to give Premiere a target bit-rate, as my final exports are intended for Youtube 4k HDR content.
Any ideas? Thanks.
Mike:
ProRes data rates are not adjustable.
For YouTube, you could create a 10-bit HEVC file using Premiere. (HDR requires 10-bit files.)
Larry
When I drag my HDR content onto the new icon like you mention:
UPDATE: If you create a sequence by dragging an HDR clip onto the New Item icon, these settings will be properly adjusted automatically.
and look at the sequence settings it still has the colorspace set to 709.