
[ This article was first published in the July, 2011, issue of
Larry’s Final Cut Pro Newsletter. Click here to subscribe. ]
Fiver Löcker asks:
How do I work with proxy media?
Larry replies: This is tricky, because the Help files don’t detail this process. But it is actually very simple.
Proxies are transcoded (converted) copies of your master files. They use ProRes 422 Proxy and are at 1/4 the size of the original. For instance, here the original ProRes 422 file for this Youth Culture clip is 238.3 MB in size.
When it gets transcoded to a Proxy, the size plummets to 19 MB. The quality is not as good, but this can save a lot of space while you are doing the rough cut.

Here’s the overview of working with proxies:
Here are the details.
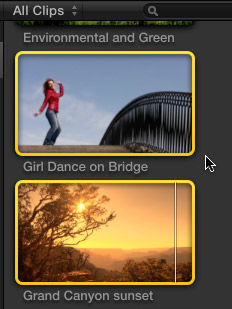
1. Assuming you did not create Proxy media when you first imported your clips, select the clip(s) for which you want to create proxies.
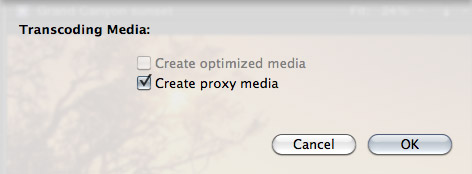
2. Select File > Transcode media. Then, in the resulting dialog window, check Proxy media.
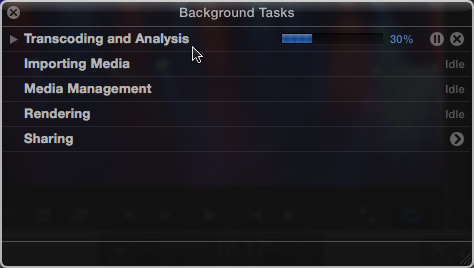
3. Depending upon the number and length of the media you selected, this can take some time, use the Background Task window (Cmd+9) to monitor progress.
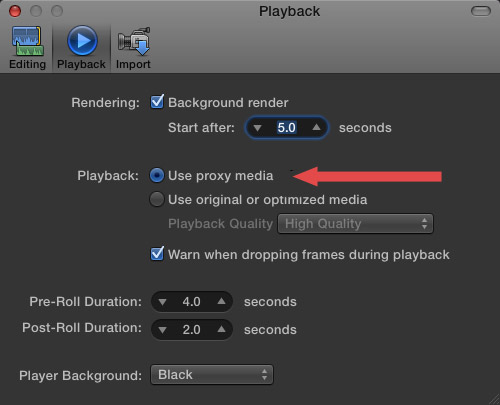
4. Once proxies are created, go to Final Cut Pro > Preferences > Playback (Cmd+,) and change the playback option to “Use Proxy Media.”
All media that has proxies, will automatically switch and be displayed (top image). Any media that doesn’t have proxies will display the missing media icon (bottom image).
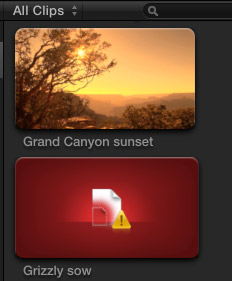
5. To switch back to high-quality images, return to Preferences and change the playback setting to “Use original or optimized media.”
Proxy files are stored in their own folder inside Final Cut Events > [ Event name ] > Transcoded Media > Proxy Media.

2,000 Video Training Titles
Edit smarter with Larry Jordan. Available in our store.
Access over 2,000 on-demand video editing courses. Become a member of our Video Training Library today!
Subscribe to Larry's FREE weekly newsletter and
save 10%
on your first purchase.

91 Responses to FCP X: Working With Proxy Media
← Older Comments Newer Comments →-
 Bronwen says:
July 20, 2016 at 8:35 am
-
 Larry says:
July 20, 2016 at 9:23 am
-
 Bronwen says:
July 23, 2016 at 8:19 am
-
 Noel Evans says:
February 20, 2017 at 11:28 pm
-
 Larry says:
February 21, 2017 at 5:35 am
-
 Sandra T says:
January 2, 2018 at 11:42 pm
-
 Larry says:
January 3, 2018 at 10:45 am
-
 Jude says:
September 29, 2021 at 8:19 pm
-
 Larry says:
September 30, 2021 at 7:13 am
-
 Armando Ello says:
December 30, 2021 at 1:47 am
← Older Comments Newer Comments →Hi Larry. Thank you for the guide! I did steps 1-3, and all went well. but when I get to #4 (switching the viewer to “proxy” ) the clip in the timeline says “Missing Proxy”.
I even tried to click the clip in the timeline to “transcode”, but that option is greyed out.
I double checked the process you advised twice, repeating steps 1-3 to make 100% sure I had checked the create proxy box when initially uploading the file from my external hard drive where all my R3D files are…but, alas, same issue. When I switch the viewer to “proxy” to edit efficiently, the window says “missing proxy”.
Bronwen:
Hmm… I won’t have time to test this till tomorrow. If you are in a rush, I suggest contacting Apple Support, as proxies are designed specifically to work with multicam clips.
Larry
Hi Larry!
Thanks again of the step by step. I slowed myself down to critically look at each step you offered and realized my issue were a product of my being an impatient dufus. I had not waited for the proxy to generate upon initial import before I dragged the optimized clip into timeline. Once I slowed my butt down and waited for a proxy to generate all was well.
Just a heads up that since this original article was published to the process to switch between proxy and original media is no longer in playback preferences.
Above your viewer browser click VIEW > then under “MEDIA” select proxy or original media.
You can edit entirely in proxy then before export simply switch back to Original media and you’re set. Also do this before exporting xml if your going to be grading in resolve.
Cheers
Noel:
Thanks for the update. Apple moved the Proxy menu with the 10.2 update, if I remember correctly.
Larry
Hi Larry,
I am still using FCPX 10.0.9. I have managed to create proxy media for all my original files. But is there any way to locate my proxy media to an external drive?
I found it easy to do with my original files by putting the alias files back to Original Media under Final Cut Events folder. But it doesn’t work for my proxy files.
Hope you can help, thanks a lot!!
Sandra
Sandra:
Good question, but I don’t know the answer. FCP X 10.0.x is really limited when it comes to proxies. My suspicion is that they can’t be moved – BUT, look in the Library bundle to see if there is a folder for Proxy files – it won’t be the same folder as Original Media. If so, your technique of using aliases will work there, too.
Larry
How do you change the location of proxy files without disrupting the file path? I copied my entire project including fthe library to another drive optimized media and proxies went offline. Are they accessed through the root files of the original drive and how can I change the path?
Jude:
After you move the files, go to File > Relink Media > Proxy files.
Larry
Hi, right click and attempting to make proxy, The proxy window shows all boxes are grayed out.the originaliteit media is there as well.. an .mp4 fike working with latest version fcpx 10.6.1 on mac Monterey..what could be the problem?