
 There are three different types of video media used by Final Cut Pro X:
Camera native media can use a wide variety of codecs, though only one codec is allowed per media file. Codecs include:
And those are just some of the more popular varieties of the hundreds of codecs that are currently in the market. So, which media format should you use? And how can you tell which one FCP X is using? Answering that question is the purpose of this article.
SOME QUICK DEFINITIONS
Camera Native Files. The file format shot by your camera and captured to a card, hard disk or tape for editing. These files have four key parameters:
Of these four, the most important is the codec.
Codec. The mathematics used to convert light and sound into numbers the computer can store. Some codecs are optimized for small file sizes, others for image quality, still others for effects processing. Codecs are, generally, determined by the camera manufacturer and, essentially, determine file size, image quality, editing efficiency, color space and all the other elements that go into an image. It is impossible to overstate the importance of the video codec in video production and post.
NOTE: Codecs are also referred to as video formats, though that is a less precise term as “video formats” can also include elements outside the codec such as image size or frame rate.
Transcode. To convert media, either audio or video, from one format to another.
CHOOSE WHICH TO USE
While there are always exceptions to the rules, here’s what I’ve come up with:
While Final Cut does transcode all files in the background, which saves time, if all you are doing is cuts-only edits with a bit of B-roll, there’s no big advantage to optimizing, because FCP will render all camera native files as necessary during editing. While exports will take a bit longer than optimized media to allow time for rendering to occur for any files that need it, the time you lose in exporting will be saved in not waiting for optimizing to finish during importing. In other words, you only render the media you export, not all the media you import.
However, most camera native formats – specifically HDV, H.264, AVCHD, AVCCAM, and MPEG-4 – are very mathematically complex. As you start to add layers, effects, color adjustments, or fancy transitions, the amount of calculations your computer needs to process will slow things down. Optimizing converts your footage into something much easier to edit, with virtually no loss in visual quality.
Proxy files are extremely small and are a perfect fit for multicam editing, or working with large resolution files during the rough editing phase. Final Cut makes it easy to switch between proxy and camera source or optimized files for final polish and output. (As a sidelight, proxy files are 1/4 the resolution of the camera native file.)
NOTE: One other element to consider is your hardware. Proxy files will always be easier to edit than optimized files; this is especially true on older/slower systems. However, powerful machines like the new Mac Pro can handle multicam and high-res media without needing to create proxy files. Using a Mac Pro for these tasks can save both time and hard disk space.
TRANSCODING MEDIA
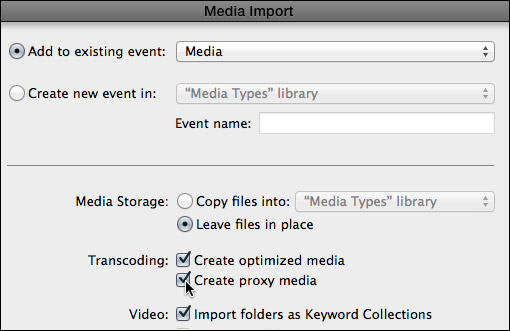
There are two places where you can transcode media:
NOTE: All transcoding happens in the background. When transcoding each file is complete, Final Cut automatically switches from camera native to optimized files.
The screen shot above illustrates your choices during import:
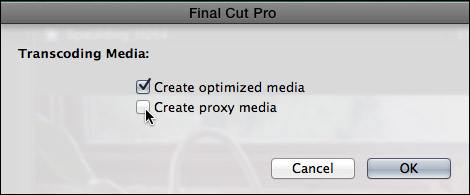
If you choose to import camera native files then convert some or all of your files after import, choose File > Transcode Media. The screen shot above illustrates your choices.
NOTE: If both camera native and optimized files exist for the same media, FCP X always uses optimized files in the project. When optimized files don’t exist, FCP X uses camera native files. Final Cut never uses proxy files unless you explicitly tell it to.
HOW TO TELL WHAT YOU ARE USING
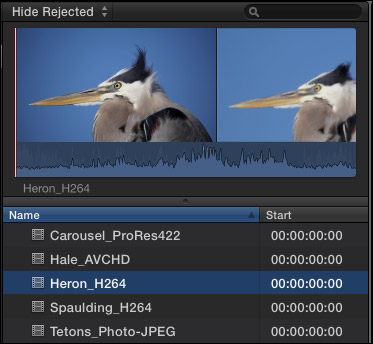
For this article, I’ve imported a variety of codecs into Final Cut Pro X (v.10.1):
For example, this shot of a Great Blue Heron is H.264. (Um, I know that because I put it into the file name.)
But… what if you don’t know what the codec is?
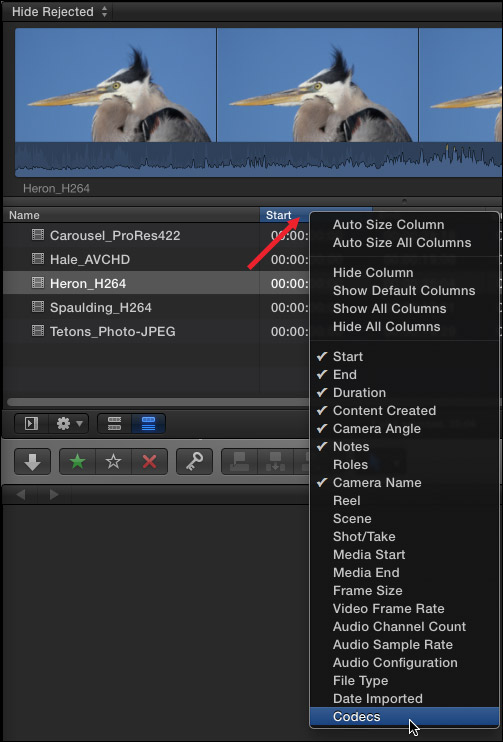
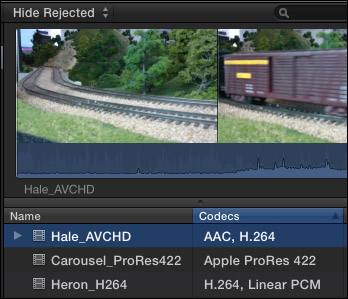
Right-click (or Control-click if you are using a trackpad) on a column header in the List View of the Browser, then check Codecs to display a new column showing the codec for each clip. (Remember each clip only uses one codec.)
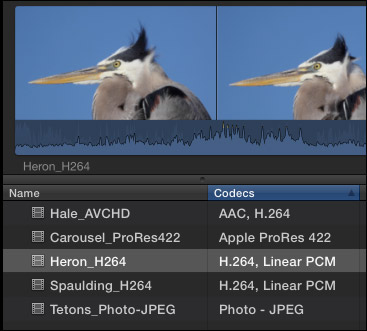
As you can see here, the file names accurately match the codecs. (I dragged the Codecs column header from the far right of the display to place it next to file names.)
NOTE: AAC is MPEG-4 compressed audio. Linear PCM is uncompressed audio; which generally means WAV format. The ProRes and Photo-JPEG clips are silent, which is why no audio file is listed.
The Inspector also provides a way to monitor codecs. Select a clip in the Browser and open the Inspector (Cmd+4)
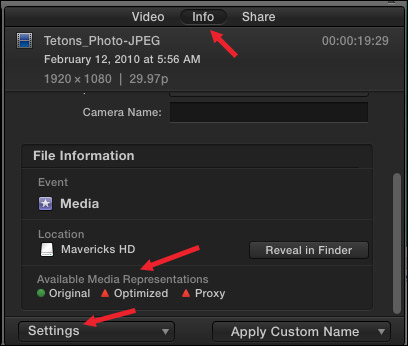
At the bottom of the Info tab are three icons that indicate whether camera native, optimized or proxy files are present for that clip. In this case, only the camera native files exist, indicated by the green light next to “Original.”
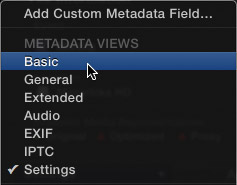
Click the Settings button below these icons and change the Info display to Basic.
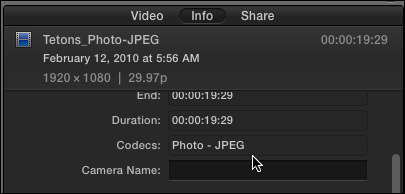
Near the top of the Info screen is listed the codec of the camera native clip. Here, for instance, the video codec is Photo-JPEG.
TRANSCODING MEDIA
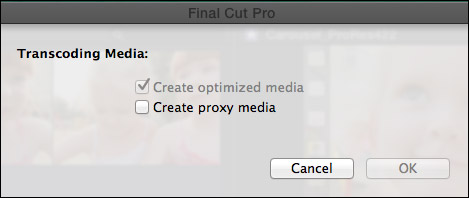
I generally transcode all media during import. It is fast, easy, and doesn’t get in the way of my editing. However, if you need to transcode files later, select the files you want to transcode in the Browser and choose File > Transcode Media. (Media can not be transcoded from the Timeline.)
In this screen shot, Optimized is grayed out because the clip I selected was already in ProRes format. Other formats that generally don’t need optimization include:
NOTE: Both AVCHD and H.264 can be played back in real-time, but on slower systems, or more complex edits, will benefit from being optimized.
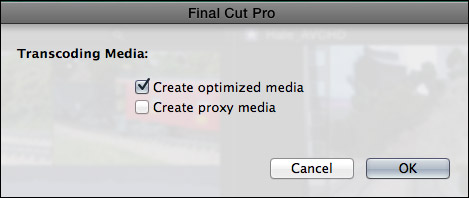
If both options are dark, it means that you have imported media that will benefit from optimization. (In general, you only need to create proxy files for multicam editing or media with resolutions above 1080p.)
The time transcoding takes is based upon the duration of your media, the speed of your processor and whether you are editing while the transcoding is going on.
For this example, I created both optimized and proxy files for all these clips.

You can monitor the status of transcoding, and other background tasks, by clicking the clock icon to the left of the timecode display. This opens the Background Tasks window (or type Cmd+9). Here, the clock indicates that transcoding is 100% complete.
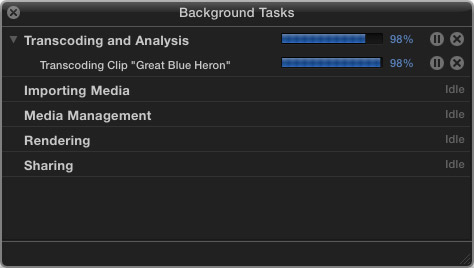
While this is what the Background Tasks window looks like when it is transcoding a media file.
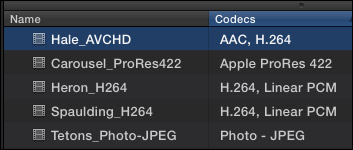
Notice that in the Codecs column of the Browser, the actual codec of the camera native file is still indicated; even though transcoded files exist.
NOTE: Optimized files are always ProRes 422, regardless of what choices you make for project render files.
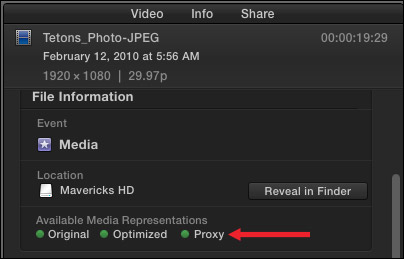
If we go to Inspector > Info > Basic settings, although the codec is listed as Photo-JPEG at the top, the green light icons at the bottom indicate that additional media files now exist.
HERE’S THE RULES
If Optimized files do not exist, FCP X uses camera native files in your project.
If Optimized files do exist, FCP X uses optimized files in your project and ignores the camera native source files.
Proxy files are always ignored, until you change a preference setting.
Apple is very clever in tracking media files. Replacing an old file with a new file of the same name in FCP 7, would cause FCP 7 to link to the new file as though it was the old file.
However, replacing an old file with a new file of the same name in FCP X, disconnects all transcoded media and FCP X treats the new file as a brand new file. This is because Apple tracks more than just the file name in its media management. (Apple calls this tracking the “metadata” of the media file.)
SWITCHING BETWEEN OPTIMIZED AND PROXY FILES
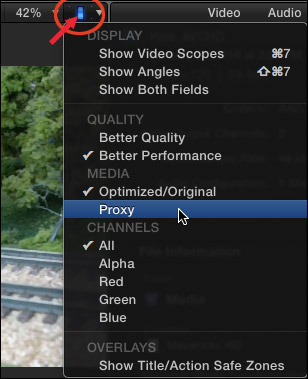
Switching between optimized and proxy files could not be easier. In FCP X (10.1) go to the switch in the upper right corner of the Viewer and choose between Optimized/Original or Proxy files.
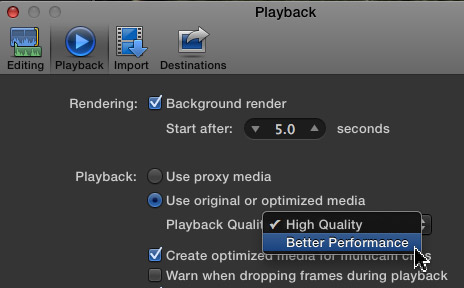
In earlier versions of FCP X, go to Preferences > Playback and click the appropriate radio button. (Apple moved both these preference settings to the Viewer switch in the 10.1 release.)
If proxy files exist, the images will instantly switch to proxies.
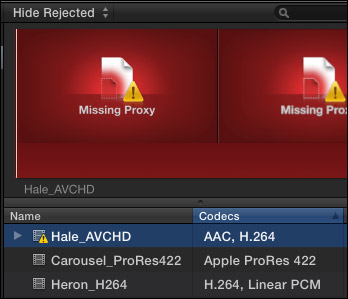
If proxy files do not exist, you get the dreaded “Missing Proxy” red screen.
Missing proxies can easily be fixed by selecting the media file in the Browser, choosing File > Transcode Media and checking the Proxy checkbox.
EXPORTING
When we export a master file, which is my general recommendation for all exports, the Settings tab gives us a number of options. (Here’s an article that talks about this more: Export a Master File.)
In general, you should set the render codec to the same setting as you plan to export. Then FCP can use the render files and just copy them when exporting. Otherwise, it will regenerate the render files from the source material during the export process, which will take longer. (Though on the new Mac Pro, this time difference may not be significant.) But if you know what your deliverable will be and you will always be creating a ProRes master, then rendering and exporting using the same ProRes setting is a best practice.
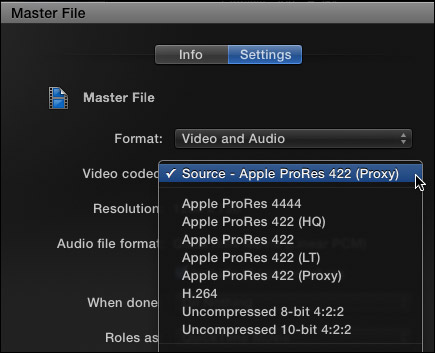
Selecting Source for output exports either proxy files, if the project is set to proxy files (as illustrated in the screen shot above)…
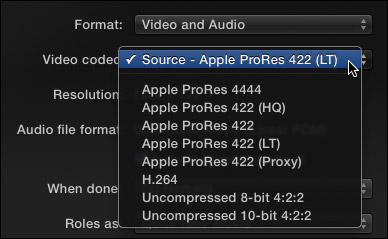
Or, if Optimized/Original is checked, selecting Source matches the render file settings in Project Properties (Cmd+J). In the screen shot above, I set render format to ProRes 422 LT, which becomes the output format.
Or, if you want to export a format other than the one you picked for Project Properties, you can choose between one of the five ProRes formats, as well as H.264 and two uncompressed formats.
I generally recommend against compressing H.264 using Final Cut, not because of any bugs, but because I like to create a master file first for archiving, then create compressed files from that master file. In other words, I create all my H.264 versions after the export is complete.
In general, while uncompressed files yield the highest possible quality, they also create the largest file sizes. As an example, I exported a 28-second 1080p 25 fps file.
THAT is quite a range in file sizes!

(Click here for a larger PNG version of this image.)
Could I see a quality difference between Proxy files and everything else? Yes, absolutely. Look at the hair, the artifacts in her skin, and the blockiness around the edges of her mouth.
However, could I see a difference between ProRes 4444 and Uncompressed 10-bit? Not for this 1080p image scaled to 1280 x 720, which is what I would post to the web.
Whether you need, or can even see, the additional image quality provided by these high-end formats is entirely up to you. If you are compressing files for the web, I would suggest you are wasting disk space; stay with ProRes 422. If you are creating files for digital projection to large screens, using high-end formats like ProRes 4444 or Uncompressed is critical, even though the file sizes are enormous.
NOTE: Final Cut does not export camera native media files.
UPDATE – EXPORTING CAMERA NATIVE FILES
After further exploring the Apple website, I learned the following:
However, these camera native exports are “wrapped” in QuickTime, so they are not “camera native,” but they are the same quality as the camera native formats.
There are also two export tools worth mentioning:
When you export using settings different from your render settings, Final Cut calculates the new files using the source media, not the existing render files.
Also, I would also not recommend using “Send to Compressor” unless you need to use a Compressor plug-in and even then I would save your project as a Master file and check the “When done” menu in the Share settings window to “Open with Compressor.” This exports the master file as quickly as possible, then opens it in Compressor where you have all the Compressor settings at your finger tips. If you need specific settings that are only in Compressor, then I would save that as a custom Compressor setting so that it shows up in Final Cut’s Share menu as a Destination.
SUMMARY
My strong recommendation is to set project render file settings to match the format you want to export as your final master file.
Final Cut does a great job of managing media. For most editing tasks, optimizing media is the best and fastest option. But, there are always situations that demand different solutions. And, now, you have a better idea what your options are.

2,000 Video Training Titles
Edit smarter with Larry Jordan. Available in our store.
Access over 2,000 on-demand video editing courses. Become a member of our Video Training Library today!
Subscribe to Larry's FREE weekly newsletter and
save 10%
on your first purchase.

151 Responses to FCP X: When to Use Optimized, Proxy, or Native Media
← Older Comments Newer Comments →-
 Dan Katz says:
October 17, 2014 at 11:35 pm
-
 LarryJ says:
October 19, 2014 at 9:33 am
-
 Noah says:
May 21, 2015 at 8:29 am
-
 Larry says:
May 21, 2015 at 8:37 am
-
 Keith B. says:
May 21, 2015 at 3:25 pm
-
 Larry says:
May 25, 2015 at 2:24 pm
-
 Noah says:
May 29, 2015 at 10:17 am
-
 Larry Jordan says:
May 29, 2015 at 10:28 am
-
 Frank says:
June 1, 2015 at 12:44 am
-
 Larry Jordan says:
June 1, 2015 at 12:45 pm
← Older Comments Newer Comments →Larry,
I read what Brad Stoddard wrote above on May 12th, and I *think* he’s talking about the same thing I’m about to ask, but to be sure, I’m asking in my own words:
I’m trying to keep a project Library small and tidy for easy transfer to another Mac with a cloned drive of footage. I’d like to move (or perhaps delete) the High Quality Media folder (containing over 40gb of data) outside the Library itself to reduce the file size.
1) Is that safe or does FCPX need that folder in *that* specific place?
2) If it IS in fact safe, and I do move it, will another FCPX seat on another machine be able to relink to it or will FCPX just automatically regenerate any files needed?
3) If I actually just DELETE it, is it also safe, in that FCPX will regenerate any necessary files?
Thanks for any clarity you can provide. And much appreciation for your ongoing contributions to this community.
-Dan
Dan:
“Is it safe?” Well, that depends.
Without knowing more, my guess is that your project is LINKING to the media in that folder, in which case, deleting that folder will delete media being used by your project. In technical terms, this would be bad.
If the reason you want to delete this media is to minimize the size of the files you are transferring, you don’t need to delete it. All you need to send between systems is the library, not the related media. If the drives are cloned, you don’t need to send media files.
If the reason you want to delete this folder is so that FCP X will edit the camera native media, then, yes, you can delete this folder as it only contains the optimized versions of your camera native master files.
However, if those camera native files can’t be played by FCP X unless they are optimized (some forms of AVCHD and MXF are examples of this), then deleting the files will break your project.
My feeling is that if your sole reason for deleting these files is to minimize data transfer, this is a none issue. Just send the library files, not the media.
Larry
I have a project that relies on 3TB’s of AVCHD cards I copied with complete file structure to 2 hard drives. If I’m editing with a RAID, I’m thinking of putting all the cards on 1 4 TB hard drive, exporting everything as proxy files, and then optimizing media at the end so that this way I’m not optimizing tons of footage I won’t use. Does that seem right?
(One caveat is much of the footage is 60i footage I’ll be converting to 24p. I think I’ll probably let FCP convert as opposed to using Twixtor or MPEG Streamclip but I wonder if that should affect my work flow idea.)
Noah:
This will probably be OK. Keep in mind that you can’t optimize footage on the Timeline, you can only optimize clips in the Browser. So you’ll need to make sure that all Timeline clips are selected in the Browser and optimized.
Larry
Hi Larry,
I’m working on a project that will consist of hundreds of final videos so I’m importing a huge amount of video files up words of 1000. (one half from a DSLR, the other half from an ENG camera) to save space I’m editing natively. Most, if not all, of the final videos will include multicam clips. In the past I’ve had enough power to edit optimized multicam without dropping frames but now I seem to be dropping frames. I assume an aging iMac and multiple FCPX updates with updating RAM are to blame.
In preferences, if I uncheck “Create optimized media for multicam clips” the problem appears to go away. After editing and sweetening these un-optimized multicam clips in my timeline will I lose quality on final output? Final output specs: 720HD and 1080HD for Video Sharing
Thanks!
Keith in NYC
Keith:
I would not expect you to lose quality, what you will lose is, perhaps, some subtlety in color correction.
Larry
Larry,
In reading over stuff…..can I only optimize footage at the end if I already have it exported as optimized? My original plan was to export only as proxy to save space. But if I would need to find all the used clips, export them again as optimized, and then change their settings, I wonder if I’m better off just biting the bullet, getting another hard drive in the beginning, exporting everything as optimized, and saving myself the hassle at the end. I’m editing with 16 GB of ram and a 2.6 GHz Intel Core i7 so I feel like it’ll deal well with the Pro Res. I thought it was simpler to convert to optimized – that you could just switch it and FCP X will automatically import that footage as optimized – but I know realize (thanks to your blog) that doesnt seem to be the case. Think I should just optimize from the get go?
Thanks (your work is invaluable for someone like me),
Noah
Noah:
You can optimize at any time. However, you can only optimize clips in the Browser, not edited clips in the Timeline. So, you would need to:
* Put the playhead in each Timeline clip
* Do a reverse match frame (Shift+F) to reveal the source clip in the Browser
* Optimize that clip
Remember optimization can run in the background, so this will take less time than you initially suspect.
However, hard drives are cheap and at the end of the project time is precious. I would invest in more storage and optimize from the beginning.
Larry
Hi Larry,
Currently I am working on a project where the source comes from a DSLR camera (h.264). I imported the material including the option to create optimized media. When then I check the information of any of the clips in the inspector, the information for the codec remains h.264.
You mentioned that before, but for me that seems pretty annoying. If FCPX refers automatically to the optimized clip, why can’t we see the appropriate information?
Besides, when I right-click any of the clips in the browser and then go to > show clip in finder, it always refers to the clips in the folder with the original files, and not to the folder with the optimized files.
Does FCPX really connects me automatically to the optimized media, even though all sighns speaks against it? Or is anything wrong on my system?
Thanks in advance, Frank
Frank:
If Optimized media exists, FCP X links to it. This article will help:
https://larryjordan.com/articles/fcp-x-know-what-youre-editing/
Larry