 There are three different types of video media used by Final Cut Pro X:
Camera native media can use a wide variety of codecs, though only one codec is allowed per media file. Codecs include:
And those are just some of the more popular varieties of the hundreds of codecs that are currently in the market. So, which media format should you use? And how can you tell which one FCP X is using? Answering that question is the purpose of this article.
SOME QUICK DEFINITIONS
Camera Native Files. The file format shot by your camera and captured to a card, hard disk or tape for editing. These files have four key parameters:
Of these four, the most important is the codec.
Codec. The mathematics used to convert light and sound into numbers the computer can store. Some codecs are optimized for small file sizes, others for image quality, still others for effects processing. Codecs are, generally, determined by the camera manufacturer and, essentially, determine file size, image quality, editing efficiency, color space and all the other elements that go into an image. It is impossible to overstate the importance of the video codec in video production and post.
NOTE: Codecs are also referred to as video formats, though that is a less precise term as “video formats” can also include elements outside the codec such as image size or frame rate.
Transcode. To convert media, either audio or video, from one format to another.
CHOOSE WHICH TO USE
While there are always exceptions to the rules, here’s what I’ve come up with:
While Final Cut does transcode all files in the background, which saves time, if all you are doing is cuts-only edits with a bit of B-roll, there’s no big advantage to optimizing, because FCP will render all camera native files as necessary during editing. While exports will take a bit longer than optimized media to allow time for rendering to occur for any files that need it, the time you lose in exporting will be saved in not waiting for optimizing to finish during importing. In other words, you only render the media you export, not all the media you import.
However, most camera native formats – specifically HDV, H.264, AVCHD, AVCCAM, and MPEG-4 – are very mathematically complex. As you start to add layers, effects, color adjustments, or fancy transitions, the amount of calculations your computer needs to process will slow things down. Optimizing converts your footage into something much easier to edit, with virtually no loss in visual quality.
Proxy files are extremely small and are a perfect fit for multicam editing, or working with large resolution files during the rough editing phase. Final Cut makes it easy to switch between proxy and camera source or optimized files for final polish and output. (As a sidelight, proxy files are 1/4 the resolution of the camera native file.)
NOTE: One other element to consider is your hardware. Proxy files will always be easier to edit than optimized files; this is especially true on older/slower systems. However, powerful machines like the new Mac Pro can handle multicam and high-res media without needing to create proxy files. Using a Mac Pro for these tasks can save both time and hard disk space.
TRANSCODING MEDIA
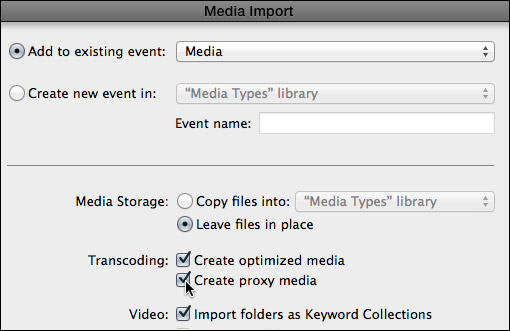
There are two places where you can transcode media:
NOTE: All transcoding happens in the background. When transcoding each file is complete, Final Cut automatically switches from camera native to optimized files.
The screen shot above illustrates your choices during import:
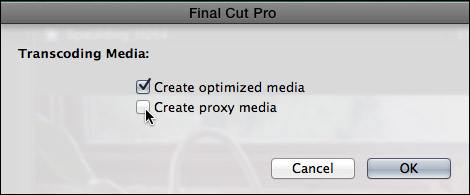
If you choose to import camera native files then convert some or all of your files after import, choose File > Transcode Media. The screen shot above illustrates your choices.
NOTE: If both camera native and optimized files exist for the same media, FCP X always uses optimized files in the project. When optimized files don’t exist, FCP X uses camera native files. Final Cut never uses proxy files unless you explicitly tell it to.
HOW TO TELL WHAT YOU ARE USING
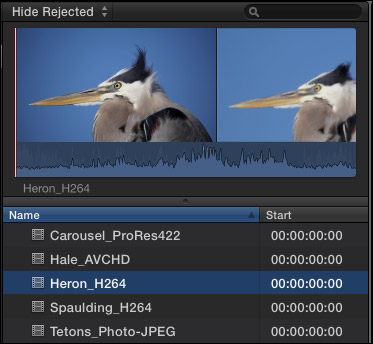
For this article, I’ve imported a variety of codecs into Final Cut Pro X (v.10.1):
For example, this shot of a Great Blue Heron is H.264. (Um, I know that because I put it into the file name.)
But… what if you don’t know what the codec is?
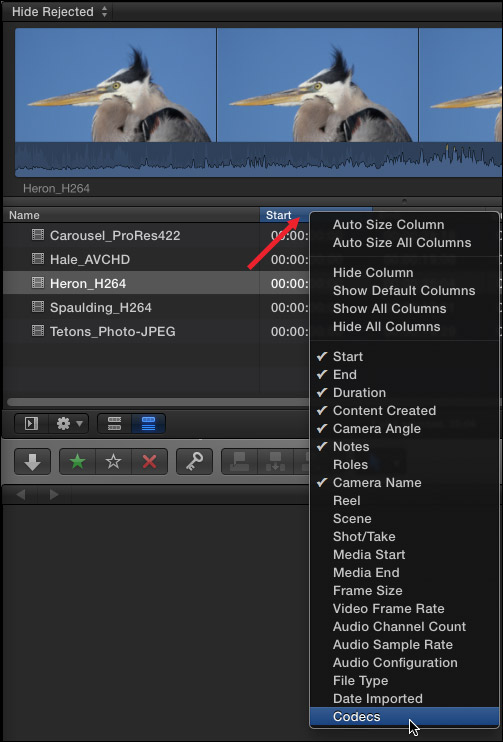
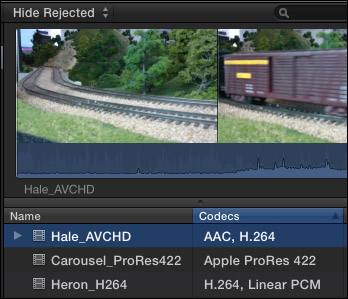
Right-click (or Control-click if you are using a trackpad) on a column header in the List View of the Browser, then check Codecs to display a new column showing the codec for each clip. (Remember each clip only uses one codec.)
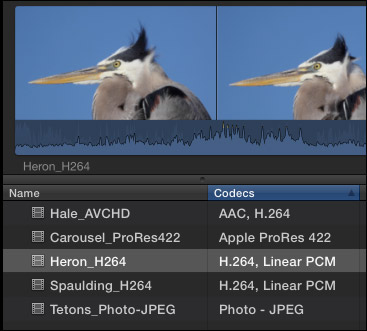
As you can see here, the file names accurately match the codecs. (I dragged the Codecs column header from the far right of the display to place it next to file names.)
NOTE: AAC is MPEG-4 compressed audio. Linear PCM is uncompressed audio; which generally means WAV format. The ProRes and Photo-JPEG clips are silent, which is why no audio file is listed.
The Inspector also provides a way to monitor codecs. Select a clip in the Browser and open the Inspector (Cmd+4)
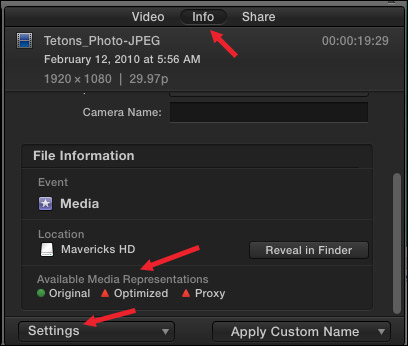
At the bottom of the Info tab are three icons that indicate whether camera native, optimized or proxy files are present for that clip. In this case, only the camera native files exist, indicated by the green light next to “Original.”
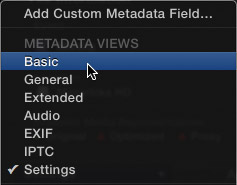
Click the Settings button below these icons and change the Info display to Basic.
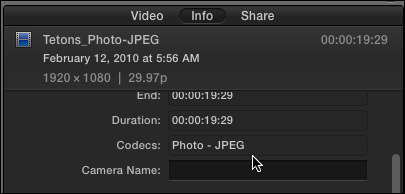
Near the top of the Info screen is listed the codec of the camera native clip. Here, for instance, the video codec is Photo-JPEG.
TRANSCODING MEDIA
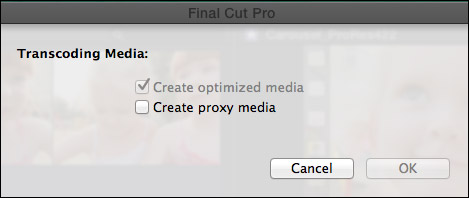
I generally transcode all media during import. It is fast, easy, and doesn’t get in the way of my editing. However, if you need to transcode files later, select the files you want to transcode in the Browser and choose File > Transcode Media. (Media can not be transcoded from the Timeline.)
In this screen shot, Optimized is grayed out because the clip I selected was already in ProRes format. Other formats that generally don’t need optimization include:
NOTE: Both AVCHD and H.264 can be played back in real-time, but on slower systems, or more complex edits, will benefit from being optimized.
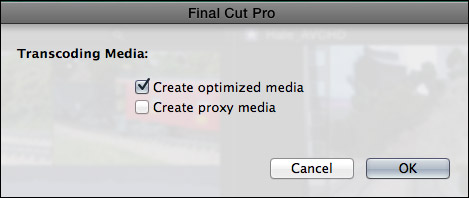
If both options are dark, it means that you have imported media that will benefit from optimization. (In general, you only need to create proxy files for multicam editing or media with resolutions above 1080p.)
The time transcoding takes is based upon the duration of your media, the speed of your processor and whether you are editing while the transcoding is going on.
For this example, I created both optimized and proxy files for all these clips.

You can monitor the status of transcoding, and other background tasks, by clicking the clock icon to the left of the timecode display. This opens the Background Tasks window (or type Cmd+9). Here, the clock indicates that transcoding is 100% complete.
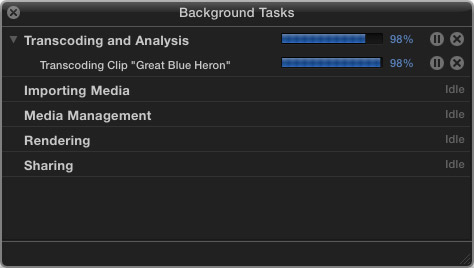
While this is what the Background Tasks window looks like when it is transcoding a media file.
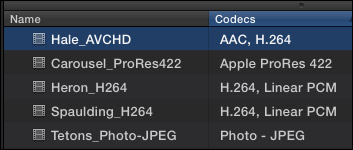
Notice that in the Codecs column of the Browser, the actual codec of the camera native file is still indicated; even though transcoded files exist.
NOTE: Optimized files are always ProRes 422, regardless of what choices you make for project render files.
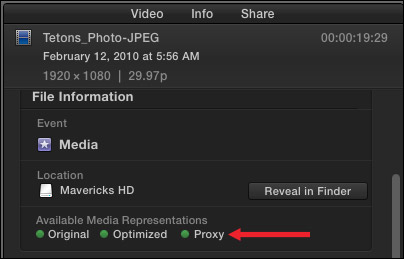
If we go to Inspector > Info > Basic settings, although the codec is listed as Photo-JPEG at the top, the green light icons at the bottom indicate that additional media files now exist.
HERE’S THE RULES
If Optimized files do not exist, FCP X uses camera native files in your project.
If Optimized files do exist, FCP X uses optimized files in your project and ignores the camera native source files.
Proxy files are always ignored, until you change a preference setting.
Apple is very clever in tracking media files. Replacing an old file with a new file of the same name in FCP 7, would cause FCP 7 to link to the new file as though it was the old file.
However, replacing an old file with a new file of the same name in FCP X, disconnects all transcoded media and FCP X treats the new file as a brand new file. This is because Apple tracks more than just the file name in its media management. (Apple calls this tracking the “metadata” of the media file.)
SWITCHING BETWEEN OPTIMIZED AND PROXY FILES
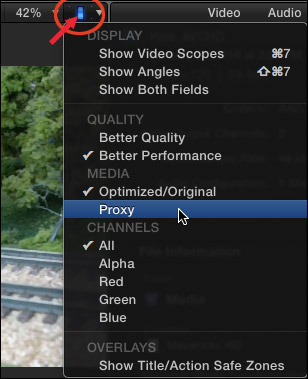
Switching between optimized and proxy files could not be easier. In FCP X (10.1) go to the switch in the upper right corner of the Viewer and choose between Optimized/Original or Proxy files.
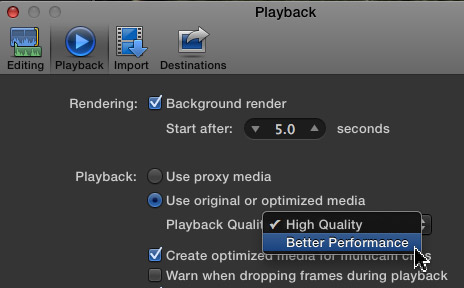
In earlier versions of FCP X, go to Preferences > Playback and click the appropriate radio button. (Apple moved both these preference settings to the Viewer switch in the 10.1 release.)
If proxy files exist, the images will instantly switch to proxies.
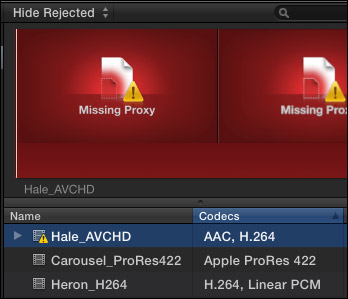
If proxy files do not exist, you get the dreaded “Missing Proxy” red screen.
Missing proxies can easily be fixed by selecting the media file in the Browser, choosing File > Transcode Media and checking the Proxy checkbox.
EXPORTING
When we export a master file, which is my general recommendation for all exports, the Settings tab gives us a number of options. (Here’s an article that talks about this more: Export a Master File.)
In general, you should set the render codec to the same setting as you plan to export. Then FCP can use the render files and just copy them when exporting. Otherwise, it will regenerate the render files from the source material during the export process, which will take longer. (Though on the new Mac Pro, this time difference may not be significant.) But if you know what your deliverable will be and you will always be creating a ProRes master, then rendering and exporting using the same ProRes setting is a best practice.
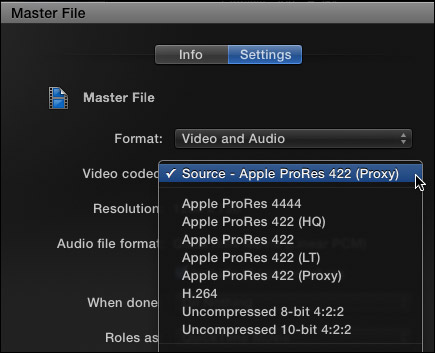
Selecting Source for output exports either proxy files, if the project is set to proxy files (as illustrated in the screen shot above)…
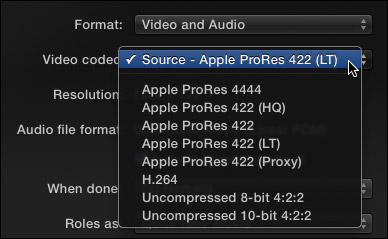
Or, if Optimized/Original is checked, selecting Source matches the render file settings in Project Properties (Cmd+J). In the screen shot above, I set render format to ProRes 422 LT, which becomes the output format.
Or, if you want to export a format other than the one you picked for Project Properties, you can choose between one of the five ProRes formats, as well as H.264 and two uncompressed formats.
I generally recommend against compressing H.264 using Final Cut, not because of any bugs, but because I like to create a master file first for archiving, then create compressed files from that master file. In other words, I create all my H.264 versions after the export is complete.
In general, while uncompressed files yield the highest possible quality, they also create the largest file sizes. As an example, I exported a 28-second 1080p 25 fps file.
THAT is quite a range in file sizes!

(Click here for a larger PNG version of this image.)
Could I see a quality difference between Proxy files and everything else? Yes, absolutely. Look at the hair, the artifacts in her skin, and the blockiness around the edges of her mouth.
However, could I see a difference between ProRes 4444 and Uncompressed 10-bit? Not for this 1080p image scaled to 1280 x 720, which is what I would post to the web.
Whether you need, or can even see, the additional image quality provided by these high-end formats is entirely up to you. If you are compressing files for the web, I would suggest you are wasting disk space; stay with ProRes 422. If you are creating files for digital projection to large screens, using high-end formats like ProRes 4444 or Uncompressed is critical, even though the file sizes are enormous.
NOTE: Final Cut does not export camera native media files.
UPDATE – EXPORTING CAMERA NATIVE FILES
After further exploring the Apple website, I learned the following:
However, these camera native exports are “wrapped” in QuickTime, so they are not “camera native,” but they are the same quality as the camera native formats.
There are also two export tools worth mentioning:
When you export using settings different from your render settings, Final Cut calculates the new files using the source media, not the existing render files.
Also, I would also not recommend using “Send to Compressor” unless you need to use a Compressor plug-in and even then I would save your project as a Master file and check the “When done” menu in the Share settings window to “Open with Compressor.” This exports the master file as quickly as possible, then opens it in Compressor where you have all the Compressor settings at your finger tips. If you need specific settings that are only in Compressor, then I would save that as a custom Compressor setting so that it shows up in Final Cut’s Share menu as a Destination.
SUMMARY
My strong recommendation is to set project render file settings to match the format you want to export as your final master file.
Final Cut does a great job of managing media. For most editing tasks, optimizing media is the best and fastest option. But, there are always situations that demand different solutions. And, now, you have a better idea what your options are.
2,000 Video Training Titles
Edit smarter with Larry Jordan. Available in our store.
Access over 2,000 on-demand video editing courses. Become a member of our Video Training Library today!
Subscribe to Larry's FREE weekly newsletter and
save 10%
on your first purchase.
151 Responses to FCP X: When to Use Optimized, Proxy, or Native Media
← Older Comments-
 Tom Trucco says:
January 21, 2020 at 6:45 am
-
 Larry says:
January 23, 2020 at 12:24 pm
-
 AJ says:
April 8, 2020 at 1:15 pm
-
 Larry says:
April 8, 2020 at 2:18 pm
-
 chris alsop says:
December 15, 2020 at 12:37 pm
-
 Larry says:
December 15, 2020 at 1:18 pm
-
 Eric says:
January 15, 2021 at 10:06 pm
-
 John Wheeler says:
November 14, 2021 at 5:19 pm
-
 Larry says:
November 14, 2021 at 5:34 pm
-
 John Wheeler says:
November 15, 2021 at 7:38 pm
-
 Larry says:
November 15, 2021 at 8:05 pm
-
 John Wheeler says:
November 16, 2021 at 9:52 pm
-
 Steve Vaus says:
July 20, 2023 at 2:06 pm
-
 Larry says:
July 20, 2023 at 2:45 pm
← Older CommentsLarry,
We are currently working on implementing the “Optimized/Proxy” workflow with 4K footage on an old trash can MacPro. We copy all camera native files to shuttle drives in the field with each camera card in a named folder (Card 001, Card 002…) and then copy those folders to a “Media” drive on our edit system. We currently import those files without optimizing leaving them in place on the Media drive.
Before you import footage, do you make a folder for each Library that you choose in Library Storage Location to create the optimized media? Do you keep all original and optimized media on-line? Would we be best to import as optimized media directly from our field shuttle drives bypassing the “Media” drive step? We could make a folder on the media drive to use for the optimized media. We have tested this by unmounting the shuttle drive after the import and FCPX sees the optimized media as available and the Original not available. One concern we have it that the optimized media grows about 7 times the original h.264 camera files eating up storage faster. We have tested these new optimized files and they certainly behave better in the edit.
Tom:
There’s no single solution. In general:
* Libraries ARE a folder; so you don’t need to create a folder to hold a Library.
* Yes, copy each camera card to its own folder in your storage. Don’t import directly from a camera card.
* I would import your camera native media, and have FCP X convert to ProRes (called “optimizing”) during the import process.
* Yes, optimized media is big, that’s why it edits so well.
Larry
Hi Larry, Sometimes, I have a ton of footage and need considerably less for output. But I still want optimal output. Ignoring speed during the edit, is there a quality difference between these two options below for the final exported output?
(1) Editing smaller non-optimized native…then exporting to optimized ProRes versus…
(2) Optimizing then editing, then exporting the finished (already optimized) ProRes MOV
To reiterate contextually where I’m coming from, If I have 1TB of native and didn’t wanna optimize or perhaps 30 iPhone clips that comprised 20 total minutes of footage. But only needed, for example, a fraction of either for the export, maybe 10-percent. If I optimize first, as you know, the size needs will be exponentially larger. But I’ve always wondered if I lose any ‘real’ quality’ by editing native then only optimizing the output.
Conversely, considering iPhone footage, if I initially transcoded iPhone clips as proxies, then edited, then can I export the finished clip in full optimized ProRess 422…from those proxies….w/o having initially used any optimized media?
A.J.
There’s no single answer. There’s nothing “wrong” with editing camera native. Here are the limits, though:
* Most camera native files (H.264, HEVC from iPhones, AVCHD…) are highly compressed, 8-bit video formats
* Highly compressed files edit slowly on older systems due to the structure of their compression.
* 8-bit files do not provide a lot of latitude for gradients, color grading and other effects that require smooth transitions
* Highly-compressed files take longer to export
As an option, if you know going in which part of an iPhone video you need, load the video into FCP X, then export as a ProRes 422 file only the section(s) you need.
And, yes, given your source media, ProRes 422 is an excellent choice.
Larry
Hey Larry! I appreciate all the excellent work you’re doing! An editor friend and myself have been editing a documentary which was shot 4K (canon C300MKII). We imported the footage and made proxies. Throughout editing, playback has been sluggish, lots of beach balls and freezes (esp with filters) We’re both seasoned editors and know all the tricks but nothing seems to work. Then one day, frustrated, my buddy did a test where he ran some footage through compressor. he converted it to prores 422 HQ 4K with the result having a color profile 221 with a mono audio (the original was 4 tracks) The difference is night and day. Everything (including 3rd party filters) plays seamlessly. The quality is excellent. So my question to you: Does this make any sense and is it at all possible to swap out the original proxies for these new Compressor files? I know FCPX won’t let you relink files like back in the day but from what I understand, you can swap out existing proxies provided all the metadata lines up? Any help or insight would be awesome! Thanks so much
Chris:
If you are getting sluggish playback, something is wrong with your proxy files.
* Extra audio tracks won’t slow your system. Go back to all four audio tracks, if that helps your edit. Audio files are tiny, compared to video.
* No, you can’t link to externally connected proxy files. Well, you can, but it is REALLY painful.
* Try deleting ALL generated media and redo your proxy files – be SURE to use ProRes Proxy, not H.264 at 1/2 resolution.
Let me know what works.
Larry
The best explanation of codec I have ever seen. Thank you.
That was an excellent introduction to the subject of proxies and optimized media!
One question I have as a newbie is this:
If you are already using proxies, what are the benefits of *also* creating optimized media during the editing process?
I can see that the export would take longer if using camera originals (e.g. H.264) because all of the edits, effects etc will be applied to compressed files, but what is the difference during the edit?
Assuming my camera source is 4K 10-bit 422 (from a Panasonic GH5) would transcoding to ProRes 422 before editing give me any advantage?
The core of my question is whether the camera orginals are actively being used during the edit if proxies are enabled? Are effects or color grades applied to the proxies during editing, and only applied to the originals/optimized media during the final render, or is the rendering (on the orignals/optimized media) going on all the time in the background?
Thanks for your excellent content!
John:
Good questions. If you can play the camera native media with no problem in Final Cut, there’s no reason, generally, to create optimized media. If, on the other hand, the source media plays choppily, or lags, or drops frames, optimizing will improve things.
If you shoot 8-bit media, but plan on a lot of color grading, optimizing into 10-bit ProRes also makes sense.
As for proxies, when you are working with proxies, nothing happens to your source media. When you are working with source media, nothing happens to proxies. If render files for source files don’t exist when you export your final project, they are created during the export.
Larry
Thanks Larry – especially considering you are still answering questions on an article your wrote 7 years ago!
I can see the advantage in creating optimized (10-bit ProRes) media if the camera source is only 8-bit, but what if it is 10-bit 422?
I found that my 4K 10-bit 422 H.264 is a bit stuttery sometimes on my i9 MacBook Pro 16 (with AMD 5500 8GB GPU) and it maxes out the CPU (lots of heat & fan noise) so I have been creating proxies.
From your answers, it looks like any processing, including color grading, uses the proxies, so there wouldn’t be much point in also creating optimized media that will remain unused until the final render & export.
Or is the best workflow to switch back to originals/optimized media when doing tasks that require maximum quality in order to assess the effect of the processing? I could see that having optimied media might be useful in these cases, on a clip-by-clip basis, rather than transcoding the entire media pool.
John:
You are misunderstanding a couple of steps.
First, H.264 reduces color to a 4:2:0 chroma subsampling. This is 1/2 the chroma in 422 and 25% the original color in the image before H.264 compression was applied. So, though it may be 10-bit, it is still throwing away a lot of color during compression.
Second, a much better way to understand proxies is that any effect, including color grading, that you apply to a proxy will also be applied, automatically and with the same settings to the camera native files when you switch back from proxies to camera native. Not during final export, but at the moment you switch. (Yes, rendering will need to occur.) In general, color grading is done using source / optimized media, but if you color grade proxies, those settings will be applied to the source.
Third, if media is compressed using independent frames, rather than GOPs – for example, ProRes, DNx, Cineform, XDCAM and several others – it is considered optimized and FCP won’t optimize media that doesn’t need it. H.264, on the other hand, compresses using GOPs, which is not optimized. If your system is laggy, optimizing will probably solve that.
Larry
Great, thanks Larry – I think I’ve got it!
The only thing that sounds odd is your first paragraph about H.264 encoding. On the Panasonic GH5 I am using the codec setting labelled as:
“3840×2160, 23.98p, 422 / 10bit /LongGOP / 150Mbps”
I am assuming this is 10-bit 4:2:2 in H.264 encoding, and not using 4:2:0 color sub-sampling. Hence my question of whether there would be any difference grading on the camera originals vs ProRes 422.
I understand that the color grading applies to the original/optimized media as soon as you switch from proxy view (during editing, or for export) and can see that using optimized media (as opposed to H.264 originals) might give a better experience if you need to do this often (where the proxies are not of high-enough quality).
I can certainly see the difference between optimized media or proxies though – the whole experience is hugely smoother. I can scrub or move through the time line at 3-4x speed and it doesn’t jump at all.
I have found one glitch with FCPX proxies & optimized media though – although I don’t think it’s really FCPX’s “fault”. I have quite a lot of media that is DNxHR HQX encoded (this is the same 10-bit 422 footage from the GH5 than I transcoded with ffmpeg). These DNxHR HQX clips don’t render the video in FCPX (only audio), which I understand may not be supported by FCPX – or more likely – the ffmpeg encoding I chose is not supported.
I thought, “ok, I’ll transcode to ProRes in FCPX”. Unfortunately creating optimized media or proxies often causes FCPX to crash instantly, or just hang at 0%.
I also tried Apple Compressor and the DNxHR files don’t even open, so I suspect there is something in this particular encoding that neither FCPX or Compressor can consume.
They do, however, open perfectly in Davinci Resolve, so I’ll just have to use this for these edits 🙂
Thanks again for all your help!
With the new M2 MacBooks do you really need to optimize? We’re editing a project with H264 footage from a Canon C200 and a drone along with HEVC GoPro footage (all 4K) We will be using Magic Bullet for color and a look. Trying to understand if optimization matters with the new high horsepower Macs. Thx!
Steve:
Good question. If you are editing, essentially, single camera shots (as opposed to multicam), you can easily edit H.264 natively on any M-series Mac. However, you may not want to.
There are two principle reasons:
* H.264 is 8-bit, which means it will show banding and color artifacts in gradients, sunsets, or other elements which have a gentle shading of color or gray-scale. Optimized media, which is ProRes 422, is 10-bit, which minimizes those artifacts to the point where they won’t be seen. (If you want to get rid of them complete, shift to ProRes 4444, which is 12-bit. But, for material shot by a camera, ProRes 422 is sufficient.
* Depending upon how you set your render files, rendering H.264 source material back into H.264 will damage overall image quality more than if you optimize and render back into ProRes 422. This is due to H.264 being a “lossy” compression technology. Which means every time you compress an image using H.264 you lose part of the image; especially color. Now, for some projects on tight deadlines or where the image quality isn’t that great to start with, you probably won’t notice. But on projects where you want to maximize image quality, you probably will.
So, these new computers can edit H.264, but I would recommend optimizing for better color, faster renders and exports and greater image quality throughout the editorial pipeline. This opinion would be true whether you use Premiere or Final Cut.
Larry