
![]() There are three different types of video media used by Final Cut Pro X:
There are three different types of video media used by Final Cut Pro X:
Camera native media can use a wide variety of codecs, though only one codec is allowed per media file. Codecs include:
And those are just some of the more popular varieties of the hundreds of codecs that are currently in the market. So, which media format should you use? And how can you tell which one FCP X is using? Answering that question is the purpose of this article.
SOME QUICK DEFINITIONS
Camera Native Files. The file format shot by your camera and captured to a card, hard disk or tape for editing. These files have four key parameters:
Of these four, the most important is the codec.
Codec. The mathematics used to convert light and sound into numbers the computer can store. Some codecs are optimized for small file sizes, others for image quality, still others for effects processing. Codecs are, generally, determined by the camera manufacturer and, essentially, determine file size, image quality, editing efficiency, color space and all the other elements that go into an image. It is impossible to overstate the importance of the video codec in video production and post.
NOTE: Codecs are also referred to as video formats, though that is a less precise term as “video formats” can also include elements outside the codec such as image size or frame rate.
Transcode. To convert media, either audio or video, from one format to another.
CHOOSE WHICH TO USE
While there are always exceptions to the rules, here’s what I’ve come up with:
While Final Cut does transcode all files in the background, which saves time, if all you are doing is cuts-only edits with a bit of B-roll, there’s no big advantage to optimizing, because FCP will render all camera native files as necessary during editing. While exports will take a bit longer than optimized media to allow time for rendering to occur for any files that need it, the time you lose in exporting will be saved in not waiting for optimizing to finish during importing. In other words, you only render the media you export, not all the media you import.
However, most camera native formats – specifically HDV, H.264, AVCHD, AVCCAM, and MPEG-4 – are very mathematically complex. As you start to add layers, effects, color adjustments, or fancy transitions, the amount of calculations your computer needs to process will slow things down. Optimizing converts your footage into something much easier to edit, with virtually no loss in visual quality.
Proxy files are extremely small and are a perfect fit for multicam editing, or working with large resolution files during the rough editing phase. Final Cut makes it easy to switch between proxy and camera source or optimized files for final polish and output. (As a sidelight, proxy files are 1/4 the resolution of the camera native file.)
NOTE: One other element to consider is your hardware. Proxy files will always be easier to edit than optimized files; this is especially true on older/slower systems. However, powerful machines like the new Mac Pro can handle multicam and high-res media without needing to create proxy files. Using a Mac Pro for these tasks can save both time and hard disk space.
TRANSCODING MEDIA
There are two places where you can transcode media:
NOTE: All transcoding happens in the background. When transcoding each file is complete, Final Cut automatically switches from camera native to optimized files.
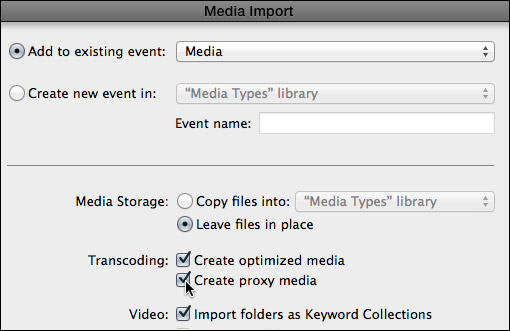
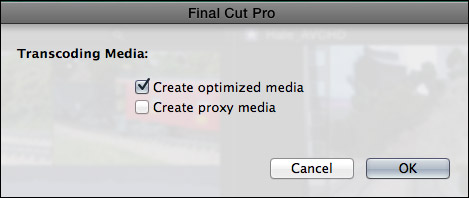
The screen shot above illustrates your choices during import:
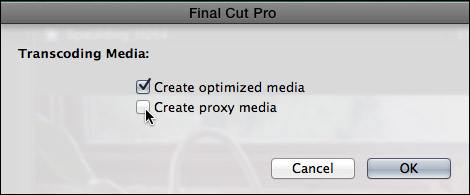
If you choose to import camera native files then convert some or all of your files after import, choose File > Transcode Media. The screen shot above illustrates your choices.
NOTE: If both camera native and optimized files exist for the same media, FCP X always uses optimized files in the project. When optimized files don’t exist, FCP X uses camera native files. Final Cut never uses proxy files unless you explicitly tell it to.
HOW TO TELL WHAT YOU ARE USING
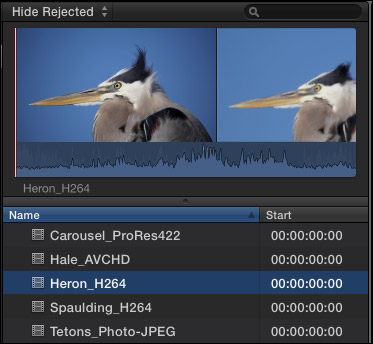
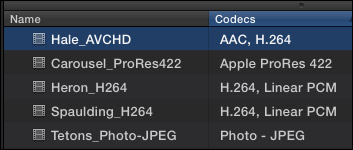
For this article, I’ve imported a variety of codecs into Final Cut Pro X (v.10.1):
For example, this shot of a Great Blue Heron is H.264. (Um, I know that because I put it into the file name.)
But… what if you don’t know what the codec is?
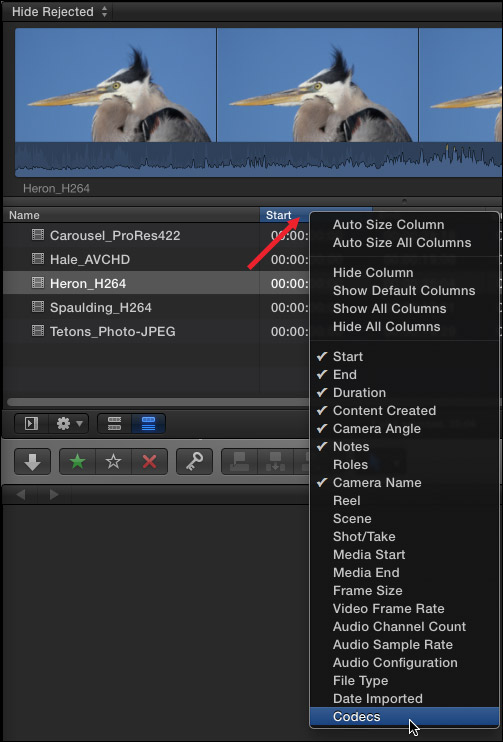
Right-click (or Control-click if you are using a trackpad) on a column header in the List View of the Browser, then check Codecs to display a new column showing the codec for each clip. (Remember each clip only uses one codec.)
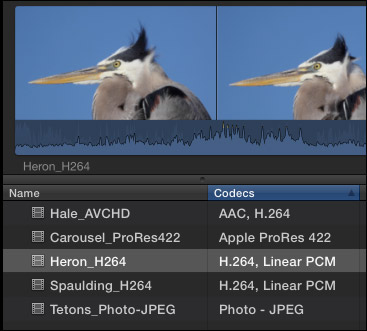
As you can see here, the file names accurately match the codecs. (I dragged the Codecs column header from the far right of the display to place it next to file names.)
NOTE: AAC is MPEG-4 compressed audio. Linear PCM is uncompressed audio; which generally means WAV format. The ProRes and Photo-JPEG clips are silent, which is why no audio file is listed.
The Inspector also provides a way to monitor codecs. Select a clip in the Browser and open the Inspector (Cmd+4)
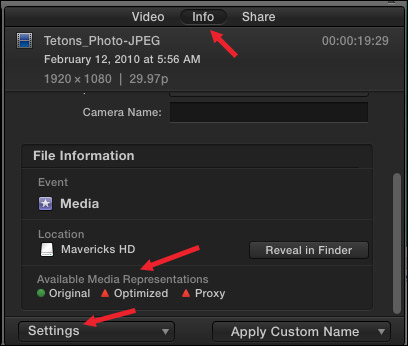
At the bottom of the Info tab are three icons that indicate whether camera native, optimized or proxy files are present for that clip. In this case, only the camera native files exist, indicated by the green light next to “Original.”
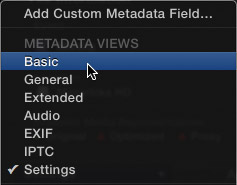
Click the Settings button below these icons and change the Info display to Basic.
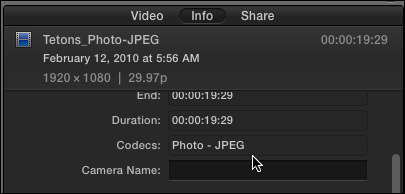
Near the top of the Info screen is listed the codec of the camera native clip. Here, for instance, the video codec is Photo-JPEG.
TRANSCODING MEDIA

I generally transcode all media during import. It is fast, easy, and doesn’t get in the way of my editing. However, if you need to transcode files later, select the files you want to transcode in the Browser and choose File > Transcode Media. (Media can not be transcoded from the Timeline.)
In this screen shot, Optimized is grayed out because the clip I selected was already in ProRes format. Other formats that generally don’t need optimization include:
NOTE: Both AVCHD and H.264 can be played back in real-time, but on slower systems, or more complex edits, will benefit from being optimized.
If both options are dark, it means that you have imported media that will benefit from optimization. (In general, you only need to create proxy files for multicam editing or media with resolutions above 1080p.)
The time transcoding takes is based upon the duration of your media, the speed of your processor and whether you are editing while the transcoding is going on.
For this example, I created both optimized and proxy files for all these clips.

You can monitor the status of transcoding, and other background tasks, by clicking the clock icon to the left of the timecode display. This opens the Background Tasks window (or type Cmd+9). Here, the clock indicates that transcoding is 100% complete.
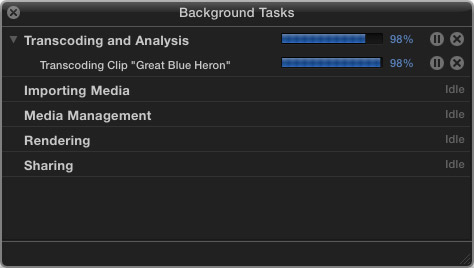
While this is what the Background Tasks window looks like when it is transcoding a media file.
Notice that in the Codecs column of the Browser, the actual codec of the camera native file is still indicated; even though transcoded files exist.
NOTE: Optimized files are always ProRes 422, regardless of what choices you make for project render files.
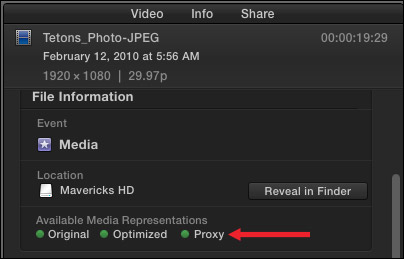
If we go to Inspector > Info > Basic settings, although the codec is listed as Photo-JPEG at the top, the green light icons at the bottom indicate that additional media files now exist.
HERE’S THE RULES
If Optimized files do not exist, FCP X uses camera native files in your project.
If Optimized files do exist, FCP X uses optimized files in your project and ignores the camera native source files.
Proxy files are always ignored, until you change a preference setting.
Apple is very clever in tracking media files. Replacing an old file with a new file of the same name in FCP 7, would cause FCP 7 to link to the new file as though it was the old file.
However, replacing an old file with a new file of the same name in FCP X, disconnects all transcoded media and FCP X treats the new file as a brand new file. This is because Apple tracks more than just the file name in its media management. (Apple calls this tracking the “metadata” of the media file.)
SWITCHING BETWEEN OPTIMIZED AND PROXY FILES
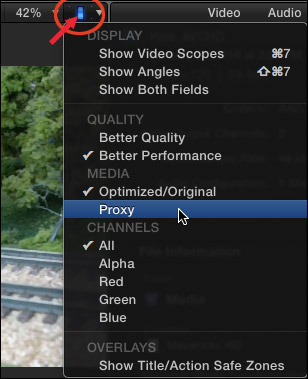
Switching between optimized and proxy files could not be easier. In FCP X (10.1) go to the switch in the upper right corner of the Viewer and choose between Optimized/Original or Proxy files.
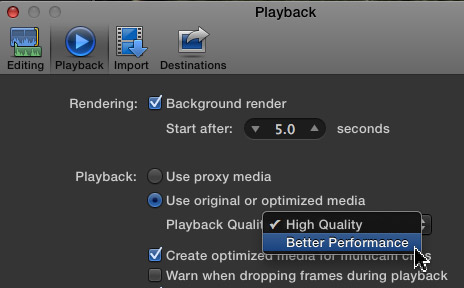
In earlier versions of FCP X, go to Preferences > Playback and click the appropriate radio button. (Apple moved both these preference settings to the Viewer switch in the 10.1 release.)
If proxy files exist, the images will instantly switch to proxies.
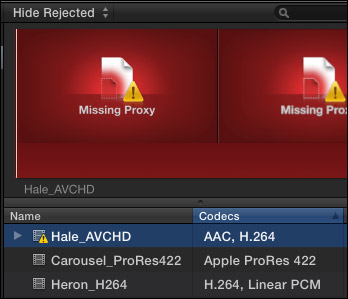
If proxy files do not exist, you get the dreaded “Missing Proxy” red screen.
Missing proxies can easily be fixed by selecting the media file in the Browser, choosing File > Transcode Media and checking the Proxy checkbox.
EXPORTING
When we export a master file, which is my general recommendation for all exports, the Settings tab gives us a number of options. (Here’s an article that talks about this more: Export a Master File.)
In general, you should set the render codec to the same setting as you plan to export. Then FCP can use the render files and just copy them when exporting. Otherwise, it will regenerate the render files from the source material during the export process, which will take longer. (Though on the new Mac Pro, this time difference may not be significant.) But if you know what your deliverable will be and you will always be creating a ProRes master, then rendering and exporting using the same ProRes setting is a best practice.
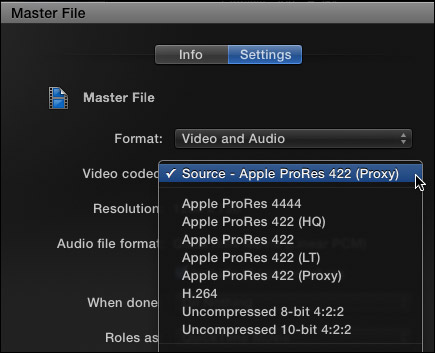
Selecting Source for output exports either proxy files, if the project is set to proxy files (as illustrated in the screen shot above)…
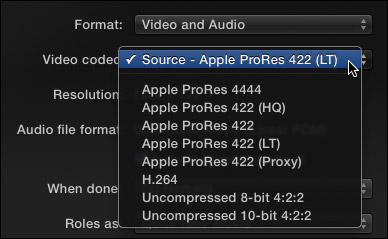
Or, if Optimized/Original is checked, selecting Source matches the render file settings in Project Properties (Cmd+J). In the screen shot above, I set render format to ProRes 422 LT, which becomes the output format.
Or, if you want to export a format other than the one you picked for Project Properties, you can choose between one of the five ProRes formats, as well as H.264 and two uncompressed formats.
I generally recommend against compressing H.264 using Final Cut, not because of any bugs, but because I like to create a master file first for archiving, then create compressed files from that master file. In other words, I create all my H.264 versions after the export is complete.
In general, while uncompressed files yield the highest possible quality, they also create the largest file sizes. As an example, I exported a 28-second 1080p 25 fps file.
THAT is quite a range in file sizes!

(Click here for a larger PNG version of this image.)
Could I see a quality difference between Proxy files and everything else? Yes, absolutely. Look at the hair, the artifacts in her skin, and the blockiness around the edges of her mouth.
However, could I see a difference between ProRes 4444 and Uncompressed 10-bit? Not for this 1080p image scaled to 1280 x 720, which is what I would post to the web.
Whether you need, or can even see, the additional image quality provided by these high-end formats is entirely up to you. If you are compressing files for the web, I would suggest you are wasting disk space; stay with ProRes 422. If you are creating files for digital projection to large screens, using high-end formats like ProRes 4444 or Uncompressed is critical, even though the file sizes are enormous.
NOTE: Final Cut does not export camera native media files.
UPDATE – EXPORTING CAMERA NATIVE FILES
After further exploring the Apple website, I learned the following:
However, these camera native exports are “wrapped” in QuickTime, so they are not “camera native,” but they are the same quality as the camera native formats.
There are also two export tools worth mentioning:
When you export using settings different from your render settings, Final Cut calculates the new files using the source media, not the existing render files.
Also, I would also not recommend using “Send to Compressor” unless you need to use a Compressor plug-in and even then I would save your project as a Master file and check the “When done” menu in the Share settings window to “Open with Compressor.” This exports the master file as quickly as possible, then opens it in Compressor where you have all the Compressor settings at your finger tips. If you need specific settings that are only in Compressor, then I would save that as a custom Compressor setting so that it shows up in Final Cut’s Share menu as a Destination.
SUMMARY
My strong recommendation is to set project render file settings to match the format you want to export as your final master file.
Final Cut does a great job of managing media. For most editing tasks, optimizing media is the best and fastest option. But, there are always situations that demand different solutions. And, now, you have a better idea what your options are.

2,000 Video Training Titles
Edit smarter with Larry Jordan. Available in our store.
Access over 2,000 on-demand video editing courses. Become a member of our Video Training Library today!
Subscribe to Larry's FREE weekly newsletter and
save 10%
on your first purchase.
151 Responses to FCP X: When to Use Optimized, Proxy, or Native Media
← Older Comments Newer Comments →-
 Dean Suhr says:
November 26, 2016 at 9:02 am
-
 Larry says:
November 26, 2016 at 9:15 am
-
 Jeannette Pope says:
March 16, 2017 at 3:12 am
-
 Piotr says:
May 17, 2017 at 8:52 am
-
 Jesse says:
May 17, 2017 at 9:42 am
-
 Larry says:
May 17, 2017 at 10:00 am
-
 Thinh Pham says:
May 22, 2017 at 7:36 am
-
 Larry Jordan says:
May 22, 2017 at 7:52 am
-
 alan says:
July 8, 2017 at 2:19 pm
-
 Larry says:
July 8, 2017 at 3:12 pm
-
 Erika Dietz says:
July 26, 2017 at 10:38 am
-
 Larry says:
July 26, 2017 at 3:02 pm
-
 Erika Dietz says:
July 27, 2017 at 4:05 pm
-
 Christian says:
February 5, 2018 at 5:02 am
-
 Larry says:
February 5, 2018 at 7:03 pm
-
 Peter Snowdon says:
February 26, 2018 at 3:38 am
-
 Larry Jordan says:
March 6, 2018 at 10:00 am
-
 Dan Durbin says:
June 16, 2018 at 9:56 am
-
 Larry says:
June 16, 2018 at 10:09 am
-
 Dan Durbin says:
June 16, 2018 at 5:17 pm
-
 Larry says:
June 16, 2018 at 8:57 pm
← Older Comments Newer Comments →Greetings Larry – great and very clear article. When we import AVCHD can we convert it to ProRes 422 and make them the only format saved in our FCP project? Our AVCHD files are only backup to a live produced/mixed file.
Dean:
Yes. Optimize your media on import; that creates the ProRes 422 files. Generated media, like optimized files, are stored in the library by default, though you can change the location using Library Properties.
Larry
I live in China and work in a film school – I have been having a lot of learning curves as we start to work with Final Cut 10.1. and we have been used to Final Cut 7. Therefore, I have been pulling out my hair to understand: 1. Work-flow and setting up projects-events-Library. 2. Working with different codecs. Your article on “When to Use Optimized, Proxy, or Native Media,” is so clear, simple, well explained, and so well written. It has finally answered my questions after using a Lynda tutorial (too confusing) and plugging on through the good yet very lengthy explanations on the apple support…
Thank you very, very much – and also, I am so happy your website opens in China – you are now going to every student in my doc classes … Jan
Dear Larry, thank you for exhausting explanation in the topic. I have a problem with creating proxy and optimized media after importing. For example as a background in the project I use simple visuals downloaded from youtube: weight 160mb small file which I usually convert via ffmpeg from mkv to m4v format. I do nothing with clip (I don’t add any affect just leave the file in place) than right click and transcode this to proxy and optimized file and what I get is 585 MB PROXY file which is 3 times heavier than the original and 4,56GB – “optimized” which is 28,5 times bigger than original. Could you guess what is happening? I was really shocked that everytime I create PROXY media which should be up to 3 times smaller than original I get 3 or more times larger file and the optimized files are cosmically larger like 30 times larger. It makes me impossible to smoothly edit with these. And many times original files work even better than the transcoded or proxy.
Great article Larry. Thank you.
I’m working on a project with both 4k and 1080p footage. To playback the 4k smoothly I need to produce proxy files, but the 1080 stuff runs fine native. As I mix the two, and enable ‘Proxy’ in the viewer, i’m left with a timeline like this: https://archive.org/details/CaptureDecran20170517A713.32.59
Two questions:
1) Is there any way to have the timeline play proxy (when available) and original/optimized (when proxy not there)?
2) If not, is there any way to batch-transcode proxies of all the clips on the timeline that don’t have a proxy yet? Or do I have to go clip by clip ‘Revealing in Browser’ and then right-clicking to ‘Transcode Media’ for each one.
THANKS A TON!!
Jesse:
No. The Timeline CAN mix original with optimized footage, but not proxy.
To create proxy files, select all the files you want to create proxies for in the Browser, not the Timeline, then choose File > Transcode Media and choose the Proxy option.
Larry
Larry,
I want to transfer footages of a Premiere Pro project to FCPX. In Premiere Pro, I’ve already created proxy media, but in FCP X, I don’t see any option to link them to original media, only creating proxy option. Is there such option in FCP X or I need to create proxy media again?
Thanks
Thinh:
you’ll need to create the proxy media again. There’s no way to link to it.
Larry
Hi Larry, really liked your summary. Maybe I’m being a bit dumb here but I thought I’d ask anyway. If i choose proxy media during import, rather than optimized, does this mean that when I export the final edited sequence it will be at a lower quality than if i had imported optimized? I don’t really understand if FCP still stores the original full-quality files on my hard-drive when importing, or whether all the imported files are lower quality. If the latter, then surely I should be converting to proxy after import, not during?
I wipe my memory cards once imported and backed up, hence the concern. Apologies if I’m asking the obvious!
Alan
Alan:
You are confused.
You are not importing proxy files, you are CREATING proxy files during the import. FCP X will always import the camera masters. Then, depending upon your choices during import, it will – at the same time – create optimized and/or proxy files.
To export files at the highest quality, be sure to change to the Original/Optimized setting in the Viewer, not Proxy.
Larry
Hi Larry,
Thank you for such an immensely helpful article. My question is similar (I think) to Piotr’s question (dated March 17). I have a folder with 300GB of 4k video from a recent travel week. I have a new MacBook with 2TB of space, but not wanting to eat that space too quickly, I store the original files (native) on a 4TB LaCie external drive.
When I initiated the import of this folder, I checked the boxes for “Create Optimized Media” and “Create Proxy Media” for all the reasons you suggest (performance, etc.) I also checked the box to “Leave originals where they are”(something like that), again, not wanting to create 300GB of duplicate files on the Mac when they can just as easily “live” on the LaCie.
Because optimized and proxy files are smaller than native, I assumed what would be stored in my Library (i.e. in “Movies” on the Mac) would be LESS than 300GB. Instead, the import has come to an abrupt halt because (as the error message reads) “The hard drive is almost full.” Sure enough, as a result of starting the import, there is now a “Motion Templates” folder in Movies that has a size of 1.95 TB! What happened? How/why did FCPX turn a 300GB folder into 1.95 TB of data? Why is that data on my Mac HD and not on the LaCie? And most importantly, what can I do about this. I still have another 500GB of video that I want to work with, but have no idea now many Terabytes this will turn into. I must be doing something wrong. Can you please help? As of now, I am completely stalled in my project b/c I don’t want to abort the import until I know what’s happening. Thank you so much for any thoughts!
-Erika
Erika:
I understand the problem. You’ve started from a false assumption. optimized files are ALWAYS bigger than camera native, unless you are shooting a RAW or Log-C format. This is because optimized files are tuned for editing, while camera native files are tuned to support the camera.
Proxy files are 1/6 the size of optimized files. Optimized file sizes depend upon frame size and frame rate – the larger the frame size or faster the frame rate, the larger the optimized file.
I am not surprised you are using this much storage space. If you shot AVCHD, your optimized files will be about five times bigger than your camera native files.
Apple has a white paper on ProRes (Google it). In the appendix at the end is a list of all the different file sizes that ProRes can take depending upon frame size and frame rate. I use this white paper constantly to estimate my storage requirements.
Larry
Thank you, Larry, excellent suggestion about the white paper…I’ll take a look. Meanwhile, I thought you might appreciate hearing that another of your articles (https://larryjordan.com/articles/fcp-x-convert-managed-to-external-media/) helped me realize how to solve this. In it, you refer to how essential it is to use external storage (which I hadn’t really thought of given that I thought a 2TB Mac would do the trick).
I moved the Library to the LaCie drive, and I think I’m good to go.
Thanks again!
Hi Larry
Great article. Thank you!
I assume I understand most of the basics, however, one thing is still unclear, and I wasn’t able to find any website on the Internet that gave an answer to this.
I am using FCPX to edit video files recorded from an online television recorder or downloaded elsewhere (e.g. from YouTube). They are all in H.264 format. The problem is that the frames are kind of ‘cross-referenced’, so frame-accurate navigation isn’t always possible. There are these typical MPEG ‘glitches’, depending on whether the playhead comes from previous frames or from following frames.
Creating optimized media in FCPX solves all these problems. However, I wonder if there isn’t any quality loss involved when the H.264 source video first gets transcoded to Apple Pro Res 422? Of course I wouldn’t mind if it was for viewing purposes in FCPX only, but it would mind if the transcoded video serves as the base for the finally exported file.
When creating a project in FCPX, I can also choose a file format for that project, e.g., Apple Pro Res 4444 XQ. If all imported files are (if selected) converted to Apple Pro Res 422, no matter what I’ve chosen for a particular project, what influence does the Apple Pro Res 444 XQ setting have then?
In other words: when does the file format chosen for a project come to play, and when does the fixed file format of the transcoded files come to play? Why isn’t it possible to set the file format (or at least the quality) of the transcoded files?
Thank you so much
Christian
Christian:
Unless you are exporting to the web, and even then I would advise against it, you would never want to export frame-inaccurate media. So, conversion to something frame accurate would be required.
And, no, there’s no quality loss when going from a more compressed format – such as H.264 – to a less compressed format – such as ProRes. It is similar to pouring water from a 5 gallon bucket into a bathtub. The bathtub is so big, it easily handles all the water with no loss. BUT… pouring a bathtub full of water into a bucket DOES generate loss because the bucket isn’t big enough to hold the entire bathtub’s worth of water.
ProRes 4444 (and 4444 XQ) are designed for cameras that are not shooting typical video color spaces. This would include LOG-C and RAW files. For material shot as H.264, which has a limited color space and high video compression, ProRes 422 will be fine.
The file format you choose for your project determines image quality, color grading control, render speed, and the format of the final master file output. If a file is in a format that doesn’t need transcoding – FCP X won’t transcode it.
Larry
I think this is the right place to ask this question. I am editing from two different cameras. I use optimised files. When I place the second camera clips on the timeline it always renders these even though there are no effects, etc. Whichever camera I put on to the timeline first it always renders the second camera. I thought the whole point of optimising was that it converted the clips into an edit friendly format and they would not need rendering. Thank you
Peter:
Sorry for the delay in answering – I missed this.
You are correct, if the two files match technically, they should not need rendering. However, assuming you aren’t superimposing the two shots or adding titles, rendering would be needed if one or more of the following don’t match:
* Codec – this would match because optimizing converts to ProRes 422
* Frame size
* Frame rate – this is probably the culprit
* Interlacing vs. progressive scanning
My guess is that the frame rates don’t match – I’d look there first.
Larry
If you are importing both MPEG-2 and H.264 CODEC video into FCP X, is there any advantage to converting them all to H.264 (or MPEG-2) before importing?
Dan:
No – and there are many reasons NOT to convert them. Both MPEG-2 and H.264 are highly compressed, with limited gray-scale and color ranges. They are good distribution formats, but not good editing formats.
A MUCH better option is to optimize both formats into ProRes 422 during import.
Larry
Thanks Larry. Would you suggest converting the files to ProRes 422 using a video converter such as Squared 5 or will FCP X convert them all to ProRes 422 during import, if I check “Transcoding: Create optimized media” during import?
Dan:
Just check “Optimize Media” during import. FCP X will handle it automatically. There’s no value in using other software first.
Larry