
![]() Apple continues improving the audio performance of Final Cut Pro X, but there is still very limited audio mixing in the latest version. It it far better to move your audio files out of Final Cut Pro X into dedicated audio software, such as ProTools or Adobe Audition.
Apple continues improving the audio performance of Final Cut Pro X, but there is still very limited audio mixing in the latest version. It it far better to move your audio files out of Final Cut Pro X into dedicated audio software, such as ProTools or Adobe Audition.
If ProTools is your tool of choice, you’ll need to use X2Pro, from Marquis Broadcast. Check their website for tutorials.
However, my preferred audio tool is Adobe Audition, so this article shows you how to get audio out of FCP X, into Audition, then the final mix back to FCP X.
NOTE: This won’t discuss the process of repairing or mixing audio. I have an entire training series dedicated to explaining how Audition works. Check it out here.
THE WORKFLOW
The process seems a bit tricky, but after you’ve done it once, you’ll be surprised at how fast this is. Here’s the overall workflow:
Done.
NOTE: You only need to export the video if you need to mix the audio while watching the video.
SECOND NOTE: Audio software, such as Soundtrack Pro, ProTools, and Audition only supports one video clip per project. For this reason, we need to export the video edit as a single clip in order to import it into Audition.
EXPORTING THE AUDIO
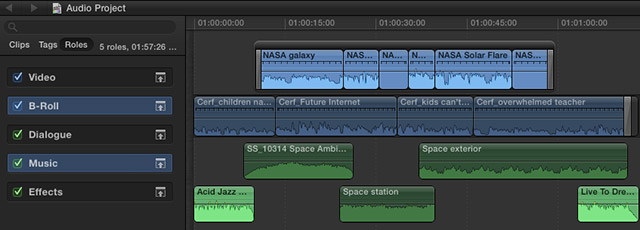
Here’s a simple project that contains an interview, B-roll, dialog, effects, and music.
To orient you on the Project, I opened the Timeline Index (type Shift+Command+2) and highlighted the B-roll and music clips. The remaining green audio clips are sound effects and the dialog is synced with the video. I only did this for illustration. This is NOT a step you need to do.
Let’s assume this project is complete and read for a sound mix.
NOTE: Only send projects to Audition after you have locked picture. Making audio changes to a Project in Final Cut after you send the Project to Audition for sound mixing will mean restarting the entire audio mixing process from the beginning.
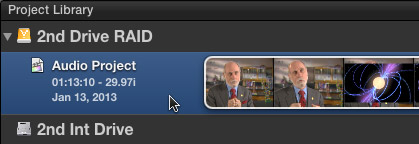
Switch back to the Project Library (type Command+0) and select the Project you want to send to Audition. (Yes, you can export from the Timeline. In this case, we will use the Project Library.)
With the Project selected, choose File > Export XML. This exports the contents of your Project as an XML file. (XML is an industry-standard format for moving data from one program to another.)
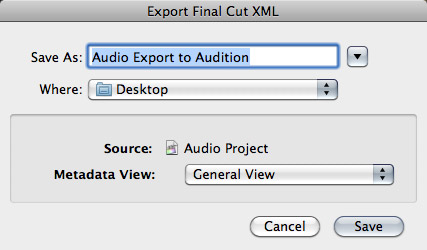
Give the file a name and location. When sending files to Audition, metadata is not particularly relevant. So leave the metadata popup set to General.
EXPORTING THE VIDEO FILE
If you need to see the video in order to mix the project, you will also need to export a separate video file. This is because audio applications only support adding one video clip per project, and XML exports all video as separate clips.
In the video export, we don’t care about image quality. We just need a simple way to get the picture out of FCP X. Because of this, there are a number of options you can use. Here’s a easy one.
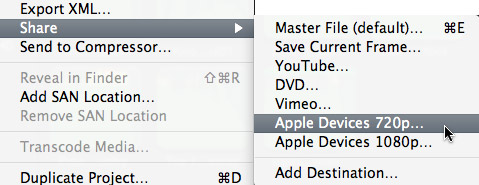
With your Project still selected in the Project Library, choose File > Share > Apple Devices 720p
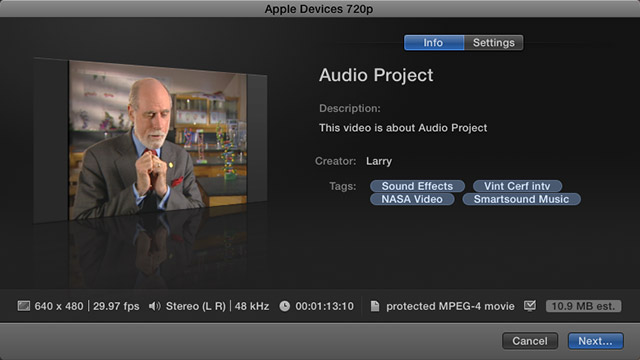
This creates a fast export using the default settings for an Apple device.
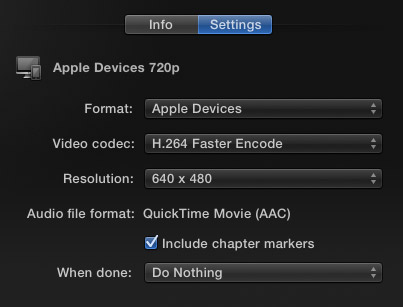
Click the Settings button if you want to examine them. Then, click Next.
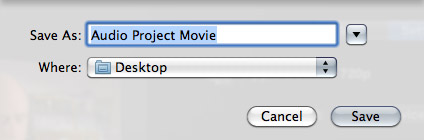
Give the file a name and location and click Save. We’ll come back to this file in a bit.
CONVERTING THE XML FILE
Converting the FCP X XML file requires a special sauce because while Audition doesn’t know how to read FCP X XML, it DOES know how to read an FCP 7 XML file.
Intelligent Assistance has created a nifty utility that handles this conversion: Xto7. This $49.99 utility is available in the Mac App Store and is extremely simple to use.
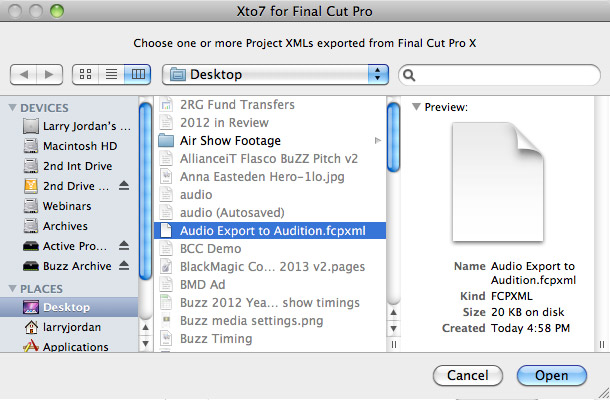
Start the utility, then select the XML file you just exported from FCP X. Click Open.
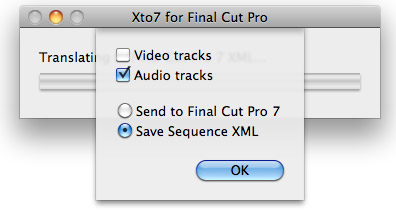
Because we don’t need the video – we exported the video as a separate file just a bit earlier, remember – uncheck Video tracks and click the Save Sequence XML radio button.
Then, click OK.
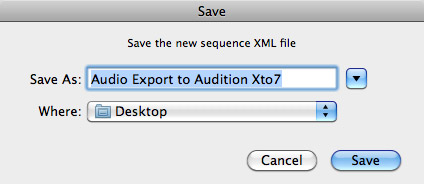
Give the new file a name and location and click Save.
IMPORT AUDIO INTO ADOBE AUDITION
Choose File > Import (Command+I) and select the XML file you converted in Xto7.
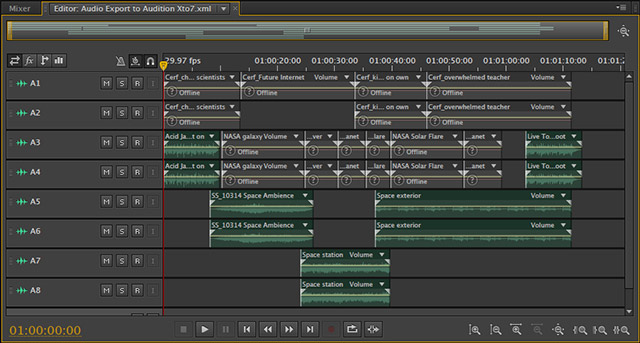
After a few seconds, your FCP X audio project opens in Audition. All stand-alone audio is green, while all audio synced to video is gray. For some reason, Audition doesn’t automatically link to audio which is stored with a video clip.
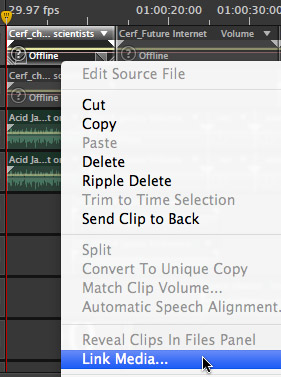
Select any one, and only one, of the offline audio clips in the Multitrack Timeline, right-click it, and select Link Media.
Navigate to the Event folder containing the original media for this Project and relink the audio clip.

Once you select any clip to relink, Audition will automatically relink all other clips in the same folder. Repeat this relinking as necessary.
When everything is relinked, save your audio project file.
IMPORT VIDEO INTO ADOBE AUDITION
Importing video is much easier. Select File > Import and choose the video clip you exported earlier from FCP X.
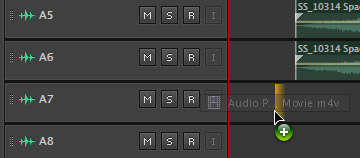
From the Files panel, drag the video file anywhere into the timeline.
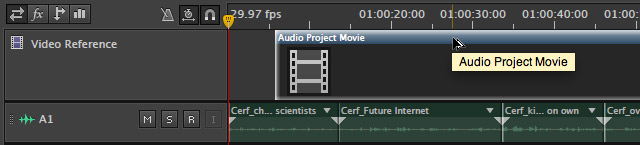
Audition automatically creates a video track for the clip at the top of the Timeline and places the video in that track.
With your mouse, drag the video clip all the way to the left until you can’t drag it any farther. This syncs the video to the audio clips.
You are now ready to mix.
EXPORTING THE FINISHED MIX
Once your audio mix is complete, and ready to export, select File > Export > Multitrack Mixdown > Entire Session.
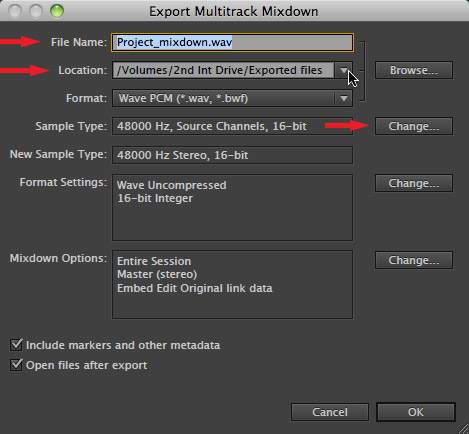
In the Export Multitrack Mixdown window, give the file a name and location.
WAV files are uncompressed and extremely high quality. Generally, for video, change the Sample type to 48000 by clicking the Change button next to Sample Type. Leave Bit-depth set to 16-bit.
The rest of the settings are fine.
Click OK and your final mix will be exported as a stereo file.
IMPORTING INTO FINAL CUT PRO X
Open your project into the Timeline in Final Cut and select the Event into which you want to import the final audio mix.
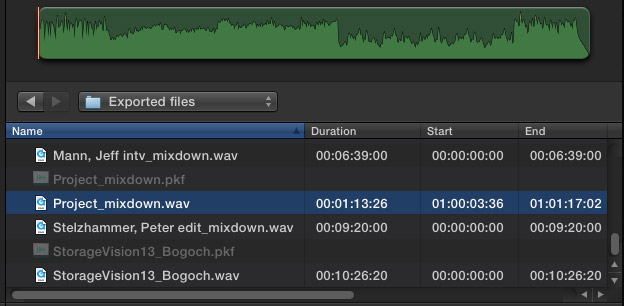
Choose File > Import and select the WAV file you just exported from Audition.
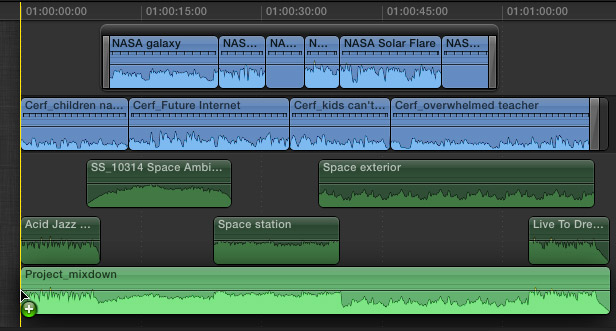
Drag the WAV file to the bottom of your project, and be sure it is aligned all the way to the left in order to assure it is synced with the video.
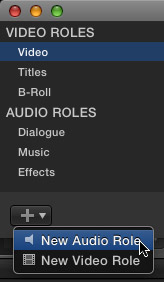
Roles allow us to easily turn on, or off, audio that we don’t need. We need to do this in order to only hear the final mix, and not other audio in the Timeline. This means we need to create a custom Role for our final mix.
Select Modify > Edit Roles and click the Plus icon in the lower left corner to create a New Audio Role. Give this a name like “Final Mix.”
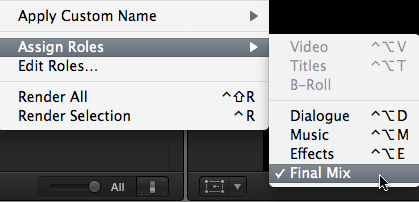
Select the Final Mix audio WAV file in your Project, then choose Modify > Assign Role > Final Mix to apply that Role to the selected audio clip.

Finally, in the Timeline Index, turn off all Audio Roles EXCEPT the Final Mix.
This mutes all audio that isn’t assigned the Role of “Final Mix.” You are now ready for final export of the Project containing the final audio mix.
SUMMARY
Although this seems like a lot of steps, the actual transfer process is very rapid. Once you’ve done this a time or two, it will become very easy.
Adobe Audition is a great application for recording and mixing audio. Once you start using it for mixing your video projects, you’ll wonder how you lived without it.

2,000 Video Training Titles
Edit smarter with Larry Jordan. Available in our store.
Access over 2,000 on-demand video editing courses. Become a member of our Video Training Library today!
Subscribe to Larry's FREE weekly newsletter and
save 10%
on your first purchase.
26 Responses to FCP X: Send Audio to Audition to Mix
Newer Comments →-
 Rob says:
February 6, 2013 at 6:10 pm
-
 Larry Jordan says:
February 6, 2013 at 10:53 pm
-
 Brad Stoddard says:
February 11, 2013 at 2:36 pm
-
 Brad Stoddard says:
February 11, 2013 at 10:25 pm
-
 Larry Jordan says:
February 11, 2013 at 11:17 pm
-
 FurryToes says:
May 20, 2013 at 7:19 am
-
 Phaedrus says:
August 22, 2013 at 4:59 pm
-
 Larry says:
August 22, 2013 at 5:55 pm
-
 Fabian Feiner says:
September 13, 2013 at 3:52 am
-
 Larry Jordan says:
September 13, 2013 at 7:21 am
-
 David Parke says:
September 17, 2013 at 10:12 pm
-
 David Parke says:
September 17, 2013 at 10:17 pm
-
 Larry says:
September 18, 2013 at 10:26 am
-
 Durin Gleaves says:
September 18, 2013 at 11:11 am
-
 David Parke says:
September 18, 2013 at 11:17 am
-
 Jason Madeja says:
January 12, 2014 at 10:12 am
-
 John O'Neill says:
December 17, 2015 at 1:04 pm
-
 Due South Films says:
March 24, 2014 at 2:41 am
Newer Comments →Thanks for this Larry, a shame one needs to buy Xto7 to accomplish this in Audition.
Are there any filters or easier ways to remove background noise (like Audition’s capture noise print)?
Not in Final Cut Pro X itself, no.
Larry
Tried the workflow with xml file from FCPX using X to 7 and Audition crashes. Only audio files in the audition files library no multitrack timeline. Clicking on Multitrack or the xml file in the library crashes the app. Not ready for prime time I guess. Trying other options.
Brad
FIXED THE PROBLEM
In the Xto7 .xml file there was a 0 (zero) in the audio sample rate . The clue was that Audition showed several of the files had 0 sample rate which should have been 48000. I changed the 48000 on line 36 from 0 to 48000 and it solved the crashing. Now just have to clean up the audio tracks in FCPX. No storylines or compound clips allowed.
Thanks, Brad. Editing XML code is not something I normally do. I appreciate your getting back to us with the solution.
Larry
You could simply export audio as separate audio files (using roles) and drag them into an audio editor – as I do into Logic?
I guess, then, you’re assuming that having “handles” is so important, that one needs to export XML. But you probably should mention that this is why you’re going to all this workflow trouble?
I export audio, as .wav files/tracks, without anywhere near this complex a workflow and it works almost identically – just without “handles” (ie automatically sized “regions” in your audio editor).
Larry,
I followed your workflow and all seemed to be fine until I exported my master file. For some reason the disabled ‘dialogue’ audio roles were exporting along with the final mix – It’s now 1 am and I’ve finally solved the issue by breaking apart the ‘dialogue’ audio and deleting it. Any ideas on why it would have been exporting when it was turned off?
Thanks.
Phaedrus:
Remember, turning clips on or off has no impact on export, even using the Timeline Index.
You need to turn Roles on or off as part of export settings, not in the Timeline.
Larry
Dear Larry,
does this work with a multi-clip?
e.g. 9 cameras
Thanks, Fabian
Fabian:
Yes…. but, remember that a multicam clip only plays the audio from whatever video is selected. If you want to send audio from ALL nine cameras, you would need to edit all the audio from each camera into the timeline as a separate layer. Then, this process works.
Larry
I find that I use a lot of J and L cuts in my pieces. Audition doesn’t seem to like that. Any audio I muted in my b-roll clips, therefore not applying any J or L cuts, comes in just fine. Most all of my audio on the main storyline seems to make Audition think that I have done a time remap on the clip. Any pointers?
It seems the problem I am having is with my Synchronized clips. I synced with H4N audio and those are all the clips that are coming in, or rather not coming in, because of the “time remap” error.
David:
Hmmm…. I don’t have an answer for this. I’ll pass this to Adobe and see what I can learn.
Larry
Hi David,
Any chance I can have you send the XML file to audbugs@adobe.com ? No media is necessary.
To make certain I understand the problem correctly, the problem audio clips are simply not there in the Audition timeline? Is the synchronized audio just repositioned on the timeline, or does this operation apply some warping to the asset to keep it aligned over time? If it’s the latter, I suspect this may be a real-time operation in FCPX that wouldn’t modify or generate a new asset and it may not be sending these clips over or instead, generating a reference with time remap settings that would not be compatible with Audition. (Any real-time effects must be rendered out when converting to FCXML.)
Thanks,
Durin Gleaves
Adobe Audition
Thanks for the response, gents! The audio IS there but it’s WAY down the timeline. Maybe an hour or more, I didn’t look at the timeline that closely I will send the XML now. And where they are way down on the timeline, they’re not really in time with the spot. They’re just sort of floating around down there. You’ll see when I send. Not sure I understand the latter part of the question. I removed any and all effects from the clips but what I think you may be saying is that FCP X is retiming the H4N clip to keep it in sync with the raw footage and that’s messing things up? Bummer.
Let me know! Thanks!
Has anybody found a good way to do this with synced clips? I’m recording on a BMCC and recording audio on a zoom. Audition will only bring in the BMCC audio clips and nothing from the synced zoom. The zoom clips that were synced to the BMCC simply do not appear in Audition.
Larry, you said the synced audio tracks would need to be edited into the timeline but I can’t find an easy way of doing that. I can’t do a “detach audio” from synced clips. Using “expand audio” doesn’t do anything except layout the synced clip differently. The ability to detach audio from a synced or multicam clip would solve my problem. I could just detach all audio and delete the BMCC tracks, leaving the zoom as independent clips.
thanks for the help, guys!
Hi Jason,
I would love to have a solution to that problem other than dragging the audio in and syncing it manually – did you com across a solution? it seems a little trickier than I anticipated for what must be a commonly required task
Great tutorial. Love Audition. Love Xto7. Speedy workflow with great results. What more could you ask for!