 David Doob pointed this out to me — you can change the shape of the line between two keyframes to add ease-in/ease-out behavior to the transition between two keyframes.
This is new to FCP X – in FCP 7, we needed to manipulate Beziér control points attached to each clip. No longer.
Here’s how this works.

1. Select the clip to which you want to add keyframes and type Control+V. This displays the video animation bars above the clip. These bars include a variety of parameters.

2. Click the small dark box on the right side of the Compositing: Opacity bar to enlarge it. I am using Opacity to illustrate this, however, this technique works on many different settings within FCP X – as long as they can be keyframed. (Not all parameters have this dark box, which means the bar containing their settings can’t be expanded.)

3. Press the Option key and click the thin horizontal black line where you want to set keyframes. In this screen shot, I’ve already set two keyframes and am getting ready to set a third between them.
To move a keyframe in time, drag it horizontally. To change the value of a keyframe setting, drag the keyframe vertically. Once you start dragging a keyframe in one direction, say, horizontally, you can’t change direction to vertical until you release the mouse.
NOTE: To move a keyframe, or line, in smaller increments, hold the Command key while dragging.

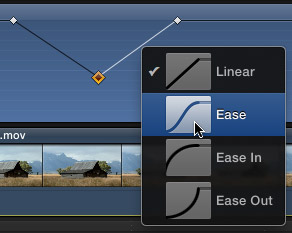
Now the magic starts. Right-click the line BETWEEN two keyframes to reveal four line shapes and select the timing adjustment you want to make:
Linear. This is the default setting, which provides a constant speed between two keyframes.
Ease. Starts and ends slowly, accelerates in the middle.
Ease In. Starts quickly, slows as movement approaches the ending keyframe.
Ease Out. Starts slowly, speeds as movement approaches the ending keyframe.
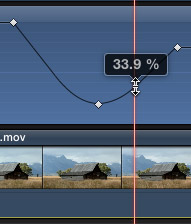
 Notice that the shape of the keyframe curve now illustrates your selection. In this screen shot, the keyframe line on the left illustrates Ease In (slows on approach), while the line on the right illustrates Ease Out (slow on leaving).To reset a line back to its default setting, right-click on the line and select “Linear.”EXTRA CREDIT
 The easiest way to move a pair of keyframes is to click the line between them. Dragging the entire line up or down resets both the starting and ending keyframe values.
WRAPPING UP

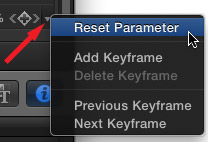
To delete all keyframes associated with a specific parameter of a clip, select the clip, go to the Inspector, and click the small, downward-pointing triangle next to the keyframe diamond at the far right side of the parameter control.
To hide the Video Animation bars, select the clip and type Control+V again.
22 Responses to FCP X: Keyframes and Curves
Newer Comments →-
 Harald says:
January 14, 2013 at 8:07 am
-
 Larry Jordan says:
January 14, 2013 at 10:37 am
-
 Brad Stoddard says:
January 23, 2013 at 10:31 am
-
 Dimitrios says:
March 3, 2013 at 1:58 am
-
 Steven says:
May 15, 2013 at 11:08 am
-
 Larry Jordan says:
May 15, 2013 at 12:11 pm
-
 Nealb says:
August 31, 2013 at 5:55 pm
-
 Eric C. says:
December 23, 2013 at 10:12 pm
-
 Louw says:
August 13, 2014 at 6:24 am
-
 Terence says:
June 9, 2013 at 1:27 pm
-
 Tegid says:
August 28, 2013 at 2:21 am
-
 Cris Blyth says:
September 18, 2013 at 5:28 am
-
 planeta porno says:
March 18, 2014 at 1:57 pm
-
 Terence says:
November 14, 2015 at 3:16 pm
-
 Mark says:
February 2, 2016 at 5:42 pm
Newer Comments →Hi,
You seem to know a lot about FCPX. Can you tell me how I can select more than one keyframe at the time? I’d like to delete all keyframes in a clip, but it’s quite a few, and takes time to select-delete-repeat.
Harald:
In the Inspector, click the small curved reset arrow for the parameter you want to reset. Or, right-click the keyframe plus icon in the Inspector and select Delete All Keyframes.
Larry
NIce tutorial on key framing opacity. There is a problem with linear keyframes in all other “video animation” bars. As far as I can see there is no “right click” to bring up the ease in, ease out parameters. Even a linear setting on the keyframe still has some whonky movement. Someone discovered a solution of adding and deleting keyframes on each side of the keyframe to make it linear. What do you think? Does Apple know about this issue?
Thanks for your excellent grasp of all things FCPX
Brad
Would I would be correct in assuming that I can’t change the keyframe type (i.e. ease out) for scale changes.
Larry, did you ever respond to Brad Stoddard’s comment regarding your ease in/ease out tutorial? Like Brad, I can’t figure out how to GET RID of the ‘whonky’ additional movement that FCP X puts in. I just want it to go straight from point A to point B.
Steven:
No, I didn’t respond to Brad because I don’t have a work-around. I haven’t had time to look into this, investigating this is on my list…
Larry
I agree with Steven … it is so annoying. I do training video of equipment where I have to zoom in to show say the control panel and, no matter what I do (including right clicking on the point in the viewer to set them to “straight” they still do the “whonky” thing.
Hey Larry,
Just found a work-around for this if you still haven’t. With a clip selected in the time, click on the “transform” option in the viewer window, select the keyframes from there, right click to change from linear to smooth.
Eric
Thank you Eric, I was about to start pulling my hair out.
Hello Larry,
Is there a way to speed-up and slow down a clip in the animation line using keyframes? It would offer more control than the retiming options. Thank you!
Hi Larry,
Been to this website a lot for help – many thanks on many occasions.
Is there a way to move a set of keyframes together? Often when I’ve finished a montage with moments of commentary in it when it goes through feedback the client will want a clip added here, subtracted there. This is easy enough except for changing the audio levels on the music underneath…. It would be great to select all of the keyframes and move them along or back along the time line accordingly. OR should I be sending feedback to FCP on this?
Very best,
Teg
ok.. but the right-click interpolation option doesn’t seem to work for audio clips… WHY ? FCPx ?? WHYYYYYYYYYY
I hope I’m simply doing it wrong.
grrrrrr…
Hi! I just wanted to ask if you ever have any issues with hackers?
My last blog (wordpress) was hacked and I ended up losing a few months of hard work due to no
backup. Do you have any methods to prevent hackers?
I’ve been trying to curve shape the volume animation on a piece of detached audio, but CTL-clicking does not bring up the curve shape selector. Is this really true? It’s a major inconvenience if so as I add in a lot of voice-over and foley where I mostly do not want the default log curve type of fade.
@Eric Thank you. The ole’ use the Transform Tool trick. Probably how it was designed to work in the first place. I wish Apple would make transitions linear by default.