
![]() FCP X has always been able to import Photoshop documents — except that if they had layers, FCP would mash them down to a single layer. Which sort of misses the whole point of having layers in the first place. Apple fixed this with the 10.0.3 release of Final Cut Pro X.
FCP X has always been able to import Photoshop documents — except that if they had layers, FCP would mash them down to a single layer. Which sort of misses the whole point of having layers in the first place. Apple fixed this with the 10.0.3 release of Final Cut Pro X.
NOTE: By the way, this technique works regardless of which version of Photoshop you are using.
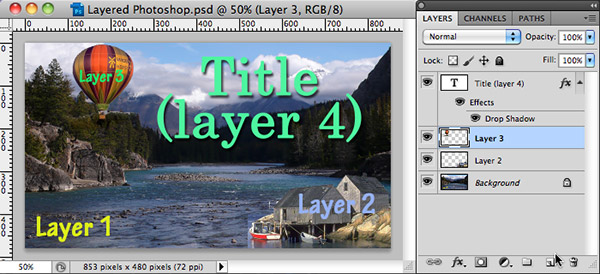
For instance, here is a four-layer Photoshop (PSD) file; incredibly well-designed, if I do say so myself. (This is, perhaps, why no one hires me to do graphics design work…)
I merged the text for each layer into the image to keep things simple. Layer 1 is the text and the background picture. Layer 2 is the text and the small buildings. Layer 3 is the text and the balloon. And Layer 4 is the large green text with a drop shadow layer effect.
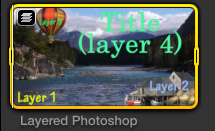
I saved the file as a PSD and imported into FCP X, just as you would import any other file. See the small icon in the top left corner of the image? The one that looks like a stack of papers? That indicates it is an imported Photoshop file.
So far, so good. But we’ve always had the ability to import PSD files – its just that they were always converted to a single layer PNG. Here’s the new part: double-click the file in the Event Browser and watch what happens.
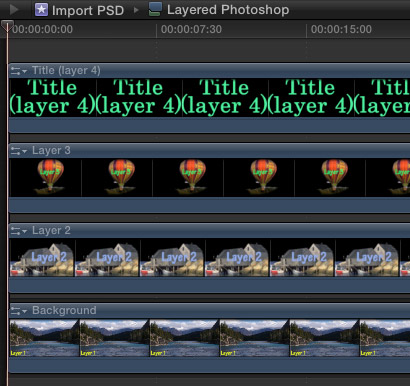
The image opens into a special form of the Timeline that allows you to see and manipulate each layer. In fact, each layer is now separate and selectable.
For example, you can:
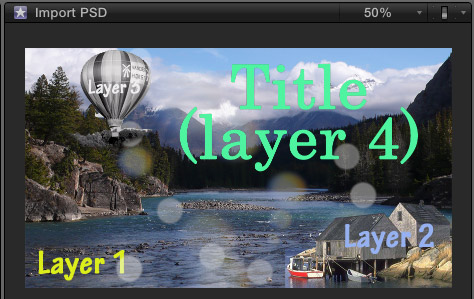
Here, for example, I applied a lighting effect to the bottom layer, which is immediately reflected in the image of the composited clip in the Viewer. Since you are changing the clip in the Event Browser, your changes will be retained as part of the clip when you edit it into the Timeline.
Hmmm… notice that the title in Layer 4 no longer has a drop shadow? More on that in a minute.
WHEN IS A CHANGE NOT A CHANGE?
If you have applied changes to an imported layered Photoshop file, then edited that file into a Project, your changes will travel with the Event clip into the Timeline.
However, if you go back and change that Photoshop file in the Event Browser again, your changes are reflected back to the clip in the Event Browser, but NOT to the edited clip in the Timeline. This means you can change your Event Browser clips without worrying that you are breaking an edited clip in your Project.
A CAUTION
Remember that drop shadow layer style I mentioned when I created the image in Photoshop? Well, just as with Final Cut Pro 7, FCP X does not know how to interpret those layer styles, so it just ignores them.
This means that you either need to apply things like drop shadows in FCP X — something Final Cut does not do well at this point — or you need to rasterize your text inside Photoshop in order to “bake” the drop shadow into the file. The easiest way to do this is to merge the text layer into the layer below it, by selecting the text layer, the choosing Layer > Merge Down.
NOTE: You may be able to simply rasterize the layer in Photoshop (Layer > Rasterize > Text), but I’ve not seen this work reliably.
SIZE MATTERS
There’s one other issue that isn’t new, but still needs to be considered. Many video formats, including all the standard definition ones, shape their pixels as rectangles, while the computer uses square pixel shapes. This means that if we are bringing in full-screen images, we need to compensate for the difference in pixel shape (called “pixel aspect ratio”) when we are sizing the image in Photoshop.
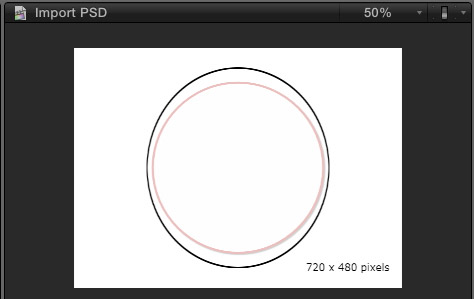
Here’s the problem. In this screen shot, the red circle was created in Final Cut Pro X as a test image. The black circle was created in Photoshop. When the PSD file is imported, the black circle became squished, and looks more like an egg. This is caused by the differences in pixel aspect ratio between Photoshop images and video images. The red circle was created in FCP just to prove how weird the black circle looks. (Oh! Those poor squished pixels.)
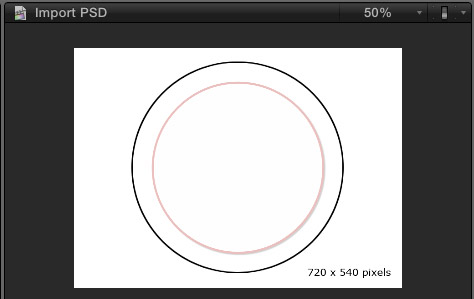
Here’s how the image should look. Two perfect circles, the black one from Photoshop and the red one generated inside FCP X. When images are created at the right size, all the geometry is retained. (As before, the red circle was created in FCP as a test image.)
This means that if we are creating images in Photoshop we need to make sure they are the right size so the geometry comes across correctly.
IMPORTANT NOTE: Setting the image size correctly is only necessary when you are importing images that are supposed to fill the screen AND match the image size of the video format. Odd-sized images are always imported as square pixels.
| Sizing Photoshop Images for Video | |
|---|---|
| Video Format | Image size |
| NTSC 4:3 | 720 x 540 x 72 |
| NTSC 16:9 | 853 x 480 x 72 |
| PAL 4:3 | 768 x 576 x 72 |
| PAL 16:9 | 1024 x 576 x 72 |
| HD 720 | 1280 x 720 x 72 |
| HD 1080 | 1920 x 1080 x 72 |
NOTE: Video images do not use DPI; that is a setting used only for printing images. Video is only concerned with total pixels across by total pixels down. By convention, we say that video images use a resolution of 72 dpi.
SUMMARY
Aside from retaining the layers as separate layers inside Final Cut, importing a layered Photoshop file is the same as importing any other graphic file. And, unless you open it to reveal the separate layers, you can edit it into your projects the same as any other clip.

2,000 Video Training Titles
Edit smarter with Larry Jordan. Available in our store.
Access over 2,000 on-demand video editing courses. Become a member of our Video Training Library today!
Subscribe to Larry's FREE weekly newsletter and
save 10%
on your first purchase.
14 Responses to FCP X: Import Layered Photoshop Files
For SD that’s true. But 1080p Pro-rez is square pixel image already. So there is no need to worry about importing PSD graphics.
Larry,
I’m having trouble importing Photoshop files with their layers. I made sure the files are RGB it is 8 bit. I am on Final Cut X 10.6 and on Mountain Lion. I tried importing a simplified version of my file with only one text file and I made sure the drop shadows and effects were merged together into one text file. When I try to click the Photoshop file in the event folder nothing happens. I opened it into the timeline but it doesn’t appear with the separate layers. Is there something else I can check?
Esther
Larry,
Never mind. I decided to start from scratch thinking the files I received may have some kind of incompatibility issue. I created a new Photoshop file with the dimensions I needed, making sure it was in RGB mode and 8 bit. I duplicated the layers into this file and then imported that new file into Final Cut X and it imported fine with all the layers no problem.
Esther
Thanks so much Esther! I was beating my head against the wall trying to figure out why mine wasn’t working. I did what you did (created a new PS file and copied the layers to it) and now it works!!
And thanks to Larry for all the info on this subject! You’re always so full of useful info!
Hi Larry,
I’m missing the automatic update function of modified photoshop layered files in Final Cut Pro X 10.1.1
Is there a way to to that?
Regards
Frank
Does importing layers work in 10.1? Ouch, I need to do a project with PSD files and they’re all coming in flattened. Please help!
Mike
Mike and Frank:
Imported layered Photoshop images was added in the 10.0.6 update and still works in the 10.1.1 version. Once the PSD file is imported, double-click it in the Browser to open it in the Timeline where you can access the layers.
If you edit it into your Timeline (rather than double-clicking it) you’ll get a single layer image.
Larry
Hi Larry,
Yes, indeed.
But an update of imported PSD files like tif-files (after external changings) is missing.
FCPX 10.1.1 still holds the old version of the updated psd-file without actual changes.
Regards
Frank
Correct. Essentially, FCP makes a copy of the PSD file and loads the copy into the Timeline.
This protects against accidentally changing a file that is edited into your sequence.
From my memory, you “should” be able to right-click on a PSD file and choose to open it in Photoshop. That may allow you to make changes without needing to reimport the file. But I’m away from my computer and can’t test this to be sure.
larry
Hi Larry,
I tried to import a PSD file and all I got was black (no layers either).
I tried it with a new PSD file and it worked. The difference is the new PSD file was an HD image size (didn’t think that mattered) and didn’t have gradient or adjustment layers. Does FCPX not handle these more ‘complicated layers’?
THanks!
Mike
Mike:
Adjustment layers and layer effects need to be rasterized before importing into FCP X. For whatever reason, FCP 7 and FCP X are not able to interpret them.
Larry
Why when I import the PSD file (that has 8 layers) looks fine in the FPCX browser but when you put it into the time line the layers do not match up. Some are larger than others?
Don:
Select the Photoshop document and, in the Video Inspector, change Spatial Conform to None.
FCP X is automatically scaling each layer to fill the frame, which is not what you want.
Larry
THANK YOU LARRY! Working on a film trailer in FCP X, from a FCP 7 project converted with SendToX. The drop shadows on titles had not come through, so when you mentioned dropping filter on layer in FCP it clicked.