
 The smaller a camera becomes the more we want to hand-hold it, rather than put it on a tripod. The problem hand-holding causes is that in spite of our best efforts, the image starts to shake.
This causes two problems:
NOTE: Motion is the enemy of image compression. The more an image moves, the higher the data rate necessary to maintain image quality, which means the larger the compressed file.
Also, with all the DSLR cameras in use today shooting video, there’s a second problem: rolling shutter effects.
This article shows you how to solve both of these issue.
STABILIZE YOUR IMAGES

Meet Lola! (And thanks to Michael Shaw for permission to use his images in this article.)
The problem with this shot is not the star, but the shakiness of the camera. Fortunately, Final Cut Pro X provides a built-in way to stabilize the image.

You can only stabilize shots that are in the Timeline. So, begin by editing your shot into the Timeline, then select the clip.
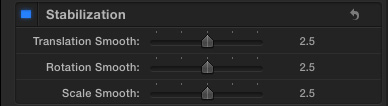
Open the Inspector (Command+4), scroll down and turn on Stabilization by clicking the checkbox. (Blue means it is on.)
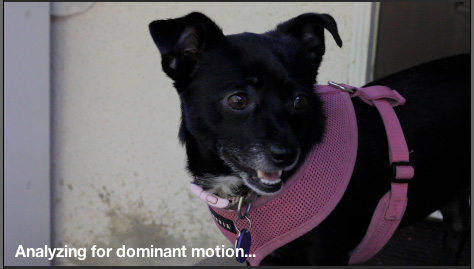
A message is displayed at the bottom of the image in the Viewer saying the Final Cut is analyzing the movement in the clip. What this means is that Final Cut is looking to separate movement that is caused by a shaky camera from movement caused by an actor, or, in this case, a dog, moving within the frame.
This analysis can be a lengthy process, depending upon the duration of the clip. Unlike FCP 7, which would analyze the entire clip stored on your hard disk, FCP X only analyzes the duration of the clip you’ve edited into the Timeline. And, yes, like other effects in Final Cut Pro X, this analysis happens in the background, so you can keep on working.
NOTE: If you have a long clip, and only need to stabilize a short part of it, cut the clip with the Razor Blade tool (B) before turning on stabilization.

When the analysis is complete, the message disappears and the image zooms in slightly. (Notice the width of the gray post on the left of the frame, compared to the initial shot above.)
UPDATE – June 4, 2012
Nicolas Nilsen reminded me that this background process stops when you move the mouse, or resume editing. By definition, a background process is “something that can be interrupted.” Analysis is very processor intensive, so it politely waits while you do other stuff, then resumes when there is a pause.
HOW THIS WORKS
What Final Cut does is sense when the image moves down, so it moves the image up by the same amount and at the same time. If it senses the image moves to the left, it moves the image a corresponding distance to the right. By applying an opposite movement of the same amount, it cancels out the shake.
But in order not to shoot off the edges of the image, Final Cut scales up slightly. The amount of zoom is dependent upon the severity of the shake. The more severe the shaking, or the more aggressively you want to compensate for it, the more the image needs to scale up.
For low resolution images – such as SD – this scaling can cause problems with pixilation. HD has more pixels to work with, so the image degradation is less. Still, for truly severe shaking, you may need to balance the amount of movement compensation with the quality of the image.
NOTE: You only need to analyze a clip once. Adjusting the settings does not require new analysis.
WHAT YOU CAN ADJUST
There are three sliders that allow you to adjust the amount of stabilization and where it is applied. All three settings default to 2.5. A setting of 0 turns that setting off. A setting of 5 applies the maximum amount of compensation. The higher these numbers, the more an image needs to scale up.
Translation Smooth: This compensates for movement horizontally and vertically. Of the three controls, this has the greatest impact on stabilizing an image.
Rotation Smooth: This compensates for rotating the camera around the image. On many shots you may be able to decrease this setting without causing problems.
Scale Smooth: This compensates for shaky zooms. If you are not zooming during the shot, set this to 0.
ROLLING SHUTTER

A new problem that appeared with the advent of DSLR cameras is “rolling shutter.” Notice in the screen shot above that both the trash cans and light post are leaning to the right?
DSLR cameras don’t take the entire image at one time. Instead, they record the image from the top of the image sensor to the bottom. If the camera isn’t moving too quickly, the slight time lag this causes creates no problem. But, if the camera is in the middle of a rapid pan – as it is here – vertical lines take on a decided lean.
Fortunately, this is easy to fix – and you can even adjust how vertical you want your lines to become.

As usual, select your clip, open the Inspector, and scroll down to Rolling Shutter.
Click the checkbox to turn it on (blue).
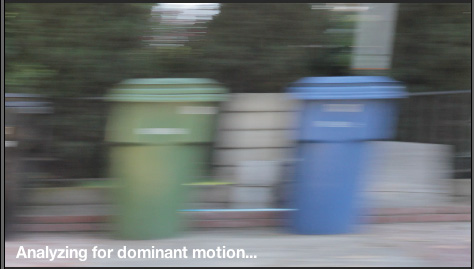
The analysis message appears again and Final Cut communes with itself to figure out what needs to be fixed.

Again, when the analysis is complete, the image zooms in slightly and image lines are back vertical, where they should be. (The blur is caused by the speed of the zoom. This is both natural and expected.)
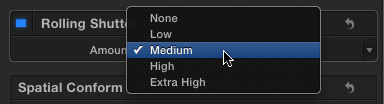
You can adjust the amount of the correction by selecting one of these menu options. None turns the effect off. The higher settings cause greater amounts of compensation.
Most of the time, Medium, which is the default, should be fine.
NOTE: I’ve created new video training which helps you learn how to use the effects in Final Cut Pro X. Click here to learn more.

2,000 Video Training Titles
Edit smarter with Larry Jordan. Available in our store.
Access over 2,000 on-demand video editing courses. Become a member of our Video Training Library today!
Subscribe to Larry's FREE weekly newsletter and
save 10%
on your first purchase.

65 Responses to FCP X: Image Stabilization
← Older Comments Newer Comments →-
 SteveneE says:
July 31, 2013 at 12:01 pm
-
 Mateja says:
August 1, 2013 at 9:19 am
-
 Sebastian says:
August 2, 2013 at 1:37 pm
-
 Jim Snape says:
August 5, 2013 at 2:15 am
-
 Will says:
August 5, 2013 at 10:02 am
-
 jeff perry says:
September 2, 2013 at 4:20 pm
-
 Walter Ellis says:
September 28, 2013 at 9:19 am
-
 Larry Jordan says:
September 28, 2013 at 9:35 am
-
 AIC says:
October 12, 2013 at 6:35 pm
-
 Larry Jordan says:
October 12, 2013 at 6:57 pm
← Older Comments Newer Comments →I have an issue with a short clip (<1sec) where, when I try stabilization, the effect turns itself off after trying to analyze the clip. I turn the effect on again, FCPX starts analyzing, and then the effect turns off. I'm wondering if this is a known condition, where the system automatically turns off an effect if it can not apply the effect, without providing any alerts, or if this is a bug. I have not yet tried extending the clip, applying the effect, then trimming the clip back to the desired length, but I wanted to add this issue and see if there was known issues out there. Thanks for the great blog!
– Steve (a former FCP7 editor trying to up to speed to speed with FCPX)
I have a strange, re-occuring stabilization issue with multiple versions of FCPX.
The stabilized clip shows a moving black frame, as if the cropping never takes place. It is kind of cool but definitely unwanted. I have seen motion do this as well.
The only way to ensure there is no moving border (black on sides of frames) is to switch the stabilization off on the clip altogether.
Some clips wind up with this effect, and others are not affected….
Any thoughts?
Hi Larry,
I noticed that the drop-down arrow for each of the three stabilization methods shows ‘Add Keyframe’, etc. Dos this mean I could keyframe how much stabilization is done in a clip? However they are greyed out. This would be a great way to minimize or turn off the stabilization effects over time. How can I set a keyframe for on e(or each) of these methods?
A really good article and some good points.
I’ve found the following while using stabilization, maybe others might find this has happened to them too?
1. Black Frame/Footage flipped etc. I’ve found this happens occasionally when the motion is too much for FCP X to work with. A solution I’ve used is to select stabilization, then work with the controls until the footage is centered and not cropped.
2. Lack of option to Stabilize. I too have had this every now and then. For me it seems to be when I’m working with footage that might have different settings, e.g some at 24p and some at 25p (depending on the camera used). I haven’t found a solution for this yet.
I ran into this bug as well, and to narrow it down the cause for people. It seems to only happen to a clip that is dragged into the main timeline. If I create a gap to be the main and then drag the clip above to where it not the main timeline it gets the function back.
I am now in 10.0.9, hope this is helpful.
I have several video clips that were taken when i was hiking through a narrow tunnel in a rock cliff. The raw video was extremely shaky, and after applying the stabilization, the edited footage appears to be floating and moving about in a black box. Is there any way to crop out these black border areas, showing just the stabilized video footage?
Hi Larry,
Thanks for the info. I have an issue though on a clip that’s a minute or two long, of which I’m only using a few seconds. The clip as a whole is footage of walking around getting sd footage of people at a wedding with a phone’s camera. The camera was left rolling between “shots” that were only seconds long at a time.
I understand the quality issue with stabilising sd footage, but a different problem comes up when I try with this footage. The footage of the short part I want to use starts shaking more than it did without stabilisation. I have played with the settings without success.
What I think happens, is that the entire clip is analysed, including all the big shakes between shots, and then when I turn on stabilisation for the small part I want to use, it also tries to compensate for those big shakes in the original footage, making my quieter parts worse. In this post you said that blading off the part you want to use would only stabilise that part, but you also said that a clip only needs to be analysed once. This could mean that any portion of the original clip only has stabilisation turned on or off but still according to the analysed data from the entire clip. I know it shouldn’t work on a per-average-across-the-clip calculation, but that’s the only explanation I can think of for my mildly shaky footage becoming wildly shaking footage when I turn on stabilisation.
What do you think?
Walter:
What I suggest is create a new project, and import ONLY the portion of the clip you want to stabilize.
Then, export that clip using File > Share > Master file.
Import that clip and stabilize it.
You should get better results.
Larry
This is a great article. I really didn’t understand rolling shutter until just now!?!
I have a strange issue that I was nearly certain was rolling shutter-realted (but now don’t) — hope this isn’t too off-topic, then.
I record with a five-year old Sony Handycam, import into FCPX and then edit. I export at 1080 and upload to Youtube. Here’s a sample: http://youtu.be/VKIVaUezFG4
At anything less than 1080, the playback is fine. If I play it back at 1080, there are all sorts of blur/wobble/streak-lines across the motion points. Jump past 20 seconds to see it (at 1080). The playback is flawless locally on my HD. It’s being introduced by Youtube compression, I think.
Again, I thought it was a rolling shutter issue that I needed to address at export, but now think it’s something else. Do you have any ideas on what it might be?
If playback is flawless on your local system, and you are seeing artifacts when playing on YouTube, the problem is not with your video. It is most likely compression artifacts caused by YouTube recompressing your video.
Rolling shutter only affects DSLR cameras, not tape-based Handycams.
Larry