
![]() Audio Enhancements are a feature in Final Cut Pro X that automatically analyze audio during import to determine if it is too soft, too noisy or has hum, then automatically corrects for those problems.
Audio Enhancements are a feature in Final Cut Pro X that automatically analyze audio during import to determine if it is too soft, too noisy or has hum, then automatically corrects for those problems.
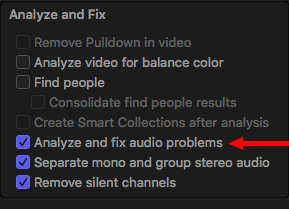
When you import any audio, whether a stand-alone clip or part of a synced audio/video clip, there’s a checkbox in the Media Import window that enables automatic audio correction: “Analyze and fix audio problems.”
When this is checked, Final Cut checks every imported audio clip for levels, hum and noise; then applies filters to correct any problems found.
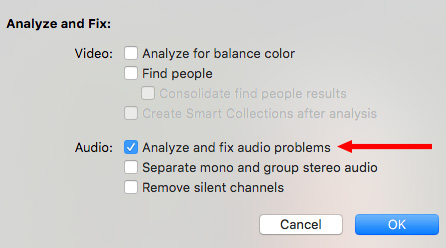
If you decide to import files without checking this box, you can analyze and fix your audio later by selecting the clips in the Browser and choosing: Modify > Analyze and Fix then checking the Analyze and fix audio problems check box.
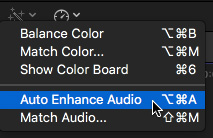
NOTE: Clips must be analyzed in the Browser. Once they are edited into the Timeline, you need to use the Magic Wand menu at the bottom left of the Viewer and choose Auto Enhance Audio.
Personally, I find it faster and easier to always analyze clips during import. That way, I don’t need to worry about doing it later.
WHAT IS ENHANCEMENT?
According to the Final Cut Pro X Help files:
Analyze and fix audio problems: Analyzes the audio for hum, noise, and loudness. Final Cut Pro automatically fixes problems that are considered severe (marked in red) and flags problems that are considered moderate (marked in yellow).
All enhancements are designed to correct most common audio problems automatically or with minor adjustments. You can let Final Cut Pro analyze audio and adjust these problems in your audio clips automatically, or you can make manual adjustments in the Audio Enhancements section of the Audio inspector.
When you import a clip with the “Analyze and fix audio problems” import option selected, only severe audio problems are corrected. If the clip contains moderate problems, these appear in yellow next to Audio Analysis in the Audio Enhancements section of the Audio inspector after the clip is imported. To correct these problems, you need to automatically enhance audio in the Audio inspector.
IMPORTANT: Audio enhancement works on the component level, not the clip level. If your audio clip has more than one audio component (for example, a dual mono clip), select an individual component, then proceed with the enhancements.
NOTE: Think of an “audio component” as an audio channel in a clip.
FINDING AND ADJUSTING SETTINGS
Finding and modifying enhancement settings is a bit more difficult in the 10.3 update; in fact, it confused me to the point that I couldn’t find it during a recent corporate training. Sigh…
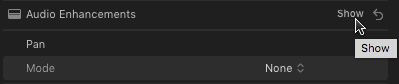
Select the clip, or clips, you want to adjust, open the Inspector and click the Audio icon. Then, to the right of “Audio Enhancements” title click Show. This reveals some of the settings. However, it doesn’t reveal all of them.
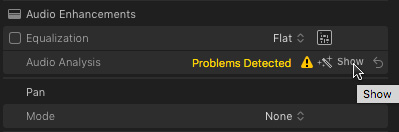
To the right of “Audio Analysis” click Show, again. This reveals the individual settings for all three Audio Enhancements.
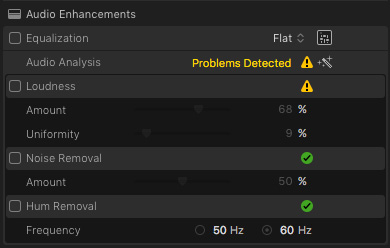
Equalization allows you to “shape” the sound by manipulating specific frequencies in the clip.
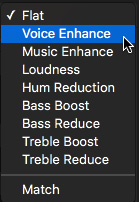
Flat means that no changes are made to the audio. The other eight options are presets that optimize the audio for different situations. The best option is to try these for your clips and see which, if any, you like the best.
Every clip will respond differently to the same setting, but you’ll get a sense of which to use with a little experimentation.
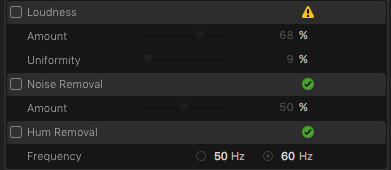
A red flag indicates a clip with a severe problem that Final Cut fixes automatically. A yellow flag indicates a clip with a moderate problem that Final Cut does not fix automatically. A green check indicates a clip with no problems in that category.
SUMMARY
While a good audio engineer can improve on these settings, when you are in a hurry or lack an understanding of how more advanced audio tools work, using Audio Enhancements can help make poor audio sound much better.
While there’s no substitute for getting a clean recording on set, when the worst happens, Final Cut provides a way to make things better.

2,000 Video Training Titles
Edit smarter with Larry Jordan. Available in our store.
Access over 2,000 on-demand video editing courses. Become a member of our Video Training Library today!
Subscribe to Larry's FREE weekly newsletter and
save 10%
on your first purchase.
30 Responses to FCP X: Using Audio Enhancements
Thank you! The double “show” link was really throwing me off!
I can’t access the options of hum removal, noise removal, and loudness in my latest version. Are these no longer available?
Liam:
They are still there.
Select an audio clip in the Timeline:
* Go to the Audio Inspector
* Click “Show” to the far right of the words “Audio Analysis.”
You’ll find there there.
Larry
Thank you! Even Apple’s support site doesn’t tell you how to show the “hidden” audio controls. Was driving me nuts!
I too, can’t access the options of hum removal, noise removal, and loudness in my latest version.
Re: “Select an audio clip in the Timeline:
* Go to the Audio Inspector
* Click “Show” to the far right of the words “Audio Analysis.”
You’ll find there there.”
Nope. Not for me. Now I’m frustrated.
I’m using…
Mac High Sierra 10.13.5
Final Cut 10.4.3
Thanks.
Paul
Paul:
I’m running the same configuration and the settings are there:
* Select an audio clip
* Open the Inspector and click the audio tab
* Click Show to the right of the text “Audio Enhancements”
* Click the “magic wand” icon to the right of “Not analyzed”
* All selected clips are analyzed
* You can now adjust EQ, Loudness, Noise Removal, and Hum Removal
Larry
i don’t get those menu items either. the only ‘show’ that’s available to me is at Audio Analysis–no matter where i put the cursor.
also, for Pan and Effects, but not Equalization, Loudness, Noise Removal or Hum Removal. why doesn’t FCPX also make them available in the drop downs?
El Capitan, OS 10.11.6, FCPX 10.3.4. thank you!
Yayoi:
Hmmm… Apple moved them in the 10.4 update. In 10.3, make sure you are selecting the audio clip in the Timeline, then go to the Audio Inspector and see if the Audio Enhancements section is there.
If not, read this for troubleshooting advice.
https://larryjordan.com/articles/trouble-shoot-your-apple-final-cut-pro-x-system/
Larry
thank you! i never got an email notice of your response so i called Apple. just like you wrote, i had failed to click and highlight the Dialogue box. instead, i was trying to bring up the menu by highlighting the entire clip. duh.
thank you for the extra info, too. this is not easy software to use, and i’ve learned so much by watching your YouTube videos. you rock!
Hi Larry,
I’ve had some issues with fining this too in the Audio Inspector. However, when I click Show to the right of “Audio Enhancements” it doesn’t reveal ‘Equalisation’. It’s completely missing from the inspector. it only shows Audio Analysis, but not Equalisation above it, as your screen shot shows. Would you know why this is not showing? I’ve trashed the preferences and reinstalled Final Cut Pro X.
Tracey:
Good point. In recent versions of FCP X, Apple moved this out of Audio Enhancements and turned it into an audio effect, which is where it belongs. The new procedure is:
* Select the clip
* Go to Effects Browser > Audio > EQ > Logic section > Fat EQ.
This is a high-quality EQ filter than can be applied to any clip, group of clips or compound clip.
Larry
Thank you so much Larry! It’s always frustrating to try and find out where the latest enhancements or effects are when FCPX is updated.
I’ve already booked in another follow up call from Apple Care, because the chap didn’t know why it wasn’t showing in the Audio Inspector, so when they call back this morning, if they don’t know already, i’ll be passing this information on from the maestro of editing – Larry Jordan!
Thank you once again for giving me (and others) the inside tip to this change, so I can get rid of the fan noise that the Producer wouldn’t turn off when I was recording. Tracey
Also Larry. I just got off the phone to Apple Care and an FCP specialist. Apparently another issue I had is that because I record in ‘4 mono stereo’, a multi-faceted recording, apparently I don’t have the option to bring up ‘Equalisation’ and therefore show Noise Removal. If it was recorded just as Stereo then it would give me the option in the Audio Inspector. We just tested it with a dummy audio recording in stereo via QuickTime and imported it into FCPX and it brought up the Equalisation and Noise Removal options when in Stereo mode. It’s strange because i’ve often recorded in 4 mono stereo (with both the wireless recorder for dialogue and the camera mic) and it worked previously on the older versions of FCP X. The Apple Care rep and FCP X Specialist (Alex) I just troubleshooted with is giving feedback to the team see if it can possibly be available in the future for more complicated sound recordings such as Four Mono, Two Stereo or music recordings. I’ll have to go back to your lessons I purchased and see how you configured the FAT EQ audio effect and save it in my effects settings. Phew.
Thanks once again, Larry.
Tracey:
Happy to help – thanks for the update.
Larry
Hi Larry,
I’ve just tested the FAT EQ and used the Male Voice booster that you speak about in your online lessons. It has improved the dialogue sound, but there is still the sound of the fans in the background that i’d like to reduce as the other dialogue recordings didn’t have the fans going, and the difference is obvious from one clip to another. Would you reduce the frequencies or DBs (Gain) in the other columns of FAT EQ to cut out the background sound, as you didn’t speak about this when you created a Male Voice Booster or Female Voice Booster in your lesson? Thank you for your advice Larry. Tracey
Tracey:
The FatEQ filter is not appropriate for noise reduction, it is no where close to precise enough. Worse, air conditioner noise spans ALL frequencies, so a simple graphics equalizer can’t get it out.
Either use the noise reduction filters in FCP X that are found in Audio Enhancements, or move the clip to an audio processor like Izotope RX 6 to get rid of the noise, then bring it back into FCP X for editing.
larry
Thanks for that feedback Larry. : )
Tracey
Hi Larry,
Just for some feedback and maybe inspriration (because I had a lightbulb moment) to solve a problem. I tried out the iZotope RX 7 (they’ve recently upgraded) trial version, and they wouldn’t let me save the with that audio processor. It worked really well, but I wasn’t willing to spend that money on buying the software quite yet. As I was the girl further up in this flow that recorded with both my wireless recorder and the camera mic and it was recorded in ‘4 stereo mono’ I couldn’t access the Equalisation or the ‘Noise Removal’option within the Audio Inspector in the latest version of Final Cut Pro X. However, my light bulb moment came last night was ‘why don’t I make the clip that’s affected by the fan noise a compound clip and then it will be in Stereo mode’. It worked and I was able to apply the Noise Removal and the audio is now slick. Got there in the end through lateral thinking. : ) I hope this helps other Final Cut Pro X Editors.
Hi Larry, I also do not see the “show” next to audio enhancements, but my clip came in at Dual Mono. When I click on each of the two Dialogues, then the Audio enhancements show. I have 2 channels on my camera: one with a lavalier mike and one with a shotgun mike. I do not quite understand why the audio came in as Dual Mono and not stereo (but then what I don’t know about sound would fill an entire internet). Anyway, is this the way it is supposed to be, that I have to click on each channel to see the audio enhancements? Also, is there a way to save a ‘preset’ on audio enhancements, so I can apply the numbers to multiple clips? Or do I just have to do it by writing down the levels (or selecting multiple clips and applying all at once?)
Thanks in advance,
Debbie
Debbie:
Treating each channel separately is the way it is supposed to be. For example, if you had a hum on one mic, you would only want to treat that one mic.
I don’t know of any way to create an “audio enhancement preset.” Have a pad of paper handy.
Larry
Thanks, Larry. I’ve got my pad!
How would you suggest that I remove a deep, rumbling (distant) train noise from my audio track? I have tried the “noise removal” which WILL work but now my actor sounds a little like in a can or squished. Suggestions?
Sandy:
Yeah, noise reduction is a definite two-edged sword. I suggest you add a low-cut filter to the audio, and remove all frequencies below 150 Hz. It may not remove all of it, but it should help a lot.
Larry
Hi, Larry.
I recently upgraded FCPX to 10.4.9 on my iMac (so now it matches the version on my laptop!) but I’m not seeing the audio enhancement options I need (mainly loudness), and I don’t see where to add them. It’s not a matter of show/hide; when it’s ‘showing’, I see audio analysis. What am I missing???
Travis:
It’s still there.
Select the clip, or clips, you want to adjust.
Choose Modify > Auto-Enhance Audio.
In the Audio Inspector, click “Show” to the right of Audio Analysis.
And all the tools you are used to are there.
Larry
But doesn’t it normally just ‘live’ there? Like, on my laptop, I never click auto-enhance audio; when I select a clip in the timeline (that has audio), those options are just there.
Travis:
Nope. Auto-Enhance can be activated when you import media, but, otherwise, you need to engage it for it to apply to a clip.
Larry
Sorry. You’ve been generous with your time and I hate to beat a dead horse here, but something’s not quite right. Could it be that I don’t have my import settings properly selected?
In my timeline, I’m clicking between two different clips. One is a commercial that I created in a previous version of FCPX, exported and then re-imported as a clip; the other is a show I recorded this morning and imported this afternoon. When I select the commercial, options for loudness/noise/hum appear without any sort of analysis, but not for the show.
Travis:
I don’t have any good ideas here. Quit FCP X, then relaunch from the Dock while pressing both Option + Cmd. That allows you to delete preference files.
This won’t harm your data, but does empty the “Recent Libraries” list, so be sure you know where your libraries are stored before you do this.
If that doesn’t work, contact Apple Support.
Larry
Thanks, Larry. I appreciate the time.