
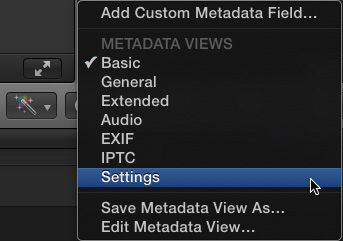
![]() Sometimes, when you are shooting SD (standard-definition) video, you set the camera menu to shoot an aspect ratio of 16:9, but the camera isn’t paying attention, so it records the video as 4:3. (This can also happen when shooting 2K 4:3 with the Arri Alexa.)
Sometimes, when you are shooting SD (standard-definition) video, you set the camera menu to shoot an aspect ratio of 16:9, but the camera isn’t paying attention, so it records the video as 4:3. (This can also happen when shooting 2K 4:3 with the Arri Alexa.)
The result is that your video looks squished.

NOTE: The opposite can also happen, where video that’s supposed to be 4:3 is recorded as 16:9. For example, in the screen shot above, the earth looks “stretched,” because the aspect ratio is wrong.
This problem is easy to fix, but not easy to find. Here’s how.
CORRECT THE ASPECT RATIO
Select the clip, or clips, that you want to correct in either the Browser or the Timeline.
Open the Inspector (Cmd+4) and click the Info tab.
In the lower left corner of the Inspector, change the popup menu to Settings.
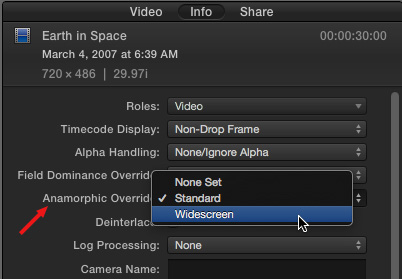
Then, in the Settings window, change the Anamorphic Override from None Set to Standard, if you want to display the selected clips in a 4:3 aspect ratio, or Widescreeen, if you want to display the clips in a 16:9 aspect ratio.

Here’s the earth, displayed at the correct aspect ratio for this clip, which is 4:3.
SUMMARY
The Anamorphic Override does not appear for HD clips, as HD is always 16:9. However, for SD clips that display incorrect aspect ratios, this is a very fast way to fix it without damaging image quality.

2,000 Video Training Titles
Edit smarter with Larry Jordan. Available in our store.
Access over 2,000 on-demand video editing courses. Become a member of our Video Training Library today!
Subscribe to Larry's FREE weekly newsletter and
save 10%
on your first purchase.
24 Responses to FCP X: Reset an Incorrect Aspect Ratio
One problem that does occur sometimes that is FCP might not read 1140×1080 correctly, and then there is no anamorphic popup. Also video that 960×720 presents a problem. It’s always read as the Panasonic anamorphic 720p format. There is no popup to change 960×720 from widecreen.
Yes: that 960 problem! What is the math for that? I had a bunch of them in a recent phone video project, and I just Shift-dragged transform until it looked normal. Is there somewhere to see the frame size? Above window shows percentage.
I know this is a really old topic but I am having a similar problem. I am working with video which alot of clips were mistakenly shot on DSLR vertically instead of horizontally so I am having to resize alot of them and double expose, blend modes etc….but my question is how do I know when I am resizing them if it is 16:9 ? or the right size. i dont want to get through all of this and have to fix it after. Thanks.
Sammy:
You can’t resize vertical video to make it 16:9 – everything will look stretched and fat.
To make sure you are creating 16:9 video, create a 16:9 project, then put your vertical video into it – WITHOUT resizing it. This will give you the full frame of video, with large black bars on the sides. Then, fill this black background with whatever images or background makes sense. The project size determines the size of your final exported video.
Larry
well since the update that SPECIFIC field is missing. now I can’t find ANYWHERE to change the aspect ratio and it really drives me CRAZY that final cut feels the need to change an aspect ratio when it has not been told to do so. WHERE IS IT NOW???
Chris:
Um, deep breath. It’s still there. In the same spot: Info Inspector > Settings > Anamorphic Override.
Email me directly if you want me to send you a screen shot.
Larry
no its not there. thats the only setting that is different on mine, anamorphic doesnt even exist.
Meagan:
At first blush, I thought you were correct, as I could not get it to appear either. However, after additional research I learned that:
* The setting needs to be enabled – it is off by default – as outlined in this article.
* Then, it STILL won’t appear unless you also select a clip, such as a 4:3 or 16:9 SD video, that has the possibility of being stretched or squeezed accidentally.
It is this last step that, I suspect, you are missing. When I select an HD clip, this Inspector option does not appear. When I select an SD clip, this option DOES appear – provided, as I mentioned, that the setting is enabled in the Edit Metadata window.
So, if you are not seeing this when you select a clip, then this is a clip who’s aspect ratio can’t be altered using this menu.
Thanks, this was a really good question.
Larry
Wow, some insanely complicated process to accomplish something very basic, still not accomplished. And no, the process for enabling settings is not outlined in the article. FCPX is one heck of a butchered application.
Skyler:
Smile… Three steps does not seem to me to be “insanely complicated.” And the Settings option in the lower left corner of the Info Inspector has been there since FCP X’s initial release.
Larry
Right click on one of your libraries and select new project. A window should come up with options to custom set the aspect ratio/ resolution and audio and render properties. For the aspect ratio, select from one of the options or type in a custom value. A new timestream with the aspect ratio settings you set should pop up linked to your new project. Opening or copying any media into this timestream will not necessarily automatically change the video file to the aspect ratio. Using the transform tool in the video tab of your inspector (the square box next to the video view), you can resize the clip to the size of the screen.. Then you can right click on the file to make a new compound clip and that will change the resolution to your settings (e.g 1080p, 720p, etc.). That should work and is the only way o knows to do it on Final Cut Pro X without the anamorphic override feature.
Thank you Joshua. This was the only way I could make it work. Nov 2020
Very new to FCP X and may be misinterpreting this….I started editing a video and wanted to use some clips shot in portrait mode (vertically). Of course, I got the black bars either side. Trying spacial conform, crop etc to fill the frame but this seems impossible without distortion or cropping in and losing half the image. Is there a fix for this?
Tommy:
Yes, you need to emulate what broadcasters do. Duplicate the clip and stack them above each other.
Apply Spatial Conform to the bottom clip, and add a Gaussian Blur so it is very blurry.
Then, the top clip will be in focus, and the bottom clip will fill the frame.
Larry
Hi Larry, I just tried your solution, but…..after applying the Gaussian Blur I see that it does now remove the black bars and fills the frame, but…….it crops right into the frame, thus losing half the image. I was able to achieve the same results with just a crop or a spacial reform, and similar results with the Ken Burns effect without applying the blur. What I was hoping for was to fill the frame without zooming in (cropping). Do you think it is possible to achieve this without the crop?
Tommy:
No.
The purpose of the lower, blurred, image is to fill the frame so there are no black bars.
The purpose of the top image is to display the entire image with no cropping. You can not fill the frame AND not crop the image; unless you also accept the black bars.
Larry
The help makes no sense. The menus mentioned in the article do not exist.
Marek:
First, remember that these settings only apply to Standard Definition (SD) video. Virtually all video shot today is High-Definition (HD), which is always 16:9. (It can be cropped to other aspect ratios as needed.)
Second, the Settings menu in the lower left corner of the Metadata Inspector in Final Cut Pro X. The default menu choice is Basic. Click on it, then choose Settings from the popup menu.
Larry
I have a video shot on iPhone in hi def, but vertically. I want to rotate it and crop away all but the performer. There’s enough resolution to make a decent video using that part, but I want to crop a 16×9 ratio shape–how do I do that? And then I want to export it to YouTube as a lower resolution video with either 16×9 or 4×3 aspect ratio so it can be viewed on normal setups.
Dave:
You don’t need to rotate it, just crop it.
Create a 16:9 project, say 1280×720. Drop the clip into it, you’ll see black bars on the side, don’t worry about it.
Select the clip, then go to the Video Inspector.
At the bottom, change Spatial Conform to None.
Then, at the top of the Inspector, use Transform > Scale to size the image the way you want.
Done.
Larry
Hi, im hoping you’ll be able to respond to this soon. I’m not seeing the Anamorphic Override option after clicking settings. Like the other commenters, the option has been removed. Can you please just tell us how to enable this. Thank you
Janelle:
The option is still there – as described in this article. I just checked using FCP X 10.4.8.
The KEY is this only appears for standard definition clips, and, potentially, some HDV. HD, by default, shoots a 16:9 aspect ratio, which means this option doesn’t apply or appear.
Larry
Hello Larry want to say I enjoyed learning FCPX from your Creative Live presentation best money spent. I do have a question. When placing images shot from my Canon 5D markII What is the best aspect ratio and overall image size to obtain the clearest looking image for our photography videos. Thank you and CHEERS from Canada.
Robert:
Like all things in tech: “It depends..”
“Normal” video uses an aspect ratio of 16:9, vertical video uses an aspect ratio of 9:16.
The “clearest” image is one displayed at 100% – however most DSLR cameras shoot more pixels than a typical video image. So, you can retain clarity either by scaling the image smaller, or cropping the edges, depending upon how you want to adjust the framing.
Image size is dependent upon the video project you create: 1280 x 720, 1920 x 1080 or 3840 x 2160. These numbers are fixed in a video format.
Larry