
 While we can create slo-motion in Final Cut Pro X using retiming (Modify > Retiming > Slow Motion), the problem with slomo created during post-production is that, often, the image quality suffers.
The reason for this is that the software needs to “invent” data to create the slow motion. For example, normally, if you shoot a clip at 30 fps and edit that into a 30 fps Timeline, video frame 1 plays at Timeline frame 1, video frame 2 plays at Timeline frame 2 and so on.
But, let’s say we want that clip to play at 50% speed. FCP plays video frame 1 at Timeline frame 1 AND frame 2. Video frame 2 plays at Timeline frame 3 and frame 4. In other words, the duration of each video frame is doubled, making it appear as though it was playing in slow motion.
Playing the same video frame multiple times works fine when you only want to slow a video clip a little bit. But, as you stretch a frame into a longer and longer duration, the video starts to look more and more like a series of still images, rather than slow motion. For example, a video clip playing at 10% speed stretches the duration of each video frame to 1/3 of a second (for a 30 fps Timeline)!
As speeds get really slow, FCP “invents” visual data by looking at all the pixels in source video frame 1 and comparing them to all the pixels in source video frame 2. Then, FCP creates as many in-between frames as necessary by moving the pixels incrementally from their starting position to their ending position. (Animators call this “tweening.”) This creates much smoother slow motion but generally damages the visual quality of the image because so much data is invented, not shot.
A much better way to create slow motion is to shoot the original activity with a camera recording at a high-frame rate. This provides the best possible image quality, though it does require your camera to shoot at frame rates faster than normal playback. This is why you read about cameras shooting 120 fps, or 500 fps. The Phantom camera is legendary for shooting thousands of frames per second for truly dazzling slow motion.
However, we don’t need to shoot at extremely high frame rates to slow something down. For example, shooting 60 fps video for playback in a 30 fps Timeline yields 50% slow motion with a higher image and movement quality than can be achieved using software alone. (Or, shoot 50 fps for playback at 25 fps to achieve 50% speed.)
NOTE: I’ve been told that NFL Films shoots all their game coverage at 32 fps, for playback at 24 fps. Even that small 25% speed slow-down yields amazing results.
THE PROBLEM
The problem is: how do you get Final Cut Pro X to play high-frame-rate video in slow motion? Because, by default, FCP plays all clips, regardless of frame rate, at the speed that makes motion look normal.
For example, if I shot 60 fps material, but played it in at 24 fps Timeline, FCP would adjust the speed of the source clip so that the video would play as though it was shot originally at 24 fps. It does this by smoothly dropping unneeded frames. Hmm. That’s nice, but not what I want.
Converting normal playback speed to slow motion is easy, but not intuitive.
AN EXAMPLE
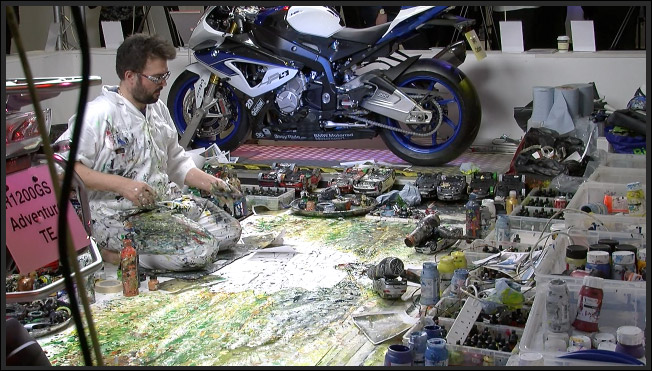
One of the more interesting booths at BVE 2014 in London this year was CVP (www.cvp.com). Here, they had an artist creating large-scale paintings and we got to watch the creative process. (Which, I might add is a WHOLE lot messier than video editing!)
Our team recorded some video of him working (thanks, Michael!) to use as part of our BVE coverage for our YouTube channel.
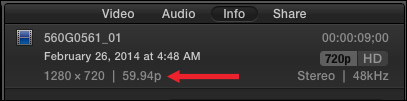
If we select the clip in the Browser and open the Inspector (Cmd+4) and click the Info tab, we see that this clip was shot 720p at 59.94 fps progressive. (I tend to use this setting for all my web materials.)
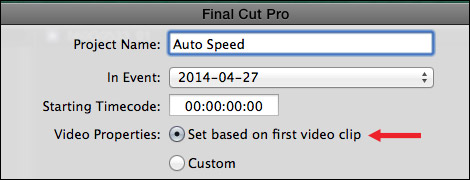
Normally, when I create a new project, I would let FCP select the project frame rate based upon the frame rate of the first source clip edited into the Timeline.
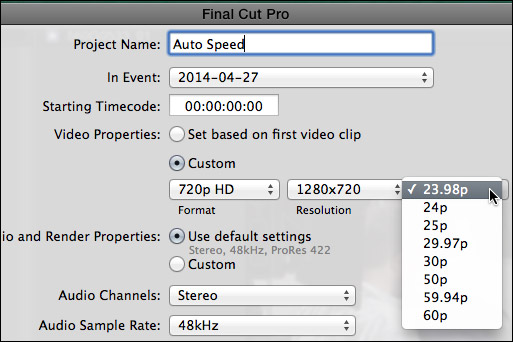
But, in this case, I want the source clips to play back in slow motion. To do this, create a custom project using a slower frame rate than the source video clip.
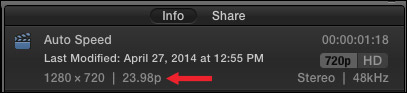
For example, here, the project shows a 23.98 fps frame rate.
When the clip is edited into the Timeline. notice that the Timeline retains the speed you set in the Project Properties panel, not the speed of the first clip edited into it.
NOTE: I have sometimes seen FCP reset the frame rate based upon the speed of the first clip edited into the Timeline. To prevent this, edit a generator into the Timeline first. This “freezes” the frame rate. Once you’ve edited at least one source video clip into the Timeline, you can remove the generator.
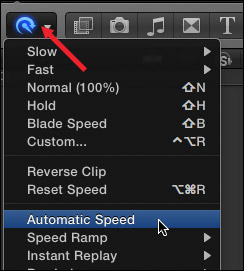
To convert the clip from playing at 100% speed to playing in slow motion, select the clip in the Timeline, then either choose Modify > Retiming > Automatic Speed, or, from the Retiming menu in the Toolbar (which looks like a Smurf wearing a headset) select Automatic Speed.

Instantly, the clip displays the Retiming Editor at the top of the clip and adjusts the speed of the clip so that every frame in the video plays back in the Timeline.
When you play the clip, you have instant slow motion with beautiful images. In this example, the clip is playing at 40% of normal speed.
Very cool and very easy to do.
EXTRA CREDIT
You can use this technique to create fast motion video by creating a project with a frame rate that’s faster than the source video clips. However, for most situations, time lapse photography in the camera will yield faster speeds and better results.

2,000 Video Training Titles
Edit smarter with Larry Jordan. Available in our store.
Access over 2,000 on-demand video editing courses. Become a member of our Video Training Library today!
Subscribe to Larry's FREE weekly newsletter and
save 10%
on your first purchase.

31 Responses to FCP X: High-Quality Slow-Motion
← Older Comments Newer Comments →-
 Anna Ehredt says:
December 4, 2016 at 6:21 pm
-
 Larry says:
December 4, 2016 at 6:32 pm
-
 Anna Ehredt says:
December 4, 2016 at 8:08 pm
-
 stanley njobelo says:
April 4, 2017 at 1:57 pm
-
 Dominique Jean says:
July 14, 2017 at 8:25 am
-
 Larry says:
July 14, 2017 at 12:13 pm
-
 Peter Metcalf says:
August 28, 2017 at 12:41 pm
-
 Jota says:
February 6, 2018 at 10:24 am
-
 Kristi Harris says:
March 17, 2018 at 7:46 am
-
 Larry says:
March 17, 2018 at 10:31 am
← Older Comments Newer Comments →Ah, I see! Thank you! So this is more of an issue with shooting the footage while not making sure both cameras were at the same frame rate, correct? The only thing I am still confused/concerned about is that my partner and I shoot weddings and I try to get normal speed footage while he does the slow motion. But doesn’t the camera shooting slow mo need to be at a higher frame rate? I’m confused about how to have both cameras at a matching frame rate when slow mo needs to be much higher. And just out of curiosity, why should my settings be at 60p? (I got lucky apparently by setting it to that!)
Anna:
Good question. The magic of 60 fps is both 24 and 30 fps divide into it equally, which means you’ll get the smoothest possible playback.
If one camera shoots normal speed, and the other camera ONLY shoot slow-mo, then sent your project settings to match the speed of your “normal” camera. That way, things that are running at normal speed will look their smoothest; while the slo-mo clips will be slow, regardless.
However, in normal shoots, you want all cameras running at the same frame rate to minimize problems with stuttery playback.
Larry
I’m sure you get this all the time, but you are wonderful. Thank you for such speedy feedback and for sharing your knowledge with us all!
Man… You are far too kind. It worked for me here.
All the way from Tanzania. I appreciate your help
Hi There,
I’ve read through all these comments and am still slightly confused. I have a project I’m working on that is set to 24fps 1080p, all the footage was taken with those settings, however my camera will only shoot 60fps @ 720p. Do I have to downgrade all the 1080p footage to 720p in order to use a few 60fps 720p clips?
Dominique:
Nope. Just drop your clips into your project and FCP X will convert them to the correct size and frame rate automatically. However, 720p clips added to a 1080p timeline will look a little soft, due to the up-conversion.
larry
Found this really usefull for a job I’m doing today with over cranked field footage. Had a few issues in the past but inserting a generator first seems to be workiing well. thanks Larry
Thanks a lot Larry this was super helpful! Keep this teaching up man, you have a nice one! 🙂
I have a Sony Z150. I recorded some footage at 120 frame rate for slow motion. When I open Final Cut it does not even see the file from the memory card. Can you point me in the direction of what I am doing wrong? Thanks!!
Kristi:
This camera shoots XAVC, which is a new codec that only recent versions of FCP X support. Make sure you are running the most recent version of FCP X.
Or, you can switch to shooting XDCAM on the camera, which all versions of FCP X support.
Larry