
![]() This article was suggested by a comment Bill Code made in an email about his problems in exporting multi-channel audio from FCP X. Bill writes:
This article was suggested by a comment Bill Code made in an email about his problems in exporting multi-channel audio from FCP X. Bill writes:
I often need to export two audio tracks (NATSOT and voice-over). It took me a while to figure out this needs to be done by assigning Roles. The problem is it seems to make using compressor presets impossible. I now have to export a file and then put it into compressor afterwards. Has anyone (Larry?) figured this one out?
Bill, you are correct. All the compression presets assume you are exporting stereo audio from FCP X; they ignore Roles. You are also correct in that we need to create a custom preset in Compressor to compress multi-channel audio.
While there is no way we can export Roles and compress the file at the same time, there is a fairly easy work-around, which I discuss here.
A couple of definitions before we start:
THE SETUP
Apple added Roles to Final Cut Pro X with the 10.0.3 release. What Roles allow you to do is to group files by “tags;” for example, all the dialog clips, or all the music clips. Roles allow you to find, hide, or export files by tag, not just clip or track.
There are five default Roles:
There are LOTS of things you can do with Roles – and this article explains Roles in more detail. (So does this video.) You can add as many custom Roles and subroles as you like.
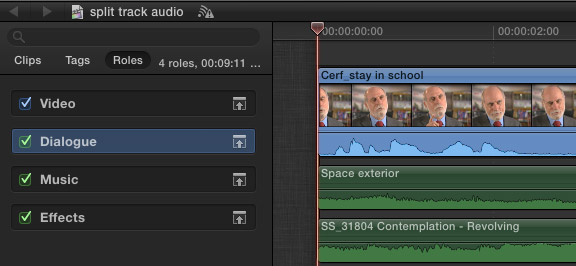
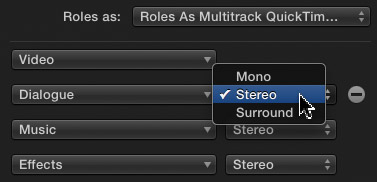
I created a simple project with one video track and three audio tracks. Here, I tagged all the dialog clips with the Dialog Role (Modify > Assign Roles > Dialog, or keyboard shortcut: Control+Option+D).
This allows us the option to consolidate the audio assigned to this Role into a separate output during export.
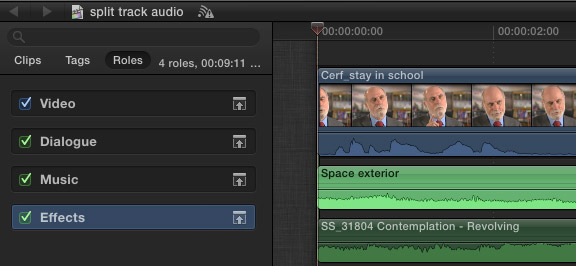
Next, I assigned all the effects clips to the Effects Role (Modify > Assign Roles > Effects, or keyboard shortcut: Control+Option+E).
Each clip can be assigned to one and only one Role. A video clip with sync audio has a single Role assigned to the video clip, and a second Role assigned to the audio clip.

Then, I assigned all the music clips to the Music Role (Modify > Assign Roles > Music, or keyboard shortcut: Control+Option+M). Assigning Roles does not affect levels, mixes, or effects. Roles are simply used for clip organization and output.
For the sake of this example, let’s pretend our mix is complete and ready to export. At this point, we have two options:
At this point, I have not found a way to compress both the video portion of a file and the audio portion, while still retaining separate audio tracks for the stems.
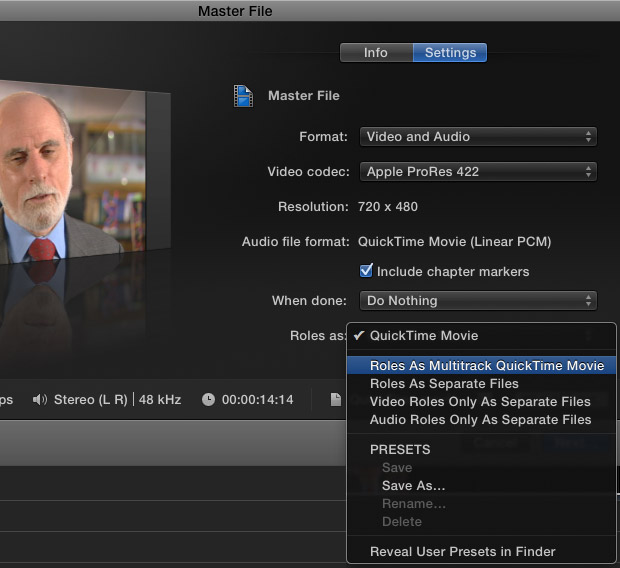
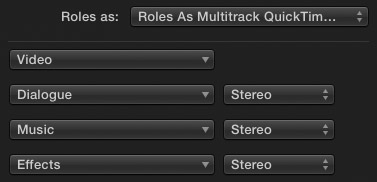
EXPORT HIGH-QUALITY MASTER FILE WITH STEMS
To export a high-quality Master File with individual stems does not require Compressor. In fact, FCP X makes it easy.

EXAMINE THE RESULTS
At this point, the export is complete; FCP will render and export the file in the background. However, just to show you what happened, let me open the file in QuickTime Player 7 so we can see the tracks. (This is not necessary at all, I’m just doing this for illustration.)
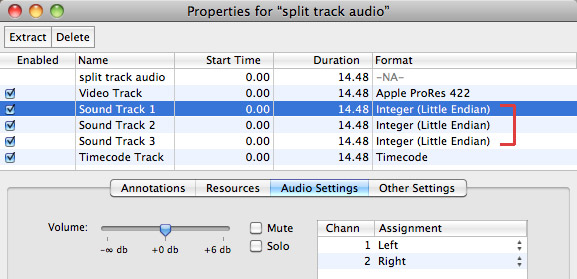
After opening the file in QuickTime Player 7, select Window > Show Movie Properties (or type Command+J). Notice the three separate Sound Tracks. These correspond to the Dialog, Music and Effects Roles. You can enable, disable, or extract whatever stems you need from this file.
Cool.
THE CHALLENGE
But…
When you export files this way, everything is uncompressed — really great quality with REALLY large files. What if you want to reduce the file size?
Well, we can, but it requires a custom Compressor preset and the understanding that you can’t compress audio if you want to retain the stems. So, we are going to create a custom QuickTime compression setting in Compressor that compresses the video and doesn’t touch the audio.
Then, we’ll create a droplet that allows us to quickly convert a Master File into something smaller to send to a client.
Here’s how.
NOTE: If Compressor is new to you, I’ve created in-depth video training that will help you make the most of it. Learn more here.
CREATE A CUSTOM COMPRESSION SETTING
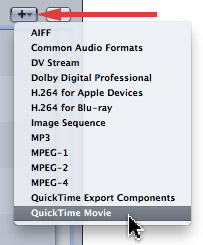
Open Compressor and, in the Settings tab, click the Plus sign to create a new compression setting.
Select QuickTime Movie. (This is important, because QuickTime is the only option I know of that supports video with multiple audio tracks.)
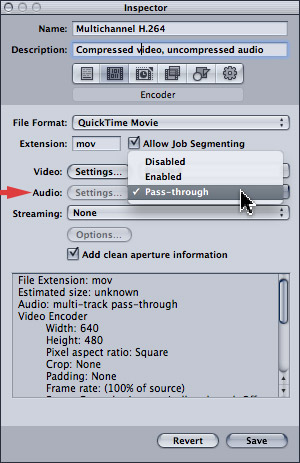
In the Inspector, set the Audio Settings to Pass-through. This means that Compressor will copy the audio as is, from the source file to the compressed file. This is the step that retains all the original audio stems from your output. Pass-through is another way of saying “untouched.”
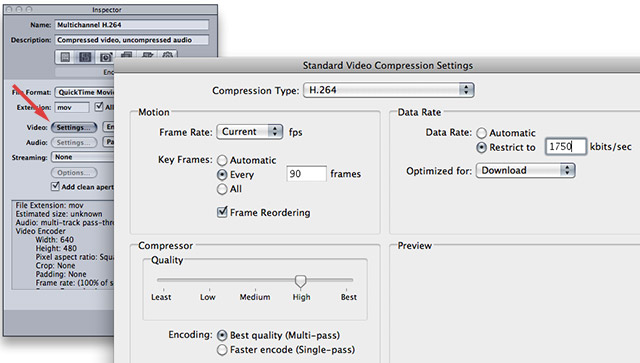
Click the Video Settings button to access video compression settings. This can be set to whatever you need. Here are my typical compression settings for 720p video. Then, configure the rest of the settings as necessary.
When you are done click Save.
CREATE A DROPLET
At this point, you have two options:
1. Compress the file directly in Compressor. This works fine, but requires you to open Compressor and import the file whenever you need to compress a file.
2. Create a droplet to automate compression. This is what I would do in most instances, as I always like something that is fast and easy.
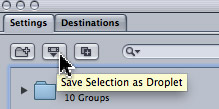
Creating a droplet is simple.

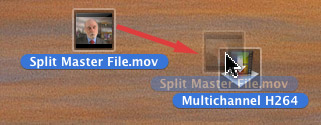
Then, to compress a multichannel Master File, simply drag it on top of the droplet in the Finder.
Poof! Done.
SUMMARY
While it would be helpful if Final Cut allowed us to export Roles into a Compressor setting, this technique provides a fast and high-quality work-around.
For my work, I always export a Master File using Roles, view it to make sure everything exported OK, then drop the file on a droplet to do the compression as a second step.
I’ve learned it is far faster to fix a problem file before you spend time compressing it, then after you’ve delivered it to the client. Also, in my unofficial tests, compressing using Compressor is faster than compressing using Final Cut Pro; especially when you are running multiple instances of Compressor.
Whenever I can combine speed, with quality and flexibility, I’m a happy camper.
Visit our website to see Final Cut Pro Training & more!

2,000 Video Training Titles
Edit smarter with Larry Jordan. Available in our store.
Access over 2,000 on-demand video editing courses. Become a member of our Video Training Library today!
Subscribe to Larry's FREE weekly newsletter and
save 10%
on your first purchase.
52 Responses to FCP X: Export Multi-channel Audio
← Older Comments Newer Comments →-
 Silver says:
June 12, 2014 at 7:08 am
-
 Ilene says:
June 16, 2014 at 8:08 am
-
 alex gwaz says:
September 29, 2014 at 3:33 am
-
 LarryJ says:
September 29, 2014 at 8:05 am
-
 alex gwaz says:
September 29, 2014 at 8:43 am
-
 Gerry Saucedo says:
October 13, 2014 at 2:26 pm
-
 LarryJ says:
October 13, 2014 at 3:28 pm
-
 Gerry Saucedo says:
October 13, 2014 at 4:06 pm
-
 Gerry Saucedo says:
October 13, 2014 at 4:49 pm
-
 Kevin C says:
July 22, 2015 at 3:23 pm
← Older Comments Newer Comments →Hi Larry, thanks very much. It’s now sorted out. It wasn’t the expected. It was a stupid mistake by me. Apple support like u advised, sorted out the issue. The whole project was not in a proper project timeline. I compiled them in a spare empty compound clip space. Affect some tests and trials, we created a new project, and copied the content into it.
We also changed Prores 422 to ‘Export File’ – H.264. Wam! I got sound and video.
Are you sure you are not an angel that escaped from heaven, Larry? Next time you come to the exhibition in London, you’ve got a beer on me…ok sorry, orange juice if u don’t take alcohol. Thank you.
Hi Larry,
Many thanks for all of your great tips on exporting multi track in FInal Cut X. Is there a way to assign an audio role to a specific track when you export? I am fine with exporting a split track master, but when I send my master files to the lab i must slate and label which track is dialog (track 1), which is music, efx etc.
Many Thanks!
Ilene
Hi Larry !
I need to send the audio from my project for protools .split master audio(with roles and tags) is a method ? thanks!
Alex:
Look into a program from Marquis Broadcast called “X2Pro.”
Larry
thanks Larry!
Thank you for this great walkthru. I’ve noticed something troubling with exporting roles as a multitrack QuickTime though, and was wondering if you had any insight. I set up a project with 8 audio stems (5.1 +lt/rt). I assigned each clip to a separate custom role (channel 01, channel 02, channel 03, etc) I added bars and tone to each role in the head format at -20db. However when I export my project using roles as a multitrack QuickTime, with each role set to mono, the resulting file has been lowered by -3db. Why wouldn’t the audio levels of the QuickTime match the levels in the project? My workaround was to raise everything +3db before exporting, but this seems like a fatal flaw. What are your thoughts on this issue? Thanks in advance!
Gerry:
This is the default method of handling stereo to mono files – the gain is lowered by -3 dB. Virtually every professional audio app does this. I know there’s a good reason for it – caused by the fact that audio levels are summed – but I can’t remember what it is.
My recommendation is to NOT raise levels on export – you are very likely to cause distortion. Instead, raise them after import into the audio application.
Larry
In this case, the final deliverable is being exported from fcpx. There is no audio application involved. I am working with discreet audio stems and trying to export a multitrack mezzanine prores file. Do you think it makes a difference if the project settings are set to stereo or surround, being that I am exporting using roles?
Actually I just did a test and a surround sequence exporting with roles as multitrack QuickTime will lower all channels by -6db.where as a stereo project will lower all channels by -3db. Perhaps if it was possible to have a mono/discreet project, this wouldn’t be an issue. If raising the levels before exporting will cause distortion, then what workflow would you recommend for creating this 8 channel mezzanine file?
Was a solution ever found for the lower audio levels caused when starting from a stereo or surround project? I am also trying to find a workflow for creating an 8-channel (and 10-channel) mezzanine file that maintains the original audio levels. Did you find a way to create a mono/discrete project? Thanks in advance!