
![]()
[Updated Dec. 15, 2024, with the update note at the top.]
Here is a really cool technique that Leo Hans suggested to me a long while ago. I finally had time to figure this out.
UPDATE 2024: Apple changed how this works with the release of Final Cut Pro 11 and Motion 5.9. This short article describes what you need to know.
BACKGROUND
An “adjustment layer” is an object on a higher layer which, when an effect is placed into it, affects all the clips below it.
Adobe first presented adjustment layers in Photoshop, then extended them to Premiere Pro somewhere around the Creative Cloud release. They are very helpful because it means we can add an effect to a single “clip” that affects everything below it.
Final Cut Pro X doesn’t have them… but, you can fake it. This article explains how.
CREATE THE MASTER CLIP
The easiest way to create this effect is to use Motion.

While not critical, set the presets to match your typical video project for both format and effect duration. (You can always change the duration in Final Cut Pro X when you apply the effect.)

Then, click the Final Cut Title option. (This step is really important!)
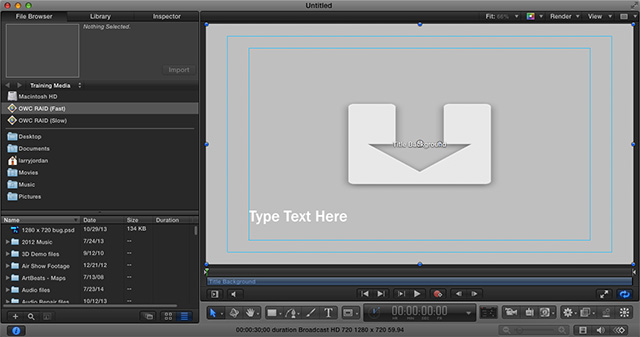
Motion opens, displaying the standard title creation template.
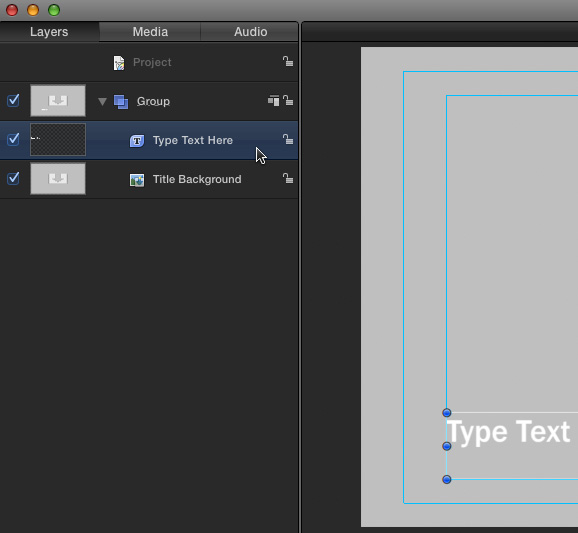
Open the Layers panel (shortcut: F5), select the text layer and delete it. This is the only change you need to make.
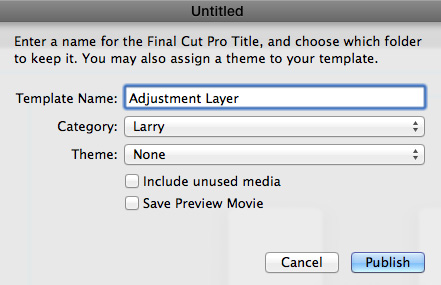
Choose File > Save As, then give the effect a name. Here, I’m using “Adjustment Layer” and storing it in a custom category named “Larry.” You can name this effect anything and store it in any category you prefer.
I just like being obvious so I can remember what I did and where I put it.
APPLYING THE EFFECT IN FINAL CUT PRO X
I’ve found, when I create new templates, that FCP X does not always know something new has been created. So, if FCP X is running, I generally quit and restart it. That way, it refreshes the list of templates available in each browser.
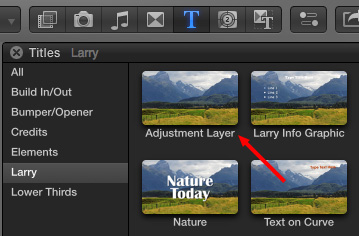
When I select the Larry category, the Adjustment Layer effect is visible in the top left corner.
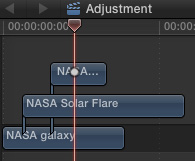
Here’s a stack of three clips in the Timeline…

That looks like this in the Viewer.
Drag the Adjustment Layer effect from the Titles Browser and put it on TOP of all three clips.
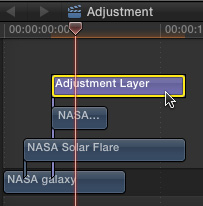
Adjust the length of the Adjustment Layer clip to run whatever duration you need.
Now – and this is the magical part – add any effect to the Adjustment Layer and it will automatically apply to all the clips below it!
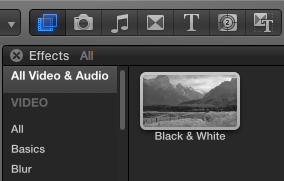
For example, here’s the Black & White effect. When I drop it on top of the Adjustment Layer effect…
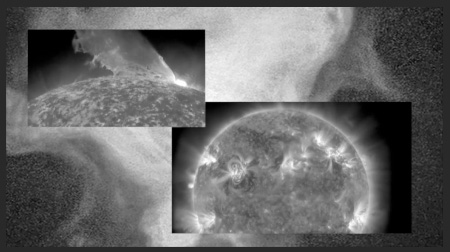
This is the result. ALL the clips below the Adjustment Layer effect now inherit the Black & White effect.
NOTE: This technique works for any effect – including Broadcast Safe. In fact, using this Adjustment Layer effect for the Broadcast Safe effect is faster and more flexible than combining all your clips into a compound clip.
SUMMARY
This is a very fast, very easy technique to use whenever you want the same effect to be applied to multiple clips. And, I am totally blown-away by how fast and easy this makes using the Broadcast Safe effect to prevent excessive white levels.
Very cool!

2,000 Video Training Titles
Edit smarter with Larry Jordan. Available in our store.
Access over 2,000 on-demand video editing courses. Become a member of our Video Training Library today!
Subscribe to Larry's FREE weekly newsletter and
save 10%
on your first purchase.
64 Responses to FCP X: Create an Adjustment Layer
← Older Comments Newer Comments →-
 Gretta Wing Miller says:
February 26, 2018 at 10:36 am
-
 Larry says:
February 27, 2018 at 9:22 am
-
 Gretta Wing Miller says:
March 5, 2018 at 5:41 am
-
 Larry says:
March 5, 2018 at 6:04 am
-
 erik fuglseth says:
March 7, 2018 at 1:11 pm
-
 Bill Bunkum says:
February 22, 2019 at 6:29 am
-
 Larry says:
February 22, 2019 at 5:41 pm
-
 Daryl says:
August 4, 2018 at 3:40 am
-
 Larry says:
August 4, 2018 at 1:06 pm
-
 Stuart Barry says:
September 3, 2018 at 12:42 am
-
 Eric Barker says:
January 1, 2019 at 9:25 pm
-
 Andrew Griffiths says:
October 16, 2018 at 3:26 am
-
 Larry says:
October 16, 2018 at 8:11 am
-
 Andrew Griffiths says:
October 19, 2018 at 8:45 am
-
 Eric Barker says:
January 1, 2019 at 9:32 pm
-
 Jim Connor says:
October 23, 2018 at 7:02 am
-
 Larry says:
October 23, 2018 at 8:49 am
-
 Bill Bunkum says:
February 22, 2019 at 6:41 am
-
 Larry says:
February 22, 2019 at 5:43 pm
-
 Silvio says:
March 2, 2019 at 1:26 pm
-
 Larry says:
March 2, 2019 at 4:29 pm
-
 Silvio says:
March 3, 2019 at 12:14 am
-
 Richard Van Kleeck says:
June 17, 2019 at 1:32 pm
-
 Larry says:
June 17, 2019 at 4:21 pm
-
 Bob McAra says:
September 5, 2019 at 12:04 am
-
 Larry says:
September 5, 2019 at 12:41 pm
-
 Sam Alexander-Pearce says:
October 23, 2019 at 1:30 am
← Older Comments Newer Comments →Why don’t you update this to say that FCPX does have Adjustment layers, but if you want to make your own, here’s how.
Gretta:
I have not noticed that FCP X has adjustment layers. Where are they?
Larry
Titles>Adjustment Layer. New to 10.4
Gretta:
Very interesting – thanks for letting me know.
Larry
Hi Gretta.I run 10.4 but I cant see any object in the Titles -menu labled : Adjustmentlayer. Where is it located?Thanks, Erik
Indeed. I’m running 10.4 as well and don’t see Adjustment Layers in Title > Adjustment Layers.
Bill:
Various 3rd-party developers supply Adjustment Layers for FCP X. Apple does not.
Larry
Adjustment layers do NOT come with 10.4. What you’re seeing was likely installed before your update.
Daryl:
That is a good thing to know. I test so much software that sometimes I forget what was part of the original installation.
In which case, this article explains what you need to know to create an adjustment layer.
Thanks!
Larry
There is a much simpler solution. Select all the clips for which you want to apply an effect – could be the whole project/sequence. Turn these clips into a compound clip (right click or menu). You can then apply any effect to the all the clips at once – now shown as a single clip. You can still break apart the clips and work on them, then return to the compound version.
I found this in Lynda.com training. Having used Premiere Pro extensively I have switched to FCPX. I find that it’s a different way of thinking about things, but now that I am getting used to it I find it quicker and much better.
I would argue that this is a very cumbersome method, and not ideal for many situations. Yes, nested compound clips are fantastic, but depending upon what you’re doing, can easily be a big nuisance. In Premiere and AE, I use both nested sequences and adjustment layers, about equally, depending on the situation. But they are no replacement for each other. There are also many situations where an adjustment layer can do things nesting can’t. What happens when you need to automate an effect over multiple clips and still need to access the clips for timing over audio? Suddenly nesting becomes a nightmare. Nesting is great, Adjustment layers are great, but they are NOT substitutes for each other.
Thanks Larry, but as Stuart says I can’t see the advantage of the ‘faked’ adjustment layer over using a compound clip, nor am I missing something?
Andrew:
The big advantage to an adjustment layer is that you don’t need to switch between going inside a compound clip to adjust an edit or level, then back out to the compound clip to adjust the effect. It can be a faster way to work.
Larry
Got it – thank you!
Agreed. Both Nesting and Adjustment Layers are very powerful workflow techniques, but they’re very different, and in more complex situations, one will have clear advantages over the other. I use both constantly (been in the video production biz for about 15 years). Adjustments are very simple, maybe not quite as powerful, but if they provide exactly what you need, they are much more immediate to automate and work with when juggling clips in a larger project.
Generally I’d rather use Adjustment Layers whenever possible unless they don’t give me the control I need. It’s much easier to make creative decisions in one timeline than two or more. Photoshop and AE have had them for decades, Premiere for about 5 years, once you start using them, you’ll quickly realize how amazing they are.
Good conversation, I have a similar issue with Key Frames, I have a background image and several text images and I want them to move in unison from a point out of the viewer to cover approx 30% of the frame., I ended up setting a key frame for each object, so I have key frames for the three text objects and one for the background ( usually a white or blue background. Getting each of these to have the correct starting point and appear to move in unison and end in unison is a challenge. My sense is that once I get these items in unison, I should make a compound clip in order to reuse it and protect it from inadvertent mouse clicks or mouse movements.
Jim:
I would flip your thinking.
Create the compound clip first, then apply your movement keyframes to the compound clip. MUCH easier.
Larry
Also, perhaps it’s too simple a question but what do you mean ‘use Motion’? I haven’t a clue what that refers to! 😛 Could you elaborate, please?
Bill:
The phrase “use Motion” refers to using the application Apple Motion to create effects – such as an adjustment layer – for Final Cut Pro X.
Motion is sold separately from Final Cut Pro X by Apple in the Mac App Store.
Larry
hello everyone, when i add a adjustment layer in final cut and apply a lut to the footage the video playback from the timeline speeds up. Is this because the performance of my macbook is to low and it lags behind and speeds then up to compensate? when i add the lut to every clip seperate i get normal playback. thank you and best wishes ..silvio
Silvio:
Adding a LUT should not change clip speed. Ever.
However, LUTs are applied to clips, because they can vary by clip. Just as you can use shots from different cameras in the same timeline.
Unlike an effect, LUTs adjust the value of pixels before they are displayed in the Timeline. I would not recommend applying LUTs to adjustment layers.
Larry
Thank you Larry
I thought balancing exposure and colour and then set the Lut via adjustment layer to get a uniform look to all the clips in the timeline is the way to go. So its better to apply the Lut to each clip individually?
Dear larry,
I have followed your advice/directions twice about how to create and adjustment layer in Motion for use in DCPX. However, the adjustment layer does not appear in the FCPX Effects Browser, even though I have re-started FCPX each time. Very frustrating. How can I get the adjustment layer to actually show up in FCPX???
Thanks for your help, Richard
Richard:
It isn’t an effect, it’s a Title. You’ll find it there.
Larry
Hi Larry,
Thanks for your help.It works perfectly in titles as you have instructed.
I have shot family movies for the past 31 years and your advice has been invaluable when editing the results.
Bob:
Happy to help. Glad you liked the article!
Larry
Hi Larry,
THank you for the advice, for some reason the title when it comes through is red and has a warning ⚠️ on it
No idea what has gone wrong
thanks again
Sam