
![]()
[Updated Dec. 15, 2024, with the update note at the top.]
Here is a really cool technique that Leo Hans suggested to me a long while ago. I finally had time to figure this out.
UPDATE 2024: Apple changed how this works with the release of Final Cut Pro 11 and Motion 5.9. This short article describes what you need to know.
BACKGROUND
An “adjustment layer” is an object on a higher layer which, when an effect is placed into it, affects all the clips below it.
Adobe first presented adjustment layers in Photoshop, then extended them to Premiere Pro somewhere around the Creative Cloud release. They are very helpful because it means we can add an effect to a single “clip” that affects everything below it.
Final Cut Pro X doesn’t have them… but, you can fake it. This article explains how.
CREATE THE MASTER CLIP
The easiest way to create this effect is to use Motion.

While not critical, set the presets to match your typical video project for both format and effect duration. (You can always change the duration in Final Cut Pro X when you apply the effect.)

Then, click the Final Cut Title option. (This step is really important!)
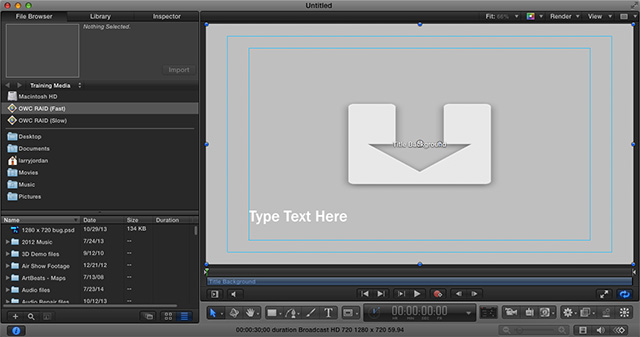
Motion opens, displaying the standard title creation template.
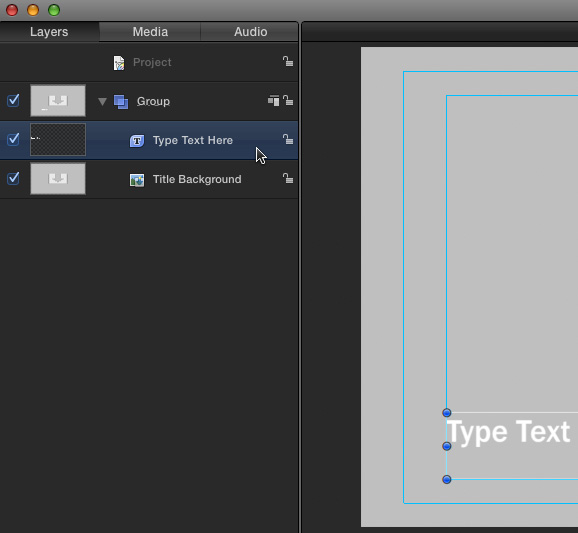
Open the Layers panel (shortcut: F5), select the text layer and delete it. This is the only change you need to make.
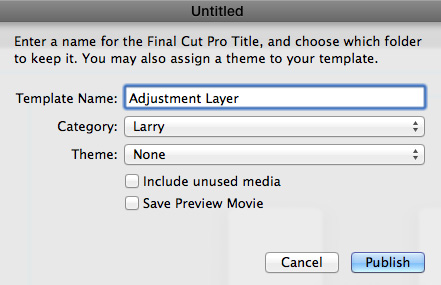
Choose File > Save As, then give the effect a name. Here, I’m using “Adjustment Layer” and storing it in a custom category named “Larry.” You can name this effect anything and store it in any category you prefer.
I just like being obvious so I can remember what I did and where I put it.
APPLYING THE EFFECT IN FINAL CUT PRO X
I’ve found, when I create new templates, that FCP X does not always know something new has been created. So, if FCP X is running, I generally quit and restart it. That way, it refreshes the list of templates available in each browser.
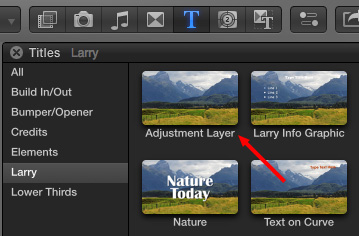
When I select the Larry category, the Adjustment Layer effect is visible in the top left corner.
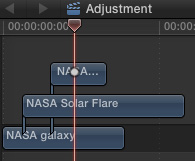
Here’s a stack of three clips in the Timeline…
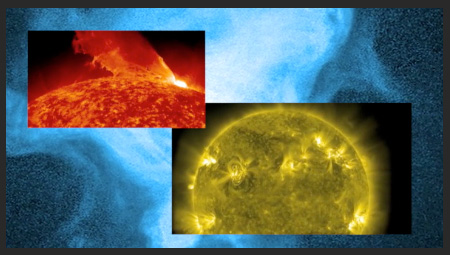
That looks like this in the Viewer.
Drag the Adjustment Layer effect from the Titles Browser and put it on TOP of all three clips.
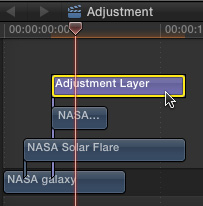
Adjust the length of the Adjustment Layer clip to run whatever duration you need.
Now – and this is the magical part – add any effect to the Adjustment Layer and it will automatically apply to all the clips below it!
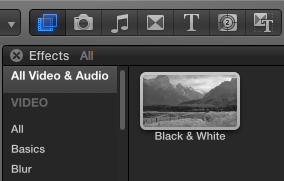
For example, here’s the Black & White effect. When I drop it on top of the Adjustment Layer effect…
This is the result. ALL the clips below the Adjustment Layer effect now inherit the Black & White effect.
NOTE: This technique works for any effect – including Broadcast Safe. In fact, using this Adjustment Layer effect for the Broadcast Safe effect is faster and more flexible than combining all your clips into a compound clip.
SUMMARY
This is a very fast, very easy technique to use whenever you want the same effect to be applied to multiple clips. And, I am totally blown-away by how fast and easy this makes using the Broadcast Safe effect to prevent excessive white levels.
Very cool!

2,000 Video Training Titles
Edit smarter with Larry Jordan. Available in our store.
Access over 2,000 on-demand video editing courses. Become a member of our Video Training Library today!
Subscribe to Larry's FREE weekly newsletter and
save 10%
on your first purchase.
64 Responses to FCP X: Create an Adjustment Layer
← Older Comments Newer Comments →-
 Dan says:
September 2, 2015 at 5:14 pm
-
 Larry says:
September 3, 2015 at 7:16 pm
-
 Nathan Veer says:
September 12, 2015 at 1:08 pm
-
 Nathan Veer says:
September 12, 2015 at 1:11 pm
-
 Joe M says:
October 5, 2015 at 3:28 pm
-
 Larry says:
October 5, 2015 at 9:41 pm
-
 Vishal says:
December 11, 2015 at 8:00 am
-
 Larry says:
December 11, 2015 at 10:48 am
-
 Mikedefieslife says:
March 26, 2016 at 7:26 am
-
 Larry says:
March 26, 2016 at 2:43 pm
-
 Bustabaz says:
August 5, 2017 at 7:04 am
-
 Larry says:
August 5, 2017 at 9:38 am
-
 steven galvano says:
June 17, 2016 at 4:44 pm
-
 Larry says:
June 19, 2016 at 6:53 am
-
 Steven Galvano says:
June 20, 2016 at 8:07 am
-
 Jaakko Manninen says:
September 20, 2016 at 8:43 pm
-
 NeonSheepYT says:
February 26, 2017 at 3:06 pm
-
 Larry says:
February 27, 2017 at 7:21 am
-
 Aaron says:
September 29, 2017 at 4:41 pm
-
 Larry says:
October 1, 2017 at 10:36 am
← Older Comments Newer Comments →I don’t have motion, but I do have after effects, am I screwed
Dan:
No… but you can’t create an FCP X effect using After Effects.
Larry
Great tip! Just following up on the downloadable adjustment layer. Would love to use this approach but do not own Motion. Any chance a downloadable adjustment layer was made available? Thanks!
Never mind, found a downloadable one here: http://www.fcpxbook.com/tips/adjustment-layer.html
Larry,
Great trick I see it as useful for applying an effect to multiple clips (as in your example).
Unless I am doing something wrong, it seems that there is a big (IMO) limitation to this workaround. The compositing tools do not work. Compositing mode has no effect at all and opacity simply fades everything down to nothing.
It would be nice to have true adjustment layers where mode and opacity can be changed. Is there any workaround to achieve this functionality?
Joe:
Because the “adjustment layer” is just a setting, there is nothing for the blend modes or opacity to work on, as they need video in the clip to which they are applied.
For those two effects, you are better off using a compound clip.
Larry
Hi Larry,
I have just updated my OS to El Capitan and am running the latest FCPX. I have an adjustment layer folder ready to install (as per Nathan Veers downloadable link) but for some reason i can’t get the effect to show up in my Titles browser with FCPX. I have tried saving to: movies>motion templates>titles but this hasn’t worked. The motion file is definitely inside the folder… Any suggestions?
Thanks
Vishal:
You probably need to put the folder containing the Adjustment Layer in a category folder inside Titles. Thusly: Motion Templates > Titles > Vishal > Adjustment Layer folder.
Or, simply create a new adjustment layer in Motion as this article describes. When you save it, Motion will put it in the right place.
Larry
This doesn’t work for me.
The layer is created as described in Motion. I then find it in FCPX and move it onto my timeline above a clip, but all I get is a red background showing a letter T and an exclamation mark in a yellow triangle.
MikeDefiesLife:
Mike, make sure you are creating a drop zone, not adding media. The red box indicates missing media that is associated with the Motion project.
Larry
Hello,
I have exactly the same problem as Mike.
I tried to create one myself in motion and tried a downloaded one and the problem is always there.
I don’t understand what you mean with “creating a drop zone, not adding media”. Can describe it more precisely?
Thank you.
Bustabaz:
A drop zone, in Motion, is a placeholder object that you create, modify and/or animate in Motion, then, when the template is added to Final Cut, you can add video to the drop zone that applies all those Motion settings to the clip in FCP X.
In the case of this adjustment layer, by starting with a Title template in Motion (and Motion is the ONLY place this can be created) the drop zone that you need for this effect is already applied. This means that you don’t need to add or modify anything – except to remove the text block that is displayed on top of the drop zone in Motion.
Now, when you save this template from Motion into Final Cut – as the article illustrates – that drop zone travels with it. By adding this template above any existing clips, any effects applied to the template will affect all the video in layers underneath it.
Larry
Thanks Larry. I’ve been using adjustment layers since this post….
There are times (such as when a scene fades to black or a cross fade between scenes) when I need to adjustment layer to fade as well.
Adjustment layers do not seem to fade. Whether I keyframe the opacity, or add a cross fade, it’s either at 100% or off.
How can I get one adjustment later to transition into another?
Steven:
Good question – I don’t know. Perhaps another reader can suggest a workaround.
Larry
Thanks Larry. It’ll be interesting to hear the feedback.
On another note (and let me know if there’s a better place to post this) I have some bad VLOG footage from a GH4. It’s quite underexposed. In FCPx, I raised the global exposure by 15% to get it in the same universe as other (better exposed) stuff.
As a result, the colors are now a mess.
I’ve watched your color correcting video, but I’m still having trouble making the footage look decent.
I posted a few seconds of the footage (untreated):
https://vimeo.com/171425671/ce589a7afb
Great idea! Thanks for the tip!
WHERE IS THE DOWNLOAD LINK
NeonSheepYT:
This article was written to explain how to create your own adjustment layer. Other sites, such as Rampant Design Tools, are providing downloads.
Larry
A question related to the last part of your post… a broadcast safe filter makes all legal. I notice when adding the sharpen effect, this also puts the histogram within 0-100. I presume my looking at the histogram and seeing everything within the scopes means its legal already after using the sharpen tool. Is this correct? Or is there something deeper that I am missing?
Thanks! Aaron
Aaron:
There’s something deeper. I am not sure the Histogram shows the same values as the Waveform Monitor. Also, broadcast safe for Rec. 601 video is not the same as Rec. 709 video.
For these reasons, I don’t trust the Histogram, but I do trust the Waveform Monitor.
Larry