
![]() Automated tools simplify complex processes. But, if you don’t know what the automated tools are doing, it is easy to make things worse, rather than better.
Automated tools simplify complex processes. But, if you don’t know what the automated tools are doing, it is easy to make things worse, rather than better.
An example of this is the automated audio enhancement settings in Final Cut Pro X.

You enable these settings either during import by checking Analyze and fix audio problems in the Media Import window or by selecting a clip in the Browser or Timeline and choosing Modify > Analyze and Fix.
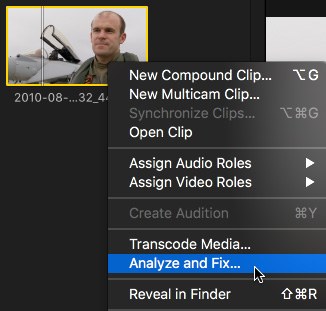
NOTE: You can also select a group of clips in the Browser, right-click and choose Analyze and Fix.
BACKGROUND
In order to understand what’s going on, and the limitations this presents, we need to first understand two basic audio concepts:
All sounds create vibrations in the air which travel from the originating source to our ears, causing our ear drums to vibrate. This vibration stimulates nerves in our ears, which sends signals to the brain, which we translate as sound.
Without those basic vibrations, we wouldn’t hear anything. This is why there is no sound in space; the sound of rocket ships on Star Trek not withstanding.
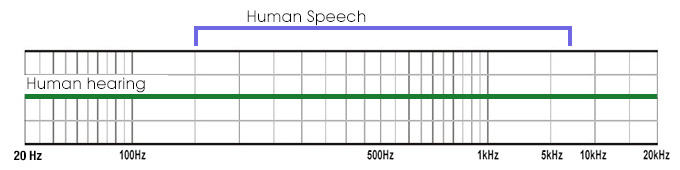
While there is an essentially unlimited range of frequencies that any noisy object can create, humans hear a fairly specific range of frequencies: from 20 Hz to 20,000 Hz (the green bar in the illustration above). The exact range depends upon your age and the volume of the originating sound.
Low-pitched sounds vibrate slower, while higher-pitched sounds vibrate faster.
Human speech is a subset of these frequencies, extending from roughly 200 – 7,000 Hz (the blue area). Men’s voices are on the lower side, women’s voices are higher and kids are higher still – pushing close to 10 kHz.
The important point is that ALL sounds are represented within the same range of frequencies. There isn’t one range for noise, and another for music and a third for speech. All sounds, everywhere, are vibrating within this single range of frequencies.
NOTE: While humans hear from 20 Hz – 20 kHz, dogs hear from 50 Hz – 45 kHz, cats from 45 Hz – 85 kHz and elephants from 1 Hz – 200kHz! Doubling the frequency raises the pitch of a sound by one octave.
AUDIO ENHANCEMENTS
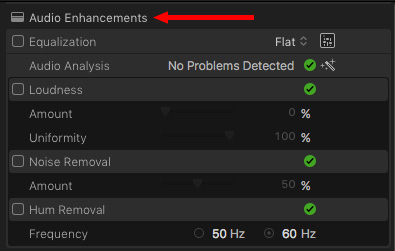
There are four categories of Audio Enhancements in the Inspector:
All of these, except for Loudness, are actually changing the frequencies of the sounds in a selected clip.
NOTE: Because Loudness adjusts volume, not frequencies, I am ignoring it for the rest of this article.
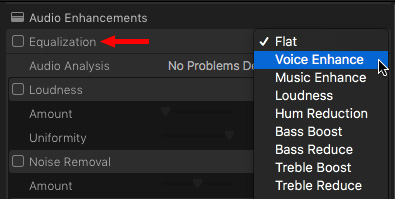
For example, the pop-up menu for Equalization shows nine options for adjusting the “sound” of a sound. Flat makes no changes to the original recorded sound. The others boost specific frequencies or reduce others.

Click the Advanced Equalizer UI icon to see what’s actually going on.
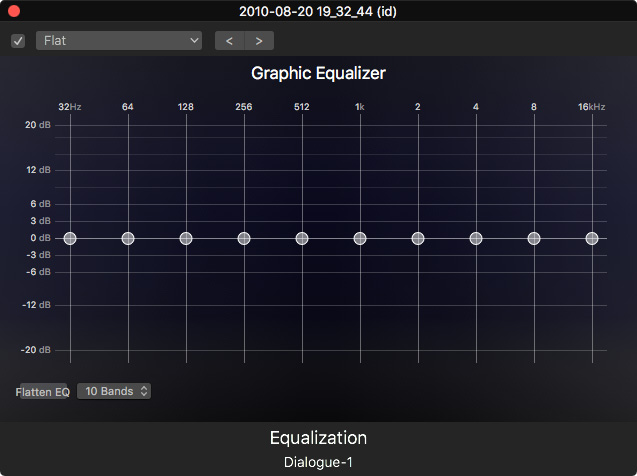
This is called a “Graphic Equalizer” and it divides the range of human hearing into frequency bands from low on the left to high on the right. Because audio is logarithmic, the range of frequencies on the right is compressed, compared to those on the left. This is just the way our ears work.
NOTE: The numbers across the top represent the range of frequencies controlled by each slider. See how each number to the right is exactly double the value of the slider on the left? Each slider represents an octave (the change in pitch of two notes separated by eight white keys on a piano). This is a ten-octave Graphic EQ, which represents the ten octaves that the average human can hear.
This screen shot shows the settings for Flat, where no changes are being made to any frequency; all the settings are “flat,” or equal.
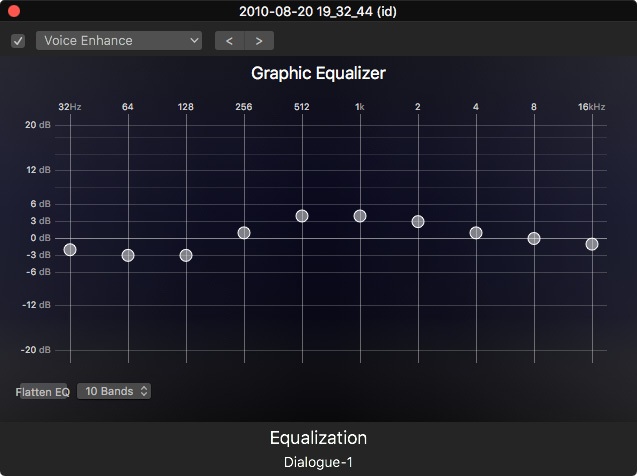
Changing the EQ (which is short for “Equalization”) to Voice Enhance shows that the lower frequencies are reduced, while those in the mid-range of human speech are boosted, or “enhanced.”
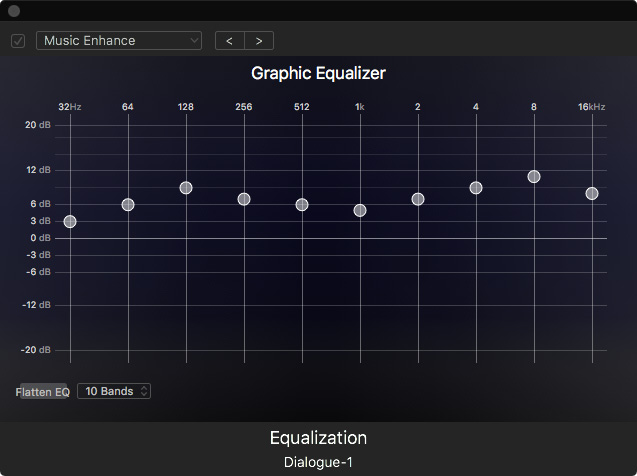
Changing the EQ to Music Enhance shows the opposite. Everything is a bit louder, except the middle frequencies which are the most important range for human speech.
In both cases, we are adjusting the same range of frequencies, but in different ways, to achieve different results. You could do the same as the presets by dragging the different sliders up or down, then picking the version that sounds the best to you.
HUM REMOVAL
Hum removal is a special case of EQ. Hum is most commonly created by interference between power and mic lines. In the US, this hum centers on a frequency of 60 Hz, well below human speech. (Elsewhere in the world, the hum is 50 Hz; even lower.)
Removing hum is as “easy” as removing all sounds at 60 Hz. Since this is below human speech it doesn’t cause problems with the sound of our actors. Except…
Well, hum is never a single pure tone. It’s a series of tones, called “harmonics,” that are multiples of the original frequency.
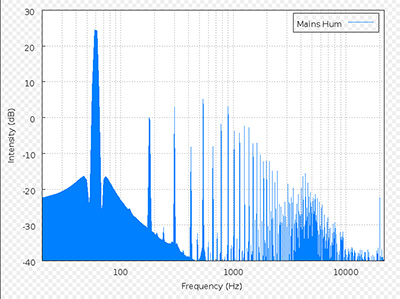
For example, this chart from Wikipedia shows the harmonics caused by a 60 Hz tone.
The problem is that as soon as those harmonics exceed about 200 Hz, they start to interfere with the speech of your actors. Since removing a tone requires removing ALL sound at that frequency, this means when we remove a tone, we have also removed all of the actor’s voice at that frequency.
We can’t have it both ways, we can’t remove noise at a specific frequency, without removing all other sounds at that same frequency.
Fortunately, human speech covers a wide range of frequencies, so that removing a small range of frequencies does not prevent us from understanding what they are saying. However, it DOES change the overall character of the voice.
This problem becomes even more significant when reducing noise.
NOISE REDUCTION
Noise is defined as an incoherent, or disorganized, range of audio frequencies. Music, by contrast, is defined as a coherent, or organized, range of audio frequencies.
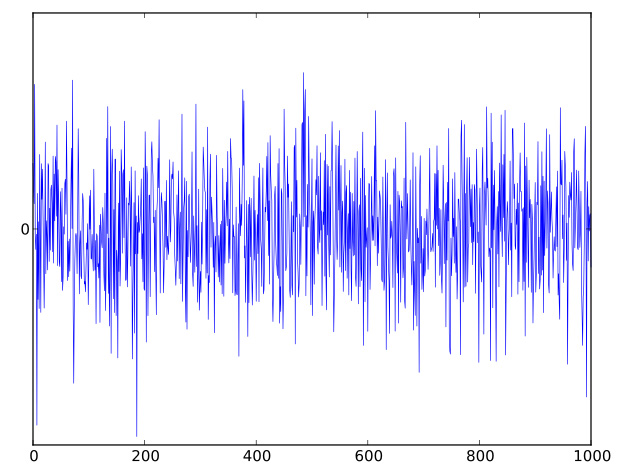
For example, this image from Wikipedia is an example of what hiss might look like. A wide range of disorganized frequencies, all at different levels.
When this noise is recorded at the same time as an actor’s voice, the two sets of frequencies overlap. And, since human hearing only hears ONE range of frequencies, the hiss and the voice are inextricably intermingled.
Using the noise removal feature in FCP X – or any audio application – to remove the noise, will also remove the actor’s voice at the same frequency. Because noise spans such a wide range of frequencies, unlike hum, removing noise often causes the voice to sound electronic, artificial, or just plain “bad.”
This isn’t the fault of the tool. Noise reduction software is designed to figure out the frequencies that represent a noise and remove them. And, at the same frequency, there is no way to separate those sounds that are noise from those that are speech.
In practice, this means that, in most cases, we can’t actually “remove” a noise, we can only reduce it. If we need a noise to be totally removed, we need to re-record the audio – which is what ADR is all about.
The best way to think of Noise Removal is that it does its best work when you reduce the noise, rather than remove it. In all cases, you are looking for the best balance between reducing the sound of the noise, without extensively damaging the sound of the actor’s voice.
SUMMARY
Most audio repair tools are designed to manipulate frequencies to enhance the ones we like and reduce the ones we don’t. The problem is that everything we hear is all represented by the same range of frequencies.
The more you understand about what frequencies are and how we use them to hear and shape sound, the better your audio will be.
And this key rule still holds true: The best way to improve the quality of your audio in post is to concentrate on recording it with the best possible quality on set.

2,000 Video Training Titles
Edit smarter with Larry Jordan. Available in our store.
Access over 2,000 on-demand video editing courses. Become a member of our Video Training Library today!
Subscribe to Larry's FREE weekly newsletter and
save 10%
on your first purchase.
6 Responses to FCP X: Avoid Problems with Audio Enhancements
Larry,
It is one of your best.
Thanks.
James
I generally don’t like to apply noise removal above 30% because I feel exceeding that impacts voice quality too much. I’d prefer to live with a little noise than overly degrade voice quality. Is this a mistake?
Ryan:
“Is this a mistake?” No.
The final determination of what levels to use is how it sounds to your ear. I have no objections to your 30% target, though that may not work for everyone in all situations.
If you like it, its good. If you don’t, it isn’t.
Larry
I find that to be the same case for me. FCP likes to apply noise reduction at 50% but almost always it creates digital artifacts (distortion) in the voice. Down around 30% seems to provide good noise reduction while not distorting the voice.
At the moment for some reason when I use noise removal, when you play it back the noise comes back in.
Is there something I am doing wrong.
Cheers
Chad.
Chad:
Like most noise reducers, the noise should be diminished, but not totally gone. (Removing the noise totally generally destroys the overall quality of the audio.)
If you need all the noise removed, you should re-record you audio in a studio.
However, if the noise is not even diminishing, then there’s a bigger problem. My best advice in this case is to contact Apple Support for help.
Larry