
![]() [ Updated Aug. 1, 2020, with a new screen shot for FCP X 10.4.x. The operation of this effect hasn’t changed. ]
[ Updated Aug. 1, 2020, with a new screen shot for FCP X 10.4.x. The operation of this effect hasn’t changed. ]
If ever there was a confusing name for an effect, this is it. Just what does “Automatic” mean?
Actually, it’s pretty cool; let me show you.
Setting the speed of a clip to Automatic Speed means that the Timeline plays every frame in a clip, regardless of the frame rate that the camera used to record the clip. The net result is that Automatic Speed allows us to create some really stunning slow-motion images with great clarity.
NOTE: The fast-motion equivalent of this technique might be considered time-lapse, as that, too, is best recorded in the camera.
BACKGROUND

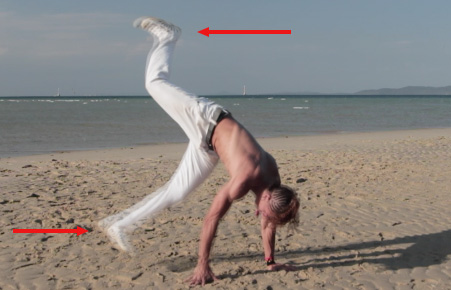
(Footage courtesy of Amy Campion – AnticsPerformance.com)
This gets a bit confusing, so let me explain. Let’s say you are shooting 50 fps video. When you edit that clip into a 25 fps project, Final Cut skips every other frame in the clip during playback in the Timeline so that the motion in the clip seems normal.
So far, no problem. Everything works as you would expect.
However, let’s say you shot that clip at 50 fps so that you could slow it down during editing. The benefit to shooting at faster frame rates than your project – called “over-cranking” – is that images are higher quality with smoother motion than if you slow it down using clip speed changes in Final Cut Pro X; or any other software, for that matter.
This is the key point: Over-cranking yields higher-quality slow-motion than changing speed in software.
Why? Because, in essence, what Final Cut does when slowing a clip down using software is duplicate frames. For example, assume that the frame rate of a clip in the Timeline matches the frame rate of the Project:
You get the idea – while the number of duplicated frames varies depending upon how much you are adjusting the speed of the clip – duplicating a frame doesn’t give us any new information, it just repeats the same frame over and over.
The slower the motion, the more your video looks like a series of still images.
TWO WORKAROUNDS
To reduce the “series of stills” look, Final Cut allows us to add Frame Blending or Optical Flow.
What Frame Blending does is create a short dissolve between each frame, thus “blending” the transition from one frame to the next. While this does reduce the “series of stills” look, as you can see from the screen shot, all moving objects tend to be blurred.

The other option is Optical Flow. Here, after a clip is analyzed, Final Cut creates “in-between” frames that seek to approximate where the pixels are moving between one frame and the next. This can create a pretty clean slow motion. Or, as you can see in this screen shot, it creates images that tend to fall apart. Its impossible to know which it will be before you try it.
As there are no settings for Optical Flow, if it works – it looks great. If it doesn’t – it doesn’t.
THE “AUTOMATIC” OPTION
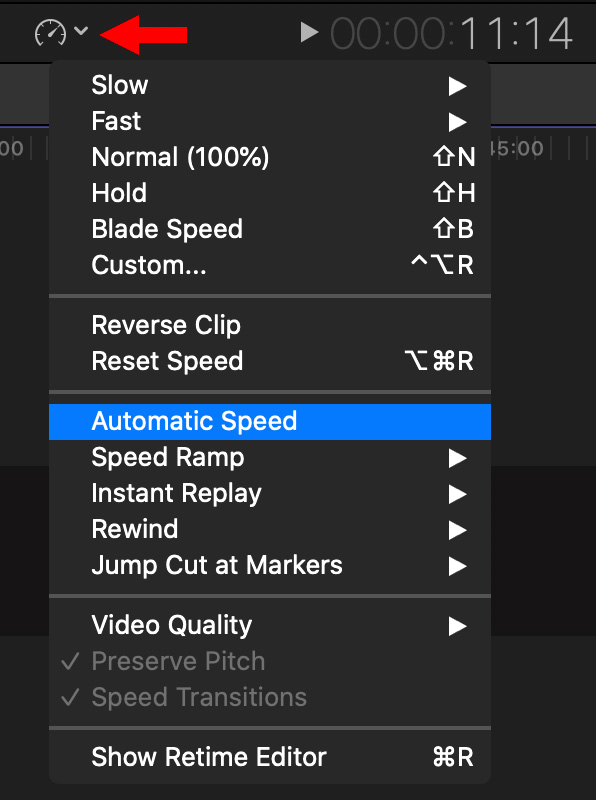
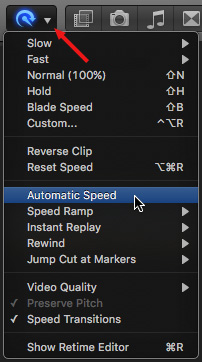
(The left image is from FCP X 10.4.x. The right image is from FCP X 10.3 or earlier.)
The “Automatic Speed” option exists in both Modify > Retime and the Retime menu in the Toolbar. What this does is play every frame in a clip to match the frame rate of the project.
So, a clip shot at 50 fps and played in a 25 fps project with the Automatic Speed option enabled would play at 50% speed AND, because each image was shot by the camera and not created in the software, the images look MUCH cleaner, crisper and with very smooth motion during playback.
A clip shot at 120 fps would play at about 21% speed in a 25 fps project, or 25% speed in at 29.97 project.
NOTE: If the frame rate of the clip matches the frame rate of the project, Automatic Speed won’t work. The frame rates must be different.
The only disadvantage to this technique is that the duration of the clip always changes based upon the difference in frame rates.
NOTE: Applying a second speed change to a clip running in Automatic mode is not advised because it always adds artifacts and choppiness to the playback. (Though not as much as if Automatic mode were not applied.)
SUMMARY
Automatic speed is how we are able to shoot 2,000 fps clips with a Phantom camera and have them playback in stunning slow-motion in the Timeline.
The key to remember is that Automatic Speed plays every frame in a clip to match the frame rate of a project, regardless of the frame rate the camera used to record the clip.
EXTRA CREDIT
Here’s a video that shows this technique in action.

2,000 Video Training Titles
Edit smarter with Larry Jordan. Available in our store.
Access over 2,000 on-demand video editing courses. Become a member of our Video Training Library today!
Subscribe to Larry's FREE weekly newsletter and
save 10%
on your first purchase.
10 Responses to FCP X: Automatic Speed effect [u]
If you used the speed change option on a 50fps clip in a 25p timeline and reduced it by the appropriate amount (50%) would you still be getting a degraded image based on frame blending or would you actually get the same results as Automatic Speed, seeing all frames shot, because they are available?
I’m also curious about this with Premiere and if there are any technical differences between Interpret Footage and using Speed Duration. In other words, if you slow to the appropriate amount, can you use either of these methods and have the same results?
Thanks!
Ray:
If the 50 fps clip was shot interlaced, then, slowing to 25 fps will emphasize the interlace lines. Otherwise, assuming the 50 fps clip was shot progressive, slowing it to 25 fps would not damage image quality. It should also behave the same as if you used the Automatic speed setting.
Larry
Fantastic, thanks, Larry. So it sounds like, given the proper frame rate, there is no technical difference between automatic speed and slowing down by the mathematically correct percentage. I guess FCPX is intelligently skipping frame sampling when it sees that the high frame rate is present.
Ray:
Not completely true.
Automatic speed plays every frame you shot at the current project frame rate. This allows you to work with frame rates which are not multiples of the project frame rate.
Taking a 50 fps shot and playing it at 25 fps is a special case of slow-motion that only works because the two frame rates are multiples of each other.
Larry
Yesterday i shot a sports video, I want it the option to slow it down at any portion of the footage, so I shot it all in 60p. I drop it into a 24p time line and now notice that the footage I didn’t slow down is choppy. Is there a way to fix this?
Gilbert:
Not easily. The way that all NLE software works is that if the source frame rate does not match the project frame rate, source frames are dropped each second to get them to match.
If, for instance, the source frame rate is an even multiple of the project frame rate, this is easy. For example, 60fps playing in a 30 fps timeline means that every other frame is dropped, resulting in smooth playback.
If, on the other hand, the two frame rates don’t divide into each other easily, then sometimes every other frame is dropped, other times, two frames are dropped. This causes stuttery playback that is most noticeable on video with lots of action – such as sports.
You can try converting the frame rate of the source footage into the frame rate you want using Compressor with Optical Flow, which can help solve this problem, but it is very time-consuming. There are also much higher-cost solutions that can help with this problem, but they are not cheap.
The best advice, always is to shoot the frame rate you need to deliver, or an even multiple of it. This is why 120 and 240 frames per second are so popular. They can be slowed to a wide variety of frame rates.
Larry
Hi Larry. I’m afraid this is a variation of the questions above, but I’m still unclear so asking anyway. If I shot the footage at 240 FPS and import it into a project set to 60 FPS, is there a difference between the results of setting the footage to ‘automatic’ VS. using the method ‘Slpw’ -> 25%? Both result in the footage being 25%, but is one higher quality than the other? You mentioned that the slow feature duplicates frames to achieve an effect whereas automatic uses the true frame rate. Is this only true if the frames are not available or is that what the slow feature does by default? The frames exist and are available since I filmed at 240 FPS thus I woudn’t think it would duplicate, but I can’t help but think I see smoother playback using the automatic method. My imagination? Thank you!
Skyler:
I would go with Automatic. The reason is that, by definition, this plays every frame of your video. 25% will only do the same if the frame rate EXACTLY matches 240 fps.
Larry
Thank you Larry.
What a wonderful writeup! And what a horrible name for the effect! Sure, “Distribute all source frames to project framerate” doesn’t roll off the tongue, but c’mon Apple: “Automatic”?! Anyway, this knowledge is going to fundamentally change my current project. Thanks again!