
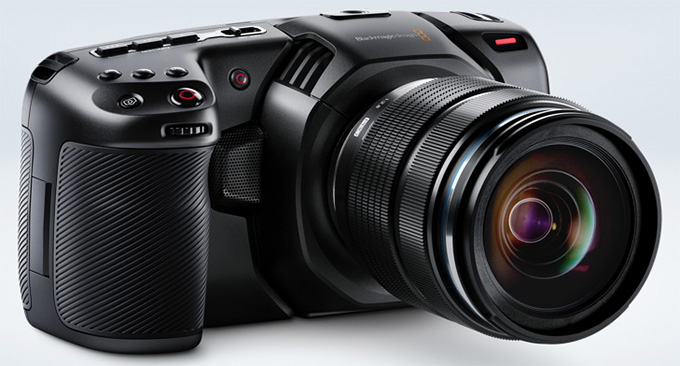
![]() One of the hottest cameras on the planet right now is the Blackmagic Pocket Cinema Camera 4K (PCC 4K) from Blackmagic Design.
One of the hottest cameras on the planet right now is the Blackmagic Pocket Cinema Camera 4K (PCC 4K) from Blackmagic Design.
When the team at doddleNEWS asked me to review the camera, I hedged. The last time I did any serious shooting, video was still standard definition. Since then, I’ve made a point to hire cinematographers, because the quality of their work is higher than mine.
So, I didn’t want to review the camera. But, when the doddleNEWS team persisted, I realized that I could provide substantial information looking at the camera from an editing perspective, because there are surprises in store if you don’t pay attention.
In this review, I want to:
NOTE: Both the camera and NLEs are continually updated. Expect these comments and recommendations to evolve over time.
UNDERSTANDING ISO
There’s been a lot of discussion about the dual ISO settings that the camera provides.
What the ISO setting does is, within the 13 stops the camera shoots that span from pure black and pure white, determine where mid-point gray will be set within this range.
In general:
RECORDING MEDIA
While you can record 1080 HD media to an SDSX card, you can NOT record UHD or 4K media to it. It is too slow.
For 4K media, you either need to use a CFast card (very expensive) or an externally attached SSD connected via USB-C. The SSD needs to be approved by Blackmagic and here’s a link listing supported cards and SSDs.
I’m using a Samsung T5 SSD for my tests. This supported all image sizes and frame rates with no problem. By the way, recording 4K RAW at 60 fps requires write speeds of 456 MB/second! Whew!!
NOTE: Here’s my review of the Samsung T5 card.
CODECS AND FORMATS
The Pocket Cinema Camera 4K shoots two different codecs:
Each of these two codecs has different compression settings:
CinemaDNG
ProRes
NOTE: To my way of thinking, you don’t buy a camera like this to shoot ProRes Light or Proxy images. So, while it is nice the camera supports these, I’m not going to factor them into this article.
Each codec supports three different frame sizes:
NOTE: I will use the UHD frame size for the rest of this article.
Each of these formats also support eight! different frame rates, measured in frames per second (fps):
Finally, when shooting ProRes, you can pick between three different dynamic ranges. I’ll define and illustrate these later in this article. (CinemaDNG only uses the Film setting):
Which of these options should you use for your next project? Well, it depends on what you want to do. Let’s take a look.
PICK THE RIGHT FRAME SIZE
Frame size has become an emotional decision. From my perspective, when viewed on screens smaller than 100 inches, you can’t see the difference between 4K and 1080p, unless you are sitting within two feet of the screen. Are an actor’s emotions any more real if you are looking at them in 4K?
On the other hand, it feels very righteous to say: “I shot this in 4K.” Clearly, bragging rights are involved. Also, higher resolutions allow you to charge more for your project.
Again, this is a personal decision. If you are shooting for the web, 1080p is fine. Otherwise, shoot the frame size required by your distributor.
NOTE: I should point out that larger frame sizes take massively more storage space.
PICK THE RIGHT FRAME RATE
Faster frame rates will:
NOTE: As with frame size, religious wars are fought over frame rates and motion blur. The short answer is pick what works for your project. I am a fan of higher frame rates.
Here’s the key rule: Shoot and edit the frame rate you need to deliver. Changing frame rates always degrades the image, especially for scenes with smooth motion.
Above all, avoid changing frame rates as much as possible. When in doubt, I recommend shooting 30 fps for web videos. This is a good balance between image clarity and smaller media file sizes and it’s supported by all NLEs.
NOTE: There is value in shooting faster frame rates to create smoother slow motion. However, in these situations, shoot a faster frame that can be divided evenly by your deliverable frame rate. For example, shoot 100 fps for a 25 fps project. Or shoot 120 fps for a 30 fps project.
Here’s an article that discusses changing frame rates in more detail.
CODEC VS. FILE SIZE
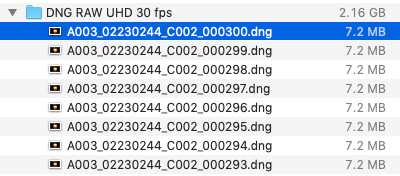
CinemaDNG is an image sequence, a collection of individual frames, collected into a folder. When you choose the different compression options, you are determining how much each frame is compressed.
NOTE: CinemaDNG only records in Film mode and is considered a RAW image format.
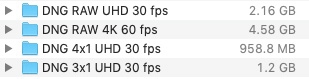
Here, for example, are three folders, each using a different compression setting. Each contains exactly 300 frames. (Just for comparison sake, I also included a folder containing 300 frames of the largest frame size and fastest frame rate: 4K/60.) Clearly, compressing an image saves a lot of disk space!
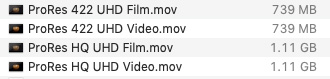
For comparison, here are the file sizes, using the same frame size and frame rate, but shot using ProRes 422 HQ and 422. Each clip is exactly 9:29. I shot both Video and Film modes so we can compare file sizes.
As you see here, while the compression setting for the codec makes a difference, the dynamic range setting does not.
Here are the file storage requirements for UHD/30:
| Codec | MB/sec | Store One Hour |
|---|---|---|
| CinemaDNG RAW | 216 | 777 GB |
| CinemaDNG 3:1 | 120 | 432 GB |
| CinemaDNG 4:1 | 96 | 345 GB |
| ProRes 422 HQ | 111 | 400 GB |
| ProRes 422 | 74 | 266 GB |
Just to stress, these files are REALLY large!
PICK THE RIGHT DYNAMIC RANGE
As mentioned earlier, the Blackmagic Pocket Cinema Camera 4K has three dynamic range settings when shooting ProRes:
As you will see, there are significant differences in how each of these settings look.
EDITING IN APPLE FINAL CUT PRO X
If you plan to edit PCC 4K footage using Final Cut Pro X, you’ll need to shoot ProRes, because Final Cut Pro X does not support CinemaDNG. (It imports it as a series of still images, not clips).
NOTE: If you import a CinemaDNG RAW frame, FCPX converts it to Rec. 709 color space.
Here are my recommendations for the PCC 4K camera and Final Cut Pro X:
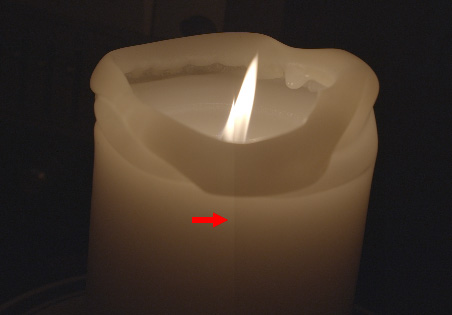
This is a split screen between ProRes 422 HQ (on the left) and ProRes 422 for footage shot in Film mode. Note the difference in mid-tone values in the middle of the candle: ProRes 422 is slightly darker. This is not noticeable when recording in Video mode. Plus, using ProRes 422 saves almost 34% in storage space.
NOTE: This image was shot ISO 400, f/6, 180° shutter, using ProRes in Film mode. The white balance was set to 3200° K. The only light was coming from the candle.
CONVERTING MEDIA USING APPLE COMPRESSOR
I really don’t recommend using Compressor to convert CinemaDNG, though you can do it. First, it takes forever and, second, it remaps the color space.
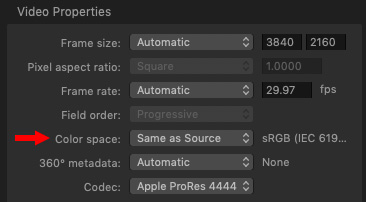
Apple Compressor will convert CinemaDNG into ProRes, however, you need to change the Color Space setting in the Video Inspector to Same as Source. To preserve the maximum color fidelity, be sure to convert it to ProRes 4444.
Additionally, Compressor doesn’t support 30 fps image sequences. Instead, it converts a 30 fps sequence into 29.97 fps. This may have implications for sound sync if you are shooting double-system sound.
NOTE: This conversion process is NOT quick. Converting a ten second CinemaDNG clip to a matching size ProRes 4444 took 3 minutes, 13 seconds. This means converting one minute of CinemaDNG to ProRes 4444 will take 20 minutes! This is the slowest of the three software I used in writing this article.
Faster CPUs with more cores will speed this. Compressor does not significantly use the GPU in this process.
EDITING MEDIA USING ADOBE PREMIERE PRO CC 2019
Premiere, like Final Cut, doesn’t support CinemaDNG directly. Like FCP X, it imports CinemaDNG as a series of still images, rather than a clip. And, while FCP X imports them quite quickly, Premier took about a minute and twenty seconds to import ten seconds worth of images.
Based on this, Premiere is not a good choice to edit native CinemaDNG files.

NOTE: Premiere does provide the option to import Image Sequences, but this option does not recognize CinemaDNG files.
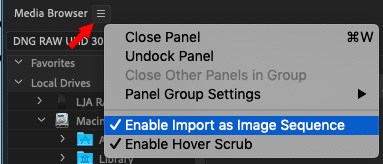
Adobe Media Encoder can import a CinemaDNG file, but you first need to Enable Import as Image Sequence in the fly-out menu from the Media Browser panel.
Encoding a 10 second RAW clip into ProRes 4444 took 48 seconds, or, roughly, 4.8 minutes to convert a minute of footage. Four times faster than Compressor.

The good news is that the converted file that AME created is virtually indistinguishable from the source file, as you see displayed here in Premiere. Source image on the left, converted ProRes 4444 image on the right. The split goes through the middle of the flame.
EDITING MEDIA USING DAVINCI RESOLVE
Opening a ten-second CinemaDNG file in DaVince Resolve took about 2 seconds and it was opened as a clip, rather than an image sequence.
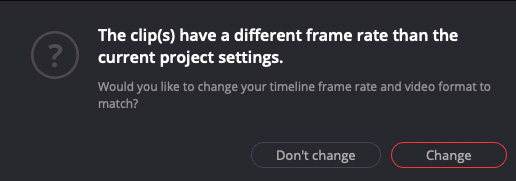
Even better Resolve recognized the correct frame rate and changed the timeline to suit.
Finally, it provided the most accurate color for the source clip. while still retaining lots of shadow detail.
IMAGE COMPARISON
NOTE: The following images were shot at ISO 400, f/6, 180° shutter, with white balance set to 3200° K. No color adjustments or LUTs were applied, except for the last image. The only light is from the candle.
(Click to see a larger image.)
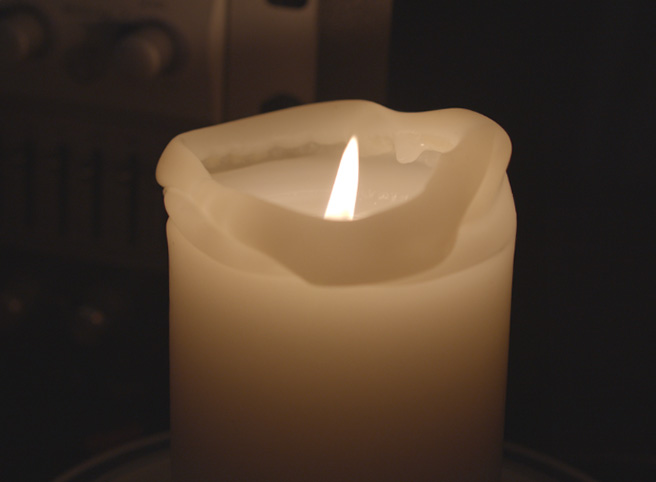
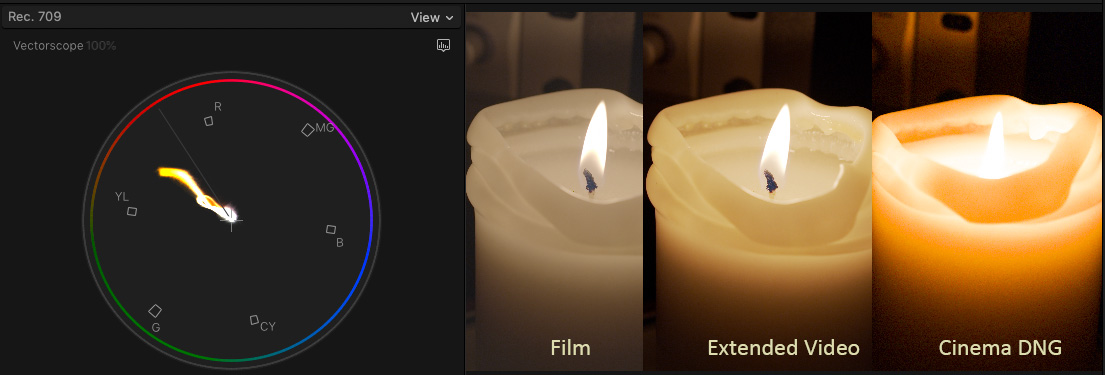
Using Final Cut Pro X, this image compares the three dynamic ranges recorded using ProRes 422 HQ: Film (left), Extended Video (center), Video (right).
Film has the greatest amount of shadow detail, while Video has extended highlights. All three are displayed in Rec. 709 color space. To my eye, Video is over-saturated.
(Click to see a larger image.)
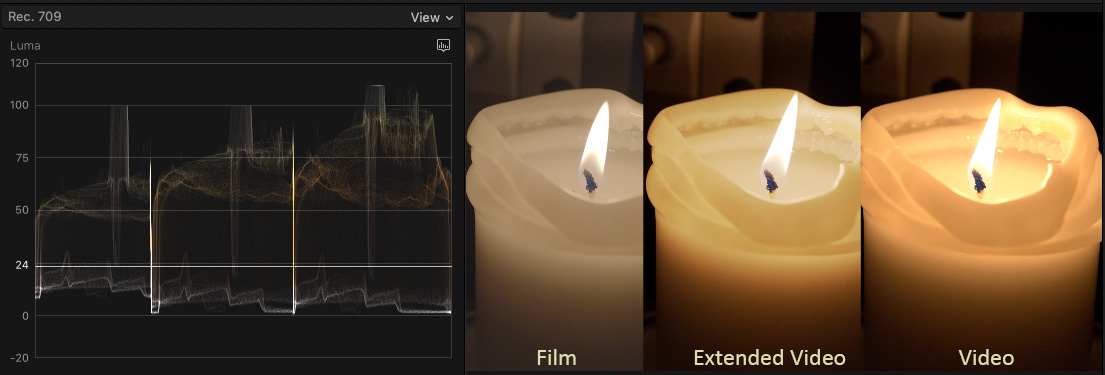
The same image, but including the Vectorscope
(Click to see a larger image.)
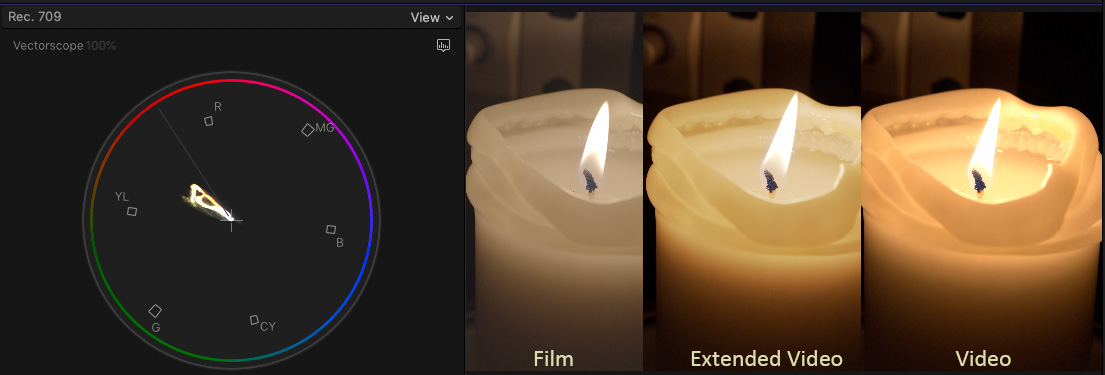
Using Final Cut Pro X, this compares ProRes Film (right), Extended Video (center) and CinemaDNG (RAW), note that all are converted to Rec. 709 color space. The CinemaDNG image is a single imported frame.
(Click to see a larger image.)
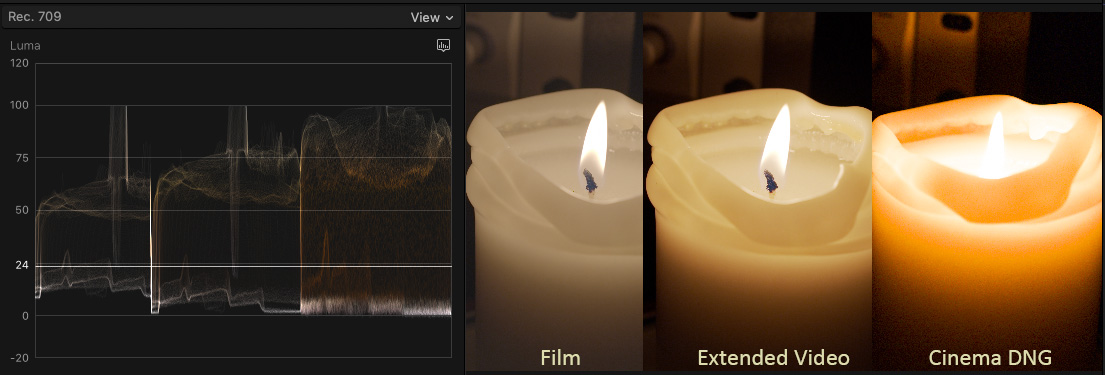
The same image as immediately above, but displaying the Vectorscope.
To my eye, Film provides the greatest latitude for color grading in Rec. 709 space, while Extended Video provides the most accurate color with the least amount of color grading needed.
OOPS! FORGOT TO SWITCH TO HDR
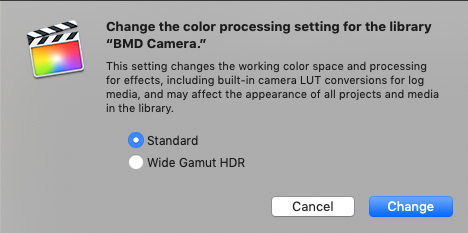
Final Cut Pro defaults to creating projects in Rec. 709 space. To change that, we FIRST need to change the Library to Wide Gamut HDR. Then, change the color space of the project. In this example, I’m using HDR 2020 HLG.
(Click to see a larger image.)
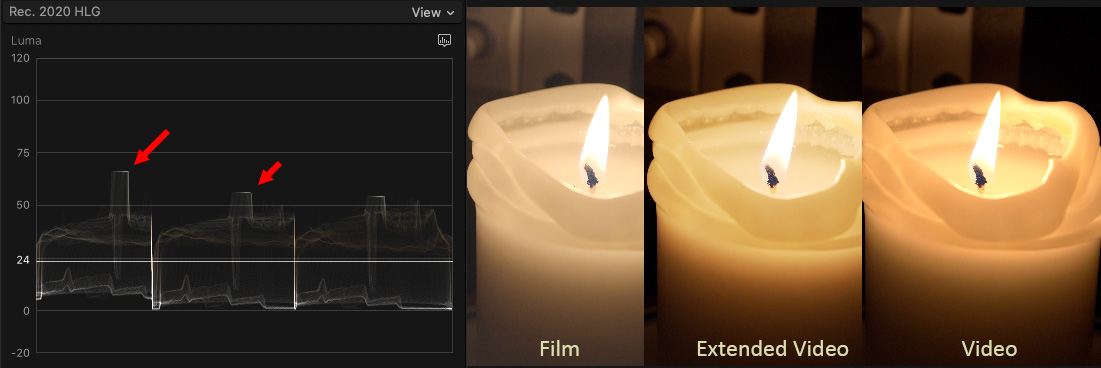
Now, when comparing ProRes Film (left), Extended Video (center), and Video, we can push the highlights a LOT further with Film than the other two. In this image, I raised highlight values as far as I could for each image without causing the highlights to blow out. As you can see, Film gives us the greatest latitude for moving into an HDR color space.
NOTE: The only way to see HDR media correctly is on an HDR monitor. The Mac display, though extended to Display P3, is not a true HDR monitor.
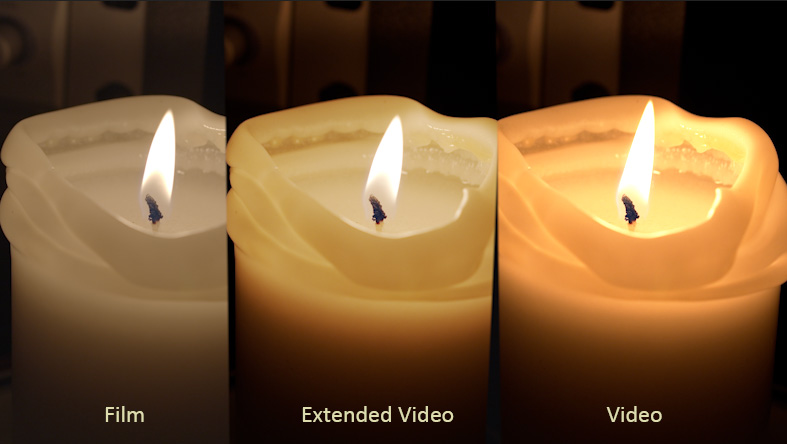
(Click to see a larger image.)
Here’s the same image – ProRes Film (left), Extended Video (center), and Video – displayed in Adobe Premiere Pro CC 2019.
SUMMARY
So, what have we learned?
As always, I’m interested in your comments, below.

2,000 Video Training Titles
Edit smarter with Larry Jordan. Available in our store.
Access over 2,000 on-demand video editing courses. Become a member of our Video Training Library today!
Subscribe to Larry's FREE weekly newsletter and
save 10%
on your first purchase.
25 Responses to Editing Issues: Blackmagic Pocket Cinema Camera 4k
Newer Comments →-
 John Teegarden says:
February 25, 2019 at 7:21 am
-
 Gregory Shaw says:
February 25, 2019 at 11:22 am
-
 Larry says:
February 25, 2019 at 11:26 am
-
 John Teegarden says:
March 1, 2019 at 7:16 am
-
 Larry Jordan says:
February 25, 2019 at 11:22 am
-
 SCOTT MARK I says:
February 25, 2019 at 3:46 pm
-
 Larry says:
February 25, 2019 at 5:08 pm
-
 Philip Cutting says:
February 27, 2019 at 12:45 am
-
 Michele Kinrade says:
February 28, 2019 at 8:03 pm
-
 Larry says:
February 28, 2019 at 8:04 pm
-
 Clayton says:
March 1, 2019 at 9:55 am
-
 Evan Thies says:
March 2, 2019 at 7:10 pm
-
 Larry says:
March 2, 2019 at 9:51 pm
-
 Emil says:
April 30, 2019 at 4:28 am
-
 Larry says:
April 30, 2019 at 8:58 am
-
 Josh says:
May 15, 2019 at 11:42 am
-
 Larry says:
May 15, 2019 at 2:49 pm
-
 Radu Vlad says:
December 25, 2019 at 6:49 pm
-
 Larry says:
December 26, 2019 at 7:33 am
-
 Bob’s Burgers says:
September 27, 2020 at 9:16 am
-
 Larry says:
September 27, 2020 at 9:19 am
Newer Comments →Are you sure about the ISO settings? You said:
——
In general:
For shooting in low-light where you want to preserve shadow detail, set the ISO between 100 – 400.
For shooting in bright-light, where you want to preserve highlight detail, set the ISO between 3200 and 6400.
When you aren’t sure what you want to do set the ISO at 400.
—–
Wouldn’t this be the opposite? In old chemical film days, having an ISO that high in bright light would make you use extremely small apertures (f22, etc.) and fast shutter speeds just to get an image that wasn’t blown out.
Just wondering…
This is a real basic topic that all photographers, still and motion, need to get their head around, but it is counter-intuitive, so really hard to do — Larry, a good topic for a tutorial or seminar! ISO is ‘gain’ and Iris is ‘exposure’. To protect or emphasize shadows, you increase exposure and lower gain (ISO). To protect or emphasize highlights, you lower exposure, and raise gain.
This link has a really good explanation of how to balance gain (ISO) and exposure for optimal images. And how to maximize dynamic range.
https://fstoppers.com/education/everything-you-ever-wanted-know-about-dynamic-range-and-more-297722
Greg:
Very helpful comment – thanks!
Larry
I watched the video and my head is hurting… All of that old information (all the way back to the Zone System and “expose for the shadow, develop for the highlights”) thrown out and burned in the trash pile next to “check the gate for hairs!”.
It all makes sense, but it won’t be intuitive without tests (of course)
Thanks for the link.
John:
With the caveat that I am not an engineer, and based upon my research, that’s my understanding.
Digital cameras do not deal with light the same way as film.
However, as with everything in production, do a test with your gear before you record your project to make sure you are getting the results you expect.
Larry
Larry, Thank you for sharing your very in depth review of using the 4kPCC camera for post production! Just a proud reader of your work.
Sincerely
Scott:
Thanks for the kind words! I have fun putting these together.
Larry
Thanks for a fascinating article. Large file sizes are the main reason I’m sticking with 1080p!
I loved this article! I did not appreciate how much the NLEs would differ in working with the same footage. Also much of my shooting is of live events where people are moving around and there is no opportunity to set up specific shots. So I like using 4K to have more options with reframing and adding a little camera movement in post. Thanks for helping us all change with the times!
Michele:
I’m glad you liked it – I enjoyed writing it.
Larry
“FRAME SIZE” – yea we sit about 15′ from a 60″ 4k TV. We get 4k via our Apple TV box – iTunes, Amazon,Netflix. It’s true at 15′ its pretty much impossible to see the difference between a very clean 1080 and a 4k image. The difference can however be seen if (as an example) you have an areal shot 1000′ above NYC with all that detail in cars and people.
Hi Larry,
Thanks for the article, there are some great insights here! I deal with Blackmagic footage regularly, so it’s great to see your workflow and recommendations.
One thing I wanted to note, in the beginning of the article you mention that SDXC cards can record 1080 HD but not UHD or 4K media – and while that is the case for older UHS-I cards, newer UHS-II cards are certainly up to the task. While they don’t have the higher read/write speeds that CFast cards or SSDs do, there’s a surprising amount of capability in those little cards. I record 4K ProRes 422 and ProRes 422 HQ to SD cards on pretty well every shoot, and I’ve yet to experience any issues or frame drops. Anyway, just thought I would mention it.
Thanks for all of the great content and training you produce!
Evan:
Thanks for your comments. I didn’t know there was a difference in cards.
Also, I want to stress that it is important to visit the Blackmagic Design webpage – linked in this article – to see the list of approved cards. While I still recommend in favor of faster storage when shooting 4K images, it is good to know that some versions of these SDXC cards will work.
Larry
Hi Larry,
Great article! The thing I was missing was how long it would take to transcode to ProRes in Resolve though. Waiting to receive a CinemaDNG project and will be editing in FCPX (they did not know this when shooting). So thinking of doing a ProRes444 (or 422HQ) transcode in Resolve. But if it takes 20x real time it’s not worth it. I would have to learn Resolve.
Emil:
Transcode speed is CPU dependent. I would strongly suggest getting some sample footage – even of traffic – to experiment with using your hardware before making a final editing decision.
Larry
I just shot a 6 camera panel discussion with the Black magic pocket 4k and I shot in pro res with the film look. I tried to play it back in premiere and it just freezes. I tried to create a proxy but encoder is telling me its going to take 72 hours for the 4o minute clip. Any ideas on what I can do better next time/how to better attach this work flow?
Josh:
My first suspicion is that your storage is too slow. For example, six streams of ProRes 422 HQ requires more than 700 MB/second of bandwidth! This bandwidth is greater than a single attached SSD or a four-drive RAID of spinning media.
You can also have a problem if you connect fast storage using a slow protocol, such as USB 3.1 Gen 1. To me, freezes imply storage issues.
In creating proxies, be sure to convert them to ProRes Proxy, rather than H.264. ProRes will be slightly bigger files, but much more efficient to edit, especially in multicam mode. You can also try other compression software, other than AME. For example, Handbrake or Compressor.
Unlike editing, video compression is CPU based. Transcoding your media on a faster CPU will also make a difference.
Larry
Well, please correct me if I’m wrong but from what I understand 10 bit and above is considered HDR and such Prores and Prores HQ are 10 bit and can lead to an HDR final cut.
Meanwhile the LT and Proxy are 8 bit.
And the CDNG is 12 bit which could provide a higher level of HDR…
Still researching the difference in bit depth (if any) in the final delivery formats between HDR, HDR10, HDR10+ and Dolby Vision flavors…
Seems to me a straight forward HDR workflow is to shoot, edit and deliver in Prores HQ.
Radu:
Smile…OK, you’re wrong.
All versions of ProRes are 10-bit, including Proxy.
HDR is defined as video files that:
* Have a frame size equal to or greater than 4K
* Have a bit-depth equal to or greater than 10-bit
* Have a color saturation greater than Rec. 709.
HDR is not created in the shooting, it is created in the final color grade, after all shooing and editing is complete.
There are not different “levels” of HDR, as the distribution formats, unlike shooting, all require 10-bit video for delivery.
Larry
“SDSX is too slow to record 4K” well, you obviously have a very slow card. I’ve shot nothing but 4K BRAW on my 128GB SD card, and I’ll tell you this, I’ve never dropped frames, not once. I’ve even gone as far as 4K 2.4:1 75fps in BRAW, again, have had zero issues with recording.
Bob’s Burgers:
Thanks for the feedback. The speed tests I’ve run on SDSX cards, using the Blackmagic Speed Test, showed speeds too slow for editing. Let us know what brand and model of SDSX card you are using.
Thanks,
Larry