
![]() One of the questions I’m getting asked more and more is how to convert HD video into SD video. SD versions are necessary for creating DVDs, to send to a cable outlet that has not yet upgraded to HD transmission, or for any of a number of perfectly valid reasons. Making this even more complex is converting between 16:9 and 4:3, or, even converting frame rates.
One of the questions I’m getting asked more and more is how to convert HD video into SD video. SD versions are necessary for creating DVDs, to send to a cable outlet that has not yet upgraded to HD transmission, or for any of a number of perfectly valid reasons. Making this even more complex is converting between 16:9 and 4:3, or, even converting frame rates.
Keep in mind that when you convert HD to SD, your image quality will degrade. Always. SD is 1/7th the image quality of HD. SD images will NEVER look as good as HD. That’s why they invented HD.
Also, DVD Studio Pro can not create DVDs containing high-def video. Instead, the format it creates – HD-DVD – died many years ago. Nor can you use DVD Studio Pro to create Blu-ray Discs.
In this article, I’ll show you how to export a master movie, and how to convert it to SD. At which point, you can compress it for DVD, or deliver it for broadcast, or… whatever.
DEFINITION: Transcode means to convert from one file format to another. In my mind when I am transcoding, I am converting from one editable format to another. When I am compressing, I am creating the final compressed version to post to the web. In my mind, transcoding always yields higher quality, but larger file sizes, than compressing. This definition is not totally accurate. Purists would argue that the two terms are essentially synonyms. That is probably true, however, they have different shades of meaning to me.
TOOLS
In this article, I’ll use Apple Compressor, because it is optimized to create QuickTime files and is inexpensive.
However, you can also use Sorenson Squeeze or Telestream Episode, if you have them installed on your system. The benefits to this software is support for far more video formats, faster performance, and a different way to automate file handling: watch folders.
One application that I prefer not to use for transcoding is Adobe Media Encoder (AME). While I truly enjoy working with other Adobe applications, AME is designed for compressing files for final delivery, not creating high-quality intermediate files. I find using it is an exercise in frustration, which is a shame because it is so nicely integrated with Premiere.
SOME BACKGROUND
Whenever you are handling a file multiple times, you want to work at the highest-possible quality so that repeated manipulations do as little damage to the file as possible. Files that are created after you export a master file and you compress the final version for the web are called “intermediate” files.
In our case, we will create an intermediate SD file using Apple ProRes 422. ProRes offers a great balance between file size, image quality, and minimal compression. I prefer it for almost all my work.
CREATE THE MASTER FILE
If you need to create a master file from your software, follow the instructions in this section. If you are given a master file, jump down to the next section.
Whether you are using Final Cut Pro 7 (or earlier), Final Cut Pro X, or Adobe Premiere Pro CS6, this process starts by creating a high-quality, self-contained, master file.
NOTE: All this software can transcode projects into an intermediate SD file. However, I’ve never liked the quality nor the time it takes. I prefer to create a high-quality master file, then convert it using a dedicated compression program, rather than rely on the editing software for the conversion.
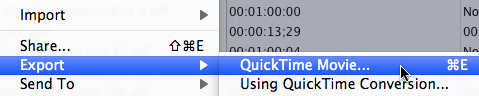
In Final Cut Pro 7, select the sequence you want to export in the Browser, then choose File > Export > QuickTime Movie (or type Command+E).
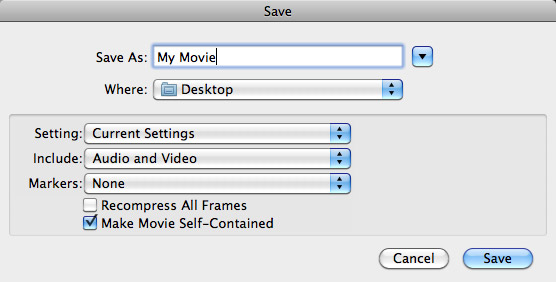
In the resulting dialog box:
When you click Save, FCP 7 exports a file that matches the sequence settings of your project and creates a self-contained QuickTime movie. This file may, or may not, be a ProRes file. At this point, we don’t care. Matching your sequence settings is both the fastest and best way to get a file out of Final Cut Pro 7.
NOTE: In the past, we could create two types of movies: reference and self-contained. Reference files were smaller and faster to export, but they simply pointed to your source and render files. If even one of these referenced files was lost or moved, the entire movie would break. Self-contained files are bigger and take longer to export. However, they are complete in themselves and can be played anywhere on anything.

In Premiere Pro CS6, select the sequence to export in the Project tab. Then, choose File > Export > Media (or type Command+M).

In the Export Settings window:
This creates a stand-alone file that matches your sequence settings. In most cases, this won’t be a ProRes file. Again, don’t worry about that.

In Final Cut Pro X, display the Project Browser and select the Project you want to output.
Choose File > Share > Master File, or type Command+E (this keyboard shortcut may not work for all versions of FCP X).
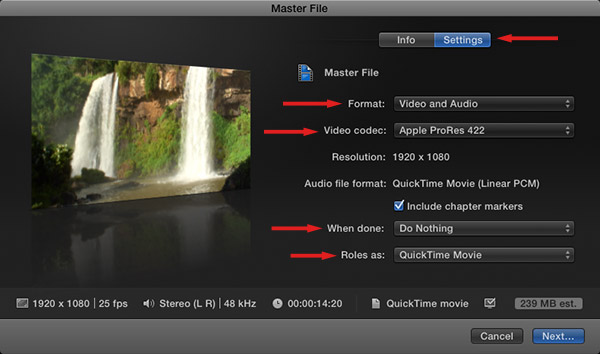
In the Master File screen, click the Settings tab and verify:
Click Next.

Give the file a name and location, then click Save.
Regardless of the software you used, you’ve now created a high-quality master file, ready to compress.
CONVERTING HD TO SD
Here’s the first thing you need to know about compression: Never, ever worry about the file size or format of your source master file. You only need to define what you want the file to become. The compression software will handle all necessary conversion.
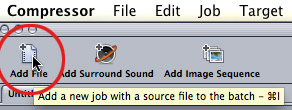
In Compressor, click the Add File icon at the top and add your master file. (in this example, I’m using a 1920 x 1080 file, complements of Pond5.)
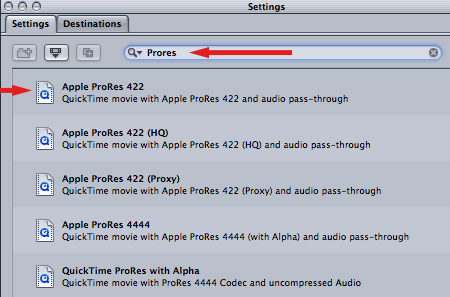
In the Search box at the top of the Settings window, type “Prores” — you don’t need to press Tab. As soon as you type the word, five options appear in the Settings window below.
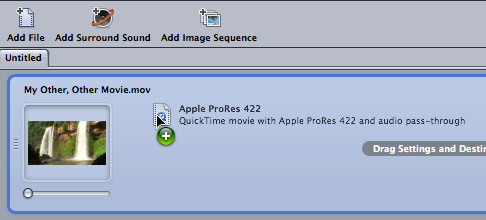
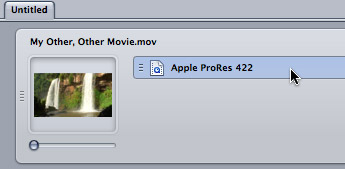
Drag the top choice – ProRes 422 – on top of the master file you imported into the top left window of Compressor. This tells Compressor what format you want the transcoded file to have.
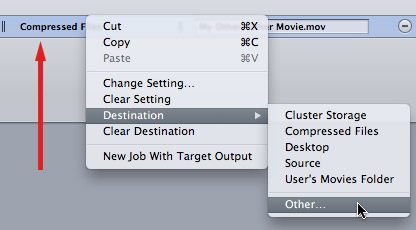
Right-click the middle column in the Task window, to set a destination. By default, Compressor stores the compressed file in the same location as the source file. On my system, I’ve created a new folder specifically to store all my compressed files. (Here’s an article that describes that process.)
You can also select Custom to set a custom destination for the transcoded intermediate file. In this example, I’ll leave the destination set to Compressed Files, which is the custom destination that I created.
A NOTE ON INTERLACING
Interlacing is the bane of video posted to the web, but required for all SD formats and some HD formats.
The good news is that if you shot 1080i, the process of creating an SD version automatically removes all interlacing. Always. All the time. So you never have to deinterlace as part of editing your project. And all 720p formats are interlace-free.
Basically, when converting HD to SD, you never worry about deinterlacing. Your final file will always look good, and it won’t contain interlace lines..
CHANGING THE IMAGE SIZE
SD is not the same frame size as HD. To change the frame size, select the Apple ProRes 422 codec this is applied to the movie. (Don’t select the movie, you need to select the codec applied to the movie.)
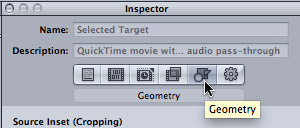
Then, in the Inspector, click the Geometry tab, this allows us to change the size of the compressed image. (Remember, we never worry about the source file, only what we want it to become.)
Now things get complex, depending upon where you need to deliver your video.
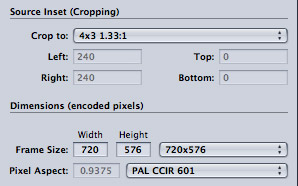
Convert a 16:9 master file to PAL 4:3
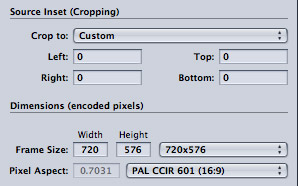
Convert a 16:9 master file to PAL 16:9
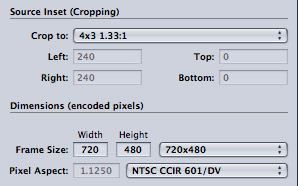
Convert a 16:9 master file to NTSC 4:3 – this works for DVD, cable, or broadcast.
Convert a 16:9 master file to NTSC 16:9
NOTE Broadcast 4:3 image sizes are actually 720 x 486. However, when those six lines are missing, broadcast gear centers the image vertically and inserts black lines at the top and bottom. Since these black lines are far outside Action Safe they won’t be seen on home TV sets.
CHANGING FRAME RATE
This is, potentially, the most tricky, because some frame rates convert perfectly and others don’t. In general, if you need to create a PAL master, shoot 25 or 50 fps. If you need to create an NTSC master, shoot 29.97, 30, 59.94, or 60 fps.
Other combinations can be converted, but will often cause image stuttering. this is one of those examples where you need to keep your final master in mind when you shoot.
NOTE: If you shot the wrong frame rate, but need to create the absolutely smoothest playback, check into renting time on an Amberfin system. This software, which is not cheap, will do the best job of retiming video. Most high-end past facilities will have access to this software.
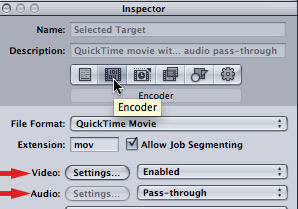
To change frame rates, click the Encoder icon in the Inspector. Then, click the Settings button next to Video.
NOTE: The Audio setting should be grayed out and set to Pass-Through. This means that your audio is simply copied without any changes from the master file to the transcoded file. In almost all cases, this is the best choice.
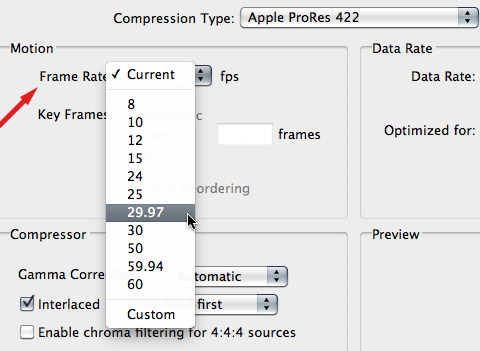
In the Standard Compression Settings window, set the frame rate to:
The rest of the settings are fine. Click OK.
MAKE IT SO

Click Submit to send your file to the last stage.
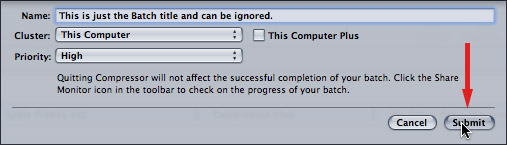
Then, click Submit a second time to send it off to compress. (The Name field allows you to enter a batch name. This has nothing to do with the name of the compressed file.)
Now that you’ve configured this setting, you can either save it as a preset if you want to use it again, or, even, convert it into a Droplet. (This article describes how to create a droplet.)
Whew. That was a lot of steps, but, it gets easier each time you do it.

2,000 Video Training Titles
Edit smarter with Larry Jordan. Available in our store.
Access over 2,000 on-demand video editing courses. Become a member of our Video Training Library today!
Subscribe to Larry's FREE weekly newsletter and
save 10%
on your first purchase.
50 Responses to Convert High Definition to Standard Definition Video
← Older Comments Newer Comments →-
 Pearl says:
February 27, 2014 at 8:49 am
-
 Rima says:
April 11, 2014 at 5:39 pm
-
 Larry Jordan says:
April 12, 2014 at 10:53 am
-
 samant says:
April 21, 2014 at 8:36 am
-
 Larry Jordan says:
April 21, 2014 at 9:51 am
-
 Megan says:
May 30, 2014 at 11:49 pm
-
 Larry Jordan says:
May 30, 2014 at 11:57 pm
-
 Doug Palmer says:
June 21, 2014 at 7:47 pm
-
 LarryJ says:
June 21, 2014 at 7:50 pm
-
 Mike Simmons says:
October 2, 2014 at 2:22 am
-
 Richard Fisk says:
January 25, 2016 at 8:09 pm
-
 Larry says:
January 25, 2016 at 8:22 pm
-
 liz de kort says:
April 28, 2016 at 11:43 am
-
 fafa says:
October 19, 2016 at 12:11 am
-
 Larry says:
October 19, 2016 at 5:33 am
-
 John Cole says:
March 18, 2017 at 1:41 pm
-
 Larry says:
March 18, 2017 at 1:54 pm
← Older Comments Newer Comments →Question: I edited my 18-minute video, 1980 x 1080 prores in FCP, export self-contained movie as per your suggestion. The self-contained movie looks beautiful. However, when I continue your suggested workflow in Compressor to burn in DVD Studio Pro, I am getting a very thin green line around the entire frame of my video. I am using the Prores codec in Compressor and trying to burn an SD DVD. You mentioned in another article that this is very unusual but I am getting it. How do I avoid this? Thank you!
I am working on a documentary which is an expansion on a thesis. When conducting interviews for the thesis I a few years ago, the intent of the interviews was to use them only as research material for the thesis so I shot them using the Olympus SP-800UZ. The camera has 720p HD movie recording capability. I’ve reshot most of the interviews with a pro camera at hi def 1080 HD. However, two of my interviewees cannot reshoot – one has passed away and one is ill. Can the 720p film be converted successfully to the 1080 for the big screen?
Rima:
Can it be converted? Yes.
Will it look as good as 1080? Maybe, depending upon the quality of your lens and lighting.
Can you use it? Absolutely. We use standard-def footage every day because “its all we’ve got.”
Larry
HI Larry,
I am working on a project wherein I have to export 1080 movie to 720 SD, also the client needs 4 track of audio ie mono on 1&2 and stereo on 3&4..
I have exported a self contained movie and it gives me the option of 4 audio tracks but going through this process doesn’t give me the option to convert size as FCP takes the timeline settings..
My timeline is HD..
please guide
Samant:
Generally, you do this in two steps:
1. Export a master file at the highest image quality and size, containing 4 audio channels.
2. Compress the file to the size and codec you need using Compressor.
Larry
Hello Larry,
I am using compressor 4.1.1 and it seems like you are using an older version in this tutorial.
Is there a quick coach you could offer on how to burn a dvd that will play on an older projector in the U.S. with this newer version of compressor?
I have gotten all the way to the (now nonexistent) geometry tab of your tutorial.. and I assume the answer is in the new video tab of compressor 4.1.1’s inspector window..? Would I be changing the frame size to .. maybe custom 4:3?
I will try it, but I would love to know before I waste another DVD, thank you so much..
Megan:
First, here is complete training on Compressor 4.1:
http://www.larryjordan.biz/app_bin/Store/catalog/product_info.php?products_id=344
Second, just use the DVD settings and Compressor will handle the frame size conversions for you.
Larry
Larry – great resource.
I shot video at 1280 x 720. I want to convert it to SD 16:9 for DVD.
After running the video through Compressor, I’m opening the file as a timeline in Encore. But, the 16:9 is squashed, and has top and bottom black bars.
I specified the Compressor settings you listed above, but the final file aspect ratio isn’t correct.
I’d appreciate your suggestions.
Doug Palmer
Doug:
Double-check your compression settings AND your track settings in Encore.
One of the two of them are set to 4:3, not 16:9.
Larry
many many thanks for this. Having finally made the move from SD to HD this really helped me out.
This article was so helpful!
I help edit for a local public TV station. We record with XA25s in mp4, 3 Mbps to save on HDD space. All of our broadcast get compressed to SD no matter how we film.
This is the process on our old computers: Shoot, use compressor to trans mp4 to ProRes422 and edit in FC7. Then compress to best DVD quality and a Vimeo setting for upload online.
Our new computer can handle our mp4 (640×360 H.264, ACC, Timecode, HD 1-1-1) natively in Premiere CC. So we edit it directly this way, then export to encoder for compressing Vimeo file and DVD files to burn. However, this produces a lower quality than in the past.
Our old workflow didn’t look the best, created tons of large .mov files but in the end SD broadcast will always be SD so it didn’t matter. Now we are trying to make sure that our Vimeo files don’t look super crummy. We have a new computer and new adobe software that can do just about anything we need it to.
QUESTION: What is the best way to edit these mp4s? Should we edit native mp4s? Should we export from Premiere using sequence settings that match our source mp4 to compressor for our Vimeo and DVDs or use encoder?
Any and all advise as to how we can make our flow easier and quality better would be great. Thank you for your time.
Richard:
You are shooting SD video (640 x 360) so you need to stay SD in order for your images to look good. If you are trying to up-res them to HD, they will look terrible.
That being said, your workflow is a bit tricky. MP4’s are already REALLY compressed, then you compress them again for Vimeo. This will rarely – if ever – look good. Worse, you are recording your media HIGHLY compressed directly on the camera. There just aren’t enough bits in your media to do what you need to do. You are recording at 3 Mbps, but Vimeo – and YouTube – expect high quality data closer to 15 Mbps. You are already starting behind the eight ball.
Hmmm…
Transcoding media allows you to add extra bits that can be thrown away during compression without damaging quality.
I would strongly recommend increasing the bit rate in your camera to the highest level possible. Then, edit that format natively in Premiere. Then, compress for Vimeo directly out of Premiere. Because you started with a higher bit rate source, your compressed files should look better.
Always try to record the highest quality you can at the camera. It is always easy to throw bits away, but impossible to put them back. Skimping at the camera is never a good idea.
Larry
Larry, you saved me with this article. Great! Best, Liz
Your post is very helpful. Thank you for that Larry.
I have HD 1920×1080 PAL footages. I edit using FCPX same format. My final output is SD for broadcast.
would you recommend to create master file in the same HD 1920×1080 from FCPX by sharing then convert it to SD using Compressor. I have the latest ver 5 compressor.
or Can I export it to SD directly form the FCPX Ver 10.2. I need a good quality master in SD for broadcast.
Thank you
Fafa:
I recommend editing and exporting an HD master. That way, you’ve got an HD version should you ever need it.
Then, convert it to SD using Compressor.
Larry
Thanks Larry!
Don’t know why I don’t just go to you first. Every time. Duh.
I shot HD, meant to shoot HD, will work in HD, BUT a last minute news outlet asked me for a favor……
I’m taking HD 16:9 23.98 and converting to SD PAL 25 4:3.
Are there any other tricks for fixing the framerate issue?
Or should I just tell the late-comer to hire an Amberfin system? (which they will never do).
John:
First, convert 23.976 fps to 25 is less of a problem than converting 25 to 23.976. My guess is that you should be OK.
In order to avoid squishing your video, you need to use the Cropping & Padding dialog. Re-read the article again and check your settings.
Larry