
![]() One of the questions I’m getting asked more and more is how to convert HD video into SD video. SD versions are necessary for creating DVDs, to send to a cable outlet that has not yet upgraded to HD transmission, or for any of a number of perfectly valid reasons. Making this even more complex is converting between 16:9 and 4:3, or, even converting frame rates.
One of the questions I’m getting asked more and more is how to convert HD video into SD video. SD versions are necessary for creating DVDs, to send to a cable outlet that has not yet upgraded to HD transmission, or for any of a number of perfectly valid reasons. Making this even more complex is converting between 16:9 and 4:3, or, even converting frame rates.
Keep in mind that when you convert HD to SD, your image quality will degrade. Always. SD is 1/7th the image quality of HD. SD images will NEVER look as good as HD. That’s why they invented HD.
Also, DVD Studio Pro can not create DVDs containing high-def video. Instead, the format it creates – HD-DVD – died many years ago. Nor can you use DVD Studio Pro to create Blu-ray Discs.
In this article, I’ll show you how to export a master movie, and how to convert it to SD. At which point, you can compress it for DVD, or deliver it for broadcast, or… whatever.
DEFINITION: Transcode means to convert from one file format to another. In my mind when I am transcoding, I am converting from one editable format to another. When I am compressing, I am creating the final compressed version to post to the web. In my mind, transcoding always yields higher quality, but larger file sizes, than compressing. This definition is not totally accurate. Purists would argue that the two terms are essentially synonyms. That is probably true, however, they have different shades of meaning to me.
TOOLS
In this article, I’ll use Apple Compressor, because it is optimized to create QuickTime files and is inexpensive.
However, you can also use Sorenson Squeeze or Telestream Episode, if you have them installed on your system. The benefits to this software is support for far more video formats, faster performance, and a different way to automate file handling: watch folders.
One application that I prefer not to use for transcoding is Adobe Media Encoder (AME). While I truly enjoy working with other Adobe applications, AME is designed for compressing files for final delivery, not creating high-quality intermediate files. I find using it is an exercise in frustration, which is a shame because it is so nicely integrated with Premiere.
SOME BACKGROUND
Whenever you are handling a file multiple times, you want to work at the highest-possible quality so that repeated manipulations do as little damage to the file as possible. Files that are created after you export a master file and you compress the final version for the web are called “intermediate” files.
In our case, we will create an intermediate SD file using Apple ProRes 422. ProRes offers a great balance between file size, image quality, and minimal compression. I prefer it for almost all my work.
CREATE THE MASTER FILE
If you need to create a master file from your software, follow the instructions in this section. If you are given a master file, jump down to the next section.
Whether you are using Final Cut Pro 7 (or earlier), Final Cut Pro X, or Adobe Premiere Pro CS6, this process starts by creating a high-quality, self-contained, master file.
NOTE: All this software can transcode projects into an intermediate SD file. However, I’ve never liked the quality nor the time it takes. I prefer to create a high-quality master file, then convert it using a dedicated compression program, rather than rely on the editing software for the conversion.
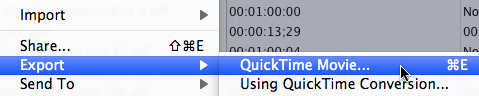
In Final Cut Pro 7, select the sequence you want to export in the Browser, then choose File > Export > QuickTime Movie (or type Command+E).
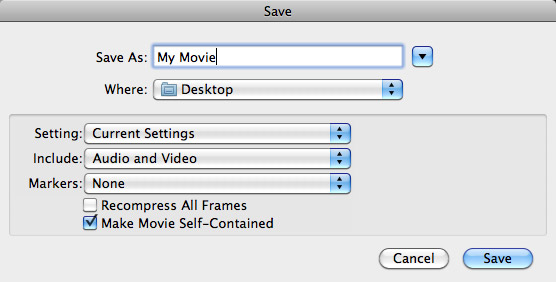
In the resulting dialog box:
When you click Save, FCP 7 exports a file that matches the sequence settings of your project and creates a self-contained QuickTime movie. This file may, or may not, be a ProRes file. At this point, we don’t care. Matching your sequence settings is both the fastest and best way to get a file out of Final Cut Pro 7.
NOTE: In the past, we could create two types of movies: reference and self-contained. Reference files were smaller and faster to export, but they simply pointed to your source and render files. If even one of these referenced files was lost or moved, the entire movie would break. Self-contained files are bigger and take longer to export. However, they are complete in themselves and can be played anywhere on anything.

In Premiere Pro CS6, select the sequence to export in the Project tab. Then, choose File > Export > Media (or type Command+M).

In the Export Settings window:
This creates a stand-alone file that matches your sequence settings. In most cases, this won’t be a ProRes file. Again, don’t worry about that.

In Final Cut Pro X, display the Project Browser and select the Project you want to output.
Choose File > Share > Master File, or type Command+E (this keyboard shortcut may not work for all versions of FCP X).
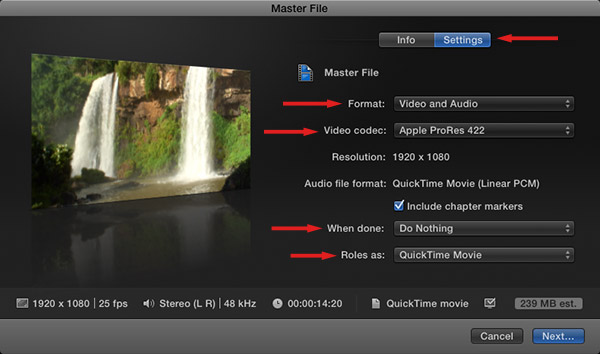
In the Master File screen, click the Settings tab and verify:
Click Next.

Give the file a name and location, then click Save.
Regardless of the software you used, you’ve now created a high-quality master file, ready to compress.
CONVERTING HD TO SD
Here’s the first thing you need to know about compression: Never, ever worry about the file size or format of your source master file. You only need to define what you want the file to become. The compression software will handle all necessary conversion.
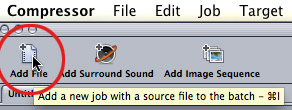
In Compressor, click the Add File icon at the top and add your master file. (in this example, I’m using a 1920 x 1080 file, complements of Pond5.)
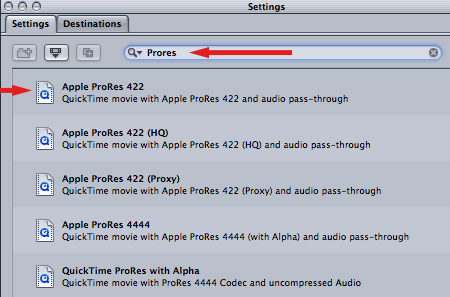
In the Search box at the top of the Settings window, type “Prores” — you don’t need to press Tab. As soon as you type the word, five options appear in the Settings window below.
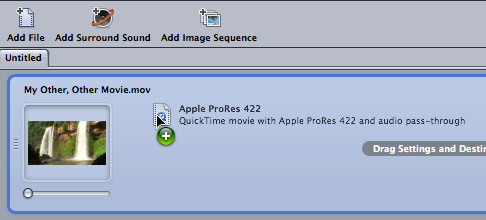
Drag the top choice – ProRes 422 – on top of the master file you imported into the top left window of Compressor. This tells Compressor what format you want the transcoded file to have.
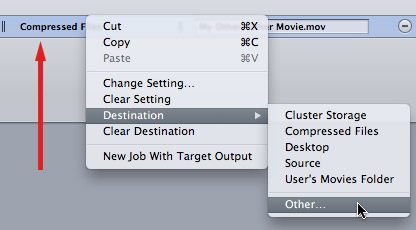
Right-click the middle column in the Task window, to set a destination. By default, Compressor stores the compressed file in the same location as the source file. On my system, I’ve created a new folder specifically to store all my compressed files. (Here’s an article that describes that process.)
You can also select Custom to set a custom destination for the transcoded intermediate file. In this example, I’ll leave the destination set to Compressed Files, which is the custom destination that I created.
A NOTE ON INTERLACING
Interlacing is the bane of video posted to the web, but required for all SD formats and some HD formats.
The good news is that if you shot 1080i, the process of creating an SD version automatically removes all interlacing. Always. All the time. So you never have to deinterlace as part of editing your project. And all 720p formats are interlace-free.
Basically, when converting HD to SD, you never worry about deinterlacing. Your final file will always look good, and it won’t contain interlace lines..
CHANGING THE IMAGE SIZE
SD is not the same frame size as HD. To change the frame size, select the Apple ProRes 422 codec this is applied to the movie. (Don’t select the movie, you need to select the codec applied to the movie.)
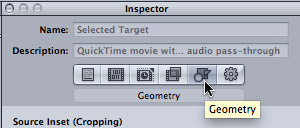
Then, in the Inspector, click the Geometry tab, this allows us to change the size of the compressed image. (Remember, we never worry about the source file, only what we want it to become.)
Now things get complex, depending upon where you need to deliver your video.
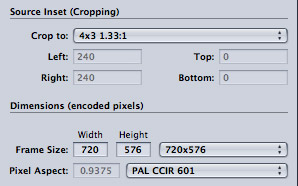
Convert a 16:9 master file to PAL 4:3
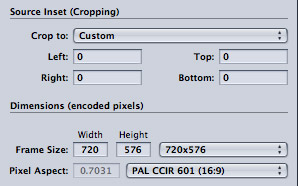
Convert a 16:9 master file to PAL 16:9
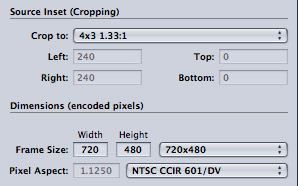
Convert a 16:9 master file to NTSC 4:3 – this works for DVD, cable, or broadcast.
Convert a 16:9 master file to NTSC 16:9
NOTE Broadcast 4:3 image sizes are actually 720 x 486. However, when those six lines are missing, broadcast gear centers the image vertically and inserts black lines at the top and bottom. Since these black lines are far outside Action Safe they won’t be seen on home TV sets.
CHANGING FRAME RATE
This is, potentially, the most tricky, because some frame rates convert perfectly and others don’t. In general, if you need to create a PAL master, shoot 25 or 50 fps. If you need to create an NTSC master, shoot 29.97, 30, 59.94, or 60 fps.
Other combinations can be converted, but will often cause image stuttering. this is one of those examples where you need to keep your final master in mind when you shoot.
NOTE: If you shot the wrong frame rate, but need to create the absolutely smoothest playback, check into renting time on an Amberfin system. This software, which is not cheap, will do the best job of retiming video. Most high-end past facilities will have access to this software.
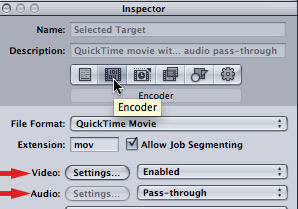
To change frame rates, click the Encoder icon in the Inspector. Then, click the Settings button next to Video.
NOTE: The Audio setting should be grayed out and set to Pass-Through. This means that your audio is simply copied without any changes from the master file to the transcoded file. In almost all cases, this is the best choice.
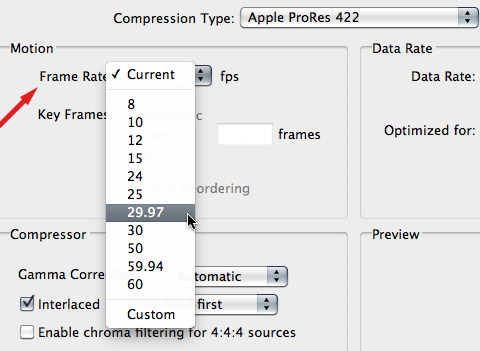
In the Standard Compression Settings window, set the frame rate to:
The rest of the settings are fine. Click OK.
MAKE IT SO

Click Submit to send your file to the last stage.
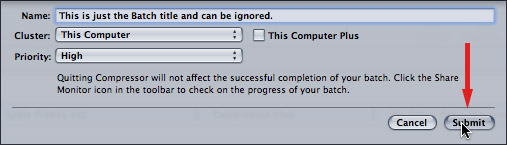
Then, click Submit a second time to send it off to compress. (The Name field allows you to enter a batch name. This has nothing to do with the name of the compressed file.)
Now that you’ve configured this setting, you can either save it as a preset if you want to use it again, or, even, convert it into a Droplet. (This article describes how to create a droplet.)
Whew. That was a lot of steps, but, it gets easier each time you do it.

2,000 Video Training Titles
Edit smarter with Larry Jordan. Available in our store.
Access over 2,000 on-demand video editing courses. Become a member of our Video Training Library today!
Subscribe to Larry's FREE weekly newsletter and
save 10%
on your first purchase.
50 Responses to Convert High Definition to Standard Definition Video
Newer Comments →-
 wayne says:
April 23, 2013 at 3:11 pm
-
 wayne says:
April 28, 2013 at 6:47 am
-
 wayne says:
April 23, 2013 at 3:19 pm
-
 Eric says:
April 24, 2013 at 9:16 am
-
 Larry Jordan says:
April 24, 2013 at 9:36 am
-
 Eric says:
April 25, 2013 at 9:54 am
-
 David Eaks says:
April 25, 2013 at 6:46 am
-
 Larry Jordan says:
April 25, 2013 at 8:01 am
-
 wayne says:
April 28, 2013 at 1:57 pm
-
 Larry Jordan says:
April 28, 2013 at 5:38 pm
-
 Karyn Ellis says:
August 15, 2013 at 9:37 pm
-
 Cal says:
October 25, 2013 at 9:34 pm
-
 Larry Jordan says:
October 25, 2013 at 9:46 pm
-
 Cal says:
October 26, 2013 at 12:54 pm
-
 Larry Jordan says:
October 26, 2013 at 12:57 pm
-
 Cal says:
October 26, 2013 at 5:38 pm
-
 Larry Jordan says:
October 26, 2013 at 5:44 pm
-
 Chuck says:
December 9, 2013 at 9:30 pm
-
 Larry says:
December 9, 2013 at 9:43 pm
-
 Chuck says:
December 9, 2013 at 10:11 pm
-
 Larry Jordan says:
December 9, 2013 at 10:28 pm
-
 Chuck says:
December 9, 2013 at 10:36 pm
-
 Leo Italy says:
December 20, 2013 at 1:51 am
-
 Larry Jordan says:
December 20, 2013 at 9:30 am
-
 Abi says:
January 1, 2014 at 10:56 pm
-
 Larry Jordan says:
January 2, 2014 at 12:30 am
Newer Comments →I have been looking for months for a way to do a good conversion. I am hoping this will work. I have made all setting changes. My source clips are 1080i60, 29.97, NTSC. I changed pixel aspect ratio to NTSC CCIR 601/DV 16:9 but picture is more 4:3 looking.
I also tried using “default for size” with same results. The defualt pixel aspect is 0.8438 is that correct? (It is shadowed out).
All source inset left at custom and 0.
Amy ideas?
Thanks so much
I found the issue. Somehow the Studio Pro settings were changed to 4:3.
Update…. When I used DVD Studio Pro and use the simulator the converted clip plays as 4:3. If the 16:9 format selected there are black columns on each side of transcoded clip.
Something not set correct. what could it be?
Hi Larry,
“The good news is that if you shot 1080i, the process of creating an SD version automatically removes all interlacing. Always. All the time. So you never have to deinterlace as part of editing your project. And all 720p formats are interlace-free.
Basically, when converting HD to SD, you never worry about deinterlacing. Your final file will always look good, and it won’t contain interlace lines..”
I follow that but if we’re going straight from an HD source to a DVD in Compressor, do we leave the Field Dominance drop-down in the Encoder tab as “Automatic”?
Thanks Eric
Eric:
Truthfully, I’m not sure.
Take a scene with motion in it – say 4-5 seconds. Set the drop-down to automatic and compress it. Then, do the same and set ti to Progressive.
Pick the one that looks the best. I SUSPECT that Progressive is the better choice, but don’t know for sure.
Larry
Thanks Larry. I tested a 1080i DVCPRO HD file out. When you leave the drop down on automatic, Compressor chooses to interlace. In my case it automatically chose the Top Field in the Field Dominance drop-down. MediaInfo confirmed.
When I selected Progressive in the Field Dominance drop-down, but left Frame Controls on auto, MediaInfo said it was progressive, but it looked awful, as if it was still interlaced.
When I selected Progressive in the Field Dominance drop-down, turned Frame Controls On and set Deinterlace to Better, the results looked good.
So to answer my original question: no, when converting to a DVD mpeg2 stream you have to manually tell it to Deinterlace, if you so choose.
Hi Larry,
I was wondering if you could share your opinion, comparing the method in this article vs the one detailed below.
Assuming a finished project with 1920×1080 media edited in FCPX:
1) Change the Project settings to NTSC SD and 720×480 DV Anamorphic
2) Export Master File
That’s it! I think it does a pretty good job, not quite as good as yours but it is quick and easy.
If the original HD Project has a lot of heavy rendering to be done, you can first export an HD master file (of course this export is most likely going to be done anyway), then bring it back in to an SD project in FCPX and export.
*note
Up to at least FCPX 10.0.7 I have found a bug when changing a Projects Settings. Titles in a secondary storyline (connected clips are not affected) do not scale down with the video, resulting in text that is much larger than intended for the frame size. A simple Cut/Paste of the Secondary Storyline itself will solve the issue. This bug does NOT show up in the timeline, it ONLY shows in the exported file.
David:
You’ve hit on one of the two benefits. Your method is faster, but doesn’t look as good.
The other reason to consider my method, is that you can convert a file, even if you don’t own FCP X. In other words, this works for any HD video.
Larry
P.S. As for the bug, I haven’t seen this – which is NOT the same as “it doesn’t exist.”
hi Larry
If I have a 2 hour HD sequence which is about a 35gb 1920 x 1080 QT movie will the settings that you suggest compress it down to fit onto a DL 8.8 gb SD DVD?
Is there any way to adjust the compression bit rate, as when using compressor for SD mov files with preset mpeg-2 Apple settings?
Thanks
Wayne
File size is totally dependent upon bit rate – so is image quality, for that matter.
Given your project, an average bit rate of 5.5 mbps, with a maximum bit rate of 7.2 mbps in Compressor should work fine.
Here’s a video tutorial I created that goes into this whole process in more detail:
http://www.larryjordan.biz/app_bin/Store/catalog/product_info.php?products_id=217
Larry
Hi Larry!
I am trying to edit together mismatched video footage… SD (.dv extension) with HD (.mp4s) using an audio track as the main timeline, but my final cut pro x is behaving poorly… playback is choppy as anything! Very frustrating. I don’t have a particularly powerful laptop (it’s a 3 year old mac pro, 4GB ram etc), but I have made other music videos using the exact same final cut pro software in the recent past.
For some reason final cut pro is extremely choppy in its playback (the audio keeps cutting out.) I thought I would try to down-size the HD footage to match the SD stuff – make it a little bit easier on the processors. Import the lower-res files back into the events folder in order to edit with matching sized files.
I just bought Compressor to do the transcoding, but unfortunately Compressor is greying out all the options in the Geometry tab. It’s a bit of a confusing interface, so I’m wondering if I am missing something? I don’t see any option to change the output size.
I am also starting with 44.1k audio, which is what I made the settings of the project to be. It seems weird to convert up to 48k only to reconvert back down again on final output. But could this be part of the choppy playback problem? If so, how do I fix that?
I am a relative newby to editing, and a bit skittish around hardware / tech troubles. But any advice you have would be greatly welcomed. Thanks!
Karyn
Hi Larry, Used your instructions above and video came out real sweet. However, I’m still having one minor problem. In the 1080i file that I used to convert to SD I had some graphics included in the file. logos, text, etc. I am noticing artifacts around these graphics. In other words, not smooth around the edges. A little hard to explain but hoping you understand what I mean. In the original movie, I used mainly PNG files as graphics. Is there another step I need to take to eliminate these artifacts? I there a suggestion you might have?
Thanks much for your input.
Cal
Cal:
Hmmm…. send me a screen shot. There are too many options to start guessing.
Larry
I do notice somewhat on computer screen. a little more on HD TV in my home.
For some cannot do a screen shot on computer when DVD player is paused on computer screen. Suggestions?
Type Shift+Command+4 and drag a selection around the portion of the screen you want to capture.
Larry
That’s what I did and the area where the movie should be is blank. desktop around that area, but blank in the hole where the still shot should be
Hmmm…. now I have no idea.
Perhaps another reader can help.
Larry
Good article Larry, but here we all sit with with new converted SD files which are WAY to big to fit on a DVD (4.7G). Isn’t the majority
of conversions from HD to SD so that the file can fit onto a DVD. I understand the article was converting HD to SD but I felt we we’re left hanging with what most of us need the conversion for. .. Getting it on a standard DVD.
Chuck:
What this article describes is creating an SD master file of your HD material. Since this master file can be used in a variety of ways, you want to retain as much data as possible. For this reason, the master file will be FAR bigger than will fit on a DVD.
From this master file, you can create an SD DVD easily using the DVD presets in Compressor.
Larry
Thank you for the timing reply! Are you speaking of the MPEG-2 For DVD setting in the Disc Burning Folder in the settings
tab? I don’t see any other presets that specify for DVD in Compressor.
Chuck:
Correct. apple keeps changing the name of this folder.
Larry
Thank you.
Hi Larry,
I have a problem,
i have in fcpx the project in pal 1920 x 1080 pro res 422,
but i have to share in DV Pal Anamorphic.
Please can you tell me the best set for compressor 4,
i don’t find a anamorphic set.
Thank you
Leo
Leo:
You have to create a new QuickTime settings preset. This isn’t hard, but to document this properly, I’d need to write an article.
In the Encode tab, set the Video Settings to DV PAL with an aspect ratio (in the same window) to 16:9.
Then, confirm that the Geometry tab is set to PAL 720×576 with a Pixel Aspect ratio of PAL CCIR 601 (16:9)
Larry
Hi Larry,
I follow your posts from time to time and really enjoy your extensive knowledge.
I have a question for you on the HD to DVD transfer you helped with above. I followed your instructions to the “T”, yet after I compressed the HD video as a ProRes file in Compressor, when I load it into DVD Studio pro it plays “boxy”, not the wide screen the original video was playing in. Mind you, the compressed ProRes file of 38 Gb for an under 2 hour program plays fine when viewing the file after compressor did its thing; just when it’s in DVD Studio Pro it’s taking on a weird “boxy look”, totally out of proportion.
Any suggestions or ideas what I may have done wrong? And also, DVD Studio Pro says it needs 8.0 Gb for burning a DVD of this file (again this is under a 2 hour program). Is there anyway for me to burn this using a regular DVD as opposed to the need of using Dual Layer which are so much more expensive and take extra time burning, let alone the pain to set up the layer transfer from one to the other?
Your help would be most appreciated! Thank you.
Abi
Abi:
If the file looks OK after compression, but before you import it into DVD Studio Pro, it means that you imported the video into a track that was formatted as 4:3. Create a new track, select that track and change the aspect ratio for that track in the Inspector to 16:9.
Bit rate totally determines file size. If your file is 8.0 GB in size, it means that your bit rate was set too high. If you use the settings I discuss in this article, your file size will drop to about 5.25 GB, which is still too large for a single-layer DVD. Drop the average bit rate to about 4.6 and see if you can squeeze it in. Keep in mind that the lower the bit rate, the smaller the file AND the lower the image quality.
Larry