
![]() [ I have an entire webinar devoted to this subject. If you are using Compressor 3.x, watch this. If you are using Compressor 4, watch this. ]
[ I have an entire webinar devoted to this subject. If you are using Compressor 3.x, watch this. If you are using Compressor 4, watch this. ]
A question I get quite frequently is how do I convert standard-definition video into high-definition video, which is a process called “up-resing,” or “up-scaling.” This article shows you how to do this using Apple Compressor 4.
There are many different ways to up-res video and I’m interested in everyone’s opinions. So, I’m writing this article for two reasons:
YOU CAN’T GET SOMETHING FROM NOTHING
Standard-definition (SD) video is one of three, very specific image sizes:
The image dimensions for SD don’t change whether the image is 4:3 or 16:9. What does change is the shape of the pixels, going from tall and thin to short and fat.
High-definition (HD) video has two specific image sizes:
There are other sizes, such as 1280 x 1080 and 1440 x 1080, which use oddly shaped pixels to achieve their image. However, for all practical purposes, HD video conforms to one of these two sizes.
Those of you who are good at arithmetic will spot the problem immediately: SD video doesn’t contain enough pixels to fill an HD image. An NTSC SD DV image contains 345,600 pixels, while a 1080 HD image contains 2,073,600. Talk about scraping too little butter over too much bread..!
What up-resing does is stretch an SD image to fill an HD frame. Your goal, in selecting a method to use, is to retain retain as much image quality as possible.
KEY PROBLEM
Here’s the key thing you need to remember: SD video, when scaled to HD size, will never look as good as material shot originally as HD. The scaled SD material will look soft, fuzzy, lack detail, and nothing can be done to make it look as good as original HD.
However, some software can make the image look better than other software.
WHAT EDITING SOFTWARE DOES
All versions of Final Cut Pro and Premier Pro (and, perhaps, Avid, but I don’t know that program as well) take SD video and enlarge it to fill the frame of an HD image. Basically, they simply scale the picture by making the pixels fatter. This technique is very fast and works great… except that it creates a very soft, fuzzy image.
If speed is crucial, scaling in the video editor is your best option. It won’t look great, but it will be very, very fast.
A BETTER WAY
Other software, such as Compressor, tries to guess what detail is missing in the lower resolution image and add it back into the scaled-up image. Whether this works well enough for your video and your project is a subjective decision that you can make after you try it. Sometimes, the answer is yes. Other times, the answer is no.
There’s no perfect solution. But, here’s something you can try.
CONVERTING USING COMPRESSOR
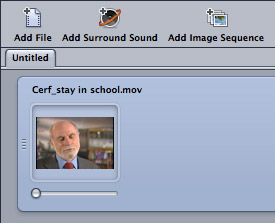
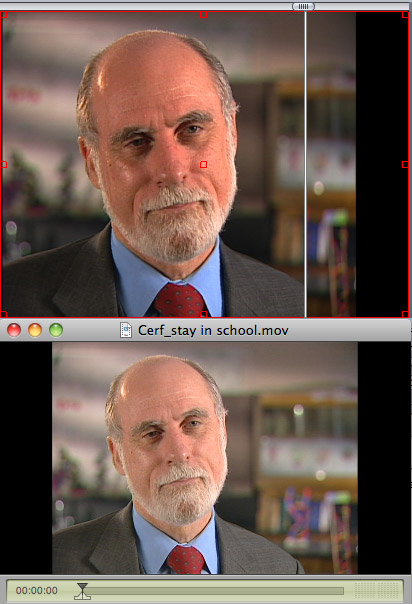
I added an NTSC 4:3 DV clip into Compressor. (Clip courtesy of Dr. Vint Cerf and Alcatel/Lucent.) Since DV is only a standard-def format, I need to do two things:
In this case, I’ll convert it to a ProRes 422 1080 clip.
NOTE: You can apply this technique to a batch of clips. You can also create a Droplet to automate the conversion. For simplicity, this article looks at up-scaling a single clip, so you can understand the process. Here’s an article that explains how to create an automated droplet.
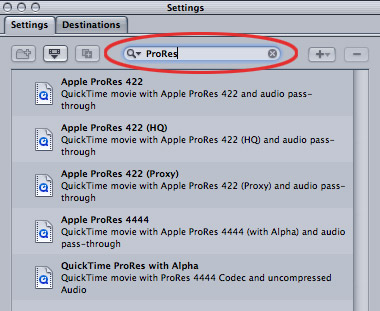
In the Settings Search box, enter ProRes; the five ProRes options are displayed. For most purposes, I find ProRes 422 to be the best all-around choice.
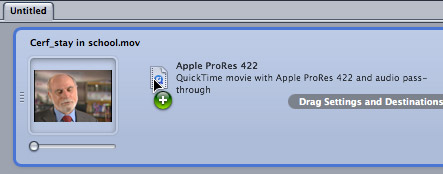
Drag the ProRes 422 setting from the Settings window and drop it on the clip in the Task window.
In the Task window, click the words “Apple ProRes 422” to display the settings applied to the clip in the Inspector.
NOTE: When creating settings in Compressor, you are always telling Compressor what you want the final image to be. Compressor will figure out what it needs to do to the Source image to achieve your final results.
THE GEOMETRY INSPECTOR
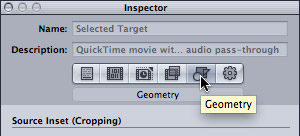
The Geometry tab in the Inspector is where we tell Compressor what size to make the image.
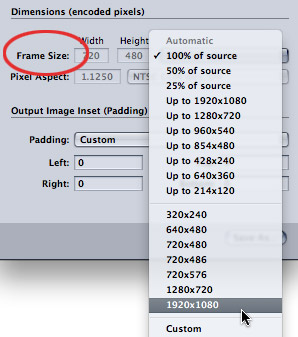
In the Dimensions section, set the Frame size to the size you want to up-res the image. In this example, I’m converting it to 1920 x 1080.
NOTE: The less you scale an image, the better it will look. So, up-resing SD video to 720 will look better than up-resing SD video to 1080.
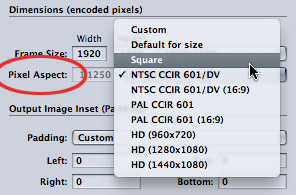
Next, set the Pixel Aspect ratio to Square. When working with HD video, Square is always the best choice. Non-square options are necessary when you are converting into a specific codec:
Unless you are converting your media into one of these special formats, always set the pixel aspect ratio to Square.
ADDITIONAL STEPS TO CONVERT 4:3 VIDEO INTO 16:9 HD
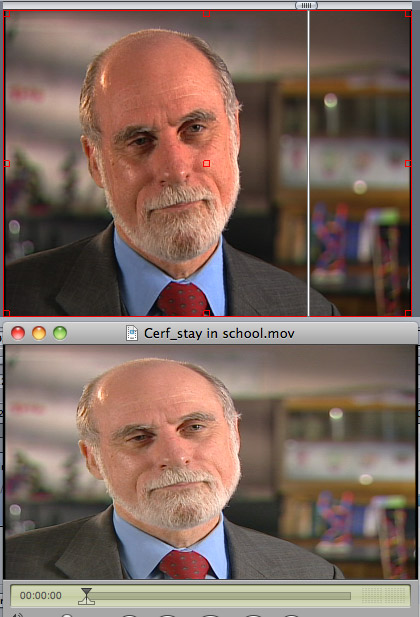
If you are converting 4:3 video into 16:9, you need to take an extra step – because if you don’t, as you can see from the screen shot above, your 4:3 video (top image) is stretched to fill a 16:9 frame (bottom image). Actors really don’t like that; as it makes them look fat.
So, we need to add padding to the left and right sides – a process called “pillar boxing” – so that the proportions of the image remain correct.
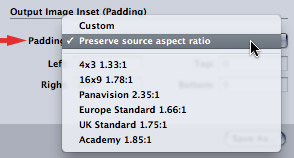
At the bottom of the Geometry section, in the Output Image section, change Padding to Preserve source aspect ratio. This adds black to the sides of the image so that the image does not get stretched.
Here’s the result when padding is added. The image now looks the same as the original, but it is contained in a 16:9 frame. If, on the other hand, you don’t want the black edges, then you’ll need to crop the top and bottom of the image so that the proportions remain the same.
NOTE: You have to make a choice: black on the edges or cropping top and bottom. You can not take a 4:3 image and have it fill a 16:9 frame without either cropping or padding, unless you want it to look stretched.
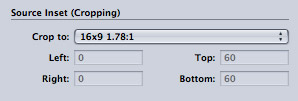
To convert a 4:3 image to 16:9 by cropping, make sure all the Padding values are set to 0, then, from the Source Inset (Cropping) section, set Crop to 16:9.
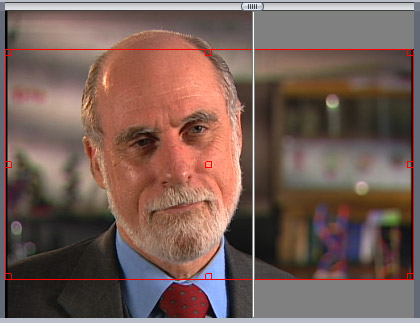
The red outline in Compressor’s Viewer illustrates the cropped image. That which is inside the red border will remain; that which is outside the red border will be discarded.
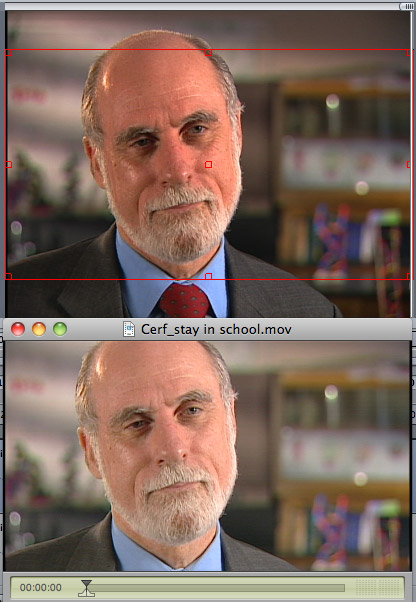
Here’s the finished result, the source image is on top, the scaled and cropped image is on the bottom. (For the rest of this article, I’ll work with the full image by adding padding, rather than cropping.)
THE FRAME CONTROLS INSPECTOR
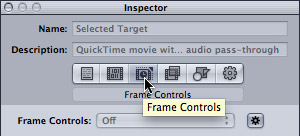
Now that we have the size of the image set, we need to determine the quality of the image. For that, we go to the Frame Controls tab. Click the third button from the left (Frame Controls) to select the Frame Controls window.
The dark gear menu to the right of Frame Controls (at the bottom right of this screen shot) says that the settings are set to Automatic. Normally, this is OK.
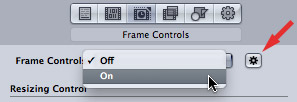
However, in this case, we want to explicitly turn on Frame Controls. So click the gear icon. This turns the automatic settings off. Then, select On from the popup menu.
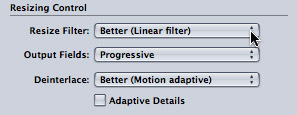
When you are up-resing an image, it is ALWAYS best to convert it to Progressive. The settings you need to change are:
NOTE: All standard-def video, both NTSC and PAL, is interlaced. There are rare exceptions for material shot 24 fps, but the safest thing to do is to assume that your material is interlaced.
As you experiment with up-resing your video – and you NEED to experiment, because different types of clips up-res differently – you can change either Resize Filter or Deinterlace to Best. However, DON’T change both to Best, because if you do, the underlying math is so complex that a process that might take an hour, stretches into DAYS!
In my tests, I could not see a significant difference in image quality between Better and Best. However, Best took twice as long to create a very similar result. I recommend using Better.
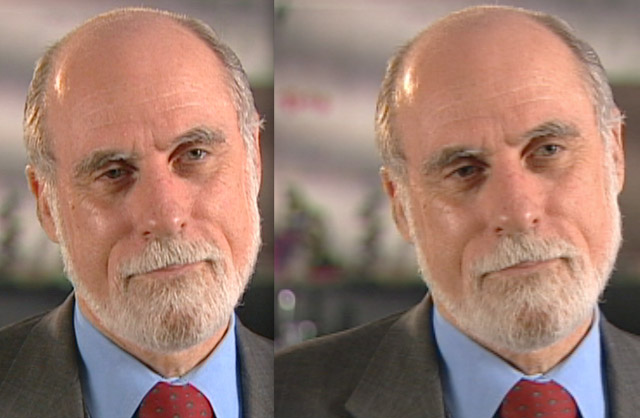
Here’s the final result. The up-scaled image is on the left, the original, enlarged image is on the right. Even when I reduced the size of these images for this article, there is a significant improvement in image quality when converting from SD to HD using Compressor — look at the detail in the beard, in the fabric of his coat, and the skin texture in the image on the left.
The difference is stunnngly apparent when viewed at full HD resolution. Frankly, if you care about quality, up-resing through Compressor is FAR superior to simply scaling your image in a video editor.
A NOTE ON CONVERTING FRAME RATES
Converting frame rates is far more difficult than up-resing an image. The basic rule of thumb is that it is better to go from a slower frame rate (24 fps) to a faster frame rate (30 fps), than to go from a faster frame rate to a slower frame rate. (Converting from faster to slower frame rates generally causes jerky movements, stuttering and other unpleasantness.)
The exception to this rule is converting from a frame rate (say 60 fps) into another frame rate that divides evenly into it (say 30 fps). So, 48 to 24, 50 to 25, and 60 to 30 are all frame rates that will convert smoothly.
For this reason, I tend to shoot all my material at 60 fps.

You can use Compressor for simple frame rate conversions, which are done by changing the speed of a clip. For frame rate conversions more complex than this, consider using a Teranex converter for material originating on video tape, or Amberfin software for file-based media.
SUMMARY
The downside to using software other than your editor to change the size of your images is that it takes time; sometimes, lots of time. The good news is that the time you spend is worth it.
Nothing beats shooting HD video in the first place for image quality. But, when you are working with historical footage, you don’t have a choice. Now you know what you can do to make your standard-definition images look as good as possible.

2,000 Video Training Titles
Edit smarter with Larry Jordan. Available in our store.
Access over 2,000 on-demand video editing courses. Become a member of our Video Training Library today!
Subscribe to Larry's FREE weekly newsletter and
save 10%
on your first purchase.
75 Responses to Compressor 4: Convert SD to HD
← Older Comments Newer Comments →-
 David Schendel says:
August 23, 2015 at 4:28 pm
-
 Larry says:
August 23, 2015 at 4:30 pm
-
 Norman Frizzle says:
March 24, 2016 at 2:44 pm
-
 Larry says:
March 24, 2016 at 2:50 pm
-
 Henrik says:
June 20, 2016 at 1:57 pm
-
 Larry says:
June 20, 2016 at 4:44 pm
-
 Henrik says:
June 21, 2016 at 10:09 am
-
 Larry Jordan says:
June 21, 2016 at 10:47 am
-
 Art Menzer says:
December 13, 2016 at 8:53 am
-
 Larry says:
December 13, 2016 at 8:46 pm
-
 Sean says:
January 2, 2017 at 2:14 pm
-
 Larry says:
January 2, 2017 at 2:22 pm
-
 Sean says:
January 2, 2017 at 2:44 pm
-
 Larry says:
January 2, 2017 at 3:13 pm
-
 Sean says:
January 4, 2017 at 1:26 am
-
 Sean says:
January 24, 2017 at 10:29 am
-
 Art Menzer says:
January 4, 2017 at 5:43 am
-
 Larry says:
January 4, 2017 at 7:53 am
-
 Dan Ionescu says:
March 18, 2017 at 5:18 am
-
 Larry says:
March 18, 2017 at 6:11 am
-
 Mike Clucas says:
April 4, 2017 at 8:07 pm
-
 Larry says:
April 5, 2017 at 6:11 am
-
 Jim says:
May 29, 2017 at 1:50 am
-
 Larry says:
May 29, 2017 at 7:11 am
-
 Peter says:
July 26, 2018 at 6:44 am
-
 Larry says:
July 26, 2018 at 7:13 am
← Older Comments Newer Comments →Hi Larry,
Thank you very much for your wisdom on this. I’m a indie doc filmmaker without big budgets. I’m currently finishing a doc, The Comedy Club and most of the footage was shot on SD over a period of 10 years. Compressor is working great and I’m pleased with the results. My question is why leave “ADAPTIVE DETAILS” off? What exactly does it do or not do when you use it?
David
David:
My understanding is that Adaptive Details are used when converting to interlaced material, which you are not doing.
Larry
I’m up-converting 720×480 29.97 to 4K 59.whatever PROGRESSIVE such that the 2 fields have a frame each for mastering purposes. I’m using Brois UpRez.
What do you think the best order is for me when my footage entails considerable stabilization processing, and possibly some shutter distortion adjustment.
Any other 4K wisdom to impart?
Norman:
Oh, man. This is gonna look ugly. SD to HD is fairly poor. SD to 4K will look close to awful – you are enlarging each individual pixel about twenty-five times.
That being said, set field dominance on the source video to lower field first. The 4K frame will be progressive.
Larry
Hi Larry!
This article was a great help for me. Thank you for writing it!
However, when I compare stills of the original low res video to the upscaled in equivalent viewing sizes, I really can’t see any particular difference. I was expecting to see large pixels turned into “smaller pixels with added blur”, easily put (similar to when resampling images in Photoshop). But I can’t see any difference at all. So I got the higher theoretical resolution, but I couldn’t see the difference you show in your comparison images. Did I miss a vital step? Note that I’m upscaling VHS footage which is of course seriously low resolution. Is it perhaps anti-aliasing I’m looking for?
Thanks again!
Henrik:
I’m not sure what you mean by “equivalent viewing sizes.” An SD image is 640 x 480 (after compensating for pixel aspect ratio), while an HD image is 1920 x 1080 or 1280 x 720. So, you should view the HD image at the larger size.
When you do, the up-res’d image will look somewhat softer and grainier, with more pixels in the frame. The up-res process does not create new image data, but rather spreads the existing image data across more pixels, which creates the softer look.
Larry
Hi again Larry,
Thanks for your reply.
I mean when I resize the window for the original video in whichever player I choose so that it has the same (larger) size as that of the up-res’d video in full size, I can’t see any difference whatsoever in the quality of the video.
That means I cannot see any difference like the one you display in your comparison between the up-scaled image and the original, enlarged image in your article (“look at the detail in the beard” etc.). So I don’t get the “softer” look you write about – I get exactly the same look, apart from that the old large pixels now are several pixels (think of one pixel just straight up divided into four – there would be no visible difference).
I did have use for your tutorial regardless, since what I wanted was an increase of pixel density (increase number of actual pixels – mainly to fool YouTube into giving me a higher bitrate for my grainy low res video, by uploading it as HD. It totally works and gives a great decrease in compression artifacts). And I’m very grateful for that! But it would also be nice to achieve the improvement you display, where the use of Compressor gives a more pleasant and “smart” upscaling than what you get when you just hit “full screen” in VLC or whatnot.
Do you see what I mean?
Thanks.
Henrik:
I don’t have any additional guidance at this point. It could be that you are using different software, where the up-res settings are not the same.
I just re-read this article – and I’m not sure, aside from what I wrote, what else I could have done that would yield these results.
Larry
Can I use compressor on it’s own (without requiring purchasing FCP) to import 4:3 .dv clips and export to deinterlaced HD (with black bars of course)? The final result I am looking for is a widescreen format in better quality than the original dv footage.
Would the best export format be MP4 in this case? I would like to maintain maximum quality at minimum size, as I will be storing/viewing these in Apple Photos (in iCloud).
Art
Art:
Yes, you can use Compressor without purchasing FCP X.
However, what you want to do can’t be done.
Converting DV to HD simply means enlarging the pixels, your image won’t “look better quality than the original DV footage.” NOTHING you do in enlarging the image will make it look better than DV – regardless of what software you use.
Also, converting from 4:3 to 16:9 means lopping pixels off the top and bottom; assuming you want the picture to fill the frame from left to right edge. If you don’t want to lose pixels, then you’ll need to “pillar-box” the image, which puts black bars on the left and right sides so that you don’t cut pixels off the top and bottom.
You can’t stretch the image to fill a 16:9 frame without either adding black bars or cropping pixels.
MP4 is a good format for final distribution, but if you want to edit the video first, convert it to ProRes for editing, then MP4 to store on iCloud.
Larry
Hi Larry,
Many thanks for this article.
I’m up-scaling beta sp transferred at 720×480 to proRes 422 custom 4:3 1280×960 – and doing another test at 1280 x 720 with pillar boxing. Both cases selecting square pixel aspect and preserve source aspect ratio. Also, I am selecting progressive mode, in order to de-interlace.
My question: do I need to play with the 29.97 frame rate too? I’ll be mixing the 1280 x 720 footage into a 720p HDV project.
The de-interlaced 1280×960 material will be used on its own, with still photo elements added.
Many thanks in advance. And Happy New Year!
Sean:
I think you are creating problems for yourself here. 1280 x 960 is non-standard everywhere EXCEPT the web. So, if you are only posting to the web, you can probably get away with this. However, you would be wiser to convert this to 1280 x 720 and use pillar boxes to keep the 4:3 aspect ratio.
The 1280×960 will get squished or stretched into any other video format, thus losing the quality you are trying to maintain.
As for frame rates, your 720 project should be set to 59.94 and you’ll be fine with a 29.97 frame rate.
Larry
Thank you very much for the quick reply, which is of great help. This solves my question regarding integrating up-scaled material into the 720 project.
If I may, I have just one follow up question:
The reason I was experimenting with 1280×960 is that I would like to create a final film in HD while preserving the 4:3 aspect ratio of the archival footage, without pillar boxing. If I up-scale to 1280×720 could I then crop the pillar boxes in compressor or indeed, in FCP to get a “true” up-scaled 4:3? I have the feeling that I’m asking a very dumb question. My apologies in advance.
Sean
Sean:
The short answer is: No.
No film today has a 4:3 aspect ratio. So, either you need to pillar box your 4:3 archival footage or create a background where you can composite your video into the foreground.
For this reason, up-resing to either 1280×720 or 1920×1080 is your best long-term option.
Larry
Thank you very much Larry for your time in answering my, and everyone else’s questions. Speaking for myself, your dedication to teaching these techniques has had a great impact on my work. I am truly grateful.
Best,
Sean
Hi again Larry.
One follow up question. I have followed these clear instructions in up scaling/de-interlacing sd material to 1280 x 720, using pillar boxing to preserve the original image.
I notice that on frame left, where the image meets the pillar box, there is a thin (greenish) line running right along the edge of the frame. This is not evident in preview mode, only once the file is created.
Do you have any suggestions how this might be corrected? Should I use the crop tool? If so, any recommended settings?
Many thanks in advance for your time.
Sean
Thank you Larry for your explanation and direction! I also purchased Neat Video to remove and smoothen the noise (grain). So my question is regarding workflow: i would like to not only res up the SD footage to HD (with black bars), but also sharpen and smoothen. I prefer the quality of Compressor for upscaling, but Neat Video is a FCP plugin (not standalone). So in what order should I apply the noise filter and sharpening? Is Compressor sharpening superior to FCP and Neat Video? Goal is efficient workflow with best quality.
Thanks again,
Art
Art:
Because removing video noise can take a long – LONG! – time, I recommend you up-res first, using Compressor, those clips you need to up-res.
Then, create your edit.
Finally, only denoise those clips that are in the edit that you need to remove the noise from.
Larry
Mr. Professor,
This article was a great help for me. Thank you for writing it!
I have many films of his youth in a 4/3 PAL analog and digital cameras made.
I have a computer MacPro 3.1and edit movies Final Cut Pro X 10.2.3. I installed Compressor 4.2.2.
I set the Compressor as follows:
1.Am added “Apple ProRes 422”
2.Video Properties:
Frame size: 1280 x 720
Pixel aspect ratio: Square
Frame rate: 25 fps Automatic?
Field Order: Progressive
3.Cropping & Padding
Cropping 16 x 9 1.78: 1
Padding: Source Preserve Aspect Ratio
4.Quality
Resize Filter: Better (Linear Filter)
Retiming quality: Better (Motion Adaptive)
Please let me know if something is wrong or if you need to add something.
Thank you in advance!
Dan Ionescu- Romania
Dan:
These settings all seem reasonable to up-res a standard definition clip to 720 HD.
What problems are you having?
Larry
I have a slightly different problem. I have footage that has been extensively sthbilized, which looks great when exported at 720p, but but the end product in it’s original 1080p is blown up by about 15%. Sharpening it too much makes it look pretty bad, and the original is too soft.
Any suggestions?
Having read this article, I was even toying with exporting at a smaller size then getting compressor to bring it back up to 1080p
Mike:
Stabilization ALWAYS zooms an image – that’s how it is able to do what it does. So, if you are stabilizing a 1080 master, you will need to live with a bit of softness created by the stabilization or not stabilize. You can’t stabilize without zooming unless you want black edges around your image as the software shifts the picture.
Larry
Larry:
All my stuff was shot 16×9 on digibeta. Do you still think compressor works best or how about a Teranex? I also have a Faroudja Picture Plus digital picture manipulator at my disposal.
Always enjoy and appreciate your writing and your wonderful perspectives.
Kindest Regards,
Jim
Jim:
If you are capturing directly from tape, use the Teranex – its what it was designed for.
Larry
Dear Larry, your favourite topic, deinterlacing! I’m cutting a piece for a London museum from DV PAL footage I shot almost 20 years ago (now an invaluable record of a cultural event). I’m editing in DaVinci Resolve but I still have Compressor 3.5.3 and 4.4 and your tutorials from a few years back still make total sense. You recommend editing before deinterlacing/upresing BUT I’m going to be using subtitles and graphics, which will not look good upresed from DV. So what I’m thinking of as a workflow is:
1. Edit in a 1920x1080p timeline, creating the background (for the pillars), subtitles and other text
2. create subclips of the DV media used (esp as all captured as 1 hr clips)
3. upres and deinterlace in Compressor (is 3.5 or 4 better for this?)
4. conform timeline with upresed footage
Also I wonder if creating subclips with handles will make for better transitions than upresing/deinterlacing from a DV output?
I can’t tell you how much your blogs/tutorials have helped me over many years. Thanks!
Peter:
If you are editing an entire program as interlaced, deinterlacing afterword makes sense. However, you are integrating interlaced legacy footage into a larger, progressive project. In this situation, interlacing the legacy footage before importing into the NLE is the wiser course of action.
Since almost all compression programs allow you to create Ins and Outs within a larger clip, you can subclip, up-res and deinterlace all in one step. I agree, do this before you start editing.
However, I would strongly urge you to experiment with a few different programs – Compressor, Handbrake, and my current favorite, ffWorks – you will find that each creates different quality video. Find the program and settings that look the best for you.
Larry