
![]() [ I have an entire webinar devoted to this subject. If you are using Compressor 3.x, watch this. If you are using Compressor 4, watch this. ]
[ I have an entire webinar devoted to this subject. If you are using Compressor 3.x, watch this. If you are using Compressor 4, watch this. ]
A question I get quite frequently is how do I convert standard-definition video into high-definition video, which is a process called “up-resing,” or “up-scaling.” This article shows you how to do this using Apple Compressor 4.
There are many different ways to up-res video and I’m interested in everyone’s opinions. So, I’m writing this article for two reasons:
YOU CAN’T GET SOMETHING FROM NOTHING
Standard-definition (SD) video is one of three, very specific image sizes:
The image dimensions for SD don’t change whether the image is 4:3 or 16:9. What does change is the shape of the pixels, going from tall and thin to short and fat.
High-definition (HD) video has two specific image sizes:
There are other sizes, such as 1280 x 1080 and 1440 x 1080, which use oddly shaped pixels to achieve their image. However, for all practical purposes, HD video conforms to one of these two sizes.
Those of you who are good at arithmetic will spot the problem immediately: SD video doesn’t contain enough pixels to fill an HD image. An NTSC SD DV image contains 345,600 pixels, while a 1080 HD image contains 2,073,600. Talk about scraping too little butter over too much bread..!
What up-resing does is stretch an SD image to fill an HD frame. Your goal, in selecting a method to use, is to retain retain as much image quality as possible.
KEY PROBLEM
Here’s the key thing you need to remember: SD video, when scaled to HD size, will never look as good as material shot originally as HD. The scaled SD material will look soft, fuzzy, lack detail, and nothing can be done to make it look as good as original HD.
However, some software can make the image look better than other software.
WHAT EDITING SOFTWARE DOES
All versions of Final Cut Pro and Premier Pro (and, perhaps, Avid, but I don’t know that program as well) take SD video and enlarge it to fill the frame of an HD image. Basically, they simply scale the picture by making the pixels fatter. This technique is very fast and works great… except that it creates a very soft, fuzzy image.
If speed is crucial, scaling in the video editor is your best option. It won’t look great, but it will be very, very fast.
A BETTER WAY
Other software, such as Compressor, tries to guess what detail is missing in the lower resolution image and add it back into the scaled-up image. Whether this works well enough for your video and your project is a subjective decision that you can make after you try it. Sometimes, the answer is yes. Other times, the answer is no.
There’s no perfect solution. But, here’s something you can try.
CONVERTING USING COMPRESSOR
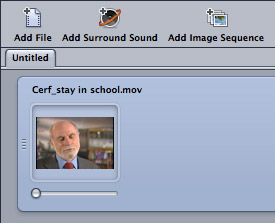
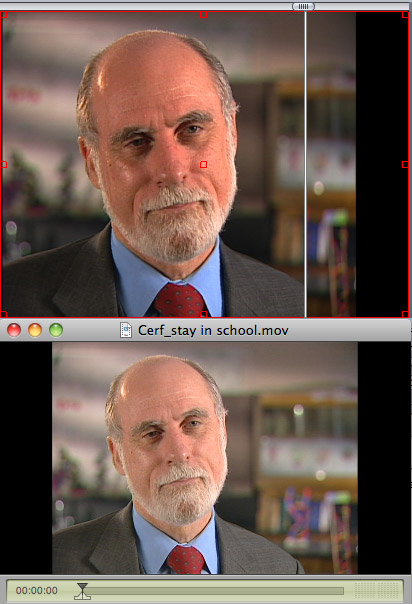
I added an NTSC 4:3 DV clip into Compressor. (Clip courtesy of Dr. Vint Cerf and Alcatel/Lucent.) Since DV is only a standard-def format, I need to do two things:
In this case, I’ll convert it to a ProRes 422 1080 clip.
NOTE: You can apply this technique to a batch of clips. You can also create a Droplet to automate the conversion. For simplicity, this article looks at up-scaling a single clip, so you can understand the process. Here’s an article that explains how to create an automated droplet.
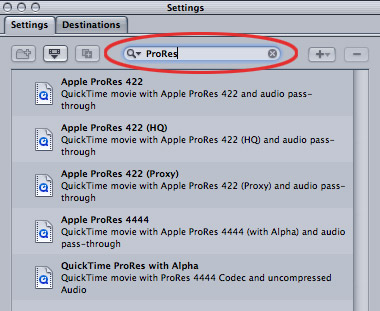
In the Settings Search box, enter ProRes; the five ProRes options are displayed. For most purposes, I find ProRes 422 to be the best all-around choice.
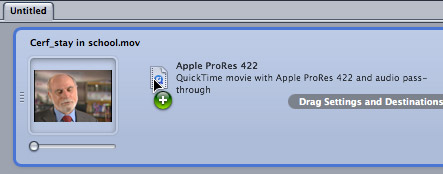
Drag the ProRes 422 setting from the Settings window and drop it on the clip in the Task window.
In the Task window, click the words “Apple ProRes 422” to display the settings applied to the clip in the Inspector.
NOTE: When creating settings in Compressor, you are always telling Compressor what you want the final image to be. Compressor will figure out what it needs to do to the Source image to achieve your final results.
THE GEOMETRY INSPECTOR
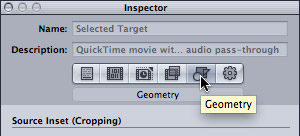
The Geometry tab in the Inspector is where we tell Compressor what size to make the image.
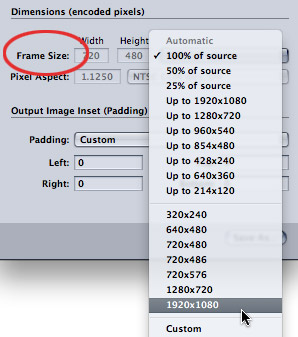
In the Dimensions section, set the Frame size to the size you want to up-res the image. In this example, I’m converting it to 1920 x 1080.
NOTE: The less you scale an image, the better it will look. So, up-resing SD video to 720 will look better than up-resing SD video to 1080.
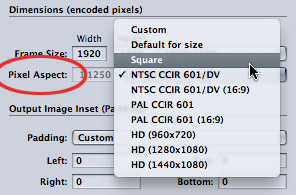
Next, set the Pixel Aspect ratio to Square. When working with HD video, Square is always the best choice. Non-square options are necessary when you are converting into a specific codec:
Unless you are converting your media into one of these special formats, always set the pixel aspect ratio to Square.
ADDITIONAL STEPS TO CONVERT 4:3 VIDEO INTO 16:9 HD
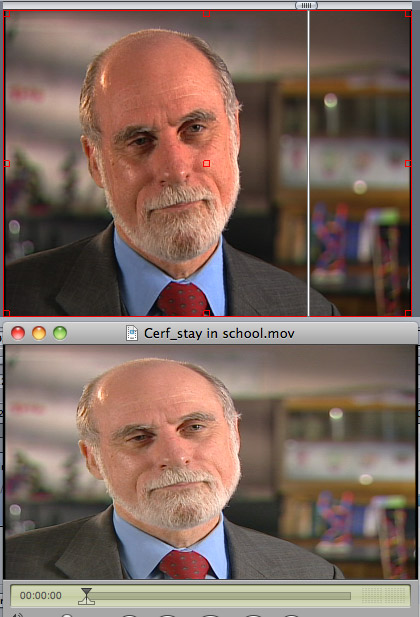
If you are converting 4:3 video into 16:9, you need to take an extra step – because if you don’t, as you can see from the screen shot above, your 4:3 video (top image) is stretched to fill a 16:9 frame (bottom image). Actors really don’t like that; as it makes them look fat.
So, we need to add padding to the left and right sides – a process called “pillar boxing” – so that the proportions of the image remain correct.
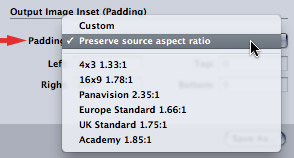
At the bottom of the Geometry section, in the Output Image section, change Padding to Preserve source aspect ratio. This adds black to the sides of the image so that the image does not get stretched.
Here’s the result when padding is added. The image now looks the same as the original, but it is contained in a 16:9 frame. If, on the other hand, you don’t want the black edges, then you’ll need to crop the top and bottom of the image so that the proportions remain the same.
NOTE: You have to make a choice: black on the edges or cropping top and bottom. You can not take a 4:3 image and have it fill a 16:9 frame without either cropping or padding, unless you want it to look stretched.
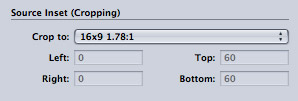
To convert a 4:3 image to 16:9 by cropping, make sure all the Padding values are set to 0, then, from the Source Inset (Cropping) section, set Crop to 16:9.
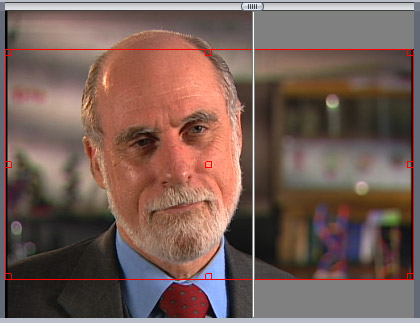
The red outline in Compressor’s Viewer illustrates the cropped image. That which is inside the red border will remain; that which is outside the red border will be discarded.
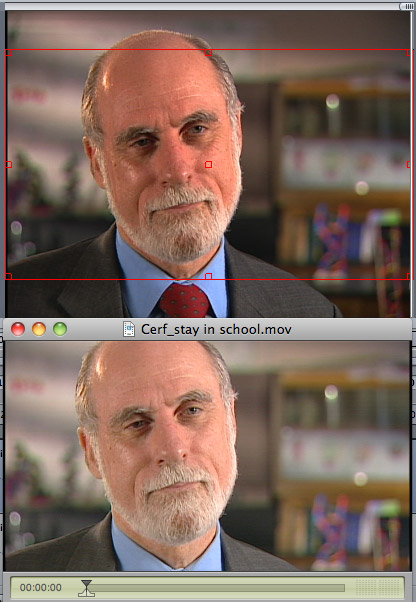
Here’s the finished result, the source image is on top, the scaled and cropped image is on the bottom. (For the rest of this article, I’ll work with the full image by adding padding, rather than cropping.)
THE FRAME CONTROLS INSPECTOR
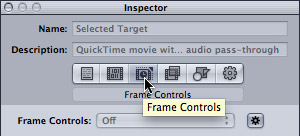
Now that we have the size of the image set, we need to determine the quality of the image. For that, we go to the Frame Controls tab. Click the third button from the left (Frame Controls) to select the Frame Controls window.
The dark gear menu to the right of Frame Controls (at the bottom right of this screen shot) says that the settings are set to Automatic. Normally, this is OK.
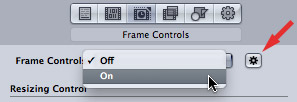
However, in this case, we want to explicitly turn on Frame Controls. So click the gear icon. This turns the automatic settings off. Then, select On from the popup menu.
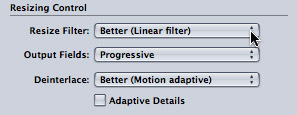
When you are up-resing an image, it is ALWAYS best to convert it to Progressive. The settings you need to change are:
NOTE: All standard-def video, both NTSC and PAL, is interlaced. There are rare exceptions for material shot 24 fps, but the safest thing to do is to assume that your material is interlaced.
As you experiment with up-resing your video – and you NEED to experiment, because different types of clips up-res differently – you can change either Resize Filter or Deinterlace to Best. However, DON’T change both to Best, because if you do, the underlying math is so complex that a process that might take an hour, stretches into DAYS!
In my tests, I could not see a significant difference in image quality between Better and Best. However, Best took twice as long to create a very similar result. I recommend using Better.
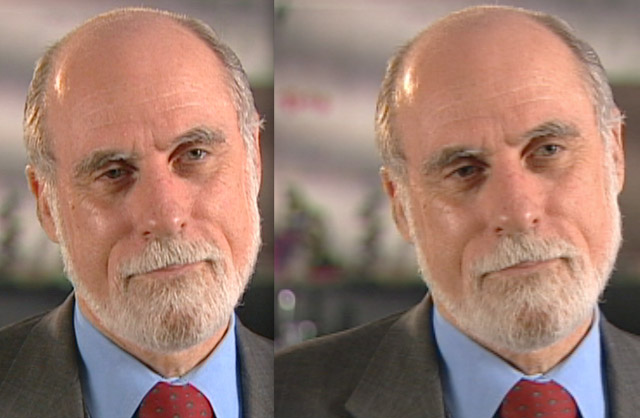
Here’s the final result. The up-scaled image is on the left, the original, enlarged image is on the right. Even when I reduced the size of these images for this article, there is a significant improvement in image quality when converting from SD to HD using Compressor — look at the detail in the beard, in the fabric of his coat, and the skin texture in the image on the left.
The difference is stunnngly apparent when viewed at full HD resolution. Frankly, if you care about quality, up-resing through Compressor is FAR superior to simply scaling your image in a video editor.
A NOTE ON CONVERTING FRAME RATES
Converting frame rates is far more difficult than up-resing an image. The basic rule of thumb is that it is better to go from a slower frame rate (24 fps) to a faster frame rate (30 fps), than to go from a faster frame rate to a slower frame rate. (Converting from faster to slower frame rates generally causes jerky movements, stuttering and other unpleasantness.)
The exception to this rule is converting from a frame rate (say 60 fps) into another frame rate that divides evenly into it (say 30 fps). So, 48 to 24, 50 to 25, and 60 to 30 are all frame rates that will convert smoothly.
For this reason, I tend to shoot all my material at 60 fps.

You can use Compressor for simple frame rate conversions, which are done by changing the speed of a clip. For frame rate conversions more complex than this, consider using a Teranex converter for material originating on video tape, or Amberfin software for file-based media.
SUMMARY
The downside to using software other than your editor to change the size of your images is that it takes time; sometimes, lots of time. The good news is that the time you spend is worth it.
Nothing beats shooting HD video in the first place for image quality. But, when you are working with historical footage, you don’t have a choice. Now you know what you can do to make your standard-definition images look as good as possible.

2,000 Video Training Titles
Edit smarter with Larry Jordan. Available in our store.
Access over 2,000 on-demand video editing courses. Become a member of our Video Training Library today!
Subscribe to Larry's FREE weekly newsletter and
save 10%
on your first purchase.
75 Responses to Compressor 4: Convert SD to HD
Newer Comments →-
 Lou Hemsey says:
November 26, 2012 at 8:56 am
-
 Elliott Landy says:
November 26, 2012 at 10:43 am
-
 Larry Jordan says:
November 26, 2012 at 10:27 pm
-
 Eric says:
November 26, 2012 at 5:11 pm
-
 Rachel says:
November 26, 2012 at 7:14 pm
-
 Larry Jordan says:
November 26, 2012 at 11:07 pm
-
 Esben says:
November 28, 2012 at 4:23 am
-
 Enrico says:
March 12, 2013 at 4:03 pm
-
 Larry Jordan says:
March 12, 2013 at 4:38 pm
-
 Enrico says:
April 3, 2013 at 6:13 am
-
 Larry Jordan says:
April 3, 2013 at 8:40 am
-
 Enrico says:
April 3, 2013 at 12:52 pm
-
 Enrico says:
October 16, 2013 at 3:05 pm
-
 Fred Thomas says:
March 15, 2013 at 3:54 pm
-
 Larry Jordan says:
March 15, 2013 at 6:01 pm
-
 Fred Thomas says:
March 17, 2013 at 1:22 pm
-
 Edwin says:
April 30, 2013 at 4:03 am
-
 Elliott Landy says:
October 8, 2014 at 6:16 pm
-
 LarryJ says:
October 8, 2014 at 9:49 pm
-
 Will the Thrill says:
November 1, 2013 at 1:17 pm
-
 Wayne says:
December 30, 2013 at 10:18 am
-
 Larry Jordan says:
December 30, 2013 at 10:53 am
-
 Wayne says:
December 30, 2013 at 2:31 pm
-
 Larry Jordan says:
December 30, 2013 at 2:37 pm
Newer Comments →Larry:
As always, excellent info, especially on the subtle things that can easily be missed.
Lou
Lou Hemsey Music and Film
You wrote: “In my tests, I could not see a significant difference in image quality between Better and Best”
How are you judging this difference, on a computer monitor (which size) or a 55 inch (plus) lcd or a high end video projector?
If we are looking for the BEST quality possible, how can we explore using both Deinterlace and Resize modes in BEST? Since changing Better to Best in both these modes at the same time, results in MUCH (days) longer render times, is it faster to first use one and then the other. AND if you do use both of them, are the results better?
Also, as I am seeking ultimate upres quality for use in large screen projection, what do you think about the following? In my still photographs I upres a tiff file so I can make a larger print. There are dedicated upressing apps to do this or you can do it in photoshop by upressing the image a little bit at a time. The rule of thumb for photoshop is to up res it 10% at each stage. These systems work. SO, what do you think about: 1) first converting the SD interlaced original to Progressive ; 2) exporting tiffs from each frame; 3) padding or cropping each frame (simple do do with batch processing; 4) upressing each tiff to the desired HD size; 5) importing all tiffs to the HD movie format. Although it is hugely intensive work, do you think this will result in a better visual result?
Elliott:
Your proposed workflow is a MASSIVE amount of work. First, I would not use TIFFs, but DPX frames – the color accuracy is better.
Second, I like the idea of doing this in two passes: 1. Deinterlace. 2. Up-res. However, I think the idea of doing it as separate images may be excessive.
The image quality may be better, but given the low resolution of the source, you may not notice it. I would test this with a very short – say, five second – clip and see how manageable this is.
Larry
Great article Larry; the forums are always filled with people asking how to up-res their image. One idea for an article might be the technique of pillarboxing the image and using an enlarged blurred image in the background.
Also, do you have an article on the Re-timing control? I wasn’t clear in this article why you were showing that picture. Thanks!
Thanks for sharing this workflow, Larry, with your ever astute observations regarding alternatives and results. For projects in FCP 7, do you have any information whether Compressor 3.5 would yield results inferior to what you found using Compressor 4.0?
Rachel:
Compressor 3.5 should work exactly the same way. Be sure to use ProRes 422 as your codec.
Larry
Great article, Larry. I have heard that Motion is the tool to use for any image calculations as it works on sub-pixel level and Compressor don’t. Could you maybe explain this difference in understandable terms, and verify whether or not it matters when it comes to upressing SD to HD?
Hello, Larry,
These are excellent instructions. I tried this for a feature-length doc and it worked pretty well and (I hope) save me some expense. My only trouble is whenI tried to “Preserve the aspect ratio” some of my shots came out elongated. The source material is SD 720×480 NTSC DV (3:2) CCIR 601 / DV at 23.98.
Is there something else I should be doing with this footage? As a side note, I nested all of the clips and mixed down the audio before sending to Compressor — perhaps I should do each clip, one at a time?
Thanks!
Enrico
Enrico:
To preserve the aspect ratio, you also need to add padding, which puts black bars on the left and right sides of the image. This prevents the stretching you saw.
Larry
Hello Larry,
One more question about this. The up-res works great, but it is, of course, a huge file. When I compress it to the H.264 codec to upload it online or burn to a DVD I get a thin green line around the edge. Is there a way to correct this? Why is it happening?
Thanks for the help!
Enrico
Enrico:
The thin green line is VERY unusual – something I’ve never seen.
Does the green line exist in the final compressed file, or does it exist also in the master up-res file?
Try compressing a short portion again and see what happens.
A GREAT Compressor utility is Compressor Repair, a free utility from Digital Rebellion. Download that, run it and see if that fixes your problem.
Larry
Hi Larry,
I haven’t figured this out yet, but I did notice that the most recent software update for FCPX had a correction for this problem. That doesn’t help me because this project is in FCP7.
To answer your question, the green line only appears on the final compressed file and not on the master up-res. The up-res looks good all around. This problem is also true for both the feature and the trailer.
You can see it here: http://saltintheair.net/trailer/. It’s very thin, so go to full screen to see it.
I’ll try running Compressor Repair and see what’s what.
Enrico
Hi Larry,
I was never able to get rid of that green line so I just trimmed it. That worked fine because the line was so thin.
Thanks overall for the great instructions.
I’m a total newbie, way out of my league, trying to make home movies of my family.
My problem: My lil JVC camera shoots in SD and HD and full HD. The viewer shows 16:9 image – for both SD and HD. When
I import HD into editing program, the SD is always 4:3 and the HD 16:9.
Bottom line: If I want to produce in 16:9, do I have to use HD?
Bottom bottom line, what’s going on with the camera display? It shows them all as 16:9.
Any help is appreciated.
fred
Fred:
Without seeing actual screen shots, it is hard to tell. However, MOST default settings for shooting SD video set the aspect ratio to 4:3. ALL HD is 16:9.
I suspect the SD video was shot in the wrong format – again, this is a guess. So, no, you don’t have to use HD to create 16:9 video – just triple-check your camera settings.
Larry
Larry:
I am really appreciative of your reply. Honestly, I did not expect a reply to such a minor, nuisance-type, request.
I shall drag out the 150 page manual ( for a cheap videocamera! ) and do some more homework.
Sincere thanks for your great site and your personal reply.
fred
Hi Larry,
I noticed you selected Progressive when up-resing. Won’t this throw away half the quality of you original SD footage when it becomes HD? Because it has to de-interlace first, thus throwing away half the resolution.
Would it not be better to only change the field order to Top First?
Cheers,
Edwin
Can you explain this further. How would changing the field order to Top First make it work better? Would it simulate Progressive?
Edwin & Elliott:
Setting the Field Dominance to top first does not make sense when up-rezing, because the number of lines in an SD image is different than an HD image. Also, since SD is virtually always lower-field dominant, you would end up with VERY jerky playback by switching the dominance setting.
Compressor – and other high-quality compression software – using the pixel information in both fields when up-rezing the image to get the best picture possible. So you would NOT! deinterlace prior to up-rezing.
Set the up-rez format to None/Progressive and let the software do its thing.
Larry
Hi, when I use this technique out of a mov file exported from 7 it worked great!
When I use it on an exported master from X the audio drifted as it played until
it was awful where the audio came late [after the lips stopped moving].
What I noticed the 7 export file had codec: DV/DVCPRO – NTSC, Linear PCM, Timecode NTSC
But the X exported Master file: Apple ProRes 422, Linear PCM, Timecode
Both are 720×480 29.97 fps.
From re-reading your article, it seems I should export the timeline as DV?
I will try that.
Here’s my Custom setting in case there’s something more I missed:
Name: SD2HD
Description: QuickTime movie with Apple ProRes 422 and audio pass-through
File Extension: mov
Estimated size: unknown
Time remapping:output duration 99.900002%
Audio: multi-track pass-through
Video Encoder
Width: 1280
Height: 720
Pixel aspect ratio: Square
Crop to: Center crop for 1.778:1
Padding: Preserve source aspect ratio
(L: 0, T: 0, R: 0, B: 0)
Frame rate: (100% of source)
Frame Controls On:
Retiming: (Better) Motion Compensated
Resize Filter: Linear Filter
Deinterlace Filter: Better (Motion Adaptive)
Adaptive Details: Off
Antialias: 0
Detail Level: 0
Field Output: Progressive
Codec Type: Apple ProRes 422
Multi-pass: Off, frame reorder: Off
Automatic gamma correction
Progressive
Pixel depth: 24
Spatial quality: 50
Min. Spatial quality: 0
Temporal quality: 0
Min. temporal quality: 0
Compatible with Mac
Larry,
Can one get a better upres using a hardware solution like the Black Magic Teranex 2D Processor or any other better hardware?
We, sadly, have a very exotic wildlife library that we would like to preserve. Was originally shot on PAL (4:3) Betacam, PAL DV and a later 100 hours PAL (16:9) HDV.
Any chance on earth of making this footage usable? If not for broadcast, at least for internet streaming?
Thanks in advance for any opinions you may have.
Wayne
Wayne:
Check into the iCR software from Amberfish. Its the software equivalent of the Teranex box.
Larry
Thanks, Larry. Do you mean Amberfin? A UK company? Doesn’t look like the software is actually for sale. Do think this
solution is better than Teranex box or cheaper or easier to use?
Thanks for your help.
Wayne
Hmmm… I’m surprised it’s not for sale. I was not under that impression. I’ll look into that.
And the Teranex box requires and SDI or HDSDI signal for input, which means it works best with live feeds and tape, rather than files.
Larry