
![]() There are two basic ways to record and display a video image:
There are two basic ways to record and display a video image:
BACKGROUND

A progressive image records and displays every pixel in the image at the same time. Progressive images are notated with a lower-case “p” as part of the image description: 720p, 1080p. Progressive images are the preferred option for all web videos because they retain the highest resolution and image quality.
The image above is a detail from fast-moving shot of a young girl twirling on a merry-go-round. Notice how clean the edges are and how all hair detail is retained.

An interlaced image records and displays an image as rows of pixels where, first, all the odd-numbered rows are displayed, field 1, followed a fraction of a second later by all the even-numbered rows, field 2. These two fields are offset in time, generally 1/50th or 1/60th of a second. Interlaced images include both NTSC and PAL standard-definition video, as well as video formats notated with a lower-case “i”; for example, 1080i.
The image above is a detail from an interlaced image of the moving fingers of a speaker. Notice the thin, horizontal lines radiating off the moving fingers and the complete lack of detail? Those are interlace lines. On a TV set, they look fine. On the web, they look awful.
While all web videos everywhere are progressive, DVDs, most cable outlets and some broadcast networks display interlaced video for bandwidth reasons. Examples in the US include: CBS, NBC, PBS, National Geographic, Discovery and many others.
GENERAL EDITING ADVICE
It is extremely easy to convert progressive video to interlaced with no loss in image quality. However, it is much more difficult to convert interlaced to progressive and, when you do, there will always be a loss in image quality.
For this reason, regardless of your delivery format, you are always best advised to shoot progressive video wherever possible.
Regardless of the software you are using to edit, the rules for editing HD are the same: always set your project/sequence settings to match the format you need to deliver. If needed, your software will convert progressive to interlaced or interlaced to progressive during the process of editing.
HOW DEINTERLACING WORKS
There are four ways to deinterlace an image; all of which reduce image quality:
As you can imagine, different options take different amounts of time (they are listed from fastest to slowest) and yield varying quality (they are listed from potentially lowest to highest quality).
Many times we need to create a project that was mastered as interlaced into progressive to post to the web. Here, you are wiser to do the conversion in Compressor rather than your editing software because Compressor offers potentially:
Notice the word “potentially.” As with all video compression, if other compression settings – for example, bit rate – are not set properly, you won’t get good results.
HOW TO DEINTERLACE VIDEO IN COMPRESSOR

Here’s the interlaced example we’ll work with today. Notice the horizontal lines radiating out from his moving face. Notice also that his face has lost most of its texture and detail.
NOTE: Deinterlacing a still image is virtually perfect, as there is no difference caused by movement between the two frames. When judging the results of interlacing, always look for something that is moving in the frame.

While this may set automatically when you select MPEG-4 or QuickTime, be sure the Field Order menu is set to Progressive. This tells Compressor to output a progressive file.
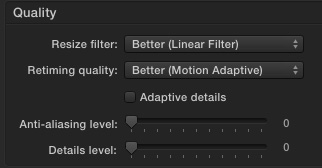
The Quality settings determine image quality for:
The default settings are OK for deinterlacing, but you may enhance quality by changing one setting: Retiming Quality.
.

(Click image to see a larger, uncompressed version of this image.)
Here is a close-up from each frame, starting with the source image, with Retiming Quality set to Faster, Better, and Best. Faster and Better both compressed a six second clip in less than one second. Best took 55 seconds to compress the same six-second clip.
NOTE: The image above is scaled to 75%, click the image to see the uncompressed source images at 100%. Other than pasting the images into Photoshop, no image modification was done to any image.
As I look at this, I see a little improvement between Faster and Better, but not enough improvement – if any – to justify using Best.

(Click image to see a larger, uncompressed version of this image.)
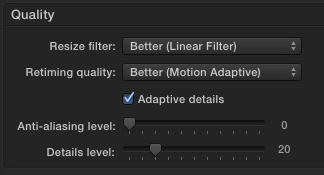
In the Quality menu are a few other settings that are useful when resizing images: Adaptive Details, Anti-aliasing, and Details Level. Here’s the same portion from each frame: Source image, Adaptive Details turned off, Adaptive Details turned on, Details level set to 20.
NOTE: The image above is scaled to 75%, click the image to see the uncompressed source images at 100%. Other than pasting the images into Photoshop, no image modification was done to any image.
Again, as I look at this, I don’t see any significant differences between these images. These settings are useful when resizing images, but not for deinterlacing.
SUMMARY
In the past, we had more controls over deinterlacing in Compressor. The latest version – 4.2 – simplifies the process, though I’m not sure for the better. If you are in a hurry, leave the Quality settings at their default.
If you want a marginal improvement in deinterlace quality, set Retiming Quality to Better, and leave Adaptive Details unchecked and Anti-alias and Details level sliders at 0.
Just remember, however, that you will always get better image quality if you shoot progressive than to convert interlaced video to progressive after the fact.

2,000 Video Training Titles
Edit smarter with Larry Jordan. Available in our store.
Access over 2,000 on-demand video editing courses. Become a member of our Video Training Library today!
Subscribe to Larry's FREE weekly newsletter and
save 10%
on your first purchase.
36 Responses to Compressor: How to Deinterlace Video
← Older Comments-
 arioman says:
February 22, 2020 at 11:31 pm
-
 Larry says:
February 23, 2020 at 9:10 am
-
 ANDY says:
April 6, 2020 at 8:44 am
-
 Larry says:
April 6, 2020 at 8:47 am
-
 Massimo says:
August 2, 2020 at 6:19 am
-
 Tony Torn says:
August 10, 2020 at 12:23 pm
-
 Larry says:
August 10, 2020 at 12:31 pm
-
 Simon says:
February 24, 2021 at 1:20 pm
-
 Larry says:
February 24, 2021 at 1:22 pm
-
 Nigel Graham says:
February 25, 2021 at 7:59 am
-
 Larry says:
February 25, 2021 at 9:11 am
-
 Corey Bowman says:
July 2, 2021 at 7:51 am
-
 Larry says:
July 2, 2021 at 7:53 am
-
 Mark says:
March 4, 2021 at 1:54 pm
-
 Alex says:
December 8, 2021 at 5:04 am
-
 Larry says:
December 8, 2021 at 5:08 am
-
 Niklas Wikman says:
April 13, 2023 at 9:46 pm
-
 Larry says:
April 14, 2023 at 3:51 am
← Older Commentshello , thanks for useful article
can i ask the screenshot of compression settings is from what convertor ?
i install many convertor but most of the have just basic setting like bitrate
Arioman:
The article and screen shots are based on Apple Compressor.
Larry
Greetings Larry, thanks for posting this informative explanation of interlacing and how to lessen its effect in video production.
My question is: can Compressor be used independently of FCP, or is it necessary to have the FCP software pre-installed before Compressor will open/run?
I see that it is available to buy as a standalone piece of software, but perhaps that is on the assumption that the user will already have FCP on their system before adding Compressor.
Many thanks.
Andy:
You can purchase and use Compressor without also installing Final Cut. It’s a stand-alone app.
Larry
thank you, Larry. You just answered another one of my questions.
Hello, thanks for this and all your other excellent posts. I’m trying to de-interlace archive footage that was shot on NTSC SD DV 27.97i, stored as a quicktime movie and re-edited in a fcpX timeline (matched properties) but whenever I try to output the field order choice is greyed out and the output stays badly interlaced.
Tony:
You are too many steps removed from the source file. You’ll need to find the original media and deinterlace that. My guess is that who ever edited it in Final Cut did not set field properties correctly and removed the ability to deinterlace.
larry
Hi all
I have purchased compressor today to deinterlace some old cal purser footage but it came out still interlaced and the image was very glitchy as if the resolution was really low
Can all interlaced footage be made progressive?
Thank you
Simon
Simon:
Sounds like a bad setting. Yes, all interlaced footage can be converted to progressive.
However, resolution – especially for SD material – is very low, when compared to HD.
Larry
Great article, I’m using compressor and FCPX both bought in Jan 2021. It’s video taped DV handycam footage 29.97i NTSC, imported though FW, no issue and see it’s interlaced as a .mov file in QuickTime and FCPX.
Opening Compressor, setting to an MP4 container all is good, 59.94 frame rate. It will compress as 59.94p when Retiming quality is set to Fast (nearest Frame) and the fields are separated in to frames, you can see combing on each frame, but it looks alright like old VHS footage. Now when I set the Retiming Quality to Good or Best, it changes the footage to 30p in a 59.94p file. So when you advance one frame at a time you see two identical frames. I thought the Good and Best settings wouldn’t change into 30p.
Any thoughts, is this a bug or sound normal? Believe it or not the footage looks better without combing (very soft) using Yadif-Bob in Handbrake as a MP4 container. As I bought Compressor I wanted to use it, I’d really appreciate your help, I have lots of VHS-C tapes to digitize and wanted to keep the 29.97i/59.94p look from old VHS tapes.
Nigel
Nigel:
First, you are confusing the field rate with the frame rate. In interlaced video, one field is half the frame, all the odd numbered lines, then all the even numbered lines. So, to create progressive video from interlaced, you need to cut the field rate in half: 59.94 fields per seconds becomes 29.97 frames per second. Why? Because it takes two fields to create a single, complete frame.
When you create a 59.94 frame rate, by definition, you are doubling all frames.
As for what looks “best,” that’s a judgement call. I find myself tweaking the settings until I find that one that makes that specific video look good. But, I never mess with the frame rate – I always leave that at 29.97 for NTSC and 25 for PAL media.
Larry
Compressor used to do a wonderful job of changing 29.97i to 59.94p, and was free of frame doubling. Compressor 3 with the x.264 codec was an incredible tool (and still is for those of us with older machines), but Apple really hurt my ability to do my job when they removed the “better (motion compensated)” setting from Compressor 4. Why they would do that is beyond me, as it was far faster than “best” with less optical flow artifacting.
Corey:
Good question. I have no idea…!
Be sure to send this as Feedback to Apple from within Compressor using the Compressor > Provide Compressor Feedback menu.
Apple tells me they read these comments, though they don’t answer them.
Larry
Hi Larry!
Again, a superb and helpful article on how to deinterlace video using a more recent version of Compressor – great job Larry!
In my quest to upsize and deinterlace old SD file to HD (via this article and another article of yours), I noticed in my research that older versions of Compressor (as you mentioned/hinted at herein) contained a separate “Deinterlaceing Controls” section geared to more specific identification and control of deinterlacing. I found an old Compressor version guide and it apparently included: “Fast (line averaging)”, “Better (motion adaptive)”, and “Best (motion-compensate” deinterlacing options. These specific option are no longer in Compressor 4.5.x but (as you say herein) appear to be combined (now) into the “Retiming Quality” pulldown options. Retiming is shown as: “Fast (Nearest Frame)”, “Good (Frame Blending)”, “Best (Motion Compensated)” and “Reverse Telecine”.
When I look in the current Compressor Guide, it does not jump out at me that the Retiming Controls are now also applicable to controlling the deinterlacing functions when a user selects “Progressive” in the Field Order. Can you (or your awesome sources) confirm that this is true? I know your results show that the the Retiming Settings appear to affect your images herein, (so it must be affecting the deinterlace) but I was just wondering how you figured out that (as a user) that deinterlacing IS affected by the Retiming Control? The only thing that is obvious to ME is Field Order can be changed = Progressive. If its true that Retiming settings not only affect Frame Rate change quality but ALSO affect Deinterlacing quality – it sure seems like apple needs to update the online manual. Curious on your thoughts Larry?
Thanks so much for you time!
Mark
Don’t know whether it’s still relevant. Having been dealing with DV captures for the last week.
1. Video was captured long time ago via Windows firewire in AVI files
2. Converted captured video in ProRes HQ under Windows.
3. Imported into FCPX. Don’t do any changes to the project or clips in relation to deinterlacing or field order.
4. Export the project as the master file.
5. Open the exported movie in Compressor.
6. Before adding preset, make sure under overall project information, Field order is not Progressive. Usually, the Compressor defines itself.
7. Add preset and under Video section make sure Field Order set to Progressive.
8. To make sure progressive is in effect, Preview video in Compressor with split review. It is clearly visible in Preview that the left side of video imported file is interlaced and the right side after Progression is being applied, the one is deinterlaced.
9. Export and enjoy.
Alex:
This is a great workflow – thanks for sharing!
I especially like the idea of importing and editing as interlaced, then converting to progressive in Compressor after the project is complete.
Larry
Hi!
I wish to do the OTHER way around as described in this post – go from a 1080p50 to 576i25 (for SD-DVD).
Can this be done in Compressor, or do I need to do the 50p -> 25i in FCP and then send to Compressor (doing the compression)?
Codec is XF-HEVC, 1920x1080p50
Niklas:
It is EASY to take progressive video and convert it to interlaced. This is identical to a film transfer without the pull-down frames. Why? because the format may be interlaced but the image remains progressive, with no interlace artifacts.
Simply drop your 1080p media into a 576i timeline and you should be all set.
Larry