
![]() There are two basic ways to record and display a video image:
There are two basic ways to record and display a video image:
BACKGROUND

A progressive image records and displays every pixel in the image at the same time. Progressive images are notated with a lower-case “p” as part of the image description: 720p, 1080p. Progressive images are the preferred option for all web videos because they retain the highest resolution and image quality.
The image above is a detail from fast-moving shot of a young girl twirling on a merry-go-round. Notice how clean the edges are and how all hair detail is retained.

An interlaced image records and displays an image as rows of pixels where, first, all the odd-numbered rows are displayed, field 1, followed a fraction of a second later by all the even-numbered rows, field 2. These two fields are offset in time, generally 1/50th or 1/60th of a second. Interlaced images include both NTSC and PAL standard-definition video, as well as video formats notated with a lower-case “i”; for example, 1080i.
The image above is a detail from an interlaced image of the moving fingers of a speaker. Notice the thin, horizontal lines radiating off the moving fingers and the complete lack of detail? Those are interlace lines. On a TV set, they look fine. On the web, they look awful.
While all web videos everywhere are progressive, DVDs, most cable outlets and some broadcast networks display interlaced video for bandwidth reasons. Examples in the US include: CBS, NBC, PBS, National Geographic, Discovery and many others.
GENERAL EDITING ADVICE
It is extremely easy to convert progressive video to interlaced with no loss in image quality. However, it is much more difficult to convert interlaced to progressive and, when you do, there will always be a loss in image quality.
For this reason, regardless of your delivery format, you are always best advised to shoot progressive video wherever possible.
Regardless of the software you are using to edit, the rules for editing HD are the same: always set your project/sequence settings to match the format you need to deliver. If needed, your software will convert progressive to interlaced or interlaced to progressive during the process of editing.
HOW DEINTERLACING WORKS
There are four ways to deinterlace an image; all of which reduce image quality:
As you can imagine, different options take different amounts of time (they are listed from fastest to slowest) and yield varying quality (they are listed from potentially lowest to highest quality).
Many times we need to create a project that was mastered as interlaced into progressive to post to the web. Here, you are wiser to do the conversion in Compressor rather than your editing software because Compressor offers potentially:
Notice the word “potentially.” As with all video compression, if other compression settings – for example, bit rate – are not set properly, you won’t get good results.
HOW TO DEINTERLACE VIDEO IN COMPRESSOR

Here’s the interlaced example we’ll work with today. Notice the horizontal lines radiating out from his moving face. Notice also that his face has lost most of its texture and detail.
NOTE: Deinterlacing a still image is virtually perfect, as there is no difference caused by movement between the two frames. When judging the results of interlacing, always look for something that is moving in the frame.

While this may set automatically when you select MPEG-4 or QuickTime, be sure the Field Order menu is set to Progressive. This tells Compressor to output a progressive file.
The Quality settings determine image quality for:
The default settings are OK for deinterlacing, but you may enhance quality by changing one setting: Retiming Quality.
.

(Click image to see a larger, uncompressed version of this image.)
Here is a close-up from each frame, starting with the source image, with Retiming Quality set to Faster, Better, and Best. Faster and Better both compressed a six second clip in less than one second. Best took 55 seconds to compress the same six-second clip.
NOTE: The image above is scaled to 75%, click the image to see the uncompressed source images at 100%. Other than pasting the images into Photoshop, no image modification was done to any image.
As I look at this, I see a little improvement between Faster and Better, but not enough improvement – if any – to justify using Best.

(Click image to see a larger, uncompressed version of this image.)
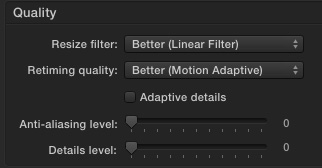
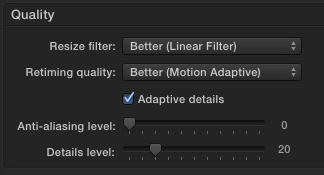
In the Quality menu are a few other settings that are useful when resizing images: Adaptive Details, Anti-aliasing, and Details Level. Here’s the same portion from each frame: Source image, Adaptive Details turned off, Adaptive Details turned on, Details level set to 20.
NOTE: The image above is scaled to 75%, click the image to see the uncompressed source images at 100%. Other than pasting the images into Photoshop, no image modification was done to any image.
Again, as I look at this, I don’t see any significant differences between these images. These settings are useful when resizing images, but not for deinterlacing.
SUMMARY
In the past, we had more controls over deinterlacing in Compressor. The latest version – 4.2 – simplifies the process, though I’m not sure for the better. If you are in a hurry, leave the Quality settings at their default.
If you want a marginal improvement in deinterlace quality, set Retiming Quality to Better, and leave Adaptive Details unchecked and Anti-alias and Details level sliders at 0.
Just remember, however, that you will always get better image quality if you shoot progressive than to convert interlaced video to progressive after the fact.

2,000 Video Training Titles
Edit smarter with Larry Jordan. Available in our store.
Access over 2,000 on-demand video editing courses. Become a member of our Video Training Library today!
Subscribe to Larry's FREE weekly newsletter and
save 10%
on your first purchase.
36 Responses to Compressor: How to Deinterlace Video
Newer Comments →-
 Tom Wolsky says:
June 22, 2015 at 2:18 pm
-
 Larry Jordan says:
June 22, 2015 at 2:48 pm
-
 Bill Frankebe says:
February 22, 2016 at 7:44 pm
-
 Larry says:
February 24, 2016 at 1:41 am
-
 Pippa says:
December 14, 2016 at 9:13 am
-
 Larry says:
December 14, 2016 at 9:15 am
-
 tony says:
January 11, 2017 at 8:25 am
-
 Larry says:
January 11, 2017 at 8:32 am
-
 Tony says:
January 11, 2017 at 11:00 am
-
 Larry says:
January 11, 2017 at 2:31 pm
-
 Rob says:
January 30, 2017 at 1:46 am
-
 Lisa says:
April 12, 2017 at 4:15 pm
-
 Larry says:
April 12, 2017 at 4:37 pm
-
 Lisa says:
April 22, 2017 at 6:13 pm
-
 Mark Slocombe says:
May 21, 2017 at 2:16 am
-
 Larry says:
May 21, 2017 at 11:50 am
-
 Peter Chigmaroff says:
February 22, 2018 at 8:30 am
-
 Tim Maisey says:
July 2, 2019 at 1:34 am
Newer Comments →“For instance, 50 fps interlaced converts to 25 fps progressive, or 59.94 fps interlaced converts to 29.97 fps progressive.”
This is very misleading. There is no such thing as 50fps interlaced, nor 59.94 interlaced. They are always progressive. The designations 50i and 60i refer to fields not frames per second.
Tom:
Sigh… You are absolutely correct. My brain was not engaged when I wrote that sentence. I’ve gone back and corrected the article.
Thanks!
Larry
I cannot get this to work at all. None of the Pro Res or Quicktime selections will deinterlace. None of them give me the “Progressive” setting. Has anyone had success with this?
Bill:
It may be that you are trying to deinterlace into a format that doesn’t support it, for example, 29.97 NTSC. Also, deinterlacing would not be an option if the source file was already progressive. Many HD formats, for example, are progressive.
Larry
Hi Larry,
I’ve struggled with the concept of progressive and interlaced for a long time and trawled through various forums to find a clear answer.
By far your article is the clearest, most constructive description, most importantly with direct instructions. Thank you very much for the help, interlaced/progressive are no longer words to fear!
Look forward to reading more,
Pippa
Thanks! Glad this helped.
Larry
this isn’t working for me. I’m using the most current version of compressor.
Tony:
What does “isn’t working” mean to you, more specifically?
Larry
my video is not deinterlacing. I’ve tried all the settings you give
if I open the video in VLC and select deinterlace it plays and looks great. compressor does not seem to be deinterlacing using these settings (noted above). I’m suing compressor 4.3
Tony:
Hmmm… I’m not sure why this is happening. I’ll look into it.
Compressor 4.3 has a number of problems – if you are able to try compressing this on an earlier version, see if that works any better.
Larry
Ive used streamclip to great effect. In one instance it made a better version than compressor.
HELP! My movie is 2 hrs. 4 min long, shot w/ Sony Z5U at HD 1920x1080i 60 and I am moving it via quicktime in 20 min. segments b/c FCP 6 crashes frequently. When I put back together on stronger computer w/ FCP7 so I can color grade, it has wavy horizontal lines during pans and movement.
Goal is to make DCP, screen and sell. Three years to create and I am stuck now! HELP!!!
Lisa:
My GUESS is that you are seeing interlacing because of the camera and format you shot. Send me a screen shot directly (larry at larry jordan dot com) and we can discuss. But, it may be that you’ll need to have this professionally deinterlaceds if you need this for a DCP because showing this on a large screen will accentuate the interlacing.
Both FCP 6 and 7, by default, don’t show interlacing unless the Canvas is at 100%.
Larry
Thank you so much for answering me. I will send screen shot though the wavy lines don’t show – just blur.
I exported from FCP 6 in 20 minute segments as self-contained QT, and put back together to color grade on FCP 7 . Will try to send you a short clip as well, and my settings.
Hi Larry – with new settings/descriptions in Compressor 4.3.2, would you go with Resize = Linear and Retiming = Best (Motion Compensated)? And what does the ‘Dithering’ option do?
Mark:
Some of these answers vary by movie, but…
* I don’t know the benefits of the Resize filter, so I’d leave it at Linear until I had time to experiment.
* Retiming I’d set to Good, not Best
* Dithering is only needed when you are creating interlacing, not removing it.
Larry
Larry,
As usual a perfectly concise and informative article that tells me exactly what I need to know.
Thanks
Thanks, Larry!
Just got some film that was shot in interlaced (m2t) over 10 years ago and your comments, as always, were spot on!
Using compressor and it is looking good, although may take me a while to convert it all…!