
![]() In my experience, there are two statements known to cause riots: the first is categorically state what’s the best non-linear editor, and, second, is to discuss setting audio levels.
In my experience, there are two statements known to cause riots: the first is categorically state what’s the best non-linear editor, and, second, is to discuss setting audio levels.
Since things are a bit quiet at the moment, let’s boldly sally forth into a discussion of audio levels.
NOTE: I am always happy to learn from readers and correct my mistakes. Feel free to share your comments below. However, name-calling is not allowed.
With the demise of Soundtrack Pro, I am very impressed with the new version of Adobe Audition CS6. I have always loved working with audio, and this program has a lot of nice features that I appreciate a great deal. So, this article shows how to use an effects filter in Adobe Audition CS6 to set levels dynamically.
THE CHALLENGE
For this tutorial, let us assume we have a variety of on-location recordings where we want to retain background and environmental sound. However, like most productions, the talent was recorded low so as to guarantee that there would be no distortion.
We want to increase the audio gain of the talent, without destroying the background sound.
There are several ways we can do this:
However, in all of these examples, there is no guarantee that we won’t adjust the audio level too much and cause distortion. Also, it is either impossible or very difficult to respond to moment-by-moment changes in audio.
What we want to do is increase the softer passages while making sure the louder passages don’t distort.
NOTE: Audition also provides filters that allow you to remove background noise. (Here’s a webinar that explains how these noise filters work.) However the reason we went on location in the first place was to record the sound of the environment along with our talent.
SOME BACKGROUND
Audition allows audio filters to be applied either to the clip or the track. A typical use of a clip filter (which Audition calls “effects.”) might be to remove hum from one clip, without applying that effect to all the other clips in that track.
However, in almost all cases, audio effects are applied to the track.
I first wrote about the Limiter filter when covering Soundtrack Pro. (Read that article here.) A similar filter exists in Audition – called the Hard Limiter effect – that should absolutely be part of your regular audio toolkit.
What the Hard Limiter effect does is amplify soft passages more than louder passages and guarantee that the loudest passages of a clip or track stay below the “limit” that you set in the effect. In other words, the Limiter effect makes the overall volume of a clip louder while “guaranteeing” that the audio in that track won’t distort.
TWO EFFECTS TO AVOID
Because Audition has its roots in radio broadcast, several of its filters are designed to improve the levels of audio recorded in a studio. While these filters work, they totally destroy any background sound that’s contained in a clip recorded on location.
These two filters are:
The problem is that these two filters are often part of the gain presets shipped with Audition. For this reason, I strongly recommend against using any presets to fix audio levels where the background sound is important to the mix.
Presets to avoid include:
These filters are excellent for studio recordings with no noise, but not to be used for mixing location audio.
A NOTE ON LEVELS IN AUDITION
Audition, like Premiere Pro, Soundtrack Pro, and Final Cut Pro, measures audio using peak (or maximum) values. It displays audio levels using a measuring system called “dBFS” – or “decibels Full Scale.”
Because the system displays peaks, rather than average (or RMS) volume, I set my audio levels set using peak values. Many pro audio engineers prefer to work using average levels, which Audition can calculate, but not display.
NOTE: The most important rule for audio is that your audio levels for the entire mix must not, ever, exceed 0 dB during mixdown, export, or when saving the file. It is not unusual for levels to exceed 0 dB during the mix as you are determining your levels, but excessive levels must be adjusted below 0 dB prior to final output.
When measuring audio levels, always assume the meters are correct and your ears are wrong.
WHERE DO YOU PUT THE LIMITER EFFECT?
On small projects, say less than 10 tracks, you can apply the Limiter effect directly to the track.
However, for larger projects, to conserve CPU cycles, the Limiter effect is often applied to a sub-mix, where all the dialog tracks, for example, are routed to the sub-mix for audio leveling before final output in the mix.
Also, as a general rule, the Limiter filter should not be applied to sound effects, natural background sound, or music. This effect is designed for narration, voice-overs, interview subjects, and all on-camera speech.
HOW DOES IT WORK?

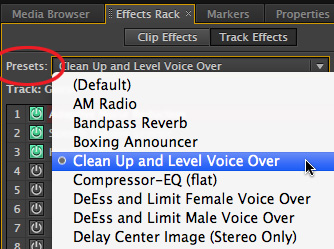
Select the track to which you want to apply the filter; this could be a track, submix, or master track. In this example, I’ve selected the track named “Larry;” note the lighter gray color indicating selection.
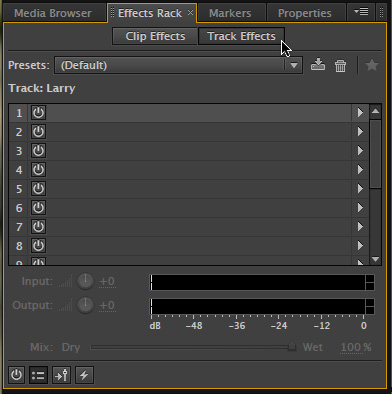
Click the Effects Rack tab – or select it from Window > Effects Rack – shortcut: Option+0) – to make it active.
Click the Track Effects tab, at the top, to make it active. This applies the effect to the track. (If you wanted to apply the effect to a clip, click the Clip Effects tab to the left.)
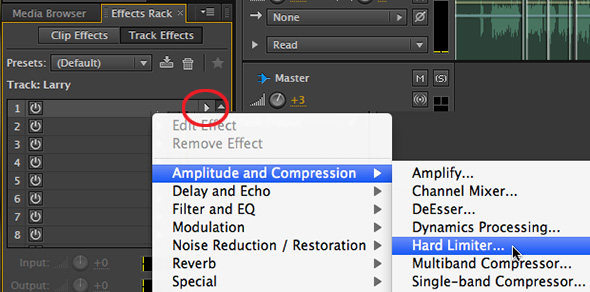
From either the Effects menu at the top of the screen, or the right-pointing white arrows to the right of the Effects Rack, select Amplitude and Compression > Hard Limiter.

Two things happen: the Hard Limiter is listed in the Effects Rack and…
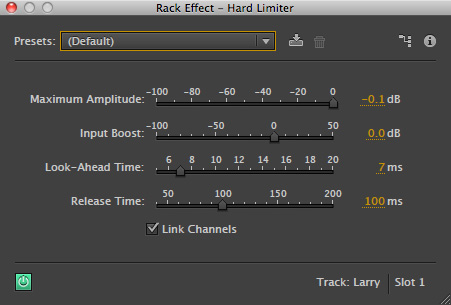
The settings for the Limiter are displayed in a floating window on top of your tracks. (Your settings for this filter may look different from mine.)
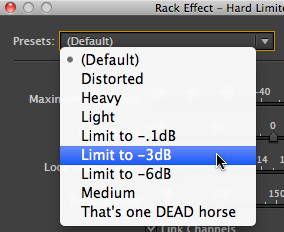
The specific settings you use can vary, but one that I like is to use Limit to -3dB.
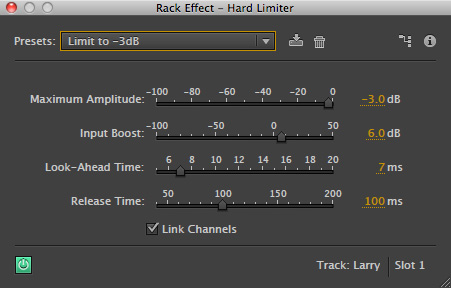
What this does is amplify (Input Boost) the audio gain for the entire clip by 6.0 dB, provided that the maximum level (Maximum Amplitude) never exceeds -3.0 dB.
The only setting you need to adjust is Input Boost. Your goal is to amplify the clip so that it sounds louder, without sounding distorted. The easiest way to adjust this is play your clip and drag the Input Boost slider to adjust the gain. For setting input gain, I like the interface of the Limiter filter in Soundtrack Pro MUCH better as it provided a visual indicator of when the filter was properly adjusted.
So here’s an easy way to set this using Audition.
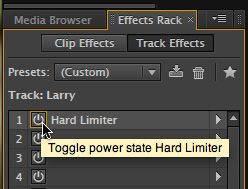
Click the green power button in the Effects Rack so it goes gray, this turns the filter off without deleting it.
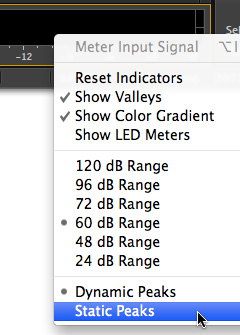
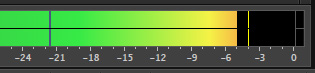
Right-click in the audio meters and set peaks to Static Peaks. This shows you the loudest your peaks are without resetting the peak indicator every few seconds.
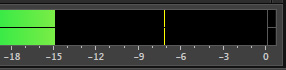
Play a representative portion of your clip and watch where the static peaks max out. Since this is a peak, most of your levels will be softer than this. Enter this number into the Input boost.
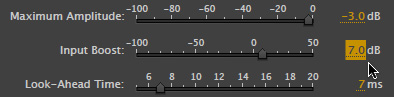
For example, in this screen shot, my maximum peak is -7 dB. So, I would enter 7 dB into the Input Boost. This gets the effect close to the level I need. At which point, I play the sequence and tweak slightly until my levels sound good. The Maximum Amplitude setting limits the total volume so that it does not get louder than -3 dB.
THE LAW OF THE PAN
This technique works great for mono clips in a mono mix, or stereo clips in a stereo mix. However, there’s a bit of a hitch when setting levels for a mono clip that’s part of a stereo mix. And that’s because when a mono clip is panned into a stereo clip, it’s gain is reduced by 3 dB. Here’s a blog post on Adobe’s website that explains this:
blogs.adobe.com/insidesound/2010/10/following-the-letter-of-the-pan-law.html
So, the process is the same, but the levels of your clip won’t exceed -6 dB. Weird but true.
SUMMARY
If you are looking to level out the audio gain of a track, without running the risk of distortion, the Hard Limiter is a great choice. The reason I prefer the Hard Limiter effect versus a compressor, is that the Limiter is easier to set up, and provides better control over limiting the maximum volume of a clip.
NOTE: Recently, I created an entire series of video training covering Adobe Audition. This tutorial is an excerpt from that training.

2,000 Video Training Titles
Edit smarter with Larry Jordan. Available in our store.
Access over 2,000 on-demand video editing courses. Become a member of our Video Training Library today!
Subscribe to Larry's FREE weekly newsletter and
save 10%
on your first purchase.
20 Responses to Adobe Audition CS6: Hard Limiter
Great article, Larry. Might be worth noting that users may override the -3dB Panning Mode drop under Preferences > Multitrack > Panning Mode. Set this to “Left/Right Cut (Logarithmic)” and the mono clip in a stereo mix rules will be overridden.
Durin:
VERY COOL! And, coming from someone on the Audition product team, I consider this both great advice and a nice compliment.
Larry
How can i work with this hard limiter in pre-record mode? like a pre-amp limiter in order to loose the picks before…
To the best of my knowledge, you can’t.
All effects are post-recording. You would need to use a limiter between your mic/mixer and the input to your computer.
larry
thanx
You can use some effects while recording if you use the right gear. I use a firewire, usb3 or thunderbolt interface to capture mono tracks for stereo mix. I pan them, then boost them 3+, and before recording, I listen, look and make adjustments to effects, and send them Post Fader, which normalizes the 3db drop to zero, then applies the limiter gate. With a live performance, it’s a great tool, and you can set it by track. Don’t forget, you can also add it to the master track if you want to affect both stereo tracks or all tracks at once. You can also analyze your audio as you rehearse, and set your levels high, while they set up PA, and then later, you can draw it back a little. It’s a great way to build your starting points early, and then only adjust them slightly after, saving time in a production environment. It will also affect output over non-standard channels, like the same box I use for capture, which has many outputs; and I can select those outputs in audition. So long as I don’t have too many of them, it will pass through instantaneously, and come out clean on the other side, right to the main PA board. This works wonders on some poor wireless mics I’ve got, and it allows me to clean the signal close to the stage, then pipe it out for boosting with a PA board, and I can even amp it up a little if needed, right from near the stage, and set limiting to keep them from distorting. I’ve done it, it works, and I couldn’t be happier.
This article is gold. Been messing with audio recorded in a moving vehicle for days and it’s been very frustrating. This was exactly the information I needed. Thank you.
Joseph:
Glad I could help.
Larry
How to disable using “Hard Limiter” when i digitize my records please? He cut my peaks !
Alex:
The Hard Limiter is off by default and is NOT applied to recordins, only playback.
If something chopped your peaks, it wasn’t the limiter. Chopped peaks are most often caused by a bad / inadequate pre-amp or poor quality recording.
Larry
Thank you.
Adobe audition 3, EMU0204, good phono stage. It’s only on 1-2 tracks from 10
http://i062.radikal.ru/1710/02/115e4fa4a3f8t.jpg
other with jumping to red sector, it’s good -i saw and did lower level of recording
I need some help here.
I did some voice over using standard microphone and recorded using Audition CS6 but I hardly hear my voice from PC speakers. I can hear my voice over clearly when I put on the headphone.
Why is that?
Any help will be appreciated.
Steven:
This sounds like a classic case of phase cancellation – the left and right channels are 180-degrees out of phase (think of waves where the trough of one wave exactly matches the peak of another wave – when you combine those two waves, they cancel out). The easiest way to fix this is to disable either the left or right channel.
Larry
in Audition 3 I am getting all my recording no matter how high the levels are to automatically limit to -3db. I know its peaking everything because the waveforms are big blocks. I cant tell if im recording correct levels or not because I cant tell where it peaks at. I just cant tell how to change this to normal so 0db is my peak.
I tried the stereo panning mode and every other setting I can find.
I have no real-time effects turned on nor do I have any rack effects on.
I’m recording 48k, 16bit from Behringer x32(no effects on that channel) through Behringer UMC22 DAW into PC.
Jason:
Audition does not have any gain control over input levels. The Behringer output is too hot. Bring that down. And, generally, for recording levels, I would set them around -12 dB so that you can get a clean recording, with headroom to add EQ and other filters in the final mix.
I would never record audio where peaks hit 0 dB – far too easy to get a distorted recording.
Larry
Larry, you told us you have set up for recording-12dB. Is that good for vocal and music recording? Why -12dB is clean recording? Normalize can be gain up our records?
Hung M Nguyen:
The absolute FIRST rule of audio recording is: Set your levels low enough that nothing in your recording distorts.
The second rule is: Set your levels high enough to minimize background noise.
For this reason, the levels we record at are not the same as those we use for final distribution of our audio. Professional audio recordists generally record around -20dB, because actors can get very loud when they become emotional in a scene. I record at -12 dB, because my recordings are interviews and narration, where people don’t get nearly so emotional.
For music, it depends upon whether you are recording the full mix from an audio console, where the sound has already been processed, or recording individual instruments for mixing later. If you are recording the final mix, I’d record around -6 dB. If you are recording individual instruments, I’d probably record around -12. It depends upon the instrument and how much control they have over their volume. I’d record drums lower and flutes higher.
Then, in the mix, I’d apply EQ, filters and, ultimately compression/limiting to bring my levels up. How far I bring them up depends upon whether the audio is going to the web, DVD, broadcast or digital cinema – each has different standards.
Hope this helps.
Larry
Wow. Larry, thanks for much for the final paragraph on this post. Please don’t ever take it down. I’ve recently had so much trouble mixing down some station imaging where I had mono voiceover files in a 48k stereo mix. I had a hard limiter on the top track containing the VO, and had multiple markers and other audio throughout the session.
When I mixed down the session, I was having the first file working perfectly to a -2dB, but when it got to the second and further VO files, the hard limit failed every time.
At first I thought that the session had become corrupt through too many markers, or cues, or me changing things, or a broken hidden volume point or even the fact that I was running a 48k session and that it was broken – I thought that something MUST have been wrong, and even potentially a bug in Audition (as I’ve found 2 in the past)! I even resorted to changing it to 44.1k and had tried using AATranslater as well to reprocess it to a new file, and I even started studying an XML export of the session for problems. I’d even started asking around about this problem.
Nothing seemed to fix my mixdown issue!
However, the good news, and after reading your post I was able to solve the issue!
I just changed all my VO files to stereo, and that was all I needed. Amazing.
Wow. Thanks so much for writing about this. Really appreciate it.
Steve:
Thanks for your very kind words. Audio is tricky and the level difference between mono and stereo can drive us all nuts.
Larry
[…] Is this a bug, I don’t know, but I found a hint to the problem from Larry Jordan.https://larryjordan.com/articles/audition-cs6-hard-limiter/ […]