
![]() [ Updated 4/23 and 5/4/18 with more information from Apple’s website. ]
[ Updated 4/23 and 5/4/18 with more information from Apple’s website. ]
Update: Aug. 4, 2025. Based on a reader’s question I just learned that FCP 11 and earlier can not embed CEA-608 captions in MXF files. If you need to embed CEA-608 captions you need to use different software like Premiere or caption tools sold as separate software. QuickTime and ProRes are not a problem.
New with the 10.4.1 update to Final Cut Pro X is the ability to add closed captions and subtitles directly into the timeline while editing a project.
This feature is remarkably deep, supporting multiple languages, the ability to import and export caption files, as well as modify, format, and automatically place captions into the Timeline.
A NOTE ON CAPTION FILES
There are about a dozen caption file formats in common use, the most popular include: SCC, SRT, VTT, MCC, and STL.
Final Cut supports CEA-608 and iTT caption file formats. “The format you choose depends on the intended use of your project and the target audience. Broadcasters, streaming services, and government regulators each have their own delivery specifications.” (FCP X Help files.)
CEA-608 files are saved in the SCC format.
For example,
- YouTube supports multiple formats, but recommends SCC.
- Vimeo supports SCC, but recommends WebVTT.
- Netflix supports SCC.
- Amazon and iTunes support both SCC and iTT
When in doubt, choose CEA-608, since SCC file support is ubiquitous and supported by virtually all online services.
UPDATE: I’ve learned that the difference between SCC and iTT is that iTT supports more languages along with non-Roman alphabets. It’s not that iTT supports greater text formatting and timeline positioning. In fact, SCC actually offers more options because iTT files are meant for subtitling — which is generally more basic in appearance. Also, iTunes requires both SCC captions and iTT subtitles, the former for captions and the latter for subtitles.
However, it is ALWAYS best to check with your distributor to make sure they support the caption file format you are creating in FCP X.
NOTE: Yes, we can convert existing captions between caption formats, I’ll show you how later in this article.
DEFINITIONS – [Update]
Captions – are often required by law and are beneficial for improving accessibility, and great for watching video in environments where you can’t listen to audio or on social media.
Use the CC button on the remote to turn them on for a television or use the CC button on the player window for web (Vimeo, Youtube). CEA-608, saved as a .scc file, is the standard in the US, Canada and Mexico. All TV sets sold in those regions since around 1990 have technology built-in to display captions and every caption file needs to be backwards compatible with that technology. Embedding an SCC file is simple, but exporting as a sidecar file allows other regions to convert from 608 to whatever they need to deliver.
Subtitles – are used for foreign languages and, with iTunes, the iTT format is used because it has the ability to work with a wider range of non-Roman alphabets. You must include iTT subtitles when delivering to iTunes or use the iTT sidecar file to convert to another subtitle format if delivering to another destination.
You can not embed an iTT file into the video as you can with SCC captions. Subtitles do not show up when you press the CC button on the TV remote and will usually default to playing on the iTunes video player window depending on how you have set your macOS Accessibility prefs. Subtitles are created in a particular visual style and there are no controls to change their appearance on the individual TV set like you can with closed captions. They also do not generally contain descriptions of the sounds being made since a hearing viewer doesn’t need that. If you are watching a movie and you see “(Tires screeching)” you are probably watching closed captions or the filmmaker has used the captions file to make the subtitles file without changing anything.
BEFORE YOU START
It goes without saying, but it’s still a good place to start, that you first need to create a high-quality transcript of your project. Then, proof-read the transcript. Nothing is more obvious – or distracting – than typos in closed-captions. Sadly, these are all too common.
If you are going to create manual captions, all you need is the transcript. If you want to import a caption file to have captions created automatically, you’ll need to create an SCC-format file. This can be done by most transcription houses, but can’t be done manually. (You’ll see why at the end of this article.)
Also, Apple advises that: “For the most efficient workflow, make sure the dialogue and related audio in your project are ‘locked’ (completely finished) before you create, sync, or edit the captions. For example, if you were to add captions and then make changes to dialogue clips later, you might cause the captions to go out of sync with the audio.” (FCP X Help files)
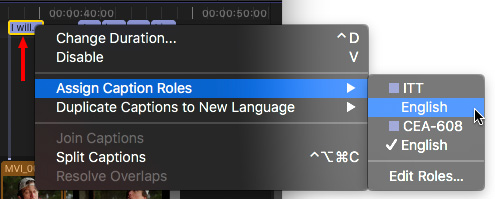
Next, create a role to apply to this set of captions, for example: “English,” or “German.”
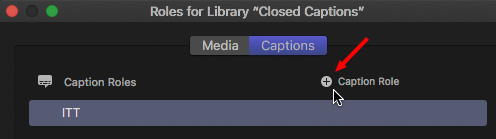
Choose Modify > Assign Caption Roles > Edit Roles.
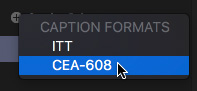
Because I want to create a caption file that can be uploaded to YouTube, I’ll create a new role in CEA-608 format.
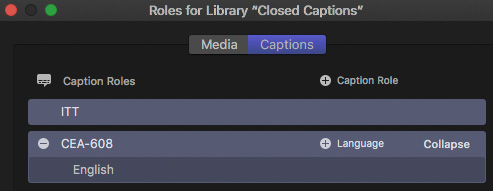
A new role is created with the default name of “English.” (Double-click the name to change it.)
Click Apply to accept these changes.
NOTE: You can create as many different caption roles as you expect to create caption files. For this example, though, I’ll only create a single caption file.
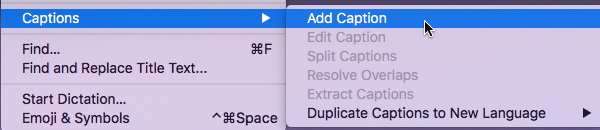
Next, position the playhead in the timeline where you want a manually-created caption to appear, then:
- Choose Edit > Captions > Add Caption – or –
- Type Option + C (Control + Option + C if the caption editor is open in the Inspector)
NOTE: If you have created custom keyboard shortcuts, the Option + C shortcut won’t work until you add it to your custom command set. If you are using the Default command set, this shortcut will work.
A new caption appears in the caption layer (which is also new to FCP) at the top of the timeline. All captions default to the iTT caption role, which may not be appropriate to your project.
UPDATE: Captions default to the iTT role if you are creating them from scratch. This is because most people will be creating captions for the web and iTT is better for worldwide use because of its support for non-Roman alphabets. If you import a .SCC file it will default to CEA-608 automatically.
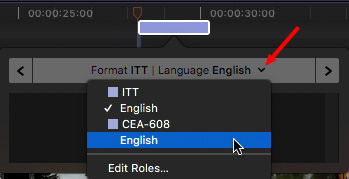
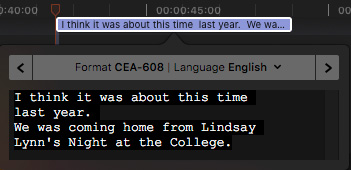
Because I’m sending the project to YouTube, I need to change the caption format to this new role. Click the small downward-pointing arrow just to the right of the caption name and choose the English (CEA-608) role we just created.
NOTE: Once you enter a caption into a role, it locks that role for all succeeding captions. In other words, you only need to set the role once.
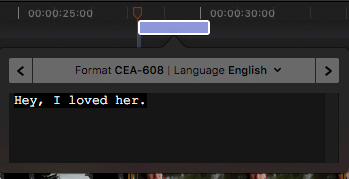
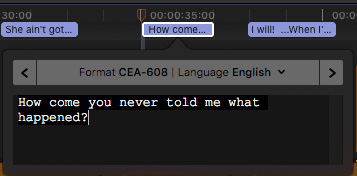
At this point, either type or copy/paste the caption text into the lower half of this window.
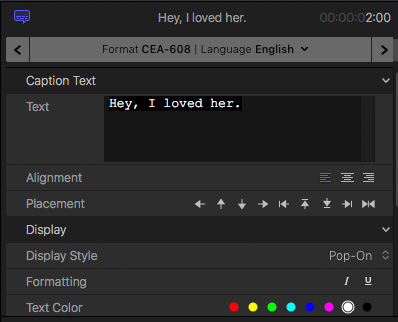
With the caption selected, the Inspector shows a variety of formatting options, most of which should be familiar to Final Cut editors.
- Alignment. Positions text left-, center-, or right-justified.
- Placement. Moves the caption text left, right, up or down in the frame.
- Display style. Determines how the caption appears in the frame. Pop-on is the most common, and the default.
NOTE: Due to technical constraints based on the caption file format, caption text has far fewer formatting options than normal text. This is a limitation of the caption format, not Final Cut.
UPDATE: As noted earlier, iTT offers broader language and alphabet support. It’s also worth noting that the look of both types of captions (SCC and iTT) can be changed when shown by the playback device or website. For example, some television sets have the ability to change the way captions are displayed onscreen.
Continue adding captions to your project until you are done.
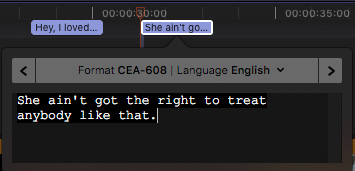
CEA-608 captions are limited to 32 characters in each line. FCP X will automatically break words to keep within this limit. This is another reason to keep captions short and change them as dialog progresses.
To edit the text of a caption, simply double-click the caption clip to open it.
ADJUSTING CAPTIONS
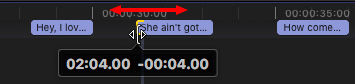
To change the timing of a caption, either drag the entire caption left or right, or trim the In or Out to get the timing you need.
Keep in mind that in the CEA-608 format, captions can not overlap.
NOTE: If two captions overlap, the new caption will overwrite the existing caption.
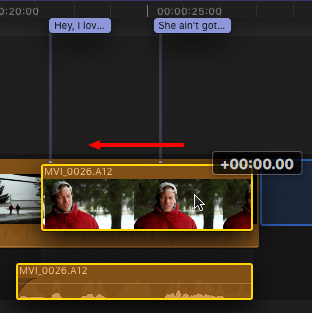
Captions are always connected clips, linked by default to the clip on the Primary Storyline. This means that if you move a dialog clip in the Timeline, any captions associated with that clip move with it.
NOTE: You can link a caption to a connected clip by selecting the connected clip before creating the caption.
UPDATE: It’s important to mention that captions can be connected to video clips or audio clips — whether they’re in the Primary Storyline or not. To change the clip to which the caption is connected, first click to select the caption, then hold Option + Command and click on the new clip to which you want the caption to be connected.
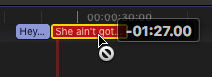
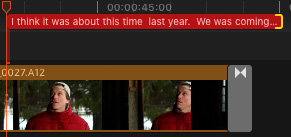
If there’s a problem with a caption, for example it overlaps another caption or violates timing rules, the affected caption turns red. For example, the top image shows two captions violating timing rules, while the bottom image shows a caption extending past the end of video.
UPDATE: When captions turn red, the captions inspector displays an explanation so users can easily identify the problem.
These problems need to be resolved before the caption file is exported.
OTHER COOL TIPS
If you have a multi-line caption (image above), it may be easier for the audience to read by breaking each line into it’s own caption (image below).

To do this, select the caption, then choose:
- Edit > Captions > Split Captions
- Type Control + Option + Command + C
- Control-click the caption and choose Split Captions.
To select all captions, select one caption, then type Command + A.
One final note, Apple’s help files state that: “You can also import source media files that have embedded CEA-608 captions and then extract the captions for use in your Final Cut Pro project.” This means we can import existing captions, modify them, then re-export them into a new movie file. Cool.
UPDATE: This line in the help docs refers to the fact that you can import a finished video file that has embedded captions, extract the captions so they are visibly attached to the primary storyline, and then continue to edit the video and captions right in FCP X. You can, of course, then export the edited video and/or captions.
THE TIMELINE INDEX
The Timeline Index has a new use for the Roles pane and a new pane: Captions
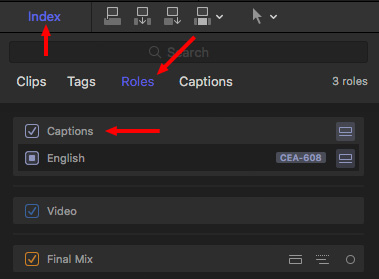
In the Roles pane of the Timeline Index, we can turn caption display on or off in both the Viewer and the Timeline.
NOTE: The Roles pane also allows you to switch between different caption files, for example, languages, by selecting the caption subrole you want to display. Only one caption file can be displayed at a time.

NOTE: You can also turn off the caption display in the Viewer using the Show Captions option in the View menu in the top right corner of the Viewer.
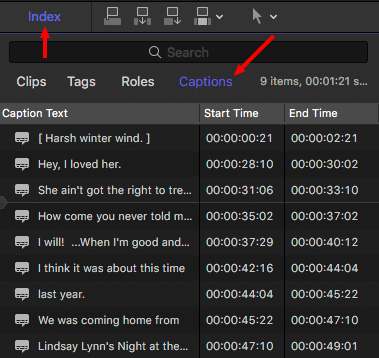
In the Captions pane we can view, navigate, and search the captions in a project.
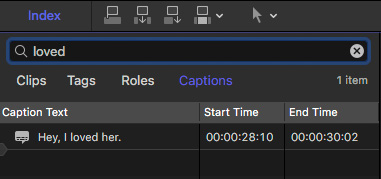
To search for text in a caption, select the Caption pane, then use the Search text box at the top.
CONVERT BETWEEN CAPTION FORMATS
“You can convert captions from one caption standard to another—for example, from CEA-608 to ITT. It’s best to do this after the caption text content, timing, and styling are final. This way, you can create the captions once and then reuse that initial work as many times as necessary.
“WARNING: When you convert between formats, some text or formatting may be lost.” (FCP X Help files)
To convert one or more captions to a new format:
- Select the captions you want to convert
- Control-click the selected captions and choose the new role / format – or –
- Change the caption format in the Inspector
EXPORT CAPTIONS
“You can export captions as separate “sidecar” files with your finished media files, or, if your captions are in the CEA-608 format, you can embed them directly in the output media file. Because embedded CEA-608 captions are encoded right into the video signal, they can be broadcast (over the air, satellite, or cable), included on DVDs, and recorded using digital video recorders (DVRs).
“You can export captions as separate files directly from the File menu. You can also export or embed captions using Final Cut Pro share destinations that include options for exporting captions.” (FCP X Help files)
UPDATE: You can also export captions as a sidecar file from the Share window when you are exporting the video. This may be a common workflow, since sidecar files are rarely used without the video to which they correspond.
To create a separate caption file:
- Open the project in the timeline
- Choose File > Export Captions
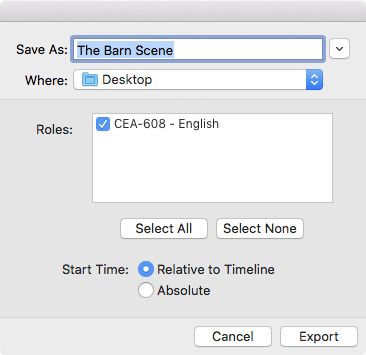
- Navigate to where you want it stored and give the file a name
- Choose which caption file role you want to export. A separate caption file is created for each role.
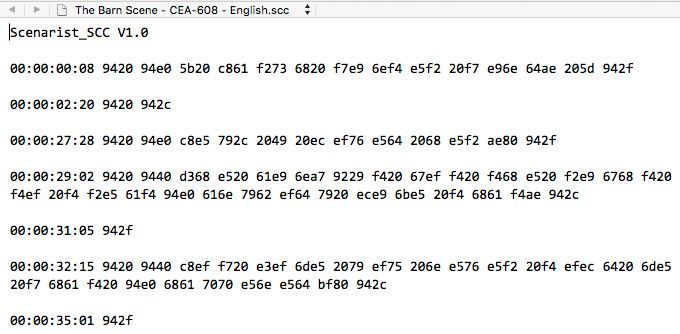
And, since I know you were wondering, this is what the contents of a CEA-608 (SCC) file look like. Timecode references followed by each character of text encoded as a hexadecimal number.
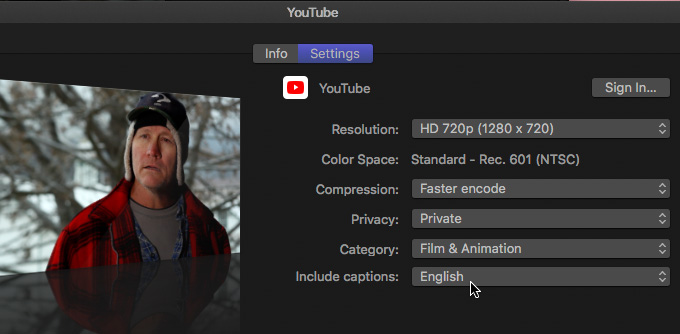
When using the Share menu to publish a file to a video website, such as YouTube, you can now include captions at the same time by choosing it in the Settings> Include captions menu.
SUMMARY
Apple has created a very flexible and powerful captioning system in the latest version of Final Cut. With captions becoming required on more and more programs, this is a feature will become increasingly useful in our projects.
EXTRA CREDIT
Here are two articles on Apple’s website that provide more information on captions:
- This article provides a nice overview of the captions workflow:
https://support.apple.com/en-us/HT208658 - And this part of the Help docs specifically discusses captions export:
https://help.apple.com/finalcutpro/mac/10.4.1/#/ver245c7581b

92 Responses to Apple Final Cut Pro X: Closed Captions [u]
← Older Comments Newer Comments →-
 Kyle SMith says:
June 11, 2019 at 8:09 am
-
 Larry says:
June 12, 2019 at 7:24 am
-
 Kathy Snyder says:
July 24, 2019 at 5:21 am
-
 Andy says:
January 5, 2020 at 2:16 am
-
 James Horne says:
September 28, 2019 at 6:09 am
-
 Darrin says:
November 20, 2019 at 5:11 am
-
 Luisa says:
December 5, 2019 at 9:31 pm
-
 Larry says:
December 5, 2019 at 9:41 pm
-
 George Zuber says:
January 2, 2020 at 8:34 am
-
 Larry says:
January 2, 2020 at 8:41 am
-
 Priscilla says:
January 31, 2020 at 10:41 pm
-
 Larry says:
February 1, 2020 at 9:59 am
-
 Brian Pistone says:
April 3, 2020 at 9:37 am
-
 Larry says:
April 3, 2020 at 9:42 am
-
 Kay says:
November 4, 2020 at 6:21 am
-
 Larry says:
November 4, 2020 at 7:50 am
-
 Charmaine Lee says:
April 22, 2020 at 1:41 pm
-
 Larry says:
April 22, 2020 at 2:17 pm
-
 Robert Thomson says:
May 29, 2020 at 4:50 pm
-
 Larry says:
May 31, 2020 at 2:59 pm
-
 Doug Burch says:
September 23, 2020 at 8:06 pm
-
 Larry says:
September 23, 2020 at 8:19 pm
-
 Patricia says:
December 24, 2020 at 11:13 am
-
 Larry says:
December 24, 2020 at 11:19 am
- CEA-608 is the least flexible, but the only captions that are included in the media file itself.
- iTT provides the most formatting flexibility.
- SRT are the most widely supported.
← Older Comments Newer Comments →can I copy the captions from one project to another? It looks like it “copied’ but it looks grey as if it’s disabled but its not disabled.
Kyle:
Your best option is to export the captions as a separate file, then import that file into your new project. Remember, if you do so, the timecode needs to match between the two projects.
Larry
Timely question and perfect answer. Thank you both for posting on this issue – it just solved my issue and saved me hours. Many thanks!
Probably a bit late but worth mentioning…
If you copy and paste captions into a new project, you need to enable the captions (Role) in the timeline index of that new project, otherwise the captions appear ‘greyed-out’.
When are they going to support embedding CC in MXF files? Premier Pro does it.
this, this, this! It’s frustrating as so many of our clients in broadcast demand an MXF file with various xdcam compressions. The stations are stuck on play out servers that just work and work, and we must go to them with the correct captioned video. Our current workflow still involves fcp 7, laying it to an xdcam disc (which gives us a shelved archive of the show) and then from there we deliver. depending on the station I might have to convert to a lower bitrate xdcam compression and compressor or fcpx will not allow us to insert captions or retain captions converted from the xdcam disc or to a MXF opa1 file. So, despite thinking I would never have to do this, we are going to purchase MacCaption, it’s so much cheaper than what it used to be after being purchased by tele stream, and we will grab a copy of their SwitchPro as well. FCP X and Compressor got to love ’em, but I sure wish they had everything I needed.
Hello!!! How can i change the SIZE of the captions? I’ve been trying to make them bigger and I just can’t seem to find how. Thanks!
Luisa:
Remember – and this is important – captions are not nearly as flexible as titles. Not at all.
You can’t change text size on captions. If you need size control, you need to use a title, but those can’t be turned on or off. It’s a trade-off.
Larry
I have created a project with two closed captions (English and Spanish); however, when I share the project to either a Pro Res file or to Vimeo, I appear to be able to include only one of the closed captions, not both English and Spanish. Is this a FCPX limitation or am I missing something? Thanks
George:
It depends upon how you are exporting them. You can only embed one subtitle file in a video and only if those captions are formatted as SCC. If you need to support multiple languages, the best – and only – option is to export each caption language as it’s own file, called a “side-car file.” These get delivered to whomever is distributing your video for final integration.
Take a look at Final Cut’s help files to learn the specifics.
Larry
Hello, is there a way to get fcpx to ignore the validation error of overlapping caption, in srt, and export them out?
Priscilla:
No, because to do so would create an illegal caption file, which would break in other applications. Captions are VERY specific in terms of timing, you must follow the rules.
Larry
Is there a way to convert captions to titles? Transcribing with a service, then want more formatting options for a 9:16 instagram video.
Brian:
I’m not sure. While we can easily burn captions into video, this doesn’t provide more formatting options, it just makes the captions permanent.
To convert a caption to a title would require copy/paste, I think. If another reader knows more, I’m happy to learn.
Larry
XTE title extractor is the only tool I found that can do this. I needed to convert titles to captions but it also converts captions to titles. http://www.spherico.com/filmtools/TitleExchange/XTE/index.html
Kay:
Spherico is a company I have great respect for. I haven’t used this tool, however. Thanks for the tip.
Larry
Can FCPX export mpeg2 with embedded captions? Or can Compressor do it?
1080i; 4:2:0; long GOP
Charmaine:
Only SCC captions can be embedded, not SRT or iTT. (That’s determined by the format, not FCP X.) Yes, Final Cut can embed the captions. Compressor can create the MPEG-2 stream, and, if needed, can create a custom compressor setting for FCP itself.
Larry
Why don’t my iTT captions after the 2:30:00 mark in my clip display on screen or burn in on Share?
Robert:
Good question, they should. Time to call Apple Support.
Larry
I was told by Amazon Prime that my captions were 4-5 seconds slower than the dialogue in the whole film. Is there an easy way to bump them forward to synch them with the film?
Doug.
This depends upon the caption format and whether they are embedded or a sidecar file.
If they are embedded, no. You’ll need to go back to the edited master and reoutput.
If they are a sidecar file, load the edited movie into final cut. Then import the caption file. Select all captions and move them earlier by 4-5 seconds.
Then export just the captions as a sidecar file.
Done.
Larry
WebEx meetings output a *.vtt file but Final Cut Pro doesn’t not import this type (doesn’t recognize it and therefore has Captions greyed out when I click Import. Do I convert the .vtt to CEA-608, iTT, or SRT?
Patricia:
It depends upon where you are sending the file. Not all services support all formats. Here’s an article that explains your options:
https://larryjordan.com/articles/fcp-x-import-modify-and-export-captions/
Larry