
[ Updated Feb. 23, 2019, to reflect new interface behaviors.]![]()
Reader Eric Merklein wrote asking whether it is possible to use two monitors with Adobe Premiere Pro CC. And the answer is “Yes,” but… it depends upon what you mean by the question.
Let me explain. There are two ways we could use a second computer monitor: to display program video or display more of the interface.
NOTE: Here’s an article to using two monitors in Final Cut Pro X.
DISPLAY VIDEO TO SECOND MONITOR
In the CC release, Adobe changed how we view the output of the Program Monitor. If you want to display program monitor output to a second computer monitor, all you need to do is change one preference setting.
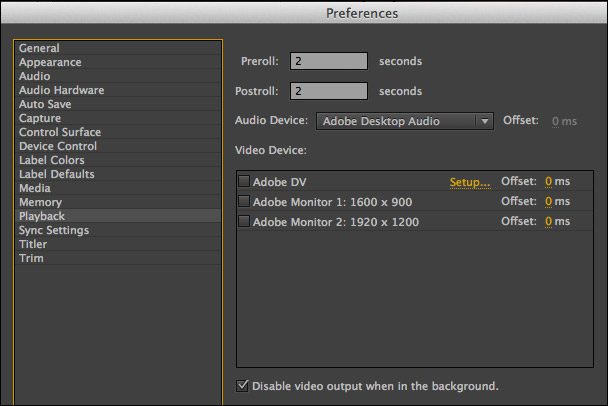
(Note: This screen is from Premiere Pro CC 2014.)
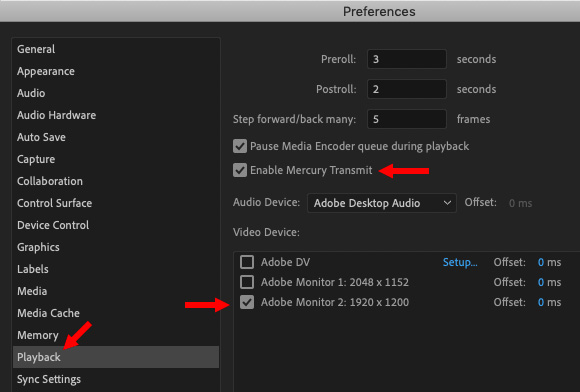
(This screen is from Premiere Pro CC 2019.)
Go to Premiere Pro > Preferences > Playback. In later versions, first click Enable Mercury Transmit. This enables sending video to a second monitor. Then, check the monitor on which you want program video to appear. And that’s it.
(In the earlier interface, the option to enable Mercury Transmit did not appear.)
BIG NOTE: Most computer monitors are not calibrated to display accurate color during video playback. Be very, very cautious about using a computer monitor for critical color correction or client approvals.
If accurate color is important to you or your clients, spend the money and buy a video monitor for your Premiere system. (This also entails purchasing a video interface to sit between the monitor and your computer.) Or, at the very least, make sure your second computer monitor is calibrated for video display.
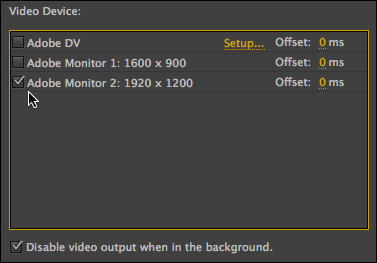
Check the monitor you want to use for video playback. In this case, I checked “Adobe Monitor 2”.
Now, when you playback a project, the second monitor will automatically switch to video playback, allowing you to watch program video on a separate monitor. (The checkbox at the bottom means that when you switch out of Premiere into another application, the second monitor reverts back to displaying the computer screen.)
NOTE: If the audio is out of sync with the video, add an offset correction to compensate. To determine the offset, estimate how many frames out of sync the audio is, then divide the program frame rate into that number.
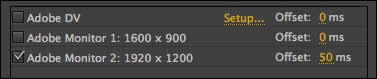
For example, if the audio is 3 frames out of sync with video, and the Timeline frame rate is 60 frames per second: 3 ÷ 60 = 0.05. Multiply this result by 1,000 to convert to milliseconds: 50. Then, enter the number of milliseconds into the Offset for that monitor.
Play back the clip and adjust this value until the audio and video are in sync.
DISPLAY THE INTERFACE TO A SECOND MONITOR
However, what Eric MIGHT have been asking is whether elements of the Premiere Pro interface can be displayed to a second monitor. Here, again, the answer is “Yes,” but… you need to create it manually.
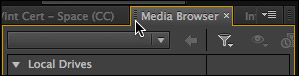
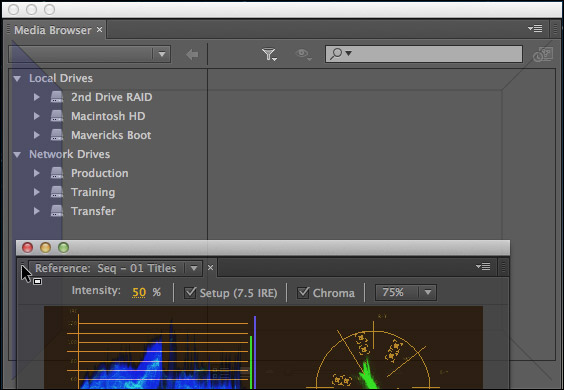
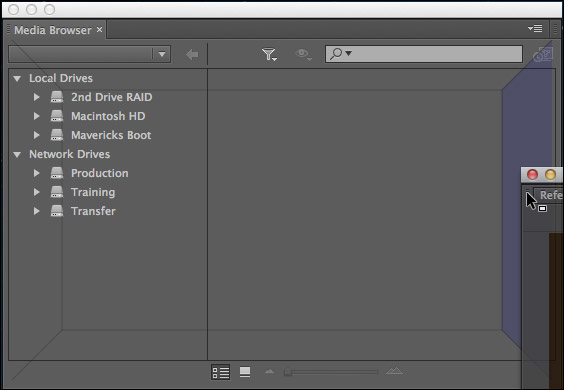
If you look REALLY closely to the left of the title of any tab, you’ll see a small, “bumply” place. This is called the “thumb.” Drag the thumb from where it is into the second monitor and let go. In this example, I’m moving the Media Browser to the second monitor.
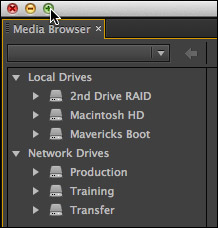
Click the green button at the top left of the window to expand this pane to fill the monitor.
Next, select the next element you want to add to the second monitor. In my case, I’m adding the Reference monitor to the second monitor so I can see a much larger view of my video scopes.
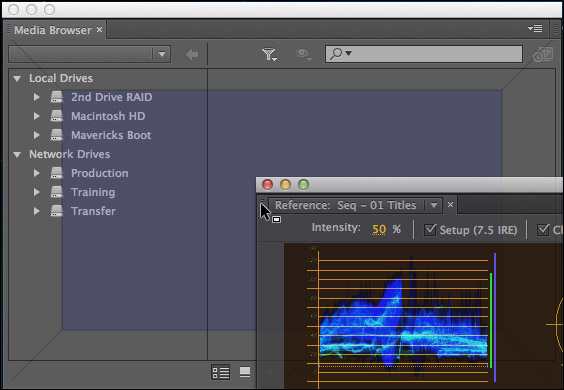
When dragging one panel into another panel, if the blue square in the center lights up, the two panel tabs will be next to each other at the top of the window.
If the blue panel is to the left, the two panels will be side-by-side, with the new addition on the left.
If the blue panel is to the right, the two panels will be side-by-side, with the new addition on the right.

If you drag the panel name into the same level as other panel names, so that the line of names turns blue, it will join that panel group. (You can also use this technique to change the order of panels within a panel group.) In other words, drag a panel name somewhere else and watch what happens.
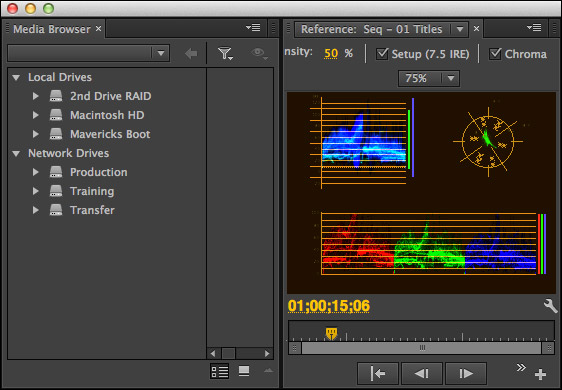
In my case, I placed the scopes on the right and the Media Browser on the left.
NOTE: Video scopes are displayed by clicking the “wrench” icon in the lower right corner of the Reference, Program, or Source monitors.
Continue adding panels until you have everything arranged to your satisfaction.
SAVE YOUR WORK
At this point, you could simply stop. Premiere will remember the last window layout you used the next time it starts up. But, this is not a good idea, because changing workspaces or trashing preferences will destroy all your hard work at creating the perfect, two-monitor, customized workspace.
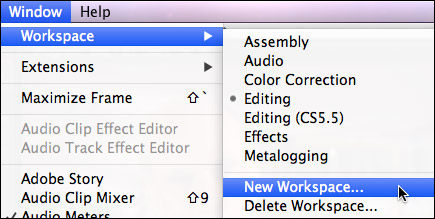
Instead, choose Window > Workspace > New Workspace to save your new layout.
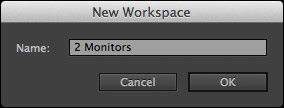
Give it a name, for instance, here, I called it “2 Monitors.”
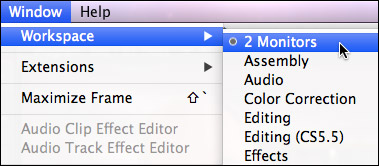
The next time you need to switch to this layout, simply select it from the Window > Workspace menu; or use the keyboard shortcut, which is displayed to the right of the workspace name.
Cool.
UPDATE – Feb. 23, 2019
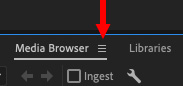
Sometime between when I wrote this article and today, Adobe changed the interface. The “small bumply place” is now to the right of the name of each panel.
However, to move a panel, all you really need to do is grab the panel name with the cursor and drag it. The name is underlined in blue, indicating you can drag it elsewhere in the interface. At which point, the rules of where it will appear, illustrated above, still apply.

2,000 Video Training Titles
Edit smarter with Larry Jordan. Available in our store.
Access over 2,000 on-demand video editing courses. Become a member of our Video Training Library today!
Subscribe to Larry's FREE weekly newsletter and
save 10%
on your first purchase.
43 Responses to Premiere Pro CC: Use Two Monitors [u]
← Older Comments Newer Comments →-
 Tania Nehme says:
January 10, 2017 at 12:27 am
-
 Larry says:
January 10, 2017 at 6:33 am
-
 david says:
February 6, 2017 at 8:39 am
-
 Larry says:
February 6, 2017 at 9:54 am
-
 Rory says:
November 17, 2018 at 8:08 pm
-
 Rory says:
November 17, 2018 at 8:02 pm
-
 Eduardo says:
February 17, 2017 at 4:08 pm
-
 Bill Hunsinger says:
July 16, 2018 at 3:19 pm
-
 Frank says:
February 23, 2019 at 9:18 pm
-
 Larry says:
February 23, 2019 at 10:26 pm
-
 Frank says:
February 24, 2019 at 10:30 pm
-
 Steve HJ says:
June 7, 2019 at 2:55 pm
-
 Larry says:
June 7, 2019 at 3:48 pm
-
 Alan Howard says:
February 11, 2020 at 10:46 am
-
 Larry says:
February 11, 2020 at 11:56 am
-
 Julien says:
September 21, 2020 at 8:01 am
-
 Larry says:
September 21, 2020 at 8:26 am
-
Https adobe premiere pro login Portal Guide Instructions Help - centtip.com says:
October 17, 2021 at 8:03 am
← Older Comments Newer Comments →Hi Larry,
I’ve been trying to use the blackmagic intenisty box to connect my 55″ TV
screen and speakers but can’t get the picture to show up on
Premiere Pro CC 2017. Have tried so many configurations. We’ve tested Pro Res footage from other projects and they play well but the proxies don’t want to play.
Have you tested the intensity box at all? Is there another option.
Currently using thunderbolt to connect drive and intensity.
Regards
Tania
Tania:
I have not testing the Intensity box from Blackmagic Design. Another option that may work is the T-tap from AJA Video Systems.
Larry
Hi guys, I notice in Larry’s screenshots his two monitors are set to different resolutions. I had a nightmare getting this to work. As premiere has a bug on the alt+scroll zoom when using a 4k monitor, I wanted to use a 1080p monitor as my main monitor and then a 4k monitor as my playback monitor. Meaning 4k resolution timelines (with 4k footage) will look their best, and 1080p footage will still play back full screen at 1080p.
Has anyone had any luck doing this or is it just me who found this doesnt work (adobe confirmed they need to be set to the same resolutions but after seeing this post Im now not sure)
I have a GTX970 and both monitors are connected with displayport
David:
Interesting. I didn’t have any problems setting this up for the purposes of writing my article. However, I don’t use the dual monitors every day, so I can’t speak to how stable this is.
Larry
I’ve suggested the guy above use SwitchRes X for changing monitor resolutions and frame rates.
But being new to Prem (uou helped us with FCP a few times over the years) I’ve found how I can send my video playback to a 2nd monitor via preferences>playback
But is there any way I can toggle this on an off without having to go to the menu?
I can use CTRL+` when the playback window is highlighted to make it full screen, but only on the primary monitor.
But I want to toggle the playback on the 2nd screen without having to go to pref>playback and ticking the box.
Any idea?
All the best.
Rory.
I got a 2nd monitor today for my new iMac running PP CC not FCP7.
It’s 4k, with the iMac 5k.
I’ve downloaded an app called SwitchRes X.
10 day free trial then €14.
This has a menu bar icon that let’s you set each screen to different resolutions and refesh or frame rates.
So I can have my main mac display in retina, and my 2nd monitor at 1080 50p (I filmed in 25) instead of 60hz.
Ditto 4k.
You can apparently make settings app specific etc.
I’d give that a go.
I can change the resolution of each screen as I want, and frame rates.
Hi, I am using the Premiere pro cc 14 and trying to use an old sony Bravia as a second monitor just to see the video as a full screen, however, doesn´t matter if I choose one or the other monitor in the play back window, just after click in the OK button, my imac screen turn to the second video and is very difficult to go back to the main window an change back the option. I just got it hiting the F5 key that opened the capture window and than it was possible to change.
To sumup, I cannot get the Sony as my second monitor, just if I drag the program window to it
I have been struggling to make my 3 monitor situation work. This tutorial was extremely helpful. Works like a dream! Thank you!
I have looked repeatedly and cannot see any small something next to the “Media Browser” tab or any tab. All I have is all black.
What am I missing?
Frank:
Nothing. Sometime after I wrote this article, Adobe moved the thumb, that small “bumpy” place from the left to the right side of each panel.
The Now, to move a panel, all you need to do is drag the NAME of the panel where you want it to go. I’ve updated the article.
Thanks for the heads-up.
Larry
Got it thanks Larry. I appreciate you taking time to update the article.
Sorry, I know I’m late to this post. I’m a fairly experienced editor and when I updated to CC 13.1 I can no longer get playback in my second monitor. I have checked the exact boxes you showed on the screengrabs (which are helpful!), but I have nothing going to the second monitor UNLESS I unlock the panel and drag it over there. Help! Thanks
Steve:
I just checked this on my system (Premiere Pro CC 2019) and it works as the article describes. “Enable Mercury Transmit” then checking the monitor you want to display video on works.
Any other panel – ASIDE from the Program Monitor – requires undocking, then dragging to the second monitor.
Larry
I have a Dell UltraSharp 32 Ultra HD 4K Monitor UP3216Q monitor and have connected it using both a displayport and an HDMI cable but I don’t have any options coming up, it’s ;like it’s not connected, but the monitor is displaying the same output as the main computer screen so it obviously IS connected .. any ideas??
Alan:
If you are seeing an image, but it is the same as your main computer screen, go to System Preference > Display and Uncheck Mirror Desktop Display – or whatever has the word “mirror” in it.
Larry
Hi guys,
When I’m in the panel playback, I don’t have the box options to click and ad my external monitor.
I just can see the default box “adobe tv”
Any ideas how to add the possibility to activate the monitor?
(it’s working on final cut X)
Thanks!
Julien:
I just tested this on the latest version of Premiere (Sept. 2020) and it works as described in the article. Make sure you can access both monitors in Apple > System Preferences > Monitors.
1. DRAG the window from your main monitor to a second monitor, then click to fill the screen. This displays both the image and the interface.
2. Enable Preferences > Playback > Mercury Transmit AND check the monitor you want to display video on.
3. Using a video interface card from AJA or Blackmagic, connect a video monitor to your computer and use this for color grading or HDR.
Larry
[…] Premiere Pro CC: Use Two Monitors [u] | Larry Jordan […]