
[ To see how Compressor 4 works, check out this step-by-step video training. ]
One of the sorely missed features in Final Cut Pro X is the ability to create chapter markers. Chapter markers are not just for DVDs, they can also be built into a QuickTime movie that’s posted to the web. In fact, all my online training uses chapter markers. (Here’s an article that describes how to view chapter markers in both QuickTime X and QuickTime 7.)
However, while we can create chapter markers in Final Cut Pro 7, we can’t in FCP X. However, we can in Compressor — both Compressor 3 and Compressor 4. Here’s how.
EXPORTING FROM FINAL CUT PRO X
When your project is complete and ready to output, open the Project Library and select your Project. Exporting is always done from the Project Library, never the Timeline.
With the Project selected, choose Share > Send to Compressor. (This is faster than first exporting your movie as a self-contained QuickTime movie, and, depending upon the video format you are editing, has the potential to yield higher quality images.) If you have already created a master QuickTime file, simply import it into Compressor.
If Compressor is already running, your Project loads almost instantly.
CREATING CHAPTER MARKERS MANUALLY
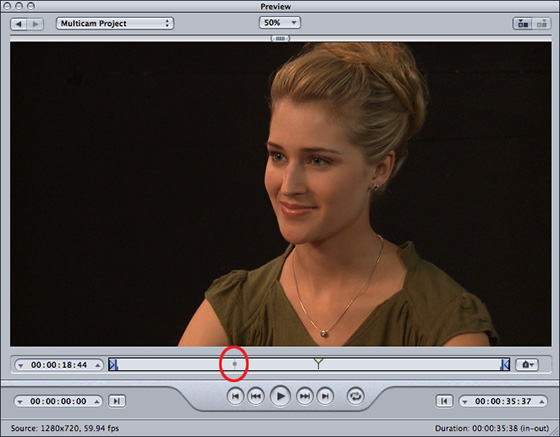
Select your Project by clicking it in the Task window. This displays the movie in the Preview window.
NOTE: See that small marker to the left of playhead (it’s circled in red)? That indicates the location of the poster frame for this movie. You can set this manually, see below.
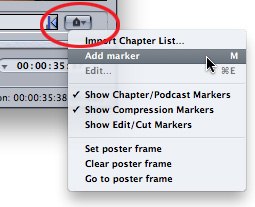
Click the Marker icon to reveal a popup menu. From this menu you can jump to, set, or clear the poster frame for the movie, as well as set chapter markers. Chapter markers are always set at the position of the playhead.
You can set chapter markers manually by positioning the playhead, then either use this menu or type M.
CREATING CHAPTER MARKERS AUTOMATICALLY
However, you can also import a marker list to set markers automatically.
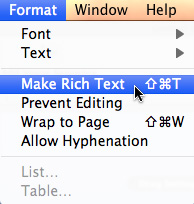
A marker list is a plain-text document. The easiest way to create one is using Text Edit. Go to the Format menu and make sure the menu choice says Make Rich Text. That’s the indicator that you are creating a plain text document. (Yes, it is a bit counter-intuitive.)
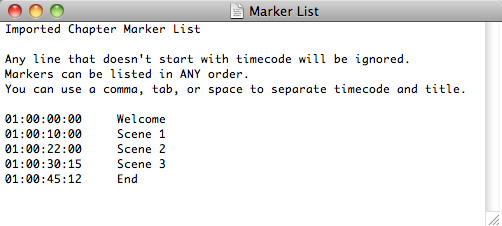
You can give your document a name and add comments at the top. Any line that doesn’t start with a number is ignored.
Then, enter a timecode value that corresponds to the Timecode of your exported movie. Press Tab and add a marker title.
Once you have markers set, compress the file as normal and the markers will be included in the compressed file. These embedded markers will be visible in both Quicktime during playback or in your MPEG-2 video for use by your DVD authoring software.

2,000 Video Training Titles
Edit smarter with Larry Jordan. Available in our store.
Access over 2,000 on-demand video editing courses. Become a member of our Video Training Library today!
Subscribe to Larry's FREE weekly newsletter and
save 10%
on your first purchase.

37 Responses to Compressor 4: Create Chapter Markers
← Older Comments-
 Larry Jordan says:
January 21, 2013 at 3:40 pm
-
 Mike Dury says:
January 22, 2013 at 1:24 am
-
 Jurie says:
November 16, 2016 at 4:18 am
-
 Larry says:
November 16, 2016 at 10:47 am
-
 Dave Scanlon says:
August 17, 2017 at 7:02 pm
-
 Dave Scanlon says:
August 17, 2017 at 7:12 pm
-
 Larry says:
August 17, 2017 at 8:56 pm
← Older CommentsMark:
“Quick” is relative. FCP X 10.0.7 allows you to set In and Out points in a project and just export that range. So, you set a range, export, set the next range, export and continue until you are done.
Because all exports run in the background, this won’t take very long.
Larry
I have done this by making each portion that would be a chapter into a mini movie saved separately, I have then imported these onto separate slides in Keynotes. This then gives you the opportunity to include explanation slides between each mini movie this is quite quick and also if you need to update any mini movie in the future it is very easy.
Mike
Hi Larry, When done in compressor with chapters, I import into Encore and my chapters are gone? any help on this? I need Encore to make DVD and menus
Jurie:
Encore can’t read chapter markers created in FCP / Compressor. And Compressor / DVD Studio Pro can’t read chapter markers created in Premiere / Adobe Media Encoder. To get chapter markers to work in Encore, you will need to create the markers and compress in Adobe Media Encoder.
Larry
Larry: I burned a DVD from compressor with chapters. However, when I played back the DVD and used the chapter function, the chapter title appeared at the bottom of the video and remains there as the DVD plays through subsequent chapters. Bizarre. This doesn’t happen if DVD is played from the start. Any explanation?? dave
Correction to my question above — I created the chapters in FCPX (convert markers to chapters) and these appeared in the DVD menu after using Compressor. However, I made the mistake of checking “Use chapter marker text as subtitles.” Still, the chapters appeared in the menu on the DVD?
Dave:
I don’t have a suggestion because I’ve always used DVD Studio Pro to create DVDs. Perhaps another reader will have a suggestion; however, in general, chapters play from the start of the chapter marker to the end of the disc. And chapter settings are not turned off when the next chapter marker is passed. So, I would not be surprised that once a text display is turned on, it remains on for the rest of the disc.
Larry