
[ This article is a work in process, because I haven’t figured out all the answers yet.
In some cases, I’m still working on the questions. ]
The research for this article started when some of my subscription users started complaining that they could only see a few minutes of one of my longer webinars before they needed to reset their browser. At first, I thought this was caused by bad programming on our part. But, further research made me realize that iOS devices only stream about 10 minutes of continuous video content when they are connected to a cellular data network, then they stop.
Period.
This article explains why. (If you want a more technical explanation, read this Apple Support Note: http://developer.apple.com/library/ios/#qa/qa1767/_index.html.)
NOTE: If any of the following conditions are true, you can ignore this article:
Understanding Live Streaming isn’t easy, but it isn’t impossible, and this article provides a cookbook you can follow which makes a lot of it fairly simple.
SOME BACKGROUND
There are two types of web video:
Progressive downloads are single files that are stored on a website. When someone wants to view them, the files are downloaded via a browser to a computer or mobile device for viewing. Downloads can be stored locally on the device doing the watching.
Streaming video is fed from a server and watched via a browser without the file actually being transferred from the server to the viewer. YouTube and Vimeo are two excellent examples of streaming video.
In the early days of web video, in the mid-1990’s, creating a high-quality progressive download video required rocket science. Today, though, we have the process nailed. However, as I am discovering, this is not the case for streaming video, which is what this article talks about.
THE ISSUE
The problem is mobile devices. Here are two scenarios involving a 30-minute training video, which is stored in a 120 MB file:
Scenario 1: Watch on a computer. When you fire up your browser to watch the program, the request goes out over your Internet connection and the file starts downloading. Except, you get a phone call about five minutes in, so you put the program on hold. Realizing that the call is going to take a while, you quit the browser and put your computer to sleep.
Scenario 2: Watch on a mobile device. Same program, same five minutes, same phone call.
The problem is that your computer has unlimited access to the Internet, while your phone most often has a data plan that charges by the megabyte transferred.
You only watched 5 minutes, therefore your phone should have downloaded only 20 MB of the program. But it didn’t. It downloaded the whole thing because it was a progressive download. You were just charged for downloading 100 MB of data that you never used.
Worse, the phone network just carried 100 MB of data that was never used. Now, multiply that by the number of users on your cell phone data network watching video and you begin to see the size of the problem. MASSIVE amounts of data are downloaded and not being used.
To prevent this problem, iOS devices will only stream the first ten minutes of video material, then they stop. If your video is shorter than ten minutes, no problem. Everything is fine. But if your video is longer than ten minutes, the user needs to open the video again in their browser and navigate to where it left off. Annoying.
THE SOLUTION
The solution lies in compressing and segmenting your video into very short chunks, about ten seconds each, then streaming those chunks sequentially to your phone. Because you are not downloading the entire file, when you stop viewing, or simply pause the video, no additional data is transferred. This frees up huge amounts of network bandwidth. When you restart the stream, the chunks pick up where you left off.
All the heavy lifting for this to work happens at the web server, so end-users don’t need to do anything different, provided they have a reasonably current browser. Even better, this new streaming protocol senses the speed of your data connection and sends files that are optimized for that speed. This minimizes stuttering and choppy playback.
This new video protocol is called HTTP Live Streaming and was invented by Apple. Google and Microsoft each have something similar, though with a different name. This streaming protocol is supported by any HTML/5-compliant browser and requires no changes on the part of the end user.
NOTE: It is more accurate to call HTTP Live Streaming a “media streaming communications protocol.” First, you compress your files, then the Live Streaming protocol defines how to segment them and generates a playlist to adaptively choose a stream based on available bandwidth. Apple has publicly documented the protocol so it is available to all browsers and devices.
While all the streaming is handled by the web server supporting this format requires major changes in how we compress videos.
NOTE: For those that want a technical briefing, here’s the WikiPedia link:
http://en.wikipedia.org/wiki/HTTP_Live_Streaming
The good news is that we can use Apple Compressor to create the files required for HTTP Live Streaming and the quality is potentially indistinguishable from a progressive download file. Another good thing is that this protocol can be viewed by both computers and mobile devices so that once you’ve created media files to support this protocol, you can use it for all your viewers.
But there are a lot of changes you need to make to get this to work:
EXECUTIVE SUMMARY
You need to recompress your master file using Apple Compressor for HTTP Live Streaming. This creates the small chunks that get streamed by the server.
You need to transfer the folder containing these files to the website that is hosting your videos, then, following the instructions that Apple provides as part of the compression process, change the links on the webpage to point to a specific file in this compressed files folder.
For videos hosted and streamed from a local website, this works great. For videos hosted on The Cloud, for example, Amazon servers, I haven’t figured out how to get this to work yet.
IMPORTANT NOTES
COMPRESSION
There are two types of files that need to be created:
While any compression software can create the MP4 files, the only application that I’ve found that also creates the segment files is Apple Compressor 4.
NOTE: In researching this article, I contacted Telestream, Sorenson Media, and Adobe to ask whether their software – Episode, Squeeze, or Adobe Media Encoder – creates these segment files. So far, the only software I’ve found that creates these is Apple’s Compressor.
Here’s how this works.
![]()
Start Compressor 4 (Compressor 3 does not support this feature).

Here, for example, I’ve loaded one of my recent webinars into Compressor for compression.

In the Settings tab, open the Apple folder and locate the HTTP Live Streaming folder.

Drag the entire folder on top of the clip you want to compress. Seven different settings are applied to the master clip.
NOTE: These seven versions of your file range from extremely high-quality high-bandwidth files to low-bandwidth audio only. This allows the server to instantly vary the quality of video playback based on the connection speed of your phone. If your viewer suddenly drives into a dead spot, the server switches to low-bandwidth chunks until the data speed improves; at which point the server automatically switches back to the higher-quality version.

Look at the compression settings, they range from audio only – at the top – to high-speed, high-quality broadband – second from the top – then a wide range of other quality and data rate options.
NOTE: You MUST use all seven of these settings, you can not select between them.
EVEN BIGGER NOTE: Do not alter any of these settings in any way. I’ll have more on that in a bit. They are optimized for HTTP Live Streaming. Leave them alone.

This process generates seven different compressed versions. Each file starts with the same name, but adds a numbered extension to differentiate between the different versions.

Next, before you start compression we need to create a destination for all these files. I long ago standardized on storing all my compressed files in a folder I created on a second drive called: “Compressed Files”
Because compressing for Live Streaming creates hundreds of new files – these “chunks” – it is also a good idea to create a new folder specifically for each video you want to compress.
So, in this screen shot, inside my Compressed Files folder, I created a folder for this webinar, called: “Webinar101”. You can call this folder anything you want, however, since this folder will be transferred to your website, be SURE that the folder name does not contain any spaces, and try to use ASCII characters.

Now that you’ve created the special folder for these files, we need to change the destination so Compressor puts these files into that folder.
While you could change each file individually, it is faster to just select the task tile (the one that has the image of the video), then right-click anywhere in the blue area and select Destination > Other.
A CRITICAL FINAL STEP

Before you click the Submit button, you have one more setting to configure. Select the task containing all the streaming compression settings, then go to the Inspector and click the Job Action tab.

Click the “Do Nothing” pop-up menu and select Prepare for HTTP Streaming.

In the Destinations text box, click Choose and select the folder you created to store the compressed files. (In my example, this was Webinar101.)
Then, at the top of the dialog, give the compressed files a name. Remember, no spaces and only use ASCII characters. Click the Save button when you’ve entered both a file name and destination.

The destination will now be used for the compression. The rest of the settings in this window are fine.
NOTE: If you don’t do this step, all the little chunks won’t be created and you’ll need to start all over again. I learned this from personal experience.

Then, as usual, click the Submit button (twice) to start compression.
On my MacPro, creating these seven versions of a one-hour webinar takes about six hours, because there is a LOT of work going on.
AFTER COMPRESSION

When compression is complete, open the folder you created. Inside you’ll find a wide variety of stuff.

You can move all the files ending with “mp4” (highlighted in yellow) out of the folder. They were needed during the process, but are not needed now.
DO NOT MOVE the file ending “m4a” (highlighted in red). This is the audio-only file and is necessary for this system to work.
MOVING TO THE WEB

As the segments are created, a special file is also built, called the “.m3u8” file. This is the master playlist controller that tells the server which files to play.

Here’s what the m3u8 file looks like. And, no, I don’t understand what this is saying either.

Inside each of the scene segment folders are all those 10-second chunks I mentioned earlier. Each of these is a very short movie, fully compressed and ready to stream.

Also in this folder is a ReadMe file that provides very specific directions on how to post this file to your website.

In case you are curious, this is what this looks weblinks look like for my movie. This Read Me file should be given to your webmaster so they know exactly what links to use when posting.
NOTE: For instance, here is the specific HTML code I used to playback a test clip from my website:
UPLOADING
Once all compression is complete, it is time to upload your movie. However, in this case, you upload the ENTIRE FOLDER that contains all these files to where ever you store videos on your website.
BIG NOTE: Just a reminder that this process is NOT necessary if you are using YouTube or other commercial video streaming services for your videos.
AN ALTERNATIVE APPROACH
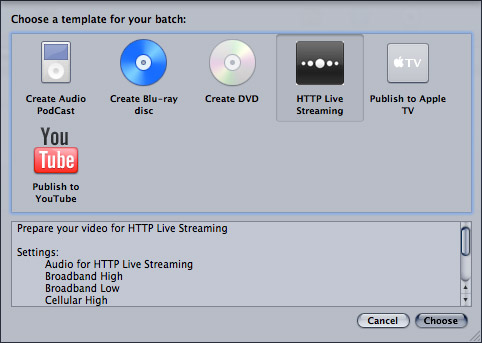
Apple provides an HTTP Live Streaming template that, potentially, makes this process easier. Just choose File > New Batch from Template (Shift+Command+N), then select HTTP Live Streaming from the Template Chooser.

That creates all the necessary settings in an empty task window. So far, so good.

But the process breaks down when I add a file. Notice all the red boxes? That indicates where the file names conflict. So, if you are using this template, you need to manually update all the file names to prevent one version erasing the other. For me, this is too much work, which is why I avoided the Template Chooser when I first presented this workflow.

However, once you’ve updated the file names – as I did here by adding numeric extensions – using the template saves you a step when selecting the pop-up menu in the Job Action tab of the Inspector. For me, the extra steps required by the Template Chooser don’t justify the time savings in the Inspector. But, now you know two ways to create these settings.
A FLY IN THE OINTMENT
So far, everything is working great. However, remember that I said not to change any of the compression settings? Well, ah, that causes me a problem. Because I want to add a watermark, maybe scale the image. And none of that is possible.
Unless you understand Job Chaining in Compressor, in which case, this becomes very, very cool.
JOB CHAINING
I’ve written about job chaining before – www.larryjordan.biz/compressor-34-job-chaining/ – but I’ve never really found a good use for it, until now.
What job chaining allows you to do is to take the output of one compression job and use it as the input for a second. For instance, I want to add a watermark to my video first, then compress it for streaming second. Job chaining makes this easy. Here’s how to do it.

Add your video to Compressor as usual.

I’ve created a custom compression setting that converts the file to ProRes 422 (to take advantage of its high quality and minimal compression) and add a watermark, using the watermark filter.
NOTE: Here’s a article that explains how to add a watermark – www.larryjordan.biz/technique-adding-a-watermark-to-video/

Next, right-click directly on the blue compression setting you just added to the clip. This displays a contextual menu – select the bottom choice: New Job with Target Output.

This creates a new job that uses the output of the first job. In other words, FIRST I add the watermark (and any other filters I want) THEN the file gets compressed for Live Streaming.

Apply the HTTP Live Streaming settings to the chained clip and proceed as before.
I’ve done several test movies using custom filters for the top job and it all works great.
SUMMARY
HTTP Live Streaming is specifically designed to reduce network bandwidth required for cellular mobile devices to watch videos, while at the same time allowing video quality to fluctuate to compensate for changing data rates across the network.
If your viewers are always watching your videos on a computer with a high-speed internet connection, they will see top-quality images without worrying about data rates or any other technical issues.
However, like all web videos, compression is only half the story. The other half is working with your web team to post the videos. The best place to start, after the files are transferred, is the ReadMe created by Compressor when the job is complete. When I followed its instructions and posted the video to my website, everything worked great. Now, I’m turning my attention to figuring out how to get this to work on Amazon’s servers.
I’ll have more on this as I learn more. As always, I’m interested in your comments.
Larry
6 Responses to The Basics of HTTP Live Streaming
Thanks, Larry, for this.
Is this assuming that we use a streaming server as part of our website for files like these?
That is a great piece of work. When it comes to Live streaming what’s is the best way to go about that and programe to use. I am testing and yet to get a live signal in to the programe Wirecast. It all sound easy but one soon hit a few (ok now what do I do) well done you for sticking with it and bring such a great report.
Liver Streaming uses the same technology but totally different software. Wirecast is a great place to start, but you need a seriously fast up-link to the Internet, which is the problem most people have with live events. Normal up-link speeds are not sufficient.
As always, test, and test again before any live event.
Larry
Trevor, with Telestream Wirecast all you’d need to do is send a RTMP (Flash) stream to a Wowza server and Wowza can be set to create the files for HTTP Live Streaming. Many commercial CDNs use Wowza and many do this for you. For example, you can stream to Ustream and desktop viewers will see Flash and Mobile viewers will get HTTP Live Stream (aka HLS).
Larry, I’m not sure what “normal” is but my own cable provider’s entry level package is 2mbps up and that’s good enough for a low motion 1280×720 stream and certainly good enough for 854×480.
Even with a slow DSL with 768kbps one can do a reasonable 400kbps 640×360 stream.
If you look at the typical default player frame size for most of “user generated” live stream sites such as Livestream, Ustream, JustinTV, you’ll see that 640×360 works well.
These days I find that nearly everyone with base level internet access at home can live stream 640×360 at 400kbps to 700kbs even covering much of the underserved rural areas in the USA.
NetIndex is a great site for finding out real world speeds for different providers at different locations around the world.
http://www.netindex.com
To find your speed (look specifically for upload) Speedtest is a reliable test.
http://www.speedtest.net
pLEASE SEND INSTRUCTIONS ON “how to” REGARDING
streaming.
i AM A REAL NOVICE !!
tHANKS;
bEN
Ben:
Streaming involves your website’s server. There are two major steps: compressing the file for streaming, which this article covers and preparing your website for streaming. This second step is much more complex and will require you to work with your web host and webmaster to make sure you have the server-side tools to stream video.
Unless your website is already prepped for streaming, you should plan on this process taking a few weeks. It is not trivial.
Larry