
 Providing a first look to a package as complex and full-featured as Adobe Audition CS6 is a lot like doing a first look at Premiere Pro CS6 – there’s a lot of the program that you just can’t cover in anything shorter than a book. These are the highlights.
With the demise of Apple’s Soundtrack Pro – and the requisite mourning – I needed to find a new audio workhorse for my weekly podcast and video training. I started dabbling with Audition about five months ago, and switched to it full time starting late March.
Now that I’m using Audition every day, I wanted to share my thoughts on the software.
BACKGROUND
Adobe Audition has been on Windows for many years, but came to the Mac with the CS5.5 release. Long a staple in radio broadcasting, Audition resembles its cousins ProTools and Soundtrack Pro, in that it is an audio editing, repair, and mixing application.
Audition is perfect when you are working with microphones, which constitutes almost all of video production. Other applications are better suited if you are creating music using sampling and keyboards.
THE INTERFACE
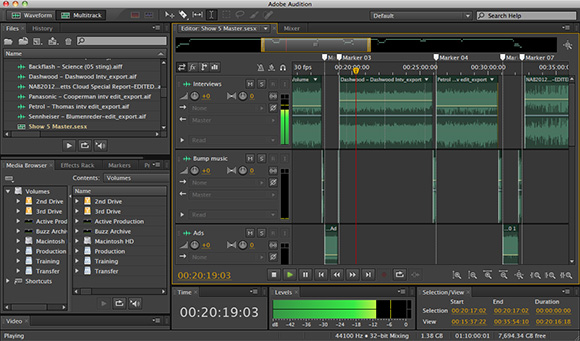
This is the Multitrack Session display. Audition is a single-window interface that is composed of multiple tabs – more than 20, in fact, with many of them initially hidden. (You can access them via the Windows menu.)
Because there are so many tab options, Audition combines these into different workspaces. Think of a workspace as a grouping of tabs that all relate to a specific task – such as editing audio, mixing to picture, or mastering an audio CD.
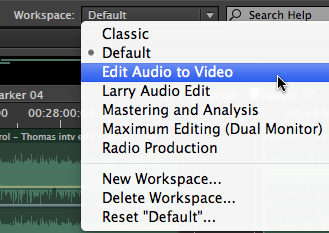
There are six workspace presets that ship with the software – plus, as you can see from the screen shot, you can create your own, as I did with “Larry’s Audio Edit.” Creating a workspace is as easy as dragging a tab from one place to another and saving the results.
NOTE: You can also “tear” a panel tab from one location, drag the tab to a second monitor, then dock other tabs to it in the second monitor. You can also undock a tab by holding the Command key while dragging the tab.
(By the way, the gold box around a tab indicates that tab panel is selected.

One thing I really like is the size of the audio meters and timecode display. You can make these as large as you want by simply dragging the edge of the frame that contains them.
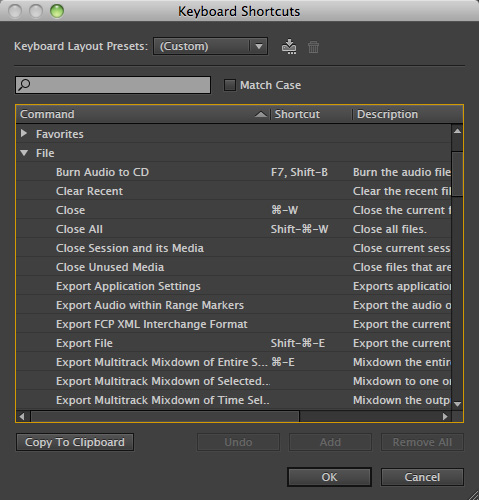
Another thing I like is that Audition supports a wide range of keyboard shortcuts, AND not only can you customize them (Edit > Keyboard Shortcuts) and create sets of different shortcuts, but you can assign MORE THAN ONE keyboard shortcut to the same function. This is GREAT!! Because for several critical shortcuts, I’ve added the Soundtrack version to the existing Audition version because my fingers could not remember the right shortcut fast enough. This is very cool!
NOTE: Adobe reminds me that you can add a shortcut in the Media Browser to where FCP 7, FCP X, and Soundtrack Pro store their loops and sound effects, so you can continue using them in Audition. Also, Adobe has created an XML file here – forums.adobe.com/message/4067368 – that allows you to import STP keyboard shortcuts into Audition.
There are four audio displays within the application:
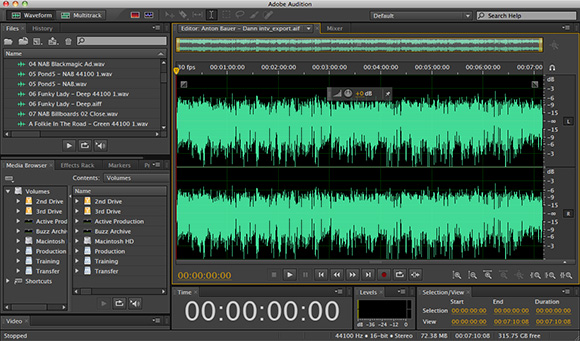
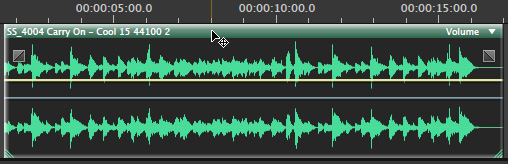
This is the Waveform Editor. It displays and edits a single audio clip and allows precise editing down to the individual audio sample. Here, we are looking at a stereo pair, where the left channel is on top.
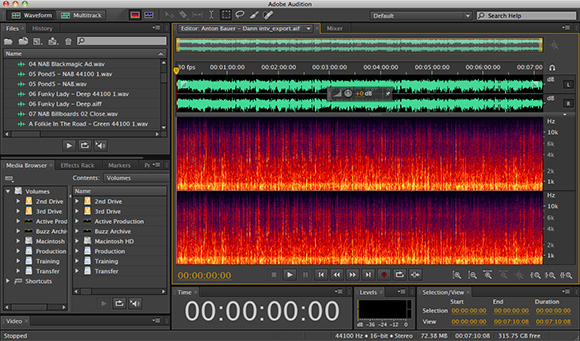
The Frequency Spectrum is a part of the waveform editor. This allows us to select and edit sections of single audio clips based upon frequency.
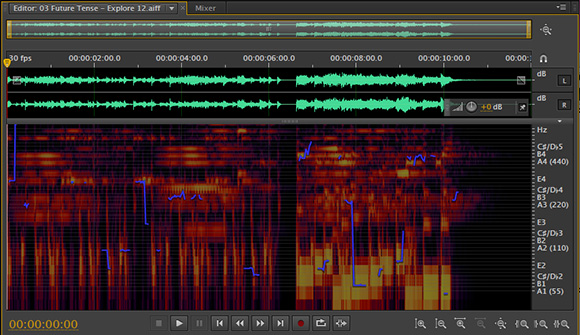
This is the Pitch window, also a part of the Waveform editor, which displays the pitch in a clip and allows you to change it. (And, no, I’m not going to explain how this works here.)

You can easily switch between the different displays by clicking the appropriate button in the top left corner of the interface.
GETTING STARTED
Opening files in Audition is the same as any other application: File > Open. You can also navigate to a session file and open it, without resorting to the File menu using the Media Browser. The Media Browser is new with the CS6 release, which makes the process of opening files a lot easier.
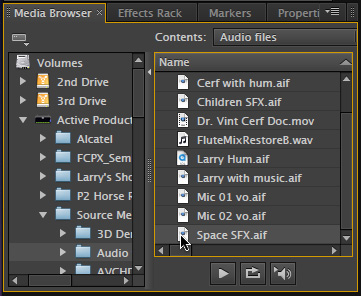
Think of the Media Browser as a preview window in Audition. The Media Browser allows you to quickly navigate to a project file (also called “session” file with the extension .SESX) or a media file. You can preview media files – like this space sound effect – without first opening it. This means you don’t waste time opening files you don’t want.
Since I shifted my audio work from Soundtrack Pro to Audition, I find the new Media Browser very useful.
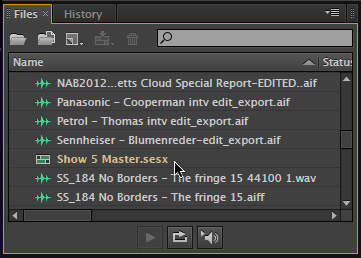
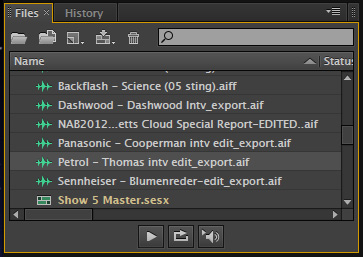
The Files panel displays all open files and projects. For instance, here, we are looking at the show master for the fifth in our series of Special Reports from the 2012 NAB Show for my podcast, Digital Production Buzz.
You can search for files, using the Search box at the top. You can preview files, without loading them to the Timeline, by selecting the file and clicking the Play button at the bottom of the tab. The only thing you can’t do, that I wish it did, was group files into folders.
Importing new files is as easy as a keyboard shortcut, or using the Media Browser. There is no real limit to the number of files the File panel can track.
CREATE A NEW PROJECT
The dull, boring way to create a new project is File > New > Multitrack Session. (Only slightly less dull is the keyboard shortcut – Command+N).
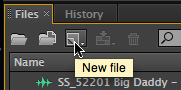
The cool, sexy way to do this is to click the New File icon in the top left corner of the Files panel. (Well, OK, it may not be as much fun as winning the lottery, but, hey, take the joy where you find it…)
From the dialog, select New Multitrack Session to display the session setup screen.
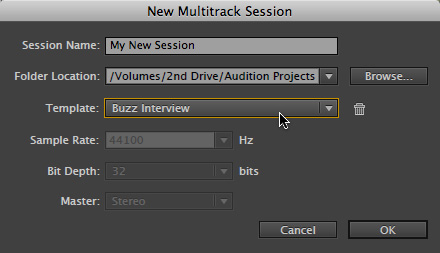
Here you give the file a name and location, as you would expect.
What is VERY helpful, though, is the ability to create templates. These are pre-built sessions – I’m using a customized one that I created for NAB called “Buzz Interview.” The reason I like templates is that you can create the number of tracks you need, label them, add all necessary filters, markers, even media – such as theme music – then save this as a template, for fast access later.
When I was in wall-to-wall production at NAB, recording 90 interviews in three days, the ability to QUICKLY save one project and create the next was essential. I love templates!

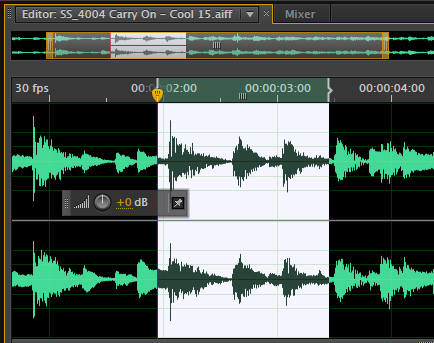
At the top of the Multitrack and Waveform windows is the global view. This allows you to see the layout of all your clips. Dragging the gold box allows you to quickly jump around inside the global view. (Zoom In/Out is fast – use the plus or minus keys on the keyboard.)
Command+ resets all tracks to fit horizontally in the window.
EDITING AUDIO
If you are familiar with Soundtrack or ProTools, you already have a basic understanding of editing audio clips. (Or, come to think of it, editing clips is pretty much the same as Final Cut Pro, or Premiere Pro.) In other words, you won’t have a problem figuring out the basics – but there is a lot of depth in the program that is not immediately obvious, but IS immediately useful. (More on that in a bit.)
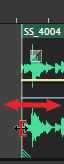
You move a clip by grabbing the top title bar – NOT the middle of the clip – and dragging; side to side to change timing, up and down to change tracks.
Grab a leading or trailing edge to trim the clip.
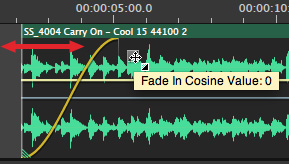
Slide the gray fader box left and right add a fade. Drag the box up and down to adjust the shape of the fade. Hold the Command key down to switch between cosine fades (ease in/ease out) and linear fades. (I was a big fan of changing fade shapes in Soundtrack Pro. I am in LOVE with how easy it is to change shapes in Audition.)
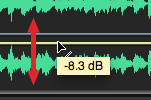
To change the audio level of a clip, drag the yellow line up or down. To add keyframes, double-click on the yellow line.
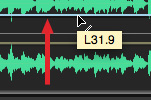
To change pan, drag the light gray line up – to pan left – or down – to pan right. Double-click the line to add keyframes. (As a note, if you plan to pan, work with mono clips.)
The only function missing for editing is a roll trim. I’m keeping my fingers crossed this shows up in a future update.
Within the Multitrack window, you can group clips, lock clips, and make clips inaudible, which makes working with sections of the timeline a lot easier. (You can also change the colors of both clips and tracks, should your fancy so move you.)
REPAIRING AUDIO
Not only can we edit audio, we can repair it – which is a function of the Waveform editor. (Notice that like the Multitrack window, the Waveform editor has a global view.)
Double-click a clip to load it from the File panel into the Waveform editor. The general rule in the Waveform editor is “Select something, then do something to it.” Select a portion of the clip by dragging across the region you want.
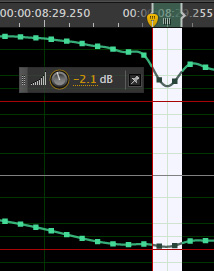
Zoom in and you can adjust individual samples using the volume HUD that floats in the middle of the Waveform editor. I use this to fix popped P’s or blown T’s, or reduce excessive peaks. While you can apply effects to individual clips in the Waveform editor, I generally reserve effects for the Timeline, because Timeline effects are more flexible.
When it comes to repairing audio, there are several options, including two very powerful features:
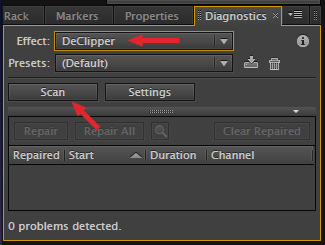
To add dynamic range back into clipped clips, select the clip you want to repair and choose Window > Diagnostics. Set the Effect to DeClipper and Scan for problem sections.
Leave all the default settings alone and click Repair All which shows up at the bottom of the window when problems are found.
Amazing!
You can also use Audition to remove hum – with a better facility than Soundtrack Pro – reduce clicks, and manually edit problems areas in the clip.
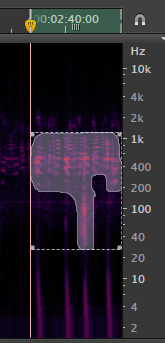
And, thinking about amazing, when you switch to the Spectral view, you can select, edit, and remove specific frequency ranges. For instance, here, I’m using the audio lasso tool – we also have a Spot Healing Brush for audio! – to grab this amorphous section of audio so I can delete it.
This is a great technique to reduce the sound of an unwelcome cell phone ring, a thud from something dropping, or decreasing the harshness of a scrape.
And once you play with the Spot Healing Brush, you’ll wonder how you ever lived without it.
MIXING
Describing audio mixing in a few paragraphs is impossible. Here are the key bullet points. The program supports all popular bit-depths and sample rates. While all sample rates need to match inside the same project, it handles the sample rate conversion quickly and easily in the background.
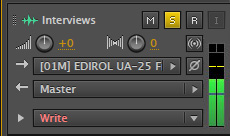
The track headers support changing volume and pan, a wide variety of audio inputs, access to sends and busses, and quick access to all effects. Plus multiple ways to write keyframes, both manually and automatically.
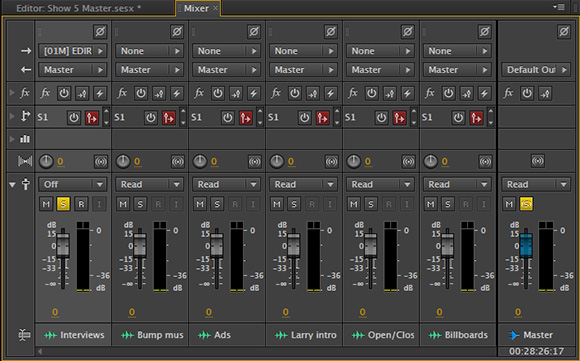
Audition supports a full-featured mixer with complete signal routing and support for some external control surfaces. (See Adobe’s website for the complete list – which is now growing with the CS6 release.)
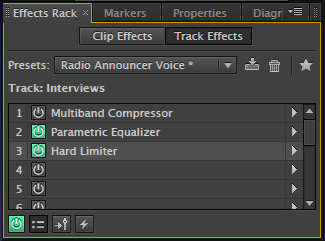
Effects can be applied to the clip (I generally recommend against this) or the track (a much better idea).
Effects are stored in the Effects Rack, which allows up to 16 effects per track. Plus, effects can be: muted, reorganized, added, deleted, adjusted, and groups of effects can be stored in effects templates. What impresses me the most here is that once you have a sound you like, you can save it as a template and reuse it almost instantly.
Speed is good.
SUMMARY
If you are looking for a replacement to the late, lamented Soundtrack Pro, or you want more capability than Premiere Pro can provide, or you just want to improve the sound of your audio – Audition is an amazingly good choice.
The more I work with it, the more fun I have with it.
Why Audition instead of ProTools? First, both are excellent programs, so either is a great choice. If you own Adobe Production Premium, you already own Audition. It is available separately at a lower price than ProTools. It is tightly integrated with Premiere Pro. And, if you are editing with Final Cut Pro 7 and want a state-of-the-art audio package with features not found in Soundtrack Pro, Audition handles FCP 7 files easily and quickly.
NOTE: I recently completed extended video training covering all the key features in Audition CS6. (I first created this for my staff training prior to our NAB Show coverage.) This training is now available to everyone – and covers the entire application in detail – more than five hours of training in more than 60 high-definition QuickTime movies.
Learn more about my Audition training here: www.larryjordan.biz/adobe/
I’m now using Audition virtually every day and recommend you take the time to check it out. It is available either as part of Adobe Production Premium, or as a stand-alone package.
Remember, the best way to improve the quality of our images is to improve the quality of our sound.
Let me know what you think.
Larry
3 Responses to First Look: Adobe Audition CS6
Larry,
Good write up on Audition.
You know my thoughts on this already. Audition is great if you use Creative Cloud whatever (I have CC it is great) But ALL the universities here and colleges teach Protools. In the final analysis if you look at all the record albums/documentaries/TV/Feature films done on Protools that is the greatest advert to learn Protools. Now around £320 SW only get an iLok go anywhere/edit anywhere then take your work to one of the largest dubbing theatres in the world if you choose to.
I’ve loved Audition since the days it was called CoolEdit and sold as shareware on a 5 1/4″ floppy! I’m so glad to see it come to the Mac. It’s a heck of a lot faster than Audacity (which I do like).
Correct me if I’m wrong but, unlike ProTools (and FCP), Audition *is* a destructive editor. This means you should always work from a copy of your original media just in case you change your mind about how drastically the audio was “repaired” and want to go back.
Allynn:
That’s, essentially, not correct. Any changes you make in the Waveform Editor are permanent. However, any changes you make in the Multitrack Timeline are non-destructive, including much, but not all of audio repair.
However, you are correct, if you are going to repair a clip in the Waveform Editor, make a copy of it first.
Larry