
[This article was first published in the September, 2010, issue of
Larry’s Final Cut Pro Newsletter. Click here to subscribe.]
I was answering some reader questions in my Forum about subclips and went to look up an article on subclips I thought I had in my editing library. Only to discover that I’ve only written once, very briefly, about subclips!
Hmmm… Well, let’s fix that this month.
Subclips are used whenever you want to create a shorter clip from a longer one. The benefit to using subclips is that they don’t create any new media on your hard disk, but make it much easier to work with longer clips.
A subclip acts just like a regular clip, except that it shares its media with the master file from which the subclip was taken.
WHY CREATE SUBCLIPS?

This illustrates the main reason we create subclips. The gap between the In and Out in this screen shot is 5 seconds. The entire clip is 1 hour long. This gap is so small it is hard to click between the marks and impossible to navigate.
Unlike audio files, we can’t zoom into the timeline of the video tab of the Viewer.
Subclips allow us to create a new clip containing just the portion of the video between the In and the Out, which makes navigation and editing much easier.
In the past, I never used subclips. Though it was more time-consuming, I captured all my media in short segments. I would capture each answer in a Q&A session as a separate clip. I’d capture B-roll in chunks by location. While this did give me more clips in the Browser, it make it easier for me to find and review the clips I was looking for.
Now that we are working with tapeless media, each time we press the record key, a new file is created. This makes capturing individual B-roll clips much easier, but converting a long interview into individual answers more awkward.
Subclips can solve this problem.
Also, and we talked about this in last week’s webinar on 3D Video, subclips are essential when you are working with drop zones in Motion templates or image wells.
Unlike a clip you edit to the Timeline, clips that are dragged into a Motion template drop zone or an image well in a third-party program like Red Giant Software’s Primatte Keyer Pro 4 or Dashwood Cinema Solutions’ Stereo 3D Toolbox, has no knowledge of In or Out, they always start at the beginning of the clip.
Subclips allow us to create clips that start somewhere other than the beginning of the media file and yet still work perfectly with drop zones or image wells.
CREATING SUBCLIPS
There are a variety of ways to create subclips. Let’s start with the easiest.
1. Open your source video into the Viewer.
2. Set an In where you want the subclip to start.
3. Set an Out where you want the subclip to end.
4. Choose Modify > Make Subclip (or type Command+U).
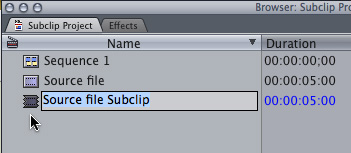
Immediately underneath the source clip in the Browser the subclip appears. It is automatically named with the name of the Source clip followed by “Subclip.” You can, of course, change the name to anything you want.
NOTE: Subclips are automatically stored in the same bin as the source clip. You can move subclips where ever you want — just like a regular clip.
This subclip is derived from the source file, and the media file of that source file stored on your hard disk. But, when you double-click it to load into the Viewer, the only media you see is that contained between the original In and the Out you used to create the subclip.
Even though there is plenty of extra media in the source file, the subclip contains no handles before the In or the Out.
There is no limit to the number of subclips you can create from a single master clip. As well, media can be shared between subclips with no problems.
USING MARKERS TO CREATE SUBCLIPS
You can also use markers to create subclips. For instance:
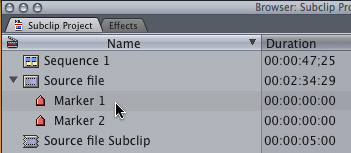
You can also use markers to create the equivalent of a subclip.
In the Browser any clip that contains markers has a triangle next to it. Twirl down the triangle by clicking it to see a list of the markers contained in the clip.
Double-click a marker to load it as a subclip into the Viewer. At which point you can edit this as any other clip.
NOTE: There’s also a very cool way to create subclips from a group of clip markers. Here’s an article that describes how.
SUBCLIPS IN LOG AND TRANSFER?
By the way, when you use Log & Transfer to set an In and an Out on a longer clip, you are not creating a subclip.
The reason is that Log & Transfer always creates new media files which are then imported into Final Cut Pro. One of the definitions of a subclip is a clip that does not contain media of its own, but only points to media contained in other clips.
WORKING WITH SUBCLIPS
Once a subclip is created, you mark and edit it as though it is a regular clip.
However, sometimes you may want to find the original source clip that the subclip came from. For example, you may want to start a few frames before the In of the subclip. To load the source file into the Viewer in place of the subclip:
1. Open the subclip in the Viewer
2. Park your playhead on the frame you want to find in the source file
3. Choose View > Match Frame > Source File (or type Command+Option+F).
The source file is immediately loaded into the Viewer, with the playhead parked on the same frame in the source file that it was in the subclip you started with.
The subclip is not altered by this swapping process.
If you just want to find the source file in the Browser, put your playhead in the subclip in either the Timeline or the Viewer, then choose View > Reveal Subclip Parent Clip.
The source clip is highlighted in the Browser.
NOTE: In point of fact, freeze frames are special case subclips — they are only one frame long with a default two-minute length. If you ever want to find the source file for a freeze frame, just put your playhead in the middle of the freeze frame and choose View > Match frame > Source file (or type Command+Option+F).
DELETING SUBCLIPS
Well, deleting actually has two meanings here. If you want to delete the subclip, just like anything else in the Browser, select it and press the Delete key.
But, sometimes, you want to reset the subclip limits back to match that of the source clip. Piece of cake.
1. Open the subclip in the Viewer.
2. Choose Modify > Remove Subclip Limits
The subclip becomes a normal clip, exactly matching the source clip from which the first was taken.
As I work with longer and longer media files, and especially for 3D work, subclips are becoming part of my daily routine. Also, for those who have been using Final Cut for a long time, the stability of subclips has materially improved over the last several versions.
If you haven’t experimented with subclips before now, they are definitely worth the effort to learn.
UPDATE – SEPT. 21, 2010
Tom Wolsky adds:
[A subclip is] not quite like a regular clip. A significant distinction is that it is a master clip so it can be renamed and other useful things.
To convert markers into subclips simply select the markers in list view [in the Browser] and press Cmd-U or Modify>Make Subclips. No need use Mark to Markers. You can also use extended markers [markers with durations] which will be honored as subclip limits when the subclip conversion is done.
Some applications and application functions, like Speed and SmoothCam, ignore subclip limits. Some wells may also.
Larry replies: Thanks, Tom. Much appreciate the additional information.

2,000 Video Training Titles
Edit smarter with Larry Jordan. Available in our store.
Access over 2,000 on-demand video editing courses. Become a member of our Video Training Library today!
Subscribe to Larry's FREE weekly newsletter and
save 10%
on your first purchase.
One Response to Working With Subclips
There is something really wrong in the way FCP7 handles subclips. This is something that’s been working well in Avid since the beginning of NLE and it’s really shocking that Apple never got it right, even in version 7.0.3, the latest Final Cut that editors called “Pro”.
The biggest issue with subclips in FCP7 is the fact that you can’t simply “Match Frame” to the “Subclip Parent Clip” from the Viewer… but you can do that from the timeline. That means: in order to track the original parent clip of a particular subclip, you must edit it into a sequence first. Truly, a waste of time and a serious limitation on the way subclips are implemented in FCP7.
But this isn’t the only issue with subclips in FCP7. There are others. To name a few:
– You double-click a Marker from a clip in the Browser (in List View) in order to load a portion of that clip in the Viewer (as a subclip, well, sort of…), and then you edit that loaded portion of the clip into a sequence, the item that ends up in the timeline will never track back to the Browser properly: the “Reveal Master Clip” command won’t work (because a Marker is not a master clip, like a Subclip is). So then you have to click OK in the dialogue box that shows (asking you to add a master clip to the Browser), and then, a subclip will be created. But this is far from ideal, since we already used Markers as an organizational tool… and we would end up with two different tools (markers and subclips) for achieving practically the same results.
– Of course, we could use the “Reveal Subclip Parent Clip” command instead, which will point to the original clip where the Marker was placed… Then we would have to scroll down on the clip and find the marker that we are interested in locating. A bit too complicated and slow. And a bit illogical: didn’t we say that a Marker is not a Subclip? So why does the “Reveal Subclip Parent Clip” command work with Markers at all? Seriously, what a mess! On one hand, you have markers that pretend to behave like subclips (sometimes they do and sometimes they don’t), and on the other hand, you have subclips that pretend to behave like masterclips but when it comes down to it, the subclips lack the functionality that anyone would expect from a masterclip (like proper Match Framing).
– The command “Remove Subclip Limits” only converts a particular subclip in an exact copy of the Parent Clip from which it was created. Why in the world would we want to make copies of our clips? Don’t we already have enough mess in our project with so many distinctive clips? How is making so many unnecessary duplicates an organizational tool? Seriously, what is this good for?
– Also, the workaround of loading a Subclip into the Viewer and choosing “View>Match Frame>Source File”, doesn’t work very well. All right, you get the source file with the playhead parked on the same frame that it was in the subclip you started with… But this “source file” is not the original parent clip. In fact, it is a file not a clip; which means that what we are about to edit into our sequences is not even present in the browser (therefore, it’s not really part of our project). If we want to track any edited material from this source file (with Reveal Master Clip), again we would get a message warning us that the master clip is not present and asking us if we want to add it to the browser… Which takes us again to the same place: more duplicate clips in our projects, more chaos.
Shouldn’t subclips be an organizational tool instead? Well, they are… in Avid.