
Here’s a quick tip for Final Cut Pro X:
If you are adding Ken Burns moves to two clips and you want to add a transition between them, apply the transition between the two clips FIRST, then add a Ken Burns move to each of the two clips on either side of the transition.
If you add the transition after adding the moves, the moves will pause during the transition.
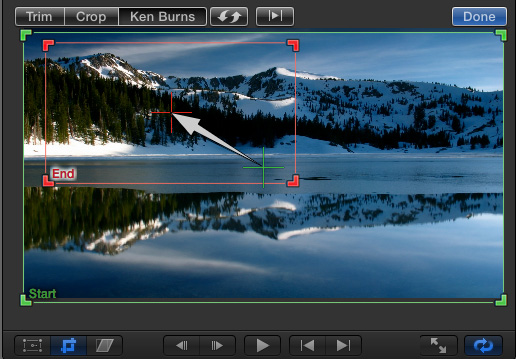
A “Ken Burns” move is one of the three Crop moves in FCP X. This effect allows you to create moves within an image; we generally use this on still images, but it works for both moving video and stills.
To create a Ken Burns move:
The duration Ken Burns effects always equals the duration of the clip. Also, it always applies an Ease-in / Ease-out behavior to the effect. To create a move that only last for a portion of a clip, you’ll need to use keyframes.

2,000 Video Training Titles
Edit smarter with Larry Jordan. Available in our store.
Access over 2,000 on-demand video editing courses. Become a member of our Video Training Library today!
Subscribe to Larry's FREE weekly newsletter and
save 10%
on your first purchase.

16 Responses to FCP X: Smoothing "Ken Burns" Moves
← Older Comments-
 John says:
December 5, 2016 at 7:12 pm
-
 Larry says:
December 5, 2016 at 10:49 pm
-
 Sven says:
June 14, 2018 at 10:22 am
-
 Larry says:
June 14, 2018 at 10:27 am
-
 Brian says:
January 5, 2019 at 1:13 pm
-
 Larry says:
January 5, 2019 at 5:41 pm
← Older CommentsNot true! If you right click on any one of the four handles when applying the Ken Burns effect you are presented with the options to: 1. Ease in and Out or 2. Ease In or 3. Ease Out or 4. Linear
John:
You don’t need to right-click on a handle. Right-clicking anywhere inside the Viewer will display the Ease-In/Ease-Out menu. This does not apply to the handle, but to how FCP X treats the entire clip.
Larry
As of 2018 and FCPX 10.4.2 I have found that even if you apply the „Fade“ transition after Ken Burns, the Ken Burns move is still going on during the transition. However, with the „Flow“ transition (name?), the move stops at the start time of the transition. I guess some transition types cannot run in parallel.
Sven:
Good comment. Flow is used to cover jump cuts within the same video by creating new video based upon a single clip on both sides of the edit. That is not the case when moving from one shot to a significantly different shot.
Larry
Hi Larry – I have been struggling to get the Ken Burns effect to look linear. I am working with still images. I want to create an “infinity” type effect where the view zooms into a photo, then zooms into the next, and the next, all at the same rate of speed. I right click and choose linear but I still get a ramping/speeding up effect at the end of each move. I am zooming WAY in – as far as I can go – each time. (Strangely, when I change it to ease out, it looks the same.)
Is the speeding up effect just a perceived thing?
If so, how could I apply a speed ramp with a steady rate of speed change to counteract it?
(I have also noted your comments about key framing the ken burns effect, but I do not see a way to key frame it within a clip of a still image like I do for the transform variables.
Brian
Brian:
I suspect this is perceptual. Two things to try.
* Set the end position to Ease In. (In and Out refer to the associated keyframe. Ease In slows down approaching a keyframe. Ease Out slows down leaving a keyframe.)
* Don’t use the Ken Burns effect at all. Use keyframes set for position and scale in Video Inspector > Transform.
Larry