
[For my disclosure policy on product reviews, please read this.]
Twixtor is a plug-in that runs inside virtually all major NLE’s that allows you to create stunning slow-motion clips from regular footage. It can also speed-up clips and create frame rate conversions. Twixtor calls this “time-warping.”
I’ve been a fan of Re:Vision Effects’ Twixtor for a long time – but never actually used it. Still, the demo movies are amazing and with RE:Vision’s recent release of an FCP X version (well, OK, they released it in March) combined with an update to Final Cut Pro X, it was time for me to take a look at it.
WHAT IT RUNS ON
I contacted the folks at Re:Vision and they graciously gave me access to the latest version. There are two versions of Twixtor: Twixtor and Twixtor Pro. Although I had access to Twixtor Pro, the version I’m demoing here is Twixtor. The Pro version adds support for foreground and background separation using mattes, and the ability to add tracking points to help guide Twixtor’s motion estimation.
The FCP X version of Twixtor is $329.95. Twixtor Pro is $595.00. Re:Vision has free trials of their software for many platforms. Visit their website to learn more.
Twixtor runs on just about everything:
(I’m expecting Bic pen support to show up any day now…)
NOTE: If you haven’t visited the Re:Vision website, they have some very cool plug-ins. Check them out here: www.revisionfx.com.
INSTALLATION
Twixtor is not available from the Mac App Store, you need to download it from the Re:Vision website. (This is not a bad thing, many plug-ins are not allowed into the App Store. Re:Vision is a well-established company with a long track record of excellent products.)
Download and installation is as easy as you would expect. I had no problems. During installation, enter a user name and license key to install the full software, or leave these blank to run the demo.
HOW THIS WORKS
In “the old days,” we would slow down clips by playing duplicate frames. For example, to run a clip at half-speed, we would play each frame twice. This slowed playback speed, while doubling the length of a clip.
To slow a clip to quarter-speed, we would play each frame four times, thus making the source clip four times longer.
The good news was that this worked, was really fast, and gave the illusion of slow-motion. The bad news was that the slower the playback speed, the more the video looked like a series of still frames playing back-to-back.
The limit of the “hold frames longer” approach is about 25% of source clip speed.
So, software developers added frame blending. This puts a short dissolve between extended still frames, adding to the illusion of movement. This smoothes the overall effect until you get to about 10% of source clip speed. At which point, this just looks weird.
NOTE: By way of comparison, things like “Bullet-Time” in the Matrix run at 1/100, or 1/1000 of normal, real-world speed. Holding frames, and frame blending just don’t work at all at speeds this slow.
What Twixtor does is synthesize new frames based upon the existing frames. This is a process animators call “tweening,” which means to create the frames in-between a starting image and an ending image. Properly done with good source material, the results can be stunning.
NOTE: For an excellent discussion of what works and what doesn’t, read this article on the Re:Vision Effects website.
CREATE A COMPOUND CLIP
NOTE: When increasing clip speed, all you need to do is apply Twixtor to the source clip. Creating a compound clip is only necessary when you are slowing things down.
Final Cut Pro X brings an entirely different attitude to creating effects, because all FCP X effects are, essentially, Motion 5 templates. This adds a level of complexity to Twixtor that isn’t present in other NLE software.
Still, the process of slowing a clip is worth it and not that hard to do.
NOTE: If you are working with material shot on film that has pull-down frames added to it, be sure to remove the pull-down before applying Twixtor. Otherwise, you get beautiful slo-mo footage that pauses when it hits a pull-down frame.

Here’s the clip I want to use – snowboard footage courtesy of Standard Films. I want to slow down the portion of the clip where the snowboarder is sailing into the air. In other words, I want the beginning of the clip to run at full speed, the middle in extreme slow motion, then the end to run at full speed, again.

With the razor blade tool (B), I put cuts at the beginning and end of the portion of the clip I want to slow down.
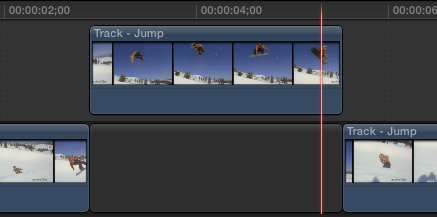
Then, I selected the center portion and chose Edit > Lift From Storyline. This moves the selected clip up to become a connected clip, and replaces the Primary Storyline with a gap. (We need to do this because FCP X does not allow plug-ins to automatically change the duration of a clip. So, we need to compensate for this duration change manually.)
I want to make this clip run at 10% of normal speed; this means that we need to make the clip 10 times longer (Original Speed divide by New Speed equals Duration Multiplier, or 100/10 = 10).
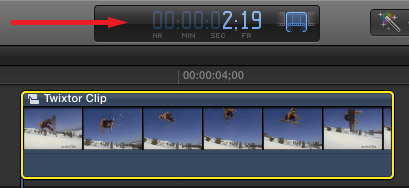
NOTE: To discover the duration of a clip, select the clip and type Control+D. This displays the clip’s duration in the Toolbar. To exit Duration mode, click anywhere in the Timeline except on the selected clip.
In our example, here, the clip runs 2:19. This means that we need to create a compound clip that is ten times longer, or around 27 seconds (26.333 seconds to be exact).
So, we are going to use a compound clip to create the longer clip we need for this effect. There are several ways to do this, here’s an easy way.
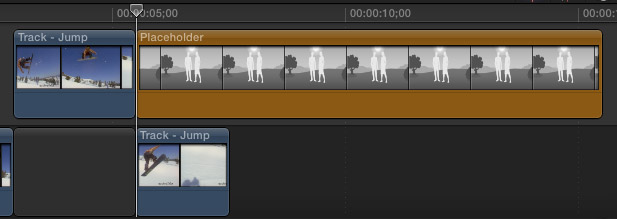
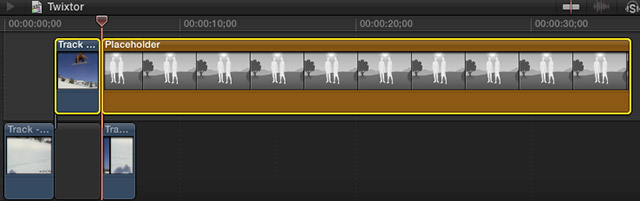
Drag a generator clip – here I’m using a Placeholder from the Generators Browser – and place it after the clip you want to slow down. Notice that both clips are touching and both are connected clips. (You don’t need to convert this to a Connected Storyline.)
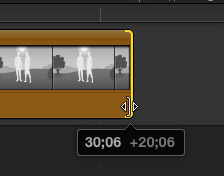
Grab the right edge of the Placeholder generator and drag it to the right until you’ve added as much additional duration as necessary for the speed-changed clip. Here, I’m dragging the edge so the clip is at least 30 seconds long. (We will trim this later, being precise is not important.)
Select both connected clips and choose: File > New Compound Clip (or type Option+G).

Give the new compound clip a name and click OK. (Compound clips are very similar to nests in FCP 7.)
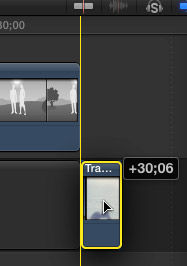
Because I want to slow the action in the middle of a clip, I’ll use the Position tool (P) to move the last portion of the main clip to the end of the compound clip.
NOTE: Like the duration of the compound clip, this ending clip position is only approximate. After the speed change, we will move this clip into its final position.
APPLY THE TWIXTOR EFFECT
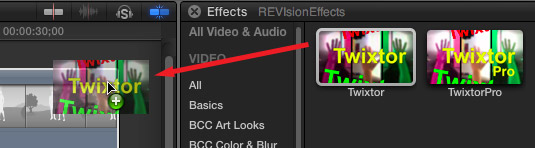
From the Effects Browser, apply the Twixtor effect to the compound clip – NOT the individual clips inside it – to change it’s speed. An orange render bar appears over the compound clip.
NOTE: Re:Vision Effects advises turning off Background Rendering and manually rendering your clip.
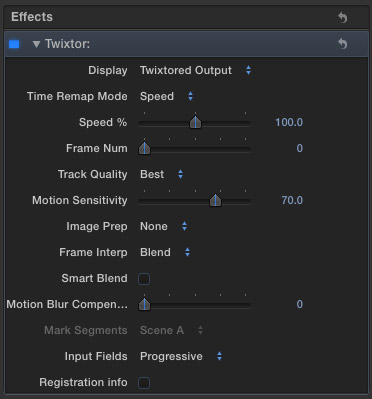
There are a variety of speed controls that Twixtor provides – and a very useful manual explains what all the settings mean. However, the default settings are very good. All we really need to do, initially, is change the Speed setting. Percentages larger than 100 speed a clip up. Percentages smaller than 100 slow a clip down.
Select the compound clip in the Timeline, open the Inspector, then, as I want to slow the clip down by a percentage, rather than a specific duration, I changed the Speed setting to 10%. The rest of the settings I leave at their default.
NOTE: I noticed a problem with my footage in that FCP X would hang when Smart Blend was turned On. When I turned Smart Blend off, everything worked great. Off is the default setting.
At this point, Twixtor goes to work creating some amazing slow motion effects.
To watch the clip in real-time, without dropping frames, select the clip and choose Modify > Render Selection (type Control+R). Never judge the quality of a speed-changed clip until it has rendered.
TRIMMING THE CLIP
Because we want the action to resume at normal speed as the snowboarder returns to the ground, cut the compound clip with the razor blade where the slomo ends, then…

… with the Position tool (P) drag the final portion of the clip to match the edit point.
When rendering is complete, admire your work.
NOTES
SUMMARY
Twixtor doesn’t work for every clip — the process of creating high-quality in-between frames ideally requires a source clip that was shot with slow-motion in mind.
Still, Twixtor can take an ordinary action clip and create stunning slow motion. What impresses me the most is how Twixtor is able to achieve the very rare feat of creating extremely slow motion with excellent image quality.
If you only need to slow your clips a little, the results of using Twixtor may not justify the cost. But, when you need to REALLY slow down your clips, the quality Twixtor provides can’t be beat.
UPDATE – Dec. 16, 2012
The folks at Re:Vision also suggested this way to create the same effect.
Instead of cutting the segment you wanted out of the storyline, you could have put the whole clip in the compound clip (and added a generator as per usual).
Then, set a keyframe of 100% Speed (in Twixtor) at the beginning, a key frame of 100% just before you want to shift the speed to slower, then change to your slower speed (say 10%). Then put another key later at 10% (just BEFORE you are done with the slowmo) and then set back to 100%. That way you can shift where/when you want to slow down the footage without having to worry about where you trimmed it.

2,000 Video Training Titles
Edit smarter with Larry Jordan. Available in our store.
Access over 2,000 on-demand video editing courses. Become a member of our Video Training Library today!
Subscribe to Larry's FREE weekly newsletter and
save 10%
on your first purchase.
18 Responses to Product Review: Twixtor for FCP X
Larry,
The folks at Re:Vision recommend interlaced footage for best results. I only shoot 30fps per your recommendation. I was wondering if you experimented with 30p, 60i, or both?
Jerry:
I don’t think they recommend interlaced, per se. Instead, they recommend higher frame rates.
I would still shoot 60p over 60i any day.
Larry
Hi,
Am director for tv show and i work with twixtor a lot watch my short film with this magic effect : http://www.youtube.com/watch?v=37WzLFVj5BU
Very nicely done and great syncing.
Steve
Shouldn’t you have also recommended using X’s Optical Flow for rendering?
Steve:
I debated that, and ultimately decided not to. Simply because what I would need to do then was to run a test for speed and quality between the Optical Flow in FCP X and the results Twixtor provides.
You are correct, however, in that we have the option to select Optical Flow (which is Apple’s name for what Twixtor is doing) in FCP X. However, optical flow in FCP X does not allow us to do frame rate changes, as Twixtor does.
Larry
I have a ton of 16mm and 8mm home movies, scanned as 23.98 that I am slowing to about 57% using FCPX’s Opt Flow. I experimented with the Twixtor demo and found it has some really nice keyframe options to mitigate and workaround image issues caused by the inherent slow-shutter blurring from old film cameras. FCPX’s Opt Flow doesn’t have key framing, nor does Motion if I’m not mistaken — it’s just all or nothing.
I understand why Re:Vision charges $329.95 for the basic Twixtor. It’s a fantastic program. But I, and probably a bunch of effects jockeys, would buy Twixtor in a heartbeat if they brought the price down a bit.
Josh:
I’ll pass your comments on. Thanks,
Larry
Larry, First off, thank you this little step by step has gotten me very far. I seem to be having some trouble though. After applying the Twixtor effect I can see the Twixtor effect in the inspector box however it does not have a pull down menu.. In other words.. Right beside the Blue square there is a triangle pointing down, I would assume to expand options within twixtor however I have no triangle .. only the word twistor and able to enable or disable. How do I see the other options??
Also, when I drag the twixtor effect onto the clip and preview turns solid blue
Jordan:
These are excellent questions – and I don’t know the answer. Check with the folks at ReVision and let me know what you find out.
Larry
Well I was running FCP 10.0 and was told by ReVision that I would have to update to update to 10.0.6 or newer for the program to work correctly. Now that I have that all taken care of comes the task of figuring out just how to get this thing “rendered” Hard to tell when something is finishing rendering.. or export into a file to play.
Good to know an update solved this. Unrendered material is indicated with an orange bar at the top of the FCP X timeline. Rendering is handled automatically during export, so that if a clip is not rendered, FCP X will render it during the export process.
Make sure to turn ON background rendering in Final Cut’s preferences.
Larry
You mentioned the problem with pull-down frames, and the need to remove them for smoother slow motion. How do you recommend removing the pull-down frames? As an example, let’s say my source clip is 30fps, but was obviously converted from 25fps, and I don’t have access to the original clip. How would I go about removing the pull-down frames? The only way I’ve found to do this reliably is manually, which isn’t ideal (duh).
I admit I’m a newbie. Can you send some light on this subject? Thanks.
Dan:
Hmmm…. good question. If you have FCP 7 installed on your system, Cinema Tools, which is installed with it, will do the trick. If you don’t, then, perhaps, another reader can provide a solution. At this point, I don’t think you can’t use FCP X itself to remove pulldown frames.
Larry
Nope, no FCP 7. I’ve tried using Compressor’s “reverse telecine”, but it hasn’t helped. I’ve done tons of searching on the subject, but I have yet to find anything that works for me. I keep feeling like I’m missing something obvious, but I’ll be darned if I can figure out what.
I’m a computer programmer, and I even toyed with the idea of writing a program to do this for me. Not with any smarts, mind you – just something I could enter a pattern into and it would remove frames based on the pattern. Unfortunately, the learning curve for programming to the QuickTime API is fairly steep, and I just don’t have the time.
Sigh. Thanks anyway. I’ve learned so much from your articles and videos, I’m certainly not complaining!
Dan
hii
i am useing final cut pro7
twixtor orange cross problem
then remove the orange cross mark in ihe canvas
then solution plz sir
Mahesh:
The best way to resolve a technical issue like this is to contact the folks at Twixtor directly.
Larry