
![]() [ Please read my Disclosure Statement on product reviews.]
[ Please read my Disclosure Statement on product reviews.]
NOTE: mLogic has updated their tape drives to LTO-8. Read an updated review here.
If you are storing data on hard disks for the long-term, you WILL lose data. You need a Plan B. But, up until now, Plan B was way too expensive. That situation has now changed – tape-based archiving is now affordable.
I have long been a fan of using LTO tape for archiving media projects and have written for several years about the importance of using tape, rather than hard disks, for archiving. However, I’ve never actually owned an LTO drive because they were too expensive for my budget by thousands of dollars.
This week two different companies each released a low-cost, Thunderbolt-based LTO-6 tape drive specifically designed for Macintosh media mavens. This review covers the new mTape unit from mLogic. In a separate review, I write about the new ThunderTape 2 from 1 Beyond.
NOTE: Because I can’t be sure you will read both reviews, I have duplicated some of the LTO background material in both articles. The product specific information is unique to each review.
WHAT YOU NEED TO KNOW FIRST
As someone who has not worked with LTO before, my immediate takeaway is that archiving is not about speed or storage capacity. It’s about workflow. Everything we learned working with magnetic video tapes applies to working with LTO tapes.
For archiving to be successful, we need to:
A tape drive may LOOK like a hard disk. But it isn’t a hard disk. It doesn’t operate like a hard disk. And you should not treat it like a hard disk. It’s a tape unit and requires learning new skills.
Also, up until now, tape drives have been so expensive, that only large organizations with established IT staffs could afford to purchase and install one. Now that prices are dropping, LTO systems are now affordable to people with no prior experience with tape. And this can cause major problems, if you don’t know what to expect.
In this review, I discuss tape hardware. Next week, I will review additional software you will need to make the most of an LTO-6 tape system.
EXECUTIVE SUMMARY
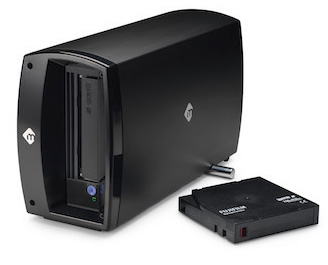
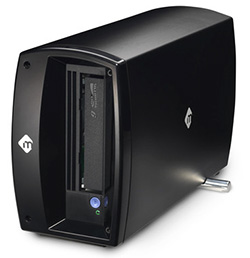
The mTape, from mLogic, is a sleek and stylish unit designed to complement the glowing-black appeal of the new Mac Pro. Designed as a stand-alone system to be attached to a single computer, it has all the software necessary to immediately start saving critical files to tape – though it will work even better with 3rd-party utilities, which are sold separately.
It is quiet when powered on but not in use, reads and writes data around 150 MB/second (the speed of a single SATA hard drive), and holds about 2.5 TB of data per tape. It uses a LTO-6 drive from IBM; one of the three founding partners of LTO technology.
Hardware setup is dead easy, installation is a piece of cake and, once you know how the utility software works, using the system to archive files is straight-forward.
I applaud mLogic for finally providing a break-thru price on what needs to be an essential component of every editor’s hardware toolbox.
SOME HISTORY
Contrary to its website, the mTape is not the first Thunderbolt LTO tape system. That honor belongs to 1 Beyond, who started shipping Thunderbolt drives more than two years ago. What mLogic can take pride in is shipping an LTO-6 drive at a price that finally makes it affordable for smaller Macintosh organizations, workgroups and individuals to acquire.
![]()
LTO (Linear Tape Open) is a magnetic digital tape format designed for storing computer data, including media. It is administered by Ultrium LTO (www.lto.org), who’s website states:
“The LTO Program was formed in 1997 and three companies — HP, IBM and Quantum — jointly oversee the development and roadmap of LTO technology. Providing open format specifications to simplify the complex array of tape storage options, LTO technology allows users to have multiple sources of product and media. The “open” nature of LTO technology also provides a means of enabling compatibility between different vendors’ offerings.”
Ultrium has published a roadmap of the technology – http://www.lto.org/technology/generations.html – laying out plans, specifications and timing for current and future hardware technology. There are currently only two manufacturers of LTO drives: HP and IBM (Quantum stopped manufacturing drives several years ago). Just like the hard drive industry, while there are only a few drive manufacturers there are lots of different vendors packaging those hard drives into different configurations for different purposes and industries.
All current LTO drives use SAS as their connection protocol. SAS, on a Macintosh, requires a PCIe card in order to connect an LTO drive to the computer. The problem is that no currently shipping Mac supports PCIe plug-in cards. What makes the mLogic unit attractive is that it provides a built-in Thunderbolt to SAS bridge so that the drive can be attached via Thunderbolt to any current Mac.
LTO-6 is the current version of LTO. This supports recording about 2.5 TB of uncompressed data to a tape at about 150 MB/second. In practice, your total storage will be a bit less and actual transfer speeds will vary.
NOTE: LTO has the option to apply data compression to files when it records them. However, since media files are already compressed, there is very little advantage – and no additional storage capacity – to using this compression during archiving.
LTO tapes have a projected shelf life of about 20 years. While not as fragile as DigiBeta tapes, these are, after all, magnetic tapes storing irreplaceable data. Treat them with respect and avoid extremes of heat, humidity or dust.
A key fact of the LTO roadmap that you need to know is that new versions arrive about every 18 months. These version changes affect both the hardware and the method of storing data on the tape. The current version – 6 – can read and write version 6 and version 5 tapes, but only read version 4. This means that we need to factor into our plans upgrading LTO hardware every two to three generations which also requires copying existing tapes from the older generation to the newer generation of hardware.
UNDERSTANDING LTFS
LTFS (Linear Tape File System) was announced at NAB in April, 2010, and released shortly thereafter. What LTFS does is provide an interface to an LTO tape that:
Traditionally, before LTFS, data written by a drive from one manufacturer could not be read on any other drive. LTFS seeks to fix that.
While this makes media management on tape similar to a hard disk, it is NOT the same. Everything on a tape takes time, because the tape needs to shuttle from wherever it is to wherever it needs to be. This shuttling is fast for a tape, but very, very slow compared to a hard drive. Creating a new folder, renaming a file, moving a file into a folder – each can take more than a minute; sometimes longer.
In other words, LTFS makes file access easier than before, but you should never use a tape drive like a hard disk. Tapes are for storing files that you can’t afford to lose, but don’t need to access very often or for making backups of your current files.
Media that you need to constantly access should be kept on your hard drive.
LTFS and the FINDER
![]()
The Mac Finder is not LTFS-friendly. In fact, the Finder can’t “find” any files stored on an LTFS tape. Files stored on tape using LTFS do not show up in a Spotlight search. You need to use some other method to find and catalog the files stored on your tapes.
Trying to view files on a tape using QuickLook is an exercise in frustration. The tape shuttled for five minutes without displaying anything, then I gave up.
You can’t read and write files at the same time. You need to wait for one operation to be complete, before starting another. This is why queuing files and processing them in batches makes the most efficient use of your gear.
NOTE: I’m also reviewing software from Imagine Products – PreRoll Post – and TOLIS Group – BRU – along with the LTFS utility software itself that can help with the process of tracking your files. More on that in future articles.
If your computer goes to sleep with a tape loaded, it will take several minutes after you wake your computer before the tape finishes talking to itself and you can use your computer again. In fact, it is STRONGLY encouraged that you never let your computer go to sleep when you are archiving to tape.
NOTE: To avoid waiting for the tape drive to wake up after the computer goes to sleep, never leave a tape in the system when you are done archiving.
HARDWARE DESCRIPTION
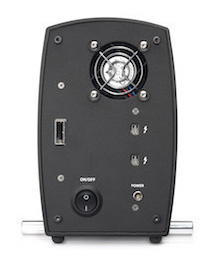
The mTape unit weights a little less than nine pounds. It’s 4 inches wide, by 12 inches long, by 7 inches high. It has a glossy black aluminum case with a black plastic front bezel. All connections are in the rear.
Here are the key bullet points for the mTape unit (as listed on the mTape website):
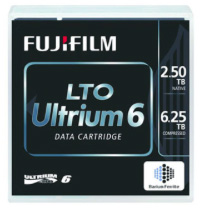
An LTO cartridge is 4 inches square and a little less than an inch thick. It feels very solid and is designed so that you can’t insert it incorrectly. A cartridge holds a maximum of 2.5 TB of data. To put that into perspective, that’s:
An LTO-6 cartridge has 846 meters of tape to wind up and down; and the tape travels at up to 10 meters per second!
INSTALLATION
Key to using the mTape is the mTape Utility – available for free from the mLogic Support website. Installing this installs utility software (written by Imagine Products) that allows mounting the drive so you can archive tapes.
This utility also installs a variety of additional driver software – such as LTFS, OSXFuse, IBM drivers and a flock of other stuff – that are necessary for the unit to run.
NOTE: It is to be hoped that Apple will make future OS’s more tape aware, but, for now, all this additional software is necessary.
The installation was a single mouse click, took about five minutes and required a computer restart when complete.
Hooking up the drive required two cables: power and Thunderbolt. Currently, I have five Thunderbolt devices on my desk; the mTape happily connects anywhere in the chain, as it has two Thunderbolt ports on the back.
NOTE: Apparently, the drivers for IBM tape drives and HP tape drives do not coexist happily in the same system. Based on my experience, I was not able to use the mTape and 1 Beyond systems on the same iMac at the same time. Tape cartridges formatted for LTFS were interchangeable. The hardware was not. I needed to install one or the other, but not both.
OPERATION
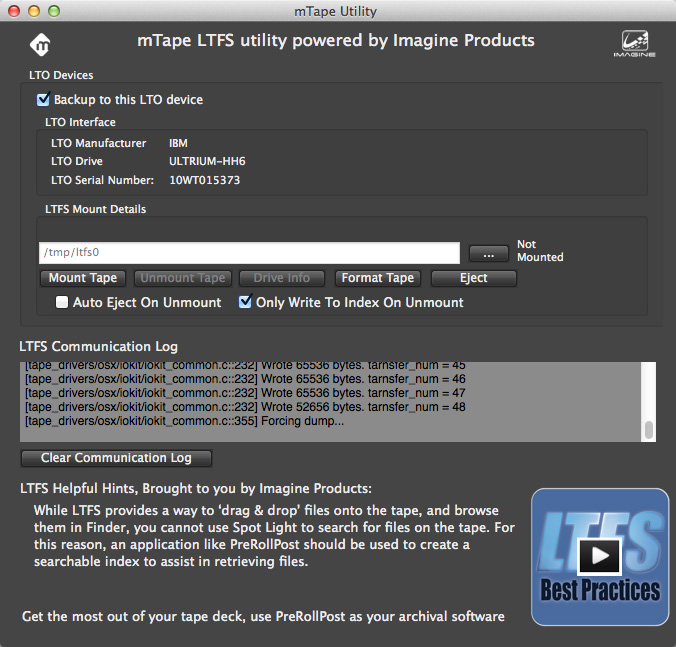
Before we can record to a tape, it needs to be formatted. We use the mTape Utility for that. Insert a blank tape, and click the Format Tape button.
NOTE: Just as with a hard disk, formatting a tape will erase any data that is recorded onto it. If it is a new tape, no problem. If there is already data on it, the Utility does not warn you data will be erased.
Formatting a tape took two minutes and 15 seconds. You only need to format a tape once.
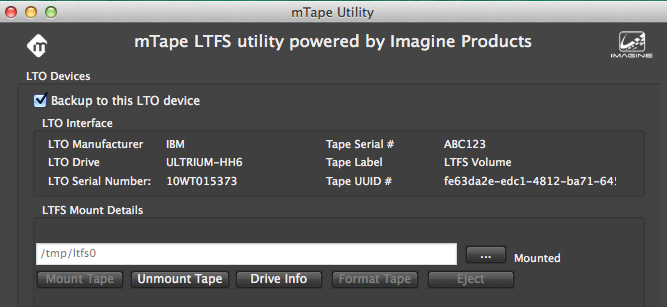
The mTape Utility also displays information about the hardware in the mTape unit.
Once the tape is formatted, it needs to be mounted. Click the Mount Tape button.
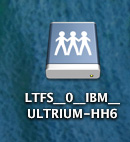
Once mounted, the drive shows up on the desktop, looking just like a hard disk; though I couldn’t find any way to change the displayed name of the tape itself.
NOTE: It may LOOK like a hard disk, but it is NOT a hard disk. When you are not archiving tapes, do not leave a tape in the drive or performance on your computer will suffer.
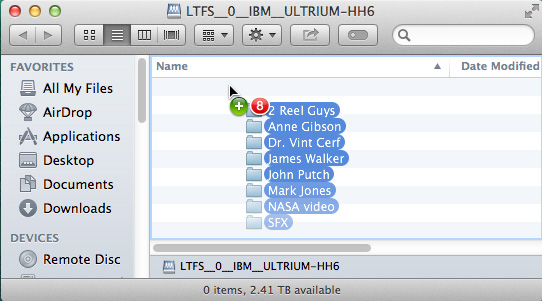
To copy files to or from the tape drive, drag them into the drive window.

When copying files, Activity Monitor is not able to measure the speed of the tape drive, however, it CAN measure the speed of data flowing off the hard drive. Here I’m copying 17 GB of files to the drive, and transfer speeds varied from about 120 MB/second to 200 MB/second. The variations in speed did not worry me, because, normally, I would not be here to watch it. However, what these speeds DON’T indicate is that it can take the drive a long time – up to two minutes – to get positioned to record or playback a file.
For example, formatting a tape took about two minutes. Mounting a tape takes a minute or two. Shuttling to position a tape can take anywhere from 30 seconds to 2 minutes.
NOTE: The BEST way to use an LTO device is to copy a bunch of files to it all at one time. Bigger files copy faster than smaller files.
Once the copying was done, the drive took another minute or so to rewind the tape. I am not clear whether additional verification was going on during this time. However, during the write, the separate read/write heads are verifying that the file was written to the tape accurately. If an error occurs, the error is sensed immediately and the file is rewritten to a different portion of the tape automatically.
NOTE: For this reason, you may not get the full 2.5 TB of storage on each tape, as some space is reserved for the LTFS index as well as files that did not write properly the first time.
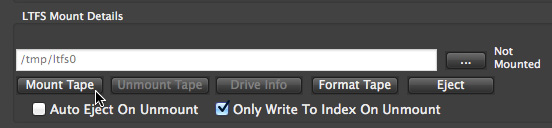
To eject a tape, open the mTape Utility and click the Unmount Tape button. The tape takes a minute or two to rewind and unmount; unmounting is not instantaneous. Check the “Auto eject on unmount” checkbox and the tape will eject when unmounted.
ADDITIONAL SOFTWARE
When it comes to operation, I need to be clear: LTFS and the mTape Utility allow you to mount the drive on the desktop, format a tape and copy files to and from the drive with no problem. However, you won’t be happy using this system that way for very long – because while LTFS allows you to see your files, it does not keep a record of what files are on what tape. For that, you will need to use other software.
This “other software” falls into three groups:
Understanding this relationship between hardware and software took me a few days.
NOTE: The mTape Utility provided by mLogic was written by Imagine Software. I appreciate all the tips they provide on using LTO tape with the mTape Utility, but I could do with a few less commercials for PreRoll Post. They become annoying very fast.
Another nice feature, made possible by LTFS is that I formatted an LTO tape using the 1 Beyond unit which uses an HP drive and HP software. That tape loaded perfectly into the mTape and I was able to display all the files on it and copy a file from that HP-formatted tape to my hard disk using the IBM drive in the mTape unit. Nice!
A CONVERSATION WITH MLOGIC
As part of this review, I sent a list of questions to Roger Mabon, CEO of mLogic, to learn more about this device. (Roger, some of you may remember, was one of the founders of G-Technology.) Here’s our conversation.
Larry: LTO drives are made by one of three manufacturers: HP, IBM, and Quantum. Since the LTO mechanism is at the heart of any archive system, should the end-user be concerned about which mechanism is used? (Context: Many editors have opinions on which brand of hard drive is “best.”)
Roger: LTO drives are currently manufactured by HP & IBM (Quantum stopped making LTOs a few years ago). Quantum has traditionally OEM’d from HP, but I heard a rumor that may be changing. Anyway, the LTO-6 inside mTape is from IBM. IBM invented magnetic tape in 1952. IBM invented LTFS. IBM is the undisputed leader in tape solutions and we believe they have the better technology and are more reliable.
Larry: Since none of these manufacturers make native Thunderbolt LTO drives, is there a performance trade-off when converting the native SAS connection of LTO systems to Thunderbolt; and should editors be concerned about this?
Roger: Since Thunderbolt is essentially external PCIe, there is no noticeable performance difference between mTape and a native SAS LTO. BTW, the steaming performance of LTO-6 is 160 MB/second. This is a fraction of the speed that the Thunderbolt bus can handle…
Larry: What maintenance is required, if any, for these units? (Context: Video tape decks required periodic head cleaning and lubrication.)
Roger: mTape will notify the user via the front panel display (A “C” will be displayed) when the LTO drive requires cleaning. A cleaning tape is required to keep the drive in top notch condition. We will supply a Fujifilm cleaning tape with every unit starting next month. Cleaning tapes will be sent to anyone who has already taken delivery of mTape.
This a good write up about LTO cleaning from our partner Archiware: www.archiware.com/blog/tape-drive-cleaning/
Larry: Does it make a difference which brand of LTO tape is used? If so, do you have preferred brands?
 Roger: Yes, we believe it does. The front runner in LTO tape media is Fujifilm. Fujifilm have patented barium ferrite (BaFe) technology which sets them apart from other players.
http://www.fujifilm.com/products/recording_media/barium_ferrite/
We will only ship mTape with Fujifilm media. Why trust your data to anything less?
Larry: What happens if the power dies in the middle of writing a tape? (Context: I’m afraid to pull the power for fear I break something…!)
Roger: If a power outage occurs during a backup, the tape can go in to an inconsistent state where the tape index does not match the tape contents. Our mTape Utility has built-in tape recovery tools to assist in resolving such issues.
Larry: There is a lot of debate in the industry about whether LTFS replaces archiving software. Does your drive require archiving software (such as BRU or PreRoll Post) in order to function. If not, where can editors download the LTFS software needed for your drive?
Roger: LTFS is not a replacement for archiving software. LTFS is complementary to such software.
LTFS will mount a tape drive like a hard drive and provides benefits such as drag & drop functionality and seamless tape interchange between systems using the technology. However, a tape drive is not a hard drive and therefore you need to work within some boundaries (see below) when using “raw” LTFS. For instance, LTFS will allow the user to do simultaneous reads and writes by simply dragging and dropping content. This will result in the tape drive “shoe-shining” (fast forwarding and rewinding) as the drive reads and writes the data to and from the tape. This is where ISVs come in…
Applications like PreRoll Post (PRP) that utilize LTFS manage how the data is written to and read from the tape to eliminate the “shoe-shine” effect. With PRP you can simply drag & drop content with abandon. All copies made to the tape with PRP are verified using MD5 checksum integrity algorithms. PRP can also create a searchable index to assist in retrieving files.
We do supply a free LTFS utility (mTape Utility) to allows the user to format, mount and eject tape cartridges.
When using the mTape Utility…
1) Do not read and write files at the same time; access to tape is sequential, not random access.
2) If you have multiple files to write, collect them in a folder and then drag the folder to the tape drive.
3) Wait until a write is complete before doing another write.
4) When you want to access a file from the tape, copy the file to a disk.
5) Always eject the tape via the mTape Utility.
Of course, there are archiving applications that do not rely on (but are compatible with) LTFS like BRU and Archiware P5 that work just fine with mTape.
Larry: Why should an editor consider your product versus the competition?
Roger:
SUMMARY
Based on about four days use, I’m quite impressed with the mTape LTO-6 tape drive. It is fast, affordable, nice-looking, quiet (when powered on, but not in use) and doesn’t take a lot of space. I especially like the price.
NOTE: When you are archiving, the drive makes a fair amount of noise shuttling the tape hither and yon. I would not try to do an audio mix while the drive is shuttling tape.
Due to the Finder not being tape-friendly, don’t do anything else on your computer when archiving and be sure your computer does not go to sleep. The best time to move files to tape is overnight, when you are out of the room and the computer can concentrate on feeding data to the tape drive.
However, while the mTape is nice, to make the most of it, we need software to help manage the entire process of archiving. Next week, I’ll write about several software options I’ve been working with as I learn how to use this new gear.

2,000 Video Training Titles
Edit smarter with Larry Jordan. Available in our store.
Access over 2,000 on-demand video editing courses. Become a member of our Video Training Library today!
Subscribe to Larry's FREE weekly newsletter and
save 10%
on your first purchase.
2 Responses to Product Review: mTape LTO-6 from mLogic [u]
Very valuable review. Based on this I purchased mTape.
Some Notes:
1. It is a good idea to test the software against your entire archive database. I tried Bru PE and YoYottaID. Both passed a simple test, but both failed the full 14TB archive. YoYotta fixed the problem within a couple of days and send me a new version. Tolls said they would fix the Bru problem in the next release – and that is the last I have heard from them..
2. mTape works great, but I was told that the mac driver has bugs so get a driver from mLogic. I couldn’t find the driver on the mLogic web site so I sent them an email – never responded. I finally found a poorly labeled driver on their site.
Everything works great. YoYotta looks like an up and comer, especially with with the upgrades they are promising in the next major version.
A cute feature of mTape is the Thunderbolt interface is bus powered so you can turn the unit off and still have a through connection to other units.
Rick:
These comments are VERY helpful. Thank you for writing.
Larry