
[This article was first published in the July, 2010, issue of
Larry’s Final Cut Pro Newsletter. Click here to subscribe.]
 This was a very challenging review to write — but not for the reasons you may expect. It is an interesting story, though, so read on.
But first, a bit of disclosure. (Click here to read my policy on product reviews and disclosure.) iStoragePro contacted us a few months ago about sponsoring my podcast, the Digital Production Buzz. We love sponsors, so we said YES!
After their ad started running, I became intrigued with their product, so I asked them to send me a unit to review. I’ve done a lot of storage system reviews over the years, mostly concentrating on the lower-cost side of the market. This month, I decided to see what riding a real rocket felt like.
The folks at iStoragePro graciously sent me TWO units – their new iStoragePro Tower 8-Bay Series, and their 16-bay Rackmount SAS Expander JBOD System.
The Rackmount SAS JBOD System is a hulking brute of a monster that holds up to 32 TB of data on 16 2TB hard drives. Weighing in at almost 80 pounds! I was stunned at the heft of this thing. It’s designed to meet the storage needs of the enterprise, designed to go in a rack in the machine room, and support multiple editors working at once,
With dual power supplies, dual fans, dual banks of hard drives, this ravening beast can handle any video format you care to throw at it.
However, it isn’t designed for the edit bay. It’s designed to be attached to an extremely fast server, with edit stations connected via fiber optic cabling. I checked around my office and saw that machine rooms, fiber optic cables, and multiple edit suites were pretty thin on the ground around here. So, with a deep sigh of regret, I leashed this behemoth, put it back in the box, and returned it to iStoragePro.
The rest of this review concentrates on the other unit iStoragePro shipped me: an iStoragePro Tower 8-bay Mini-SAS JBOD System.
NOTE: “JBOD” means “Just-a-Bunch-of-Drives” and refers to an enclosure that holds several hard drives; in this case eight drives. The RAID is created by the RAID card, which is sold separately, and plugs into your tower computer. While not impossible technically, RAID cards generally do not work with laptops or iMacs. For instance, none of the five supported RAID cards works in the ExpressCard/34 laptop slot of a 17″ MacBook Pro. And smaller laptops don’t have the ExpressCard/34 slot at all.
A NOTE ON iStoragePro
iStoragePro is a brand of Ci Design, an Irvine-based storage company founded in 1983. Up until recently, they have traditionally sold into the enterprise market through value-added resellers. Their line of iStoragePro systems is their first foray into the audio/video market, selling direct to end-users.
This move into a new sales channel is significant, as we will see in a bit.
PRODUCT DESCRIPTION
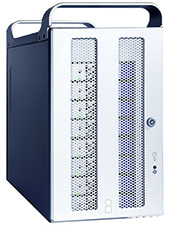
The Tower 8 stores up to 16 TB of data, using 8 hot-swappable hard drives. (“Hot swappable” means you can take a dead drive out and insert a new drive without turning off power to the system, or losing access to the drive from your computer.) The front of the unit locks to prevent the accidental removal of a drive.
It connects to the computer via Mini-SAS, which is a truly high-speed protocol that can deliver hundreds of megabytes per second to your computer. However it requires installing an interface card in your computer. Since this interface card also doubles as your RAID card, this is not necessarily a bad thing. However, the need for a card rules out any Mac that isn’t a MacPro.
iStoragePro lists five RAID cards that it has qualified for this unit, from Areca, ATTO, and Highpoint. The unit arrived with an ATTO R380 PCI-e RAID card.
The Tower 8 supports RAID levels 0, 1, 2, 5, 6, 10 or JBOD. For video work with a unit like this, only RAID levels 5 or 6 should be considered. RAID level 5 means you can lose one hard drive while protecting your data. RAID level 6 means you can lose two drives simultaneously without losing your data. I’m only a little paranoid so RAID level 5 is fine for me. Besides, the performance and storage characteristics are better for RAID 5 vs. RAID 6.
It runs on Mac, Windows, and Linux systems, with a standard 3-year warranty. Designed to sit on the desktop, it has four hard rubber feet on the bottom.
UNPACKING
The unit arrived in two boxes, one holding the eight hard drives (Western Digital 2.0 TB Black drives – Enterprise class); and the other holding the unit itself.
NOTE: Western Digital Green drives are more energy efficient. Black drives provide better performance. Since we are interested in video editing, I recommend using Black drives.
The unit looks like a half-sized version of a MacPro. Same industrial design.
Accessories were nicely stored in plastic bags in a small box packed with the unit. Everything was there… except a manual or a Quick Start guide.
Oh, well. How hard could it be?
INSTALLATION
The unit connects to the computer via Min-SAS; a truly high-speed connection that can deliver hundreds of megabytes of data per second to the computer. The ATTO RAID card installed easily, but since I didn’t have a manual, I decided to guess and install it in the top slot of my computer. Total installation took five minutes into my Mac Pro. (Yup, you’re right — wrong guess.)
NOTE: A big benefit of using Mini-SAS connectors is that cables can be up to 10 meters (30 feet) long. This allows a lot of flexibility in where the unit gets placed.
Installing the hard drives was easy. Each slot on the Tower was labeled from 1 to 8, and each drive had a number. Installation was simple:
Installing all eight drives took two minutes, tops. Then, lock the front of the cabinet. If you worry about these things, take the keys with you. If you don’t, leave the keys in the unit.
I really like the locks they use to make sure the drive stays put. And, there’s a clamp on the power cable to be sure the power doesn’t disconnect by accident. EVERY hard disk should have something like this!
NOTE TO OTHER MANUFACTURERS: How hard would it be to put some sort of clamp on your power cable to keep it from accidentally slipping out? I get angry every time I see a wall wart with a flimsy slide-in 9 volt power cable. All our data is only secure as long as nothing disturbs that cable. Once it slides out — goodbye data. This is STUPID! Creating a means to secure the power cable to the unit is neither expensive nor difficult.
Stop being lazy and find a way to keep your power cables from getting pulled out.
OK, I’m done now.
After everything was installed, I weighed the unit: 33.5 pounds. Not light. But a third the weight of the Rackmount RAID still growling quietly in its box.
At this point, things started to get confusing.
I have two MIni-SAS cables that shipped with the unit. Do I need both of them?
There are two ports on the ATTO card, but THREE on the Tower? Which cable goes where?
Unlike FireWire cables, which, like flimsy 9 volt power cables, can be easily pulled out of the unit because there’s nothing holding them in place except pressure, the Mini-SAS connectors slide in and click/lock shut. If they don’t click, you’ve installed them upside-down.
POWERING UP
With everything connected, I power the unit up. Nothing.
OK, maybe I installed something wrong. So I went to the support section of their website. They provide 800 telephone support Monday thru Friday, but today was Saturday.
In rapid succession I discovered:
Hmmm… So, now I’m sitting here, writing up my notes and waiting till Monday so I can contact support to figure out how to get the unit working.
Back in a bit….
THE REST OF THE STORY
First you should know that I hate writing bad reviews. I believe companies want to turn out good products. If there are problems, part of my job is to point them out so they can fix them.
But there were a lot of problems here. So, rather than write about all my troubles, I decided to set up a conference call with their product management team to discuss them. I would rather talk about problems that were fixed, rather than problems unfixed.
If they were interested in making good products, they’d listen. If they weren’t, they wouldn’t.
Thanks to the help of Katie Khor, my main contact at iStoragePro and just a stellar person, she put together a meeting with all their key product marketing, engineering, and business development staff in about 24 hours. We spoke for 90 minutes.
During that time I learned that iStoragePro traditionally sells to VARs and other resellers that configure the gear before it even gets into the customer’s hands. This is their first move to selling direct to end-users, so they had never considered the kinds of information we would need to work with their gear.
After our conversation and over the next two weeks, they:
STILL NEEDS WORK
Their website still needs a way to contact support via email, rather than phone. As well, the Tower 8 documents need to be posted. And some key technical information is still missing – see below.
But the changes I saw were a huge improvement!
SETTING UP THE SYSTEM
If you want to work with high-speed RAIDs, be sure to buy from an experienced vendor and call the vendor’s tech support lines to ask questions BEFORE you buy – just to be sure they explain things in a way you can understand. I found iStoragePro’s support team very helpful.
When you jump to the world of extremely high-speed RAIDs, you are no longer in the world of Plug-and-Play. Configuration is neither simple nor obvious. And installation is absolutely not fast.
Plan on investing time to get this to work – it took me several hours spread across three days. However, the time invested was very well spent!
The Quick Start Guides are not helpful. Here’s what the documentation is missing:
Once the software is installed, connected, and powered up, you need to use the Configuration Utility to create the RAID.
RAIDs, unlike hard disks, need to be created first, then formatted. Follow the ATTO user guide to accomplish this task. Though lengthly, a RAID only needs to be created once.
The 12 TB drive I was testing took about 12 hours (yes, I wrote “hours”) to build – and that was in Express mode. Advanced mode is considered more reliable, at which point plan to double your creation times. Your time will vary based upon the speed of your computer and the size of the RAID, but allow PLENTY of time for this process.
NOTE: If you need to delete a RAID group, inside the Configuration Utility, control+click the name of the group and select Delete. THEN, pull the interface cable and plug it back in. Make sure all groups are gone and all disks mount.
When Creating the Group is complete, you won’t see an icon on your desktop.
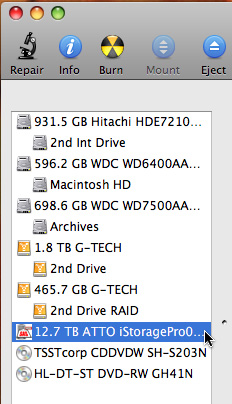
Instead, open Disk Utility and you’ll see the name of your group on the left. Select the name of the RAID from the window on the left.
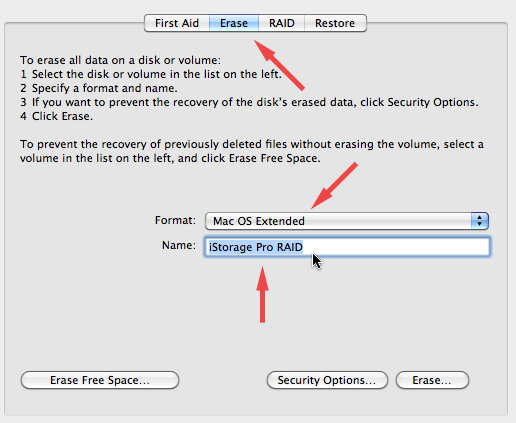
Because you have already created the RAID, all you need to do is format it for a Mac. Click the Erase tab at the top of the window.
Set the Format to Mac OS Extended and give the RAID a name. You don’t need to journal a RAID, only the Boot disk.
Then, click Erase in the lower right corner to begin the final formatting process. Unlike the earlier process, this is very quick — a matter of a few seconds.
When you are done, the icon of your RAID appears on your hard disk, ready to use.
SPEED TO BURN!
EGADS!!! This thing is FAST!!!!
And quieter than a MacPro. I mean this is virtually silent! Their silent fan technology is VERY impressive.
Let’s check out the numbers, using the AJA Speed Test utility.
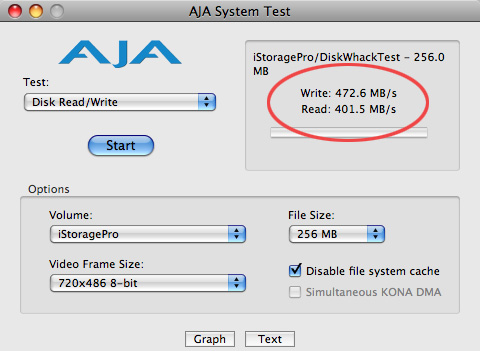
Pushing 500 MB/second! And I discovered I didn’t even have the RAID card in the fastest slot. Smokin’.
By way of comparison, look at these numbers.
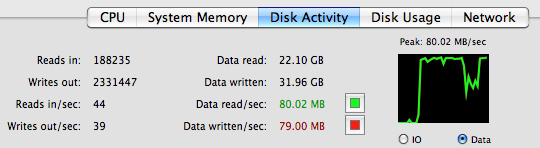
The fastest we can copy to a FireWire 800 RAID is about 80 MB/second.
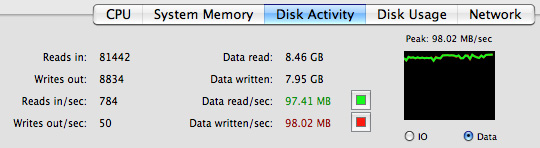
The fastest we can copy to an eSATA 2-drive RAID is about 100 MB/second.
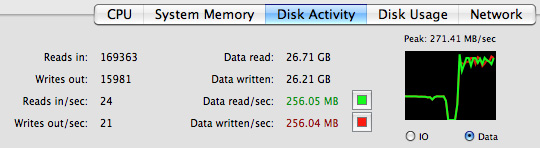
When I asked it to duplicate 1 TB of data files internal to the RAID, duplication speeds were over 250 MB/second.
This drive is plenty fast enough to support multiple streams of uncompressed 1080p video for multi-cam work.
Looking toward the future, editing 4K images requires a data transfer rate of 1.5 GB/second. The 6 gbps backplane of this unit will allow up to 3 streams of simultaneous uncompressed 4K editing. Wow…!
And in terms of ease-of-use, moving files around this RAID is exactly the same as if it were a single internal hard drive on your computer.
CONCLUSION
Setup is not for the faint-of-heart. But if you want great gobs of speed in a dead quiet unit that you can place a comfortable distance from your computer, this is a solid choice.
Take time to be sure you are putting cards and cables in the right locations. Picking the wrong slot will significantly slow down the unit. Read all the manuals and allow time to contact tech support and plan on waiting a day for the unit to be configure itself.
However, once you’ve got it installed and running, though, this is the fastest hard disk you’ve ever worked with. The speed is breath-taking.
Their website is: cidesign.com/products/istoragepro/
UPDATE – Aug. 11, 2010
Dave writes:
I just finished reading your review of the iStorage Pro 8 drive RAID and was thoroughly entertained (at your expense!) and informed. However, I was ultimately frustrated when I got to the end of the review and couldn’t find any pricing info. Was this (1) an oversight, (2) on purpose or, (3) my inability to find it? I went to their site and became even more frustrated as I had to submit an inquiry via email JUST to find out the darn price of the box. I know that you said that they are a bit “new” at dealing direct with customers but this was extremely frustrating. What was the suggested list price of the unit you were testing (including the RAID card)?
Larry replies: Dave, this is a good question. However, since the Tower 8-bay has six different configurations, I asked iStoragePro to send me their pricing. They did, so as near as I can determine:

2,000 Video Training Titles
Edit smarter with Larry Jordan. Available in our store.
Access over 2,000 on-demand video editing courses. Become a member of our Video Training Library today!
Subscribe to Larry's FREE weekly newsletter and
save 10%
on your first purchase.
5 Responses to Hardware Review: iStoragePro Tower 8 RAID
Hi Larry, longtime reader thanks for all that you do. When you were talking about editing several streams of uncomp 4k video, you mentioned “6 gbps backplane.” could go further and explain where you go that number and what you mean by backplane?
Best
The backplane is the main data conduit within a device like a data switch or a RAID. It is the high speed circuitry that moves data from one place to another within the device.
The 6 gbps (which is 60% of the speed of a Thunderbolt connection) was given to me by the manufacturer. This is a very, VERY fast data path which allows processing very large media files.
Larry
Oh how exciting is this product review. Maybe in a half a year I can budget this.
Wait, their website is dead and you’ve crossed out their name? Are they gone and off the market?
Nope – try this website of the parent company:
http://cidesign.com/products/istoragepro/
Larry