
 [ Read my product review disclosure statement here.]
[ Update – 9/7/20: G-Tech updated the ArmorLock app to version 1.0.1. They added “How-to videos to help you get started and … a link to the User Manual is included inside the app. ” ]
[ Update – 9/7/20 PM. I finally got this to work. Yay! ]
This morning, G-Technology, a part of Western Digital, released ArmorLock, a portable NVMe SSD designed from the ground-up for security, speed and portability.
Their press release describes it as: “designed to deliver an easy-to-use, high-performance, high-grade security storage solution for creators in the media and entertainment industry. Facing the threat of hijacked media files and leaked films, studios, agencies, and especially investors are demanding a better way to protect critical content. While much of the industry’s focus has been on cloud security, data often remains vulnerable on the portable storage devices holding critical commercial content.”
G-Tech sent me a device to review and here’s what I learned.
EXECUTIVE SUMMARY
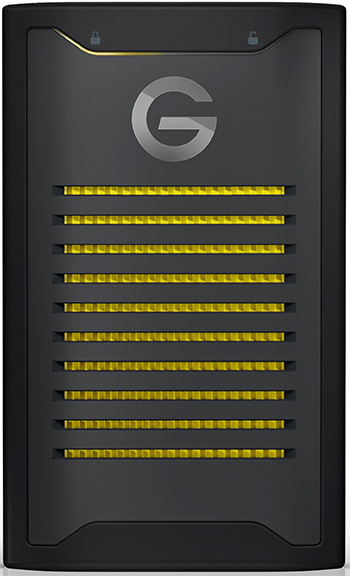 The ArmorLock is designed from the ground up to provide a secure, portable and fast NVMe SSD which connects using either Thunderbolt 3 or USB directly with a Mac. It uses 256-bit, AES-XTS encryption built directly into the hardware. It is IP67 dust/water resistant, can be safely dropped from head height and is designed to survive being rolled over by a car. (I, uh, didn’t have the courage to test this part.)
Rather than dealing with passwords, G-Tech created a security and access app that runs on Mac and iOS devices. Because of this stand-alone app, we can do things with this drive – like location tracking, multi-user and device control – that can’t be done any other way. The app is used to authenticate the device, the hard drive itself is directly connected to a Mac.
Western Digital, the parent of G-Technology, has thought long and hard about security. For example, security updates can be sent directly to the drive from Apple’s servers without touching our data. If you plug the drive into any computer without the app, it doesn’t appear on the desktop. If an unauthorized user attempts to open the drive, they can’t get in. With the app, you can control who can access the drive – even terminate their access remotely. Western Digital even wrote a special “BlueTooth stack” to make wireless communication more secure.
Update: However, configuring the same drive to work with multiple computers or multiple users is NOT easy. It took me four days, two calls to support and tracking down the user manual to get this to work. But, it IS working; which is great!
From a speed point of view, the device is faster than an SSD, but not as fast as a native NVMe drive. Still, the combination of speed with security and portability makes this device compelling.
Developer: G-Technology
Website: www.g-technology.com
ArmorLock User Manual
Price: $599 (US) for 2 TB storage.
INSTALLATION
While the drive attaches via USB-C or USB-A to a Mac, accessing the drive requires first installing a free app from the Mac App Store, or the iOS store.
NOTE: While the Mac app is fine for initially configuring the drive, the iOS app is MUCH better for authenticating multiple users or computers. The heavy use of QR codes for identification leads into using the cameras on an iPhone. My initial mistake in setting up this drive was in assuming the Mac app was the best option. It probably isn’t.
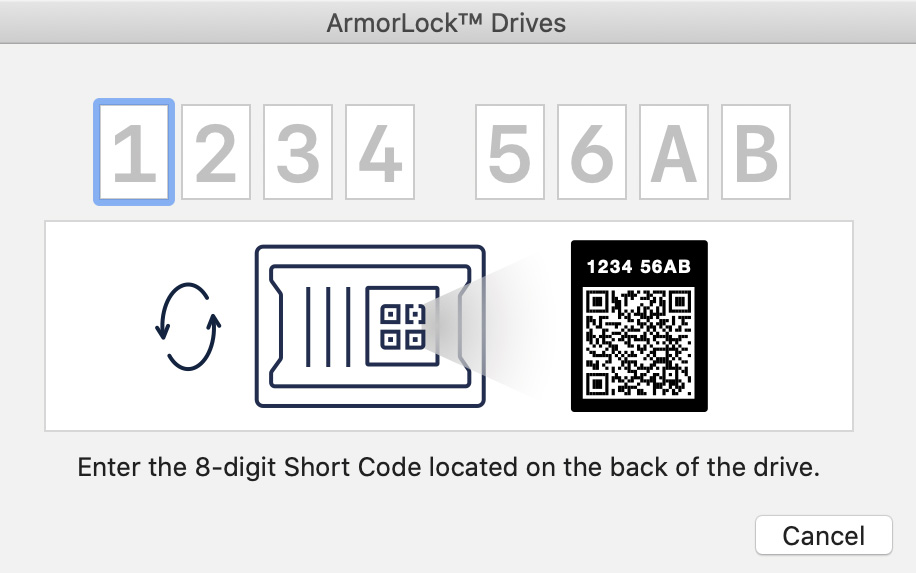
After installing the app on your Mac, click the Add Drive button, then enter the 8-digit code from the bottom of the drive, or scan the QR code.
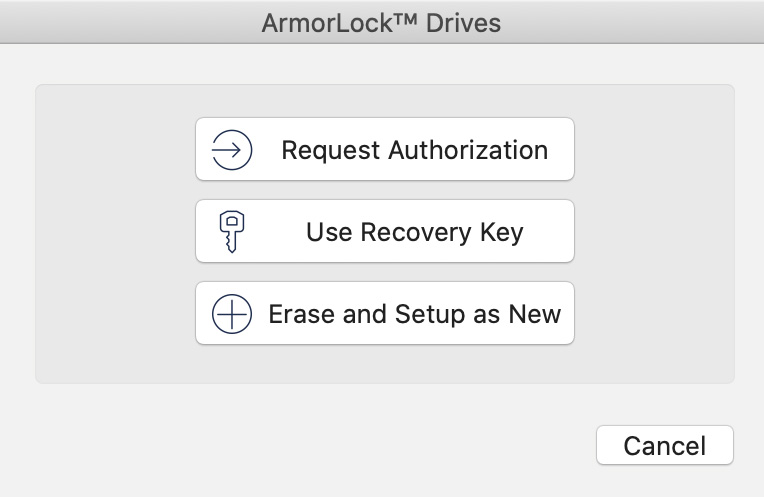
Next, choose Erase and Setup as New.
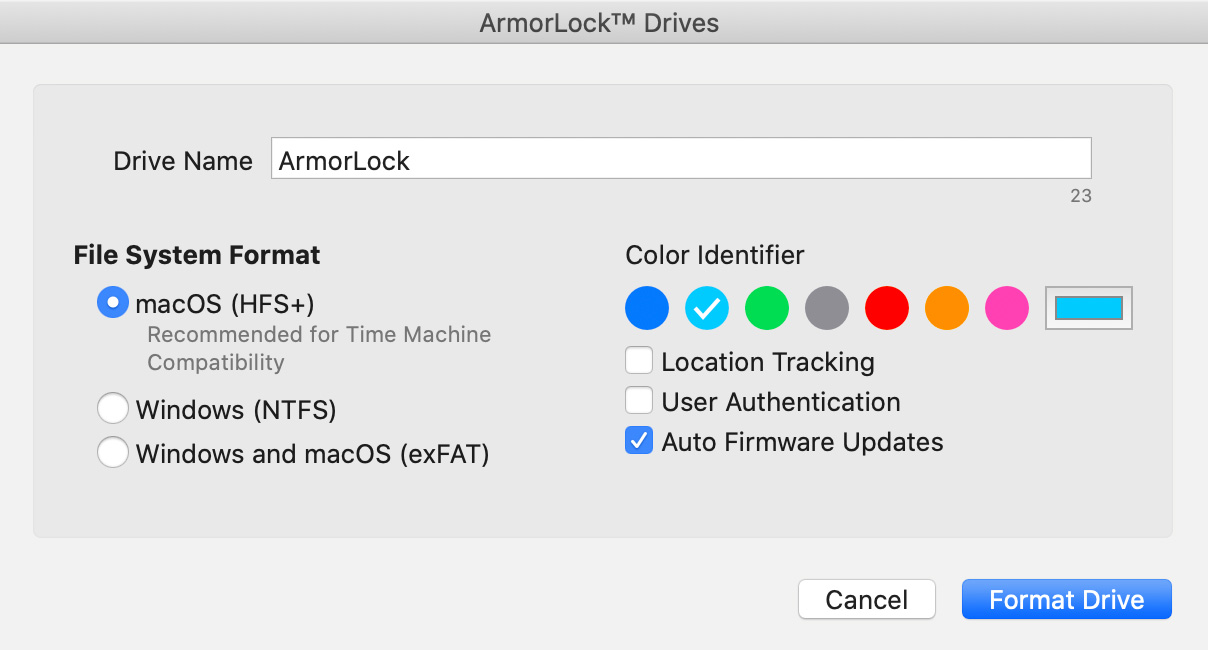
Give the device a name – if you only have one drive, the default is fine. Where naming becomes really useful is in tracking multiple devices.
Pick the file format; Mac users should use HFS+.
NOTE: In talking with the folks at G-Tech, I learned that the reason APFS does not appear is due to security issues when using APFS to control external devices. Apple and G-Tech are working to improve the security of APFS.
Location tracking, when enabled, will display the last location where the drive was connected to a location-enabled device. This does not track a device that is in shipment.
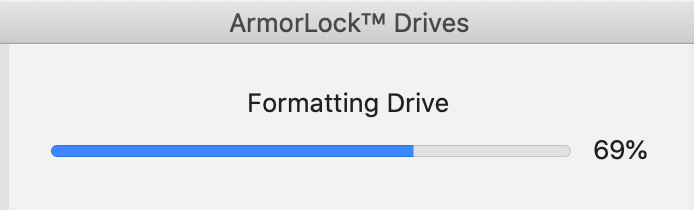
After configuring the drive, the app formats it. Formatting 2 TB to HFS+ took less than a minute.
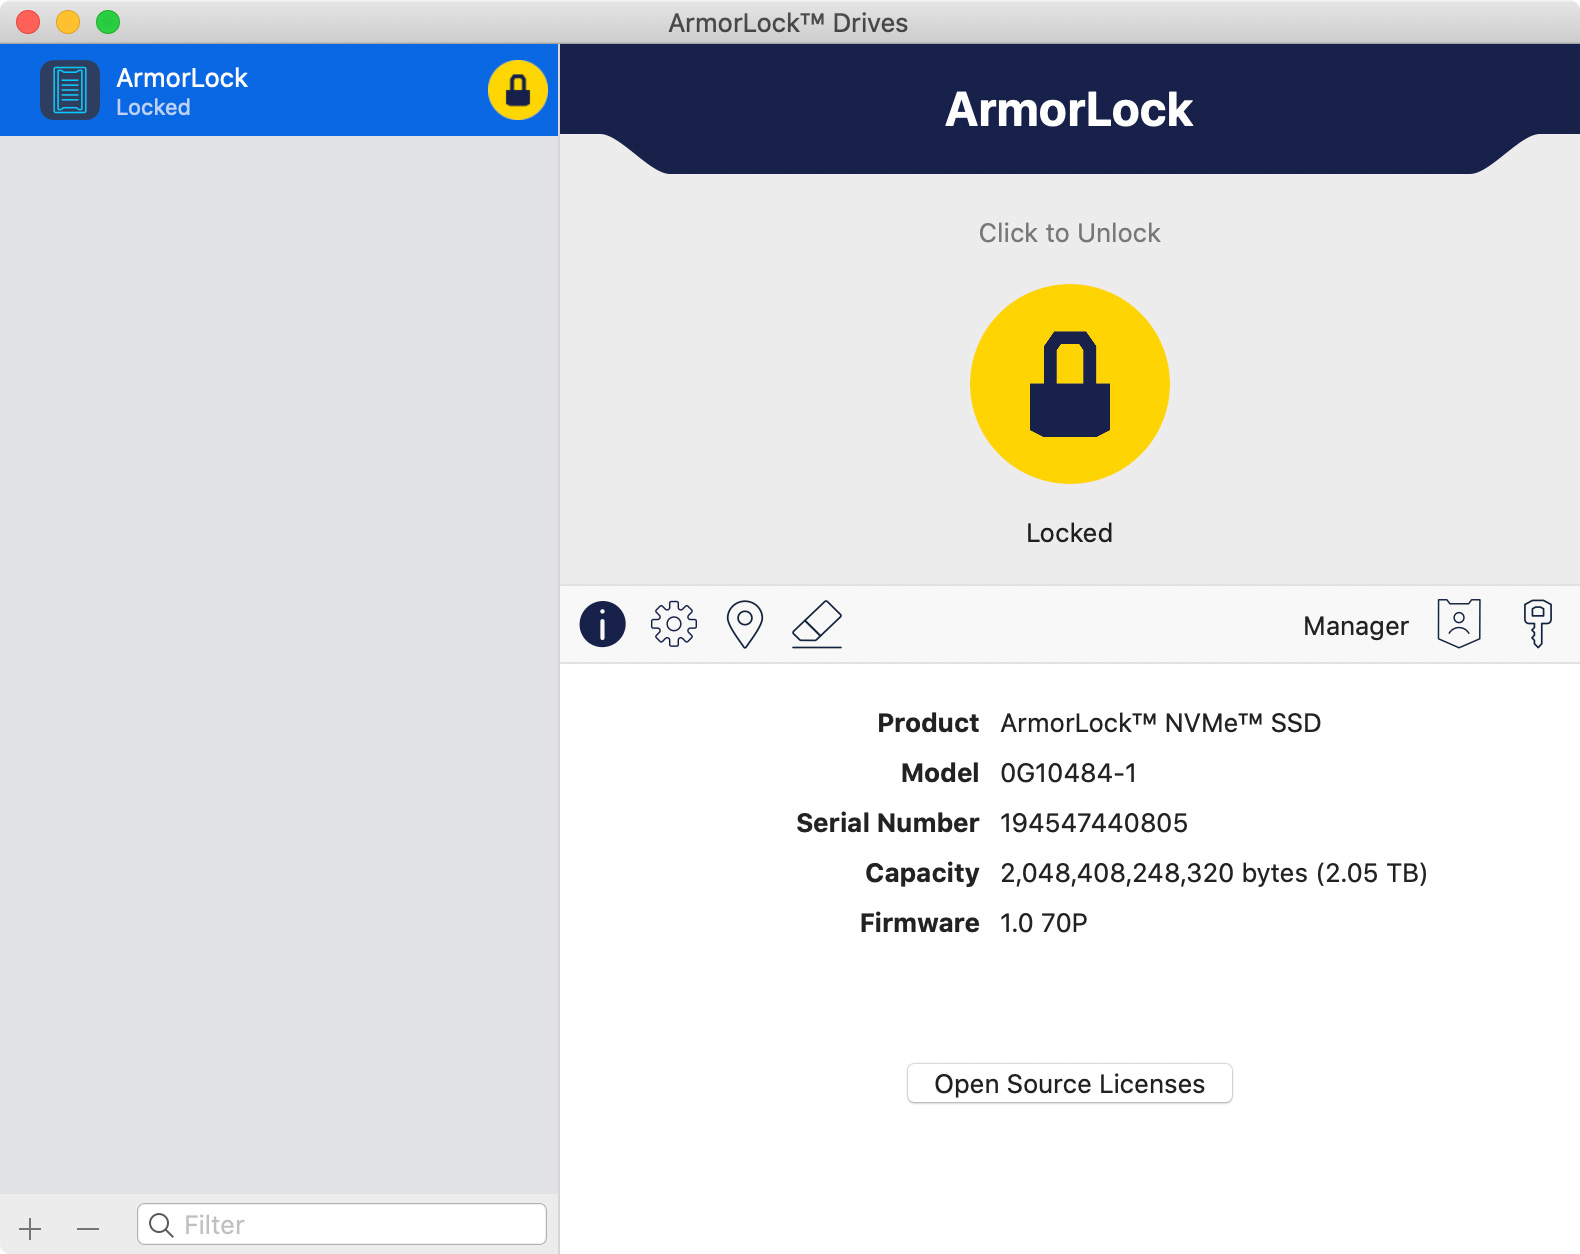
This is the Info screen, which appears when a drive is formatted and ready for use. To unlock a drive and mount it to the desktop, click the big yellow Locked button. The buttons in the middle are:
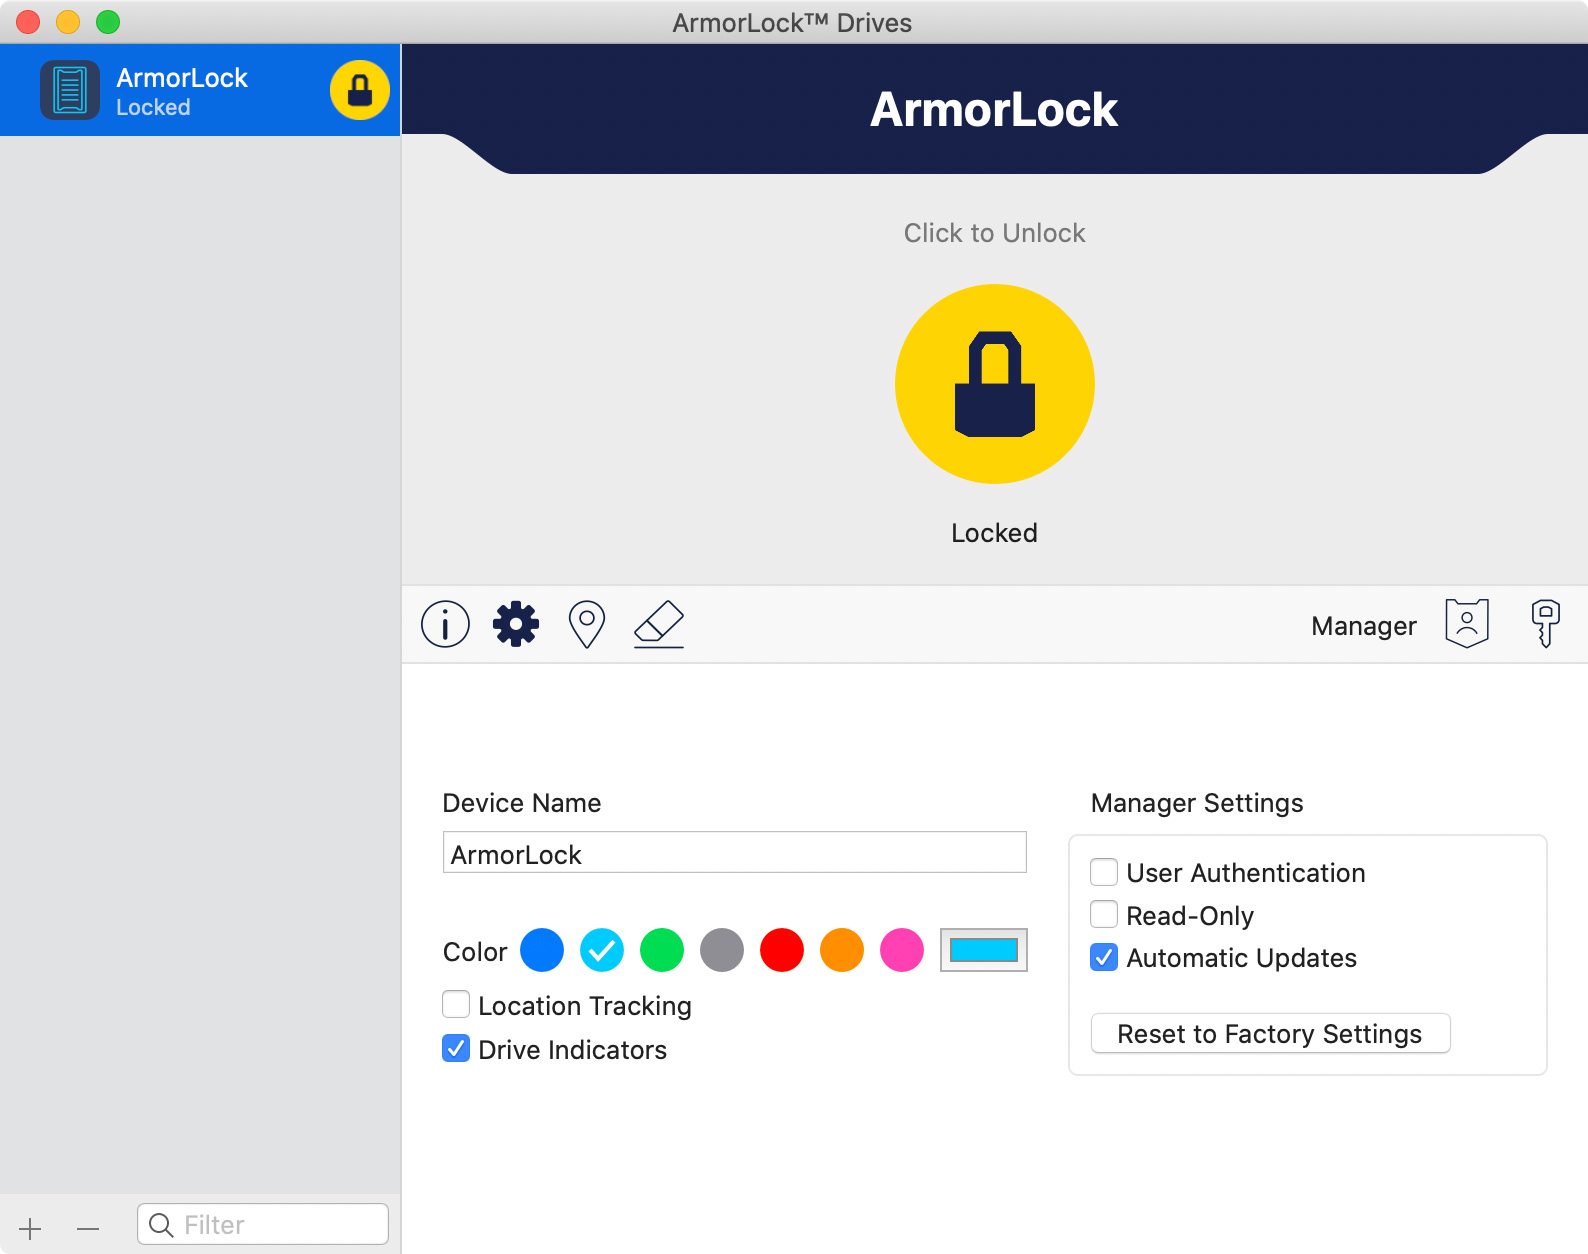
Here’s what the Settings screen looks like.
OPERATION – SINGLE USER
Once a drive is formatted and unlocked using the app, it become like any other drive attached to your computer. You read, write and organize files on it the same as any other external storage device.
NOTE: Once the drive appears on the desktop, you can quit the app. The app is only needed for initial authentication.
While the Mac and iOS versions of the app are identical, the documentation assumes you’ll be using the iOS app. The drive uses a secure version of BlueTooth to communicate with an iOS device for authentication.

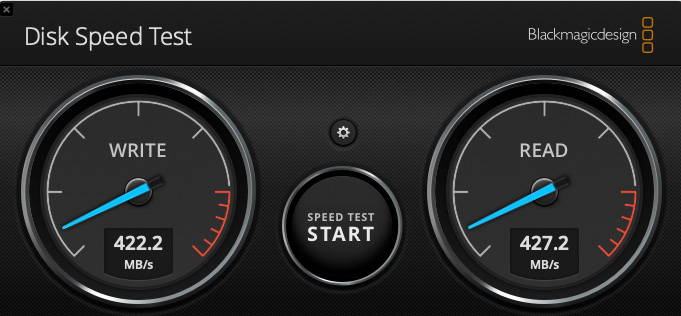
I ran Blackmagic Speed Test to measure the speed of the drive and it clocked in at slightly over 900 MB/sec when connected via USB-C. This is more than twice as fast as a non-NVMe SSD, but less than top-line NMVe SSDs, which push data around 2500 MB/sec.
(Click to see larger image.)
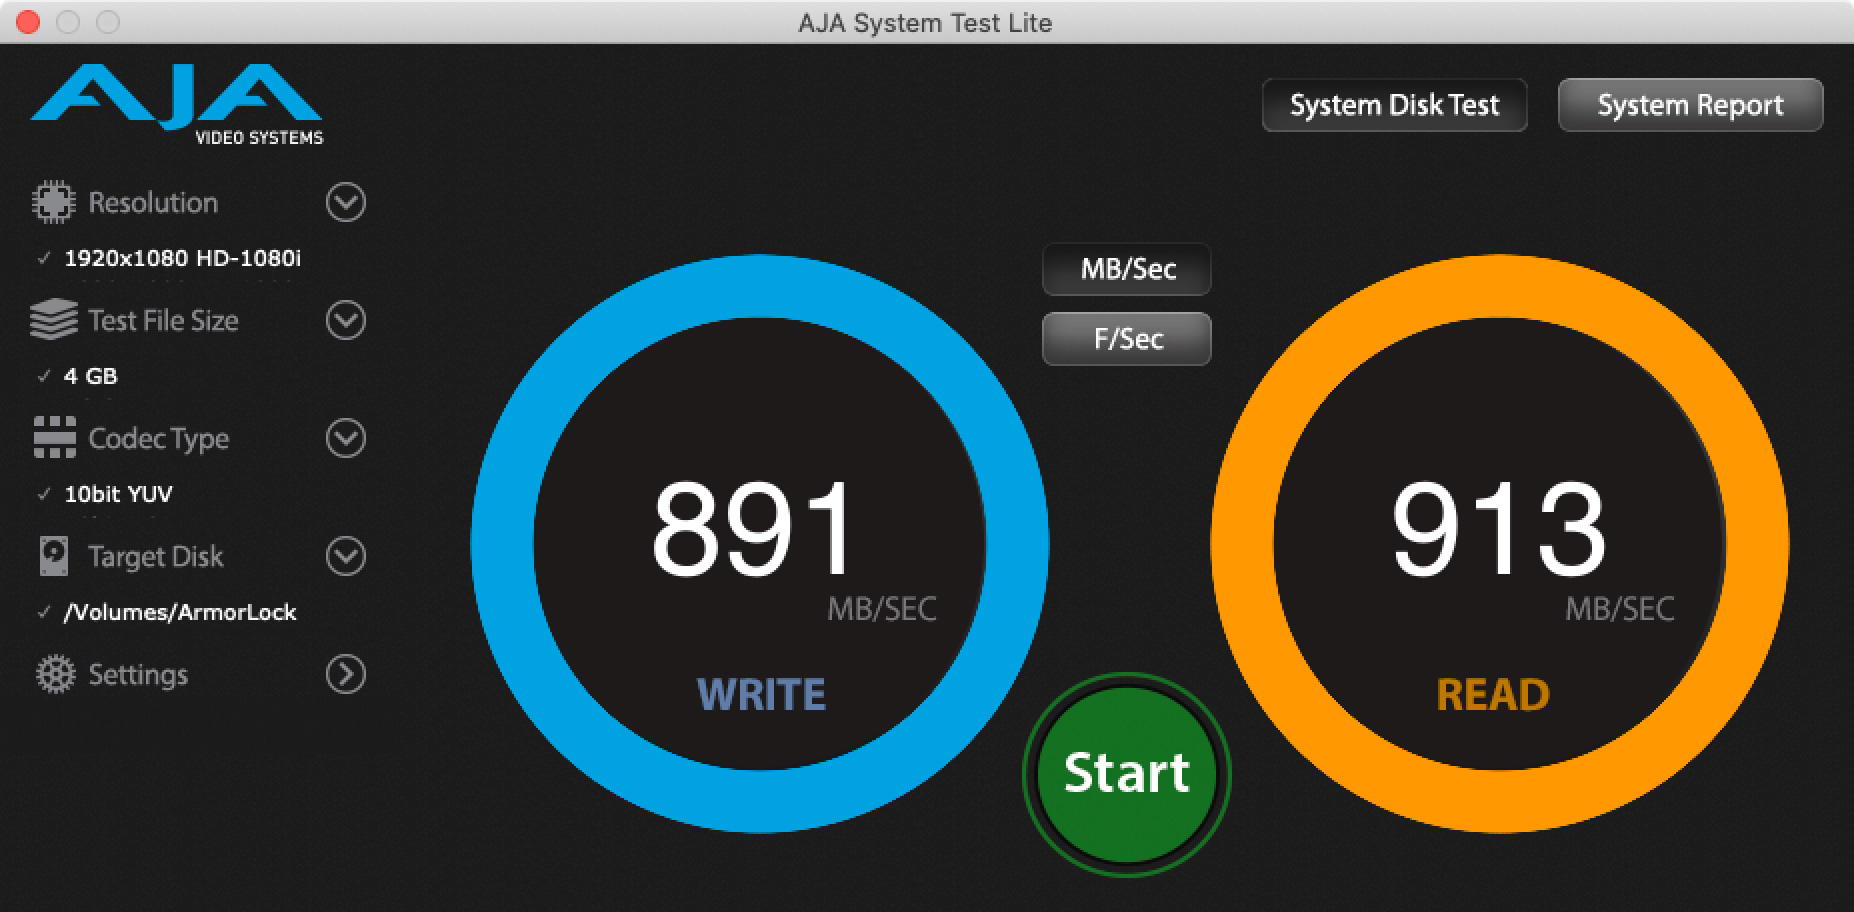
Here are the results from AJA System Test Light when connected via USB-C.
While these numbers are fast enough to edit 2K media directly from the drive, the product team at G-Tech said they designed this more for DIT and file transfer work than sheer speed for editing. Over time, they expect to optimize the speed of the drive more.
When you are done using the drive, you can either eject it – as with any storage – or use the app. In both cases, the drive is locked and dismounted. It’s default state is fully locked and encrypted.
UPDATE – USB-A SPEEDS
I was finally able to connect the drive via USB-A, and here are the numbers.
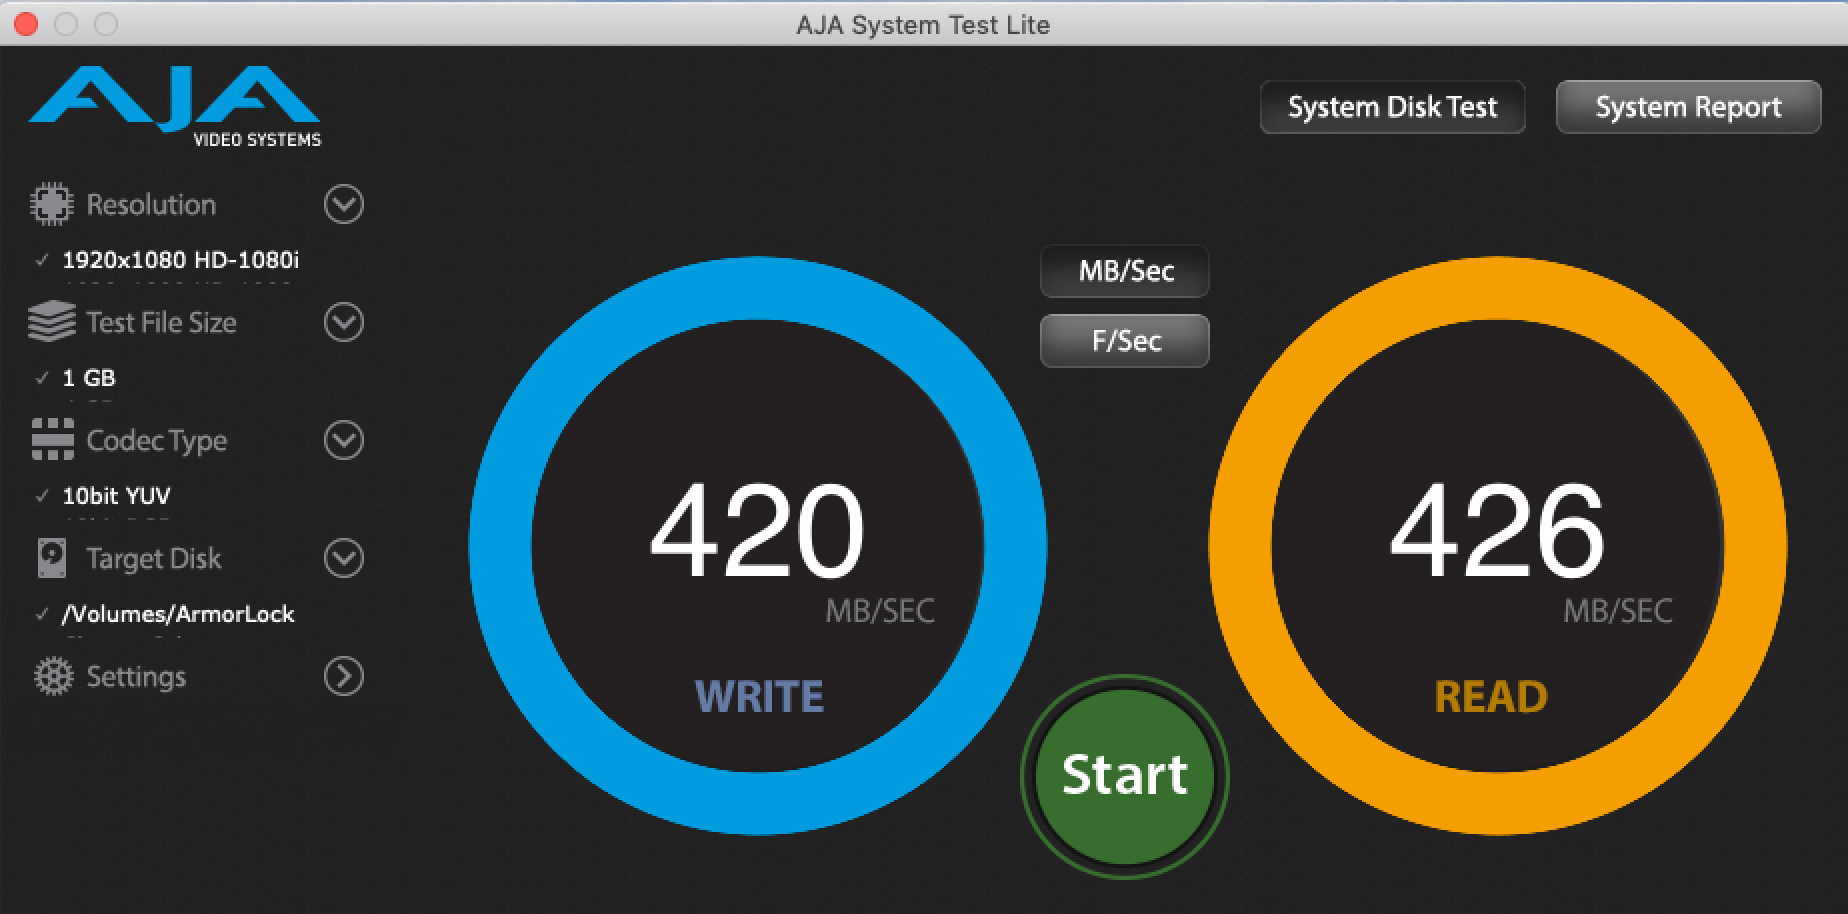
Although USB-A speeds are half those of USB-C, they are more than adequate to edit any media at 1920 x 1080 frame sizes or smaller.
OPERATION – MULTIPLE USERS
Using the drive as a single user protected drive is straight-forward. Sharing the drive between users or computers is much trickier and requires a different way of thinking. G-Tech has a video that explains the process. It is essential to watch this video, because the app does not make these steps clear.
NOTE: While the app runs on both Macs and iPhones, the video tutorials assume you are running the iPhone version. This, too, is a different way of thinking for most video people.
(And, as a note to the people creating the video tutorials, the music is way too heavy-handed. The music is so intense it creates emotional stress, when all we want to do is learn how something works. Worse, the pacing of the titles is WAY too fast! These tutorials are best watched with the sound off and hitting the pause button frequently.)
IMPORTANT: You must create and authenticate additional users or computers before sending them the drive!
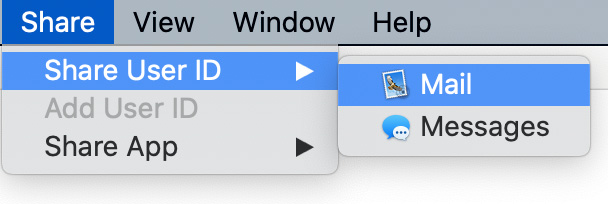
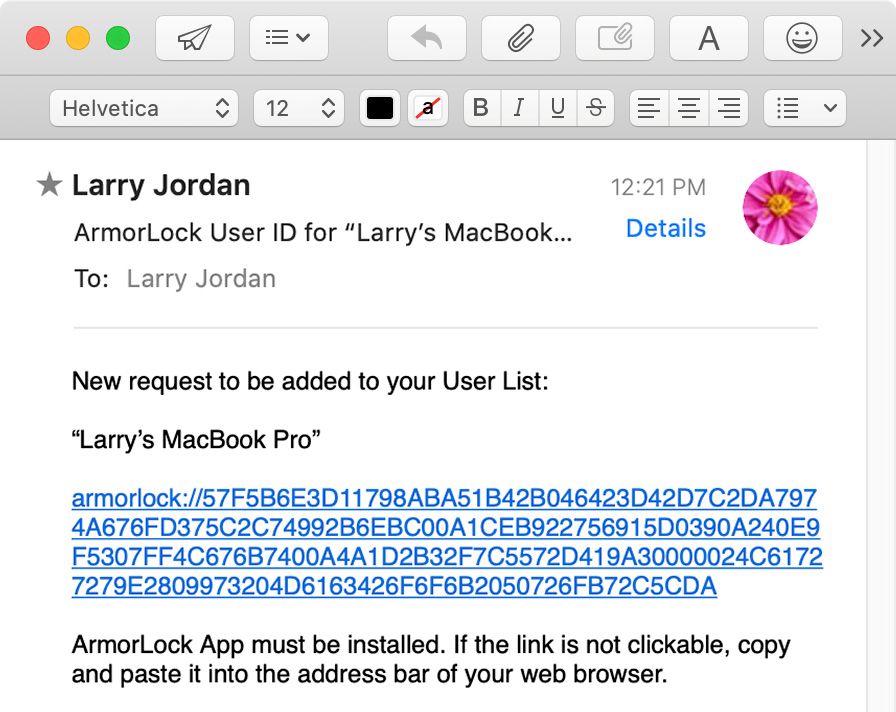
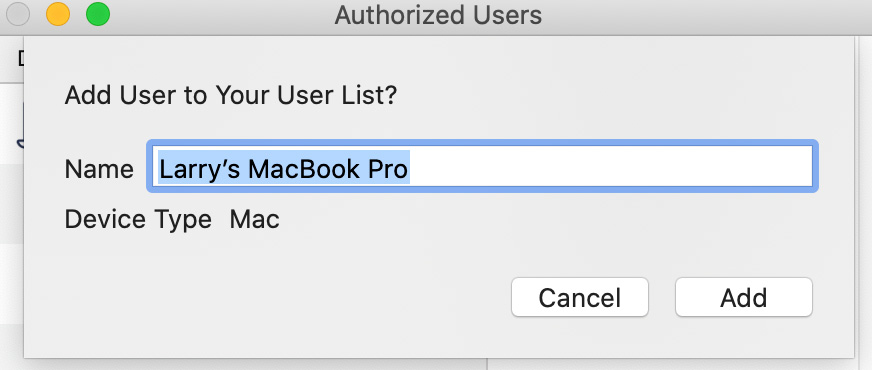
NOTE: You can only add a new user when the drive is attached to the Manager’s computer. This is why it is critical to add new users before shipping the drive.
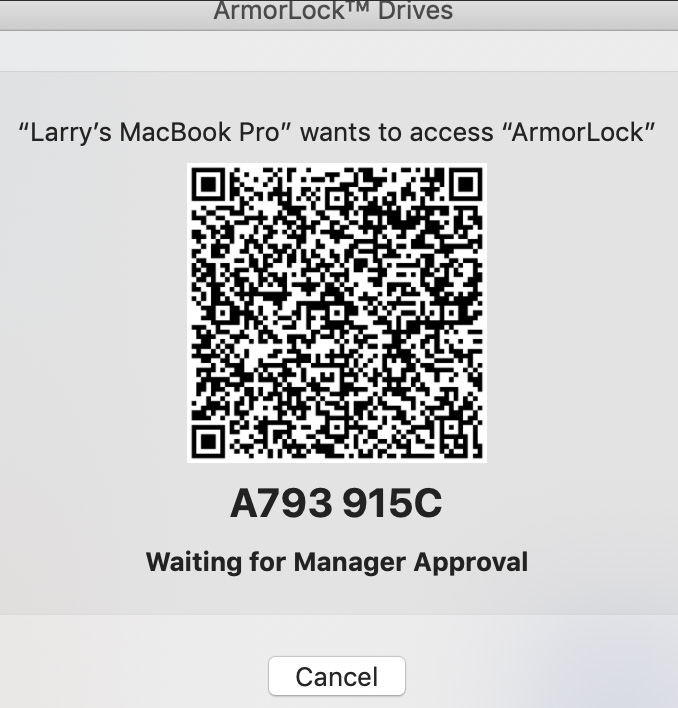
In theory, once a user is added to the app, the drive should become accessible. But as the screen shot above makes clear, there’s still at least one missing step.
UPDATE: It took me four days, five attempts and finally tracking down the user manual which, until the 1.0.1 update, was impossible to find, to get this to work. I won’t recreate all the steps here, because you can read them in the user manual, but these are the key points:
Based on this experience here’s more of what I learned:
OTHER GOODIES
In spite of the complexity in adding users, there are many things I like about this device:
NOTE: In talking with G-Tech about security, they stress that aside from authorizing users and providing updates, all security operations are done locally. There is no network access required. By avoiding the web, they prevent drives from getting hacked remotely.
THINGS I’D LIKE TO SEE
The hardest part of any new thing is getting started. Because this ships world-wide, G-Tech created a simple three-panel user guide to illustrate the installation process. This is a good example that pictures can tell stories, but not deliver details. I needed to go to the press release to figure out how to install the app.
In my tests, the app was installed in the Download folder. If this happens to you, simply move it from Downloads into Applications.
This drive needs to be directly connected to your computer. It will not work through a USB hub. This may be important if all your iMac ports are full. Connecting via Thunderbolt will be faster than USB.
Finally, adding and managing users needs a lot of work. There are still some rough edges here – but the update providing better access to the user manual helps a lot. But once the drive is mounted to your system, the actual operation is exactly what you would expect: fast and easy, in a very rugged container.
SECURITY
I’m not a security analyst, so I can’t test the security aspect. What I found was:
SUMMARY
The reason a device like the ArmorLock exists is because you need to safely send files from Point A to Point B and know that they are not going to be intercepted along the way. The ArmorLock is well-built, easily portable, and, as far as I can tell, highly secure. Western Digital has done an outstanding job thinking carefully about security. But authenticating takes patience. Plan to spend time reading the user manual and, perhaps, talking with tech support, to get this to work. Once you do, though, the G-Technology ArmorLock drive delivers on its promise.

2,000 Video Training Titles
Edit smarter with Larry Jordan. Available in our store.
Access over 2,000 on-demand video editing courses. Become a member of our Video Training Library today!
Subscribe to Larry's FREE weekly newsletter and
save 10%
on your first purchase.