
![]() [ Please read my Disclosure Statement covering product reviews. ]
[ Please read my Disclosure Statement covering product reviews. ]
CoreMelt released a new version of SliceX this week: SliceX with Mocha. This plug-in combines rotoscoping (tracing around the edges of an object) with motion tracking (moving the rotoscoping as the traced object moves in the frame.
Their timing was perfect because I was able to add it to my recent webinar on 3rd-Party Plug-ins for Final Cut Pro X.
WHAT IT DOES
CoreMelt is a highly-respected developer of plug-ins for a wide variety of post-production software. Founded by Roger Bolton, and based in Sydney, Australia, CoreMelt’s mission is to bring powerful and flexible tools to video editors with simple workflow and at affordable prices.
According to CoreMelt’s website:
SliceX lets you create instant Shape Masks to cut out layers or isolate effects directly in Final Cut Pro X without having to go into Motion or create the masks with an external program. SliceX includes nine motion templates for common tasks and you can also use the Shape Masks with built in effects, the built in color corrector or with third party plugins. SliceX powered by mocha takes the pain out of following complex motion, just draw a shape and hit “track.” You can then adjust with manual keyframes as needed.
NOTE: Mocha is a planar motion-tracking software developed by Imagineer Systems. Imagineer partnered with CoreMelt to create this new version.
SliceX with Mocha supports Final Cut Pro X only, and has a retail price of $149. Learn more here: www.coremelt.com/products/slicex-powered-by-mocha.html
NOTE: CoreMelt is offering upgrade pricing of $79 for people that already bought SliceX and want to get the Mocha tracking.
There are six different components to SliceX with Mocha:
For this review, I’ll look at three of these: Blur Shape Mask, Shape Mask Layer, and Object Remover
BLUR SHAPE MASK
As with all Final Cut Pro X effects, edit the clip you want to change into the Timeline.
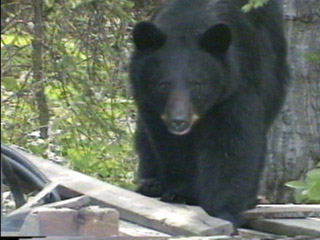
Here, for example, we have an alleged felon – someone so dangerous that we need to mask their identity from the public. In other words, we need to blur the bear’s face. (Serious felon clip courtesy of Pond5.com, as are all the clips in this review.)
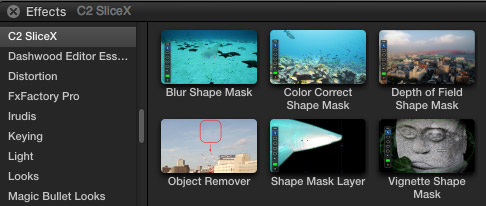
Open the Effects Browser and select the category C2 SliceX. Drag the Blur Shape Mask effect on top of the Timeline clip.
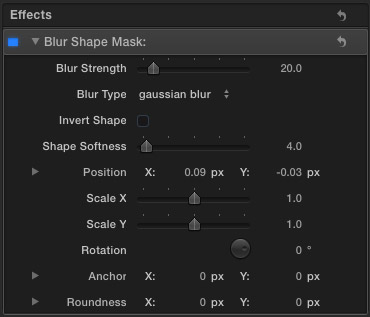
Select the clip, open the Inspector, and the Blur Shape Mask effect is listed at the top. However, with this effect, you can do most of what you need to do in the Viewer, itself. (See the Blur Strength slider? That is where you control how much blur this effect creates.)

On the left of the Viewer is the SliceX Toolbar, where you can select the shape you want to draw, as well as a Move tool (Arrow), keyframe tool, and other options. To create a rounded rectangle/square/circle shape, click the second tool down from the top.
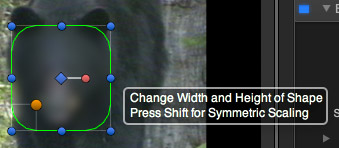
Position the playhead at the start of the clip, then, draw the shape directly where you want it in the Viewer. In this case, I am covering the face of the bear with a rounded rectangle. (You can adjust control points to change roundness, scaling, and rotation.)

Click the Mocha icon in the SliceX Toolbar so that it glows brown. This activates the motion tracker option.

Click the Track Forward arrow. Notice that I did NOT need to select any tracking points. Mocha figures all that stuff out automatically. Final Cut Pro steps through the clip frame by frame somewhat slower than real-time, but you won’t have time to go get coffee, the process is both fast and fun to watch.
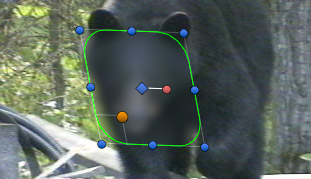
During the track, Mocha alters the shape of the mask as the shape of the underlying clip changes. As you can see here at the end of the clip, the shape of the mask changed as the bear moved its head during its walk.
NOTE: There may be times where, due to the complexity of the move, you will need to alter the mask shape manually. SliceX fully supports shape keyframes for this purpose.
Once the track is complete, render the clip (or let FCP X render it automatically) and you are done! If you need to alter the amount of blur, softness of the edges, or other parameters, you can easily do that in the Inspector, as I pointed out earlier.
But wait! There’s MORE!!
SHAPE MASK LAYER
Rotoscoping is often necessary when you need to remove a background, but didn’t shoot the scene in front of a green screen. Rotoscoping is slow, painful, expensive, and persnickety.
It is also labor intensive.
However, SliceX can make the process a whole lot faster. While this may not solve every rotoscoping problem, it can definitely make effects possible that were never affordable before.
Start by selecting the clip, and this time apply the Shape Mask Layer filter from the C2 SliceX collection.
What this effect allows you to do is define the edges of an object, then make everything either outside, or inside, those edges transparent. In short, you can put a foreground object in front of a new background.
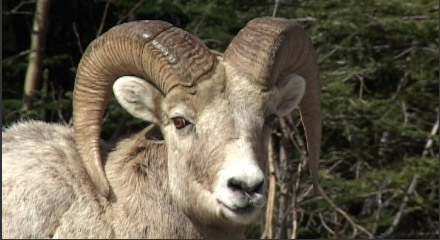
Here, for example, I want to move this Big Horn Sheep out of the forest and into a beach at sunset. (Yes, I know, they don’t belong at the beach, but just stay with me here.)
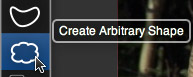
Select the Create Arbitrary Shape tool.
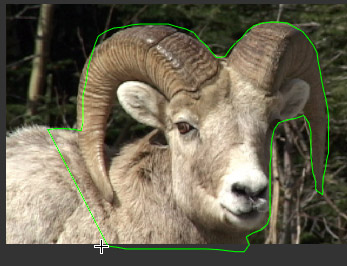
Then, draw around the edges of the foreground object. This is the time-consuming part. The closer you map the edges, the better the rotoscope will look.

As soon as you complete the shape, the old background is instantly replaced by the new background, which is a video clip placed on a layer below the original clip. Each of those green points can be moved, so you can clean up the edges and repair mistakes.
You can motion track this effect the same as the Blur effect, by turning on Mocha, then tracking forward from the start of the clip; or you can track backward from the end of the clip, whichever is easier.

I also adjusted the amount of edge softening in the Inspector, to make the foreground object more solid. Rotoscoping is never “easy,” but SliceX makes it a WHOLE lot easier than it has been. The more careful you are in defining the edges of the shape, the better your results will be.
NOTE: CoreMelt recommends that if you need to keyframe your shape at all to use the Bezier tool and not the freeform shape tool as the Bezier tool creates fewer points which are easier to animate.
OBJECT REMOVER
This effect just makes me giggle. SliceX allows us to remove objects from the frame.
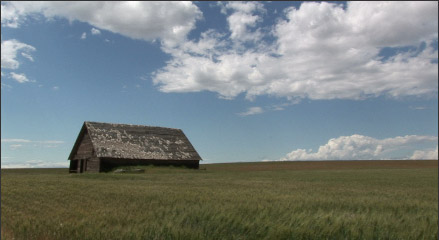
For instance, here is an old barn in the middle of a wheat field. I want to remove the barn from the shot. Worse, the camera is slowly panning across the field, which means the barn is changing position during the clip. We could do this frame by frame in Photoshop, but it would take FOREVER.
Select the clip and apply the Object Remover effect from the C2 SliceX category.
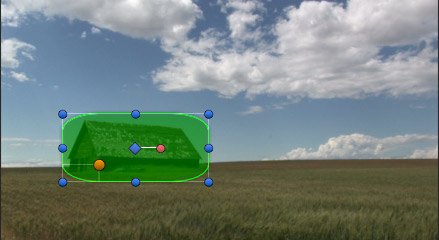
Draw a shape that covers the entire barn. In this case, I used a rounded rectangle. You can also create a shape composed of multiple Bezier control points, a free-hand shape, or a geometric pattern such as a star or polygon.
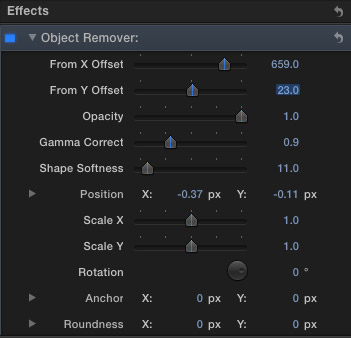
Go to the Inspector and change From X Offset to slide the green selection area horizontally. Change From Y Offset to slide the green selection area vertically.
I also adjusted the Gamma Correct setting to better blend mid-tones of the replaced image.
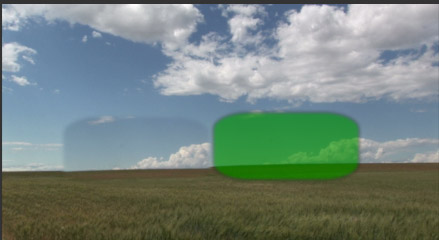
What SliceX does is replace the original selection with the video under the green selection. This is exactly like cloning in Photoshop, except it works with video and you can motion track it.
DISCLAIMER
Those of you with eagle eyes will note that I have not done a good job matching edges, or the clouds are cutting off on the edge of the selected area. In fact, none of the effects I created in this review are perfect. Perfection wasn’t my goal. In this review, I wanted to showcase what this new plug-in can do. CoreMelt has several videos on its website that go into more detail on how to achieve perfection.
SUMMARY
CoreMelt has a tradition of creating industry-respected plug-ins. That tradition continues with SliceX with Mocha. The combination of image selection with motion tracking is a huge time-saver when it comes to selecting, tracking, and modifying portions of an image.
CoreMelt has a free trial available on their website: www.coremelt.com. You owe it to yourself – and your increasingly tight deadlines – to give SliceX with mocha a try.
Visit our website to see Final Cut Pro Training & more!

2,000 Video Training Titles
Edit smarter with Larry Jordan. Available in our store.
Access over 2,000 on-demand video editing courses. Become a member of our Video Training Library today!
Subscribe to Larry's FREE weekly newsletter and
save 10%
on your first purchase.
3 Responses to Product Review: CoreMelt SliceX with Mocha
I brought a v2 plugging set and still have not received my licence key it’s bin over 24 hours what is going on
Lawrence:
For things like missing license keys, it is always fastest and best to contact the developer – CoreMelt – directly.
Larry
OMG I just loathe a CoreMelt products. After a year I still have a watermark on the AE projects when I add anything from CoreMelt. Also, I can’t log into my account cos they change something bla bla bla. As far as I’m concerned I have payed for the “Everything” plug-in bundle a year ago and I don’t care if they changed their website or not, logging in and fixing customers problem with their products should be of a great importance, and not another way around. I am through with the CoreMelt and wish I didn’t spend couple hundred dollars on their product when their service is crappy.